2010 BMW 135I navigation system
[x] Cancel search: navigation systemPage 33 of 250

Controls
31Reference
At a glance
Driving tips
Communications
Navigation
Entertainment
Mobility
Opening from inside
Press the button: the trunk lid opens unless it
has been locked.
Opening from outside
Press the button, see arrow, or the button on
the remote control for a longer period. The
trunk lid opens slightly and can be swung
upward.
In the event of a malfunction, please con-
tact your BMW center or a workshop that
works according to BMW repair procedures
with correspondingly trained personnel.<
Locking or unlocking separately
The switch is located in the glove compartment.
1Locking the trunk lid
2Unlocking the trunk lid
Locking separately
Push the switch in the direction of arrow 1.
The trunk lid is locked and cannot be unlocked
using the central locking system.
If you give the remote control without the inte-
grated key to someone else while the glove
compartment is locked, the trunk lid cannot be
opened. This is an advantage when valet park-
ing, for example. Locking the glove compart-
ment, refer to page99.
Unlocking separately
Push the switch in the direction of arrow 2.
Emergency release
Pull the lever in the cargo area. The trunk lid is
unlocked.
Closing
The handle recesses on the interior trim of the
trunk lid make it easier to pull down.
Make sure that the closing path of the
trunk lid is clear; otherwise, injuries may
result.<
Page 35 of 250

Controls
33Reference
At a glance
Driving tips
Communications
Navigation
Entertainment
Mobility
motion sensor even if the convertible top is
open. An alarm can be triggered unintentionally
by falling objects such as leaves, refer to Avoid-
ing unintentional alarms.
Avoiding unintentional alarms
The tilt alarm sensor and interior motion sensor
may be switched off at the same time. This pre-
vents unintentional alarms, e.g. in the following
situations:
>In duplex garages
>During transport on car-carrying trains,
boats/ships or on a trailer
>When animals are to remain in the vehicle
Switching off tilt alarm sensor and
interior motion sensor
Press the button on the remote control
again as soon as the vehicle is locked.
The indicator lamp lights up briefly and then
flashes continuously. The tilt alarm sensor and
the interior motion sensor are switched off until
the next time the vehicle is unlocked and subse-
quently locked again.
Comfort Access*
Comfort Access enables you to enter your vehi-
cle without needing to hold the remote control
in your hand. All you need to do is wear the
remote control close to your body, e.g. in your
jacket pocket. The vehicle detects the corre-
sponding remote control within the immediate
vicinity or in the passenger compartment.
Comfort Access supports the following func-
tions:
>Unlocking/locking the vehicle
>Unlocking the trunk lid separately
>Engine starting
>Convenient closing
Functional requirement
>The vehicle or the trunk lid can only be
locked when the vehicle detects that the remote control currently in use is outside of
the vehicle.
>The vehicle cannot be locked or unlocked
again until after approx. 2 seconds.
>The engine can only be started when the
vehicle detects that the remote control cur-
rently in use is inside the vehicle.
Comparison to the standard remote
control
In general, there is no difference between using
Comfort Access or pressing the buttons on the
remote control to carry out the functions men-
tioned above. You should therefore first famil-
iarize yourself with the instructions on opening
and closing starting on page26.
Special features regarding the use of Comfort
Access are described below.
If you notice a brief delay while opening or
closing windows, the glass roof or the
convertible top, the system is checking whether
a remote control is inside the vehicle. Please
repeat the opening or closing procedure, if nec-
essary.<
Unlocking
Grasp the handle on the driver's or front pas-
senger door completely, arrow 1. This corre-
sponds to pressing the button.
Locking
Touch the surface, arrow 2, with your finger for
approx. 1 second. This corresponds to pressing
the button.
To preserve the battery, please make
sure that the ignition and all electrical
Page 39 of 250

Controls
37Reference
At a glance
Driving tips
Communications
Navigation
Entertainment
Mobility
with Comfort Access, refer to Locking on
page33.
After switching off the ignition
When the remote control is removed or the igni-
tion is switched off, you can still operate the roof
for approx. 1 minute as long as no door has
been opened.
Pinch protection system
If the glass roof encounters an obstruction dur-
ing closing from approximately the middle of
the opening in the roof, or during closing from
the raised position, the closing movement is
interrupted and the glass roof is opened again
slightly.
Despite the pinch protection system
check and clear the roof's travel path prior
to closing it; otherwise, the safety system might
fail to detect certain kinds of obstructions, such
as very thin objects, and the roof would con-
tinue closing.<
Closing without pinch protection
If there is an external danger, press the switch
forward past the resistance point and hold it
there. The roof closes without pinch protection.
Following interruptions in electrical
power supply
After a power failure, there is a possibility that
the glass roof can only be raised. The system
must be initialized. BMW recommends having
this work done by your BMW center.
Closing manually*
In the event of an electrical malfunction, you can
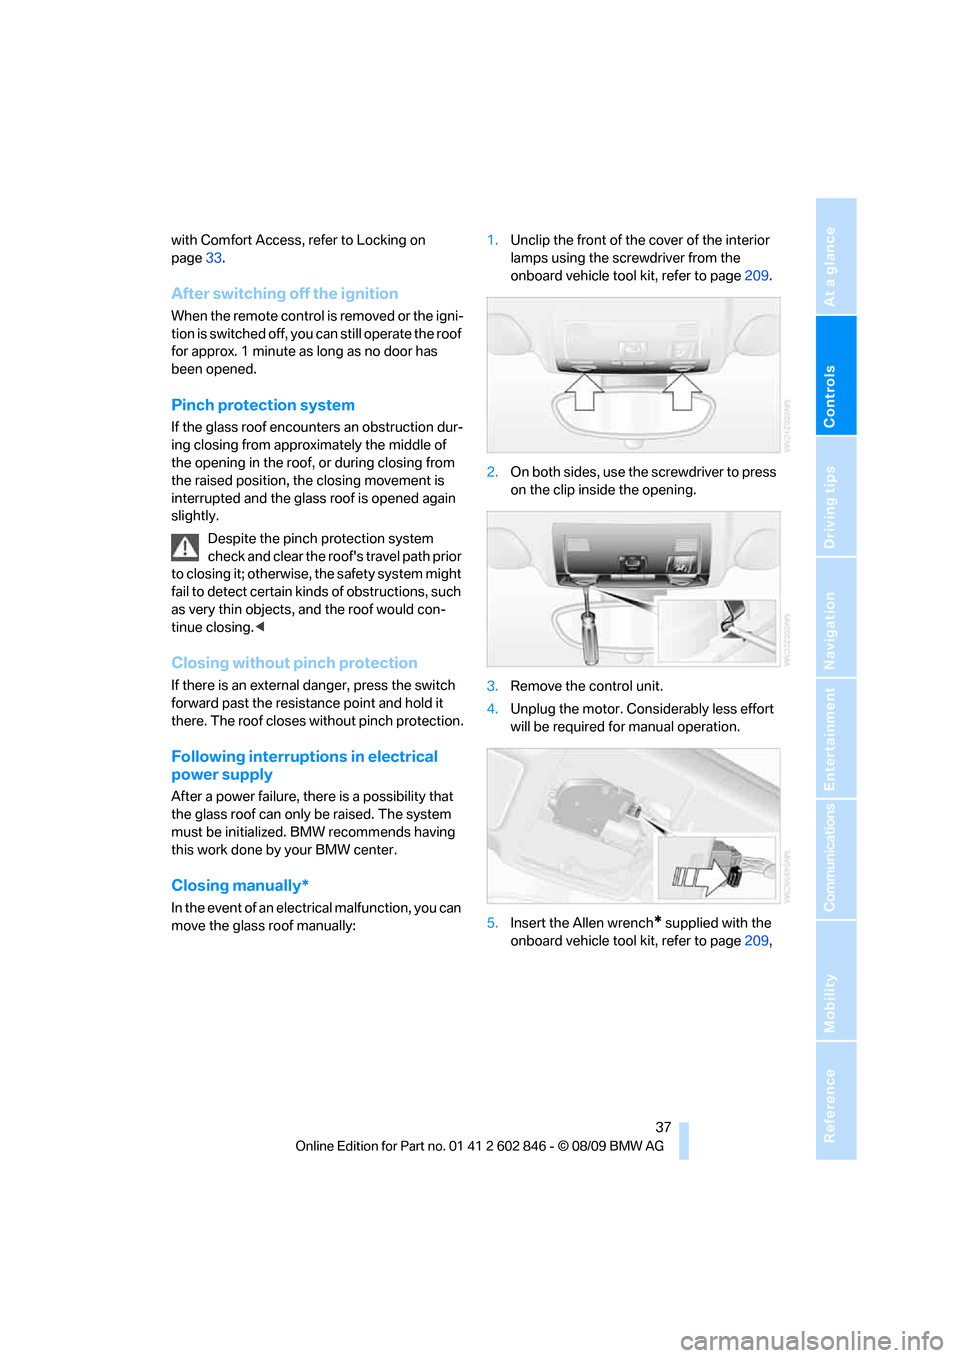
move the glass roof manually:1.Unclip the front of the cover of the interior
lamps using the screwdriver from the
onboard vehicle tool kit, refer to page209.
2.On both sides, use the screwdriver to press
on the clip inside the opening.
3.Remove the control unit.
4.Unplug the motor. Considerably less effort
will be required for manual operation.
5.Insert the Allen wrench* supplied with the
onboard vehicle tool kit, refer to page209,
Page 51 of 250

Controls
49Reference
At a glance
Driving tips
Communications
Navigation
Entertainment
Mobility
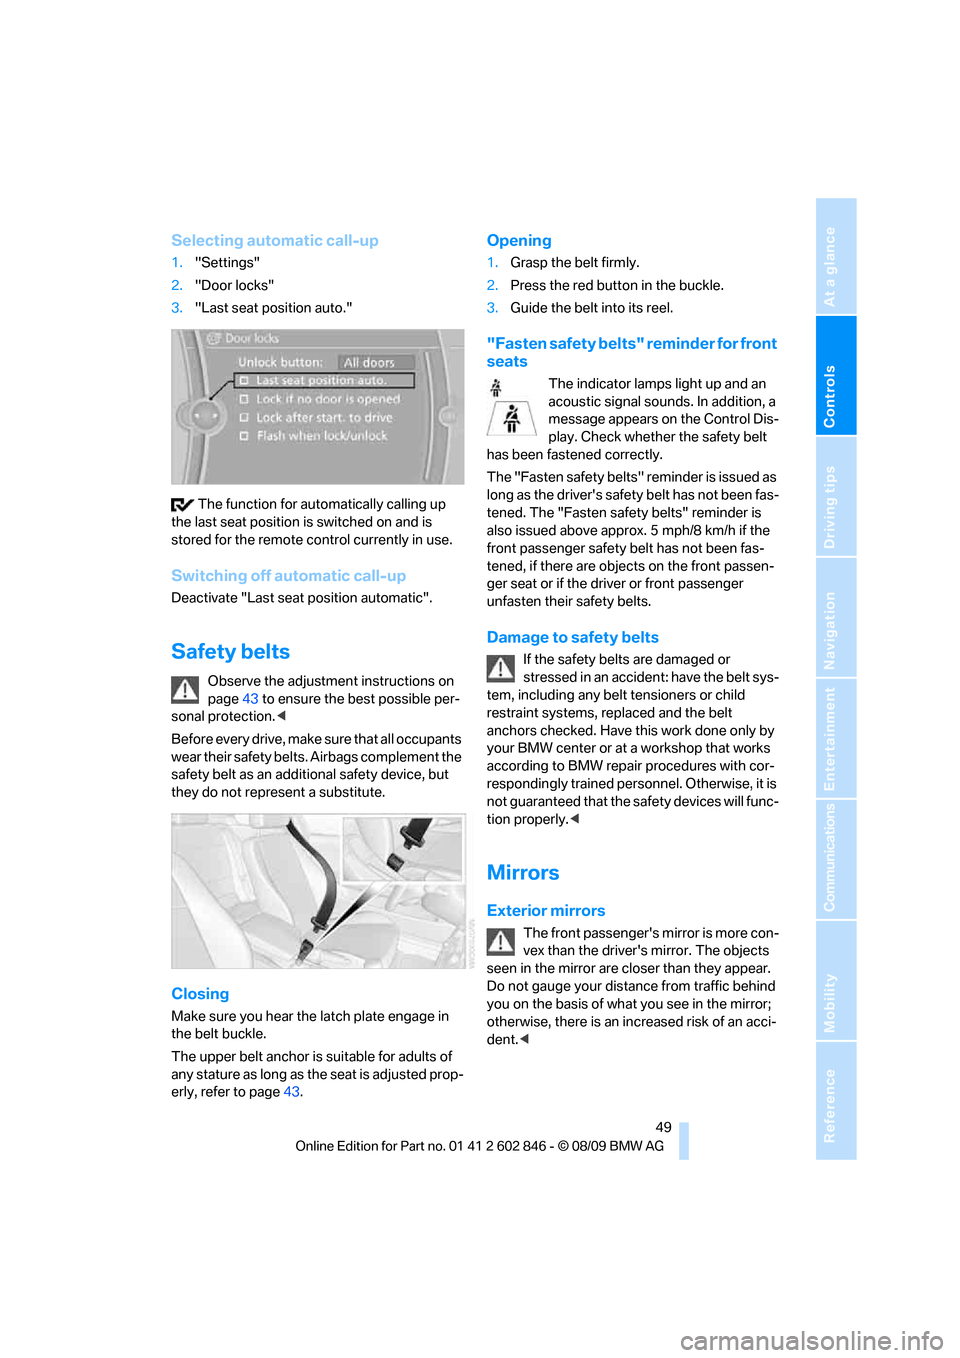
Selecting automatic call-up
1."Settings"
2."Door locks"
3."Last seat position auto."
The function for automatically calling up
the last seat position is switched on and is
stored for the remote control currently in use.
Switching off automatic call-up
Deactivate "Last seat position automatic".
Safety belts
Observe the adjustment instructions on
page43 to ensure the best possible per-
sonal protection.<
Before every drive, make sure that all occupants
wear their safety belts. Airbags complement the
safety belt as an additional safety device, but
they do not represent a substitute.
Closing
Make sure you hear the latch plate engage in
the belt buckle.
The upper belt anchor is suitable for adults of
any stature as long as the seat is adjusted prop-
erly, refer to page43.
Opening
1.Grasp the belt firmly.
2.Press the red button in the buckle.
3.Guide the belt into its reel.
"Fasten safety belts" reminder for front
seats
The indicator lamps light up and an
acoustic signal sounds. In addition, a
message appears on the Control Dis-
play. Check whether the safety belt
has been fastened correctly.
The "Fa sten safety belts " reminder is iss ued a s
long as the driver's safety belt has not been fas-
tened. The "Fasten safety belts" reminder is
also issued above approx. 5 mph/8 km/h if the
front passenger safety belt has not been fas-
tened, if there are objects on the front passen-
ger seat or if the driver or front passenger
unfasten their safety belts.
Damage to safety belts
If the safety belts are damaged or
stressed in an accident: have the belt sys-
tem, including any belt tensioners or child
restraint systems, replaced and the belt
anchors checked. Have this work done only by
your BMW center or at a workshop that works
according to BMW repair procedures with cor-
respondingly trained personnel. Otherwise, it is
not guaranteed that the safety devices will func-
tion properly.<
Mirrors
Exterior mirrors
The front passenger's mirror is more con-
vex than the driver's mirror. The objects
seen in the mirror are closer than they appear.
Do not gauge your distance from traffic behind
you on the basis of what you see in the mirror;
otherwise, there is an increased risk of an acci-
dent.<
Page 53 of 250

Controls
51Reference
At a glance
Driving tips
Communications
Navigation
Entertainment
Mobility
Interior and exterior mirrors, automatic
dimming feature*
The automatic dimming feature of the interior
and exterior mirrors
* is controlled by two photo
cells in the interior rearview mirror. One photo
cell is in the mirror frame, see arrow; the other is
on the back of the mirror.
In order to ensure that the system functions
correctly, keep the photo cells clean, do not
cover the area between the interior rearview
mirror and windshield, and do not affix adhesive
labels or stickers of any kind to the windshield
directly in front of the mirror.
Steering wheel
Adjustments
Do not adjust the steering wheel position
while the car is in motion; otherwise, there
is a risk of an accident due to unexpected move-
ment.<
1.Fold the lever down.
2.Move the steering wheel to the preferred
height and angle to suit your seated posi-
tion.
3.Swing the lever back up.Do not use force to swing the lever
back up; otherwise, the mechanism
will be damaged.<
Steering wheel heating*
Press the button.
The LED in the button lights up when the steer-
ing wheel heating is switched on.
Page 55 of 250

Controls
53Reference
At a glance
Driving tips
Communications
Navigation
Entertainment
Mobility
To lock the safety belt
1.Secure the child restraint system with the
belt.
2.Pull the belt strap all the way out.
3.Allow the belt strap to retract and pull it taut
against the child restraint system.
The safety belt is locked.
To unlock the safety belt
1.Open the belt buckle.
2.Remove the child restraint system.
3.Allow the safety belt strap to retract all the
way.
LATCH child restraint fixing
system
LATCH: Lower Anchors and Tethers for CHil-
dren.
To install and use the LATCH child
restraint system, follow the operating and
safety instructions provided by the manufac-
turer of the system; otherwise, the protective
function of the seat may be compromised.<
Mounts for the lower LATCH anchors
Before installing the child seat, pull the belt out
of the area for the child restraint fixing system.
Ensure that both lower LATCH anchors
are correctly engaged and that the child
restraint system is resting firmly against the
backrest; otherwise, the protective function of
the seat may be compromised.<
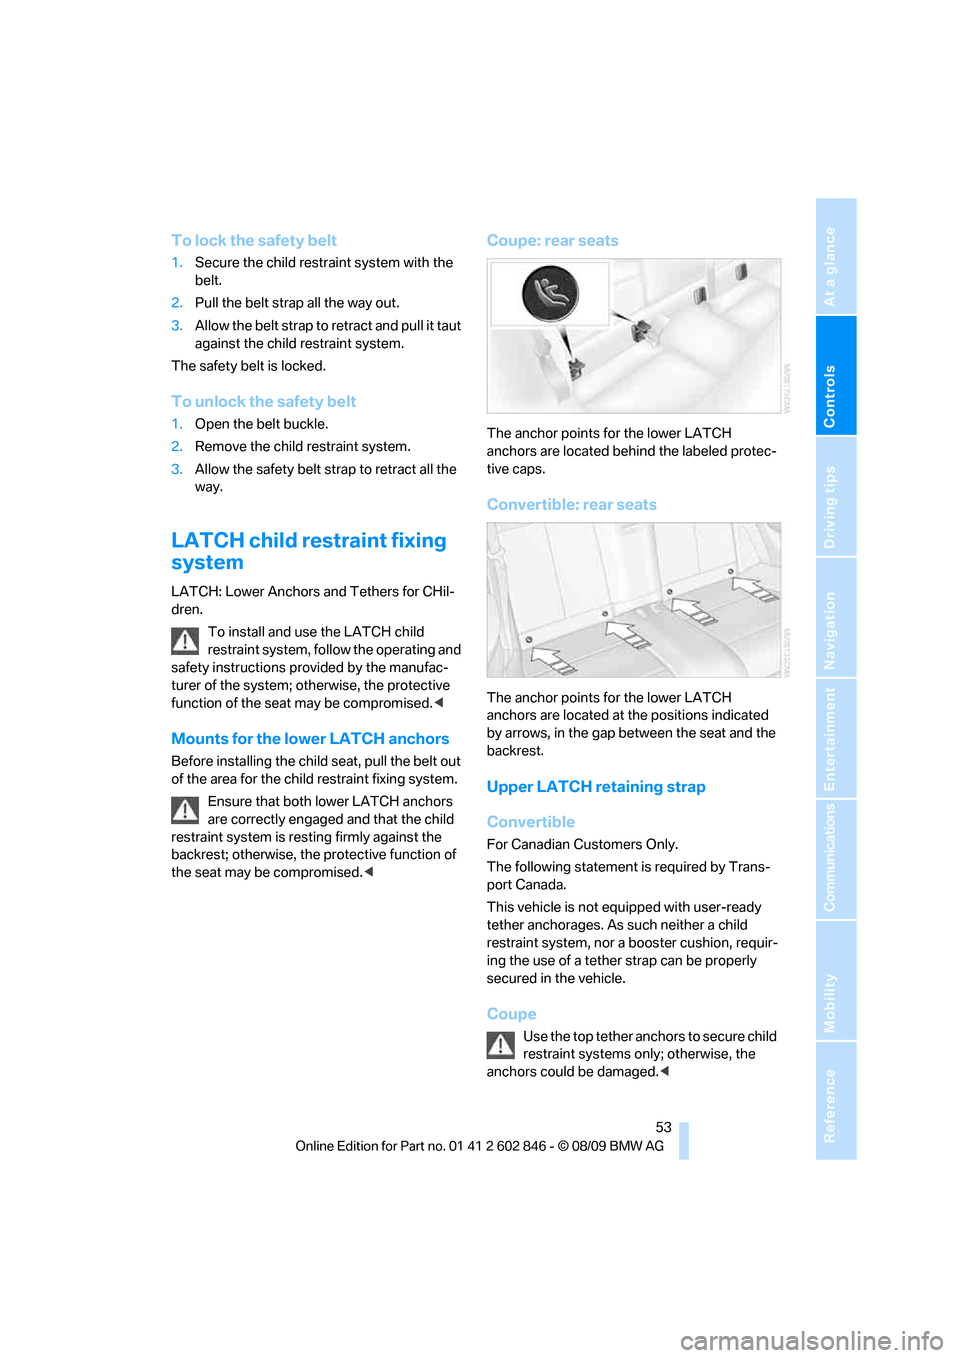
Coupe: rear seats
The anchor points for the lower LATCH
anchors are located behind the labeled protec-
tive caps.
Convertible: rear seats
The anchor points for the lower LATCH
anchors are located at the positions indicated
by arrows, in the gap between the seat and the
backrest.
Upper LATCH retaining strap
Convertible
For Canadian Customers Only.
The following statement is required by Trans-
port Canada.
This vehicle is not equipped with user-ready
tether anchorages. As such neither a child
restraint system, nor a booster cushion, requir-
ing the use of a tether strap can be properly
secured in the vehicle.
Coupe
Use the top tether anchors to secure child
restraint systems only; otherwise, the
anchors could be damaged.<
Page 61 of 250

Controls
59Reference
At a glance
Driving tips
Communications
Navigation
Entertainment
Mobility
Steptronic changes gear. M1 through M6 are
displayed on the instrument cluster.
Upshifts and downshifts are executed only
when they will result in a plausible combination
of engine and vehicle speed; thus, for example,
a downshift that would cause the engine to
overrev will not be executed by the system. The
gear selected is briefly displayed in the instru-
ment cluster, followed by the gear actually in
use.
Shifting gears via shift paddles* on the
steering wheel
The shift paddles allow you to shift gears
quickly since both hands can remain on the
steering wheel.
>When you use the shift paddles on the
steering wheel to shift gears in automatic
mode, the transmission switches to manual
mode.
>If you do not accelerate or shift gears using
the shift paddles for a certain amount of
time, the transmission switches back to
automatic mode.
If the selector lever is in the M/S gear
plane, manual mode remains active.<
>To shift up: pull one of the shift paddles.
>To shift down: press one of the shift pad-
dles.
Upshifts and downshifts are executed only
when they will result in a plausible combination
of engine and vehicle speed; thus, for example,
a downshift that would cause the engine to
overrev will not be executed by the system. The
gear selected is briefly displayed in the instru-
ment cluster, followed by the gear actually in
use.
Overriding selector lever lock
Should the selector lever refuse to move out of
position P even though the ignition is switched
on, the brake is depressed and the button on
the selector lever is pressed, the selector lever
lock can be overridden:
1.Unclip the sleeve of the selector lever.
2.Pull the sleeve up over the selector lever
until the sleeve is inside out.
3.Using the screwdriver from the onboard
vehicle tool kit, refer to page209, press the
red lever, see arrow, while moving the
selector lever to the desired position.
Turn signals/
headlamp flasher
1High beams
2Headlamp flasher
3Turn signals
Using turn signals
Press the lever beyond the resistance point.
To turn off manually, press the lever to the
resistance point.
Page 63 of 250

Controls
61Reference
At a glance
Driving tips
Communications
Navigation
Entertainment
Mobility
Deactivating intermittent wipe or rain
sensor
Press the button again, arrow3.
The LED goes out.
Deactivate the rain sensor before enter-
ing an automatic car wash. Failure to do
so could result in damage caused by undesired
wiper activation.<
Cleaning windshield and headlamps*
Pull the lever, arrow 4.
Washer fluid is sprayed onto the windshield and
the wipers are operated for a short time.
When the vehicle lighting system is switched
on, the headlamps are cleaned at regular and
appropriate intervals.
Do not use the washers if there is any
danger that the fluid will freeze on the
windshield. If you do, your vision could be
obscured. Antifreeze should therefore be
added to the fluid, refer to Washer fluid.
Do not use the washers when the washer fluid
reservoir is empty; otherwise, you will damage
the washer pump.<
Windshield washer nozzles
The windshield washer nozzles are heated
automatically
* while the engine is running or
the ignition is switched on.
Washer fluid
Washer fluid antifreeze is flammable.
Therefore, keep it away from ignition
sources and only store it in the closed original
container that is kept out of reach of children;
otherwise, there is a risk of personal injury.
Comply with the instructions on the con-
tainer.<
Washer fluid filler neck
Only refill washer fluid when the engine is
cool to avoid contact with hot engine
parts. Otherwise, fluid spills constitute a fire
hazard and a risk to personal safety.
Fill with water and, if required, with a washer
antifreeze, according to manufacturer's recom-
mendations.
Mix the water and antifreeze before filling
the washer fluid reservoir to make sure
the correct concentration is maintained.<
Capacity
Approx. 6.3 US quarts/6 liters.
Cruise control*
The concept
You can use the cruise control feature begin-
ning at approx. 20 mph/30 km/h. The car then
stores and maintains the speed that you specify
using the lever on the steering column.
Do not use cruise control when driving at
constant speed is prevented by adverse
conditions, e.g. winding roads, dense traffic or
poor road conditions due to, e.g. snow, rain, ice
or loose surfaces. Otherwise, you could lose
control of the vehicle and cause an accident as a
result.<