2010 BMW 128I COUPE Interior
[x] Cancel search: InteriorPage 34 of 250

Opening and closing
32
Alarm system*
The concept
The vehicle alarm system responds:
>When a door, the hood or the trunk lid is
opened
>To movements inside the vehicle: interior
motion sensor, refer to page32
>When the car's inclination changes, for
instance if an attempt is made to jack it up
and steal the wheels or to raise it prior to
towing away: tilt alarm sensor, refer to
page32
>When there has been an interruption of
power supply from the battery
Depending on the market-specific version, the
alarm system briefly signals unauthorized entry
attempts by:
>An acoustic alarm
>Switching on
* the hazard warning flashers
Arming and disarming
When you lock or unlock the vehicle, either with
the remote control or at the door lock, the alarm
system is armed or disarmed at the same time.
You can open the trunk lid using the button
of the remote control even if the alarm system is
armed, refer to page28. The lid is locked and
monitored again as soon as it is closed.
Panic mode
You can trigger the alarm system if you find
yourself in a dangerous situation.
Press the button for at least three seconds.
To switch off the alarm: press any button.
Switching off an alarm
>Unlock the car with the remote control, refer
to page27, or
>insert the remote control all the way into the
ignition lock.
Indicator lamp displays
>The indicator lamp under the inside rear-
view mirror flashes continuously: the sys-
tem is armed.
>The indicator lamp flashes after locking:
doors, hood or trunk lid are not properly
closed. Even if you do not close the alerted
area, the system begins to monitor the
remaining areas, and the indicator lamp
flashes continuously after approx.
10 seconds. The interior motion sensor and
the tilt alarm sensor are not activated.
>The indicator lamp goes out after unlocking:
your vehicle has not been disturbed while
you were away.
>If the indicator lamp flashes after unlocking
until the remote control is inserted in the
ignition, but for no longer than approx.
5 minutes: your vehicle has been disturbed
while you were away.
Tilt alarm sensor
The tilt of the vehicle is monitored. The alarm
system reacts, e.g. to attempts to steal a wheel
or tow the vehicle.
Interior motion sensor
Coupe
In order for the interior motion sensor to func-
tion properly, the windows and glass roof must
be completely closed
*.
Convertible
The interior of the car is monitored up to the
height of the seat cushions. Thus the alarm sys-
tem is activated together with the interior
Page 35 of 250
Controls
33Reference
At a glance
Driving tips
Communications
Navigation
Entertainment
Mobility
motion sensor even if the convertible top is
open. An alarm can be triggered unintentionally
by falling objects such as leaves, refer to Avoid-
ing unintentional alarms.
Avoiding unintentional alarms
The tilt alarm sensor and interior motion sensor
may be switched off at the same time. This pre-
vents unintentional alarms, e.g. in the following
situations:
>In duplex garages
>During transport on car-carrying trains,
boats/ships or on a trailer
>When animals are to remain in the vehicle
Switching off tilt alarm sensor and
interior motion sensor
Press the button on the remote control
again as soon as the vehicle is locked.
The indicator lamp lights up briefly and then
flashes continuously. The tilt alarm sensor and
the interior motion sensor are switched off until
the next time the vehicle is unlocked and subse-
quently locked again.
Comfort Access*
Comfort Access enables you to enter your vehi-
cle without needing to hold the remote control
in your hand. All you need to do is wear the
remote control close to your body, e.g. in your
jacket pocket. The vehicle detects the corre-
sponding remote control within the immediate
vicinity or in the passenger compartment.
Comfort Access supports the following func-
tions:
>Unlocking/locking the vehicle
>Unlocking the trunk lid separately
>Engine starting
>Convenient closing
Functional requirement
>The vehicle or the trunk lid can only be
locked when the vehicle detects that the remote control currently in use is outside of
the vehicle.
>The vehicle cannot be locked or unlocked
again until after approx. 2 seconds.
>The engine can only be started when the
vehicle detects that the remote control cur-
rently in use is inside the vehicle.
Comparison to the standard remote
control
In general, there is no difference between using
Comfort Access or pressing the buttons on the
remote control to carry out the functions men-
tioned above. You should therefore first famil-
iarize yourself with the instructions on opening
and closing starting on page26.
Special features regarding the use of Comfort
Access are described below.
If you notice a brief delay while opening or
closing windows, the glass roof or the
convertible top, the system is checking whether
a remote control is inside the vehicle. Please
repeat the opening or closing procedure, if nec-
essary.<
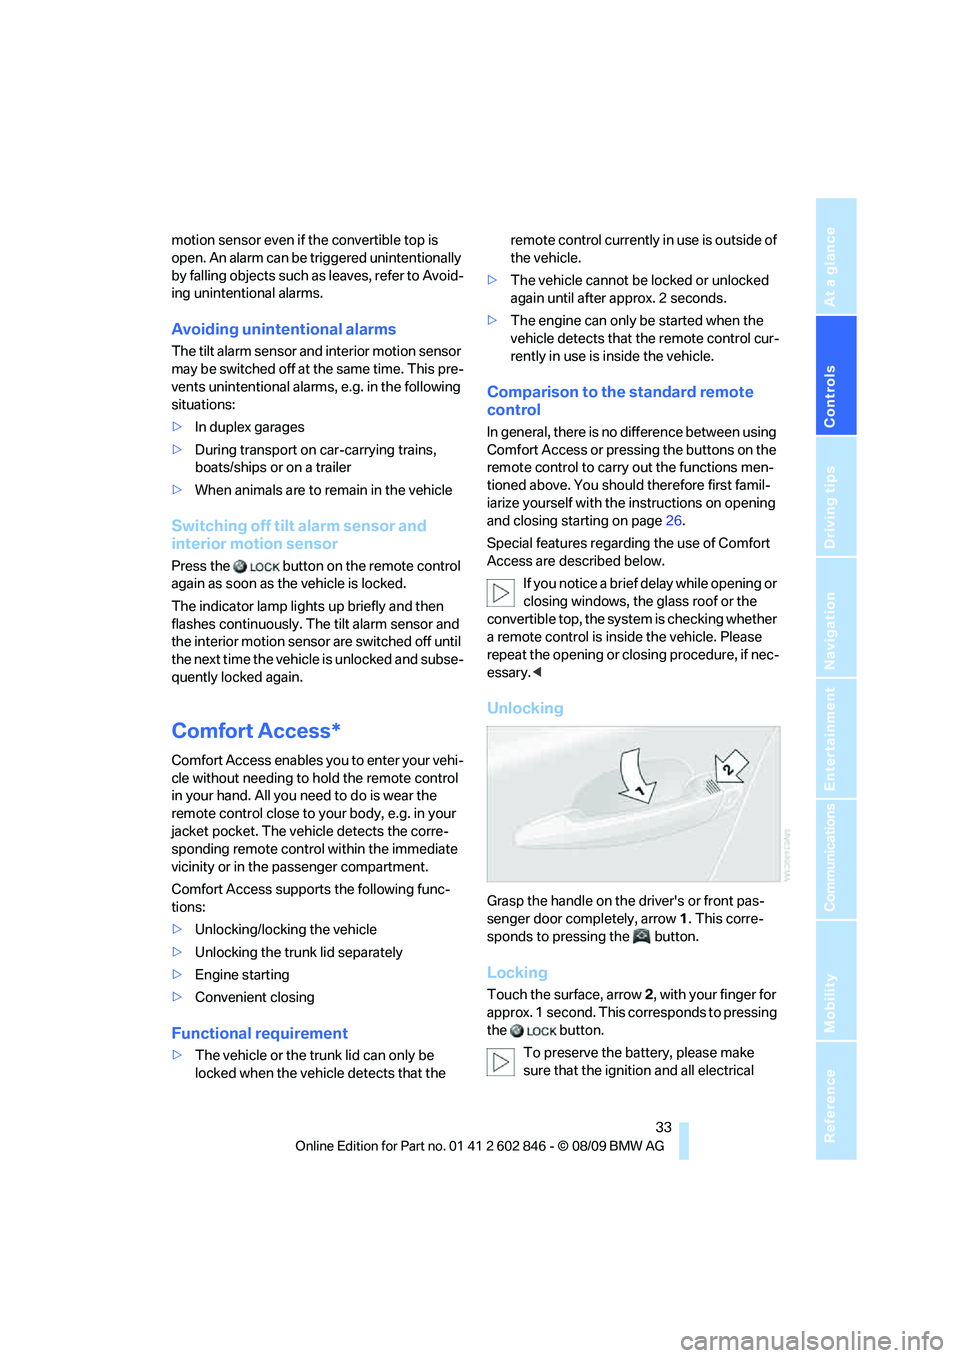
Unlocking
Grasp the handle on the driver's or front pas-
senger door completely, arrow 1. This corre-
sponds to pressing the button.
Locking
Touch the surface, arrow 2, with your finger for
approx. 1 second. This corresponds to pressing
the button.
To preserve the battery, please make
sure that the ignition and all electrical
Page 39 of 250
Controls
37Reference
At a glance
Driving tips
Communications
Navigation
Entertainment
Mobility
with Comfort Access, refer to Locking on
page33.
After switching off the ignition
When the remote control is removed or the igni-
tion is switched off, you can still operate the roof
for approx. 1 minute as long as no door has
been opened.
Pinch protection system
If the glass roof encounters an obstruction dur-
ing closing from approximately the middle of
the opening in the roof, or during closing from
the raised position, the closing movement is
interrupted and the glass roof is opened again
slightly.
Despite the pinch protection system
check and clear the roof's travel path prior
to closing it; otherwise, the safety system might
fail to detect certain kinds of obstructions, such
as very thin objects, and the roof would con-
tinue closing.<
Closing without pinch protection
If there is an external danger, press the switch
forward past the resistance point and hold it
there. The roof closes without pinch protection.
Following interruptions in electrical
power supply
After a power failure, there is a possibility that
the glass roof can only be raised. The system
must be initialized. BMW recommends having
this work done by your BMW center.
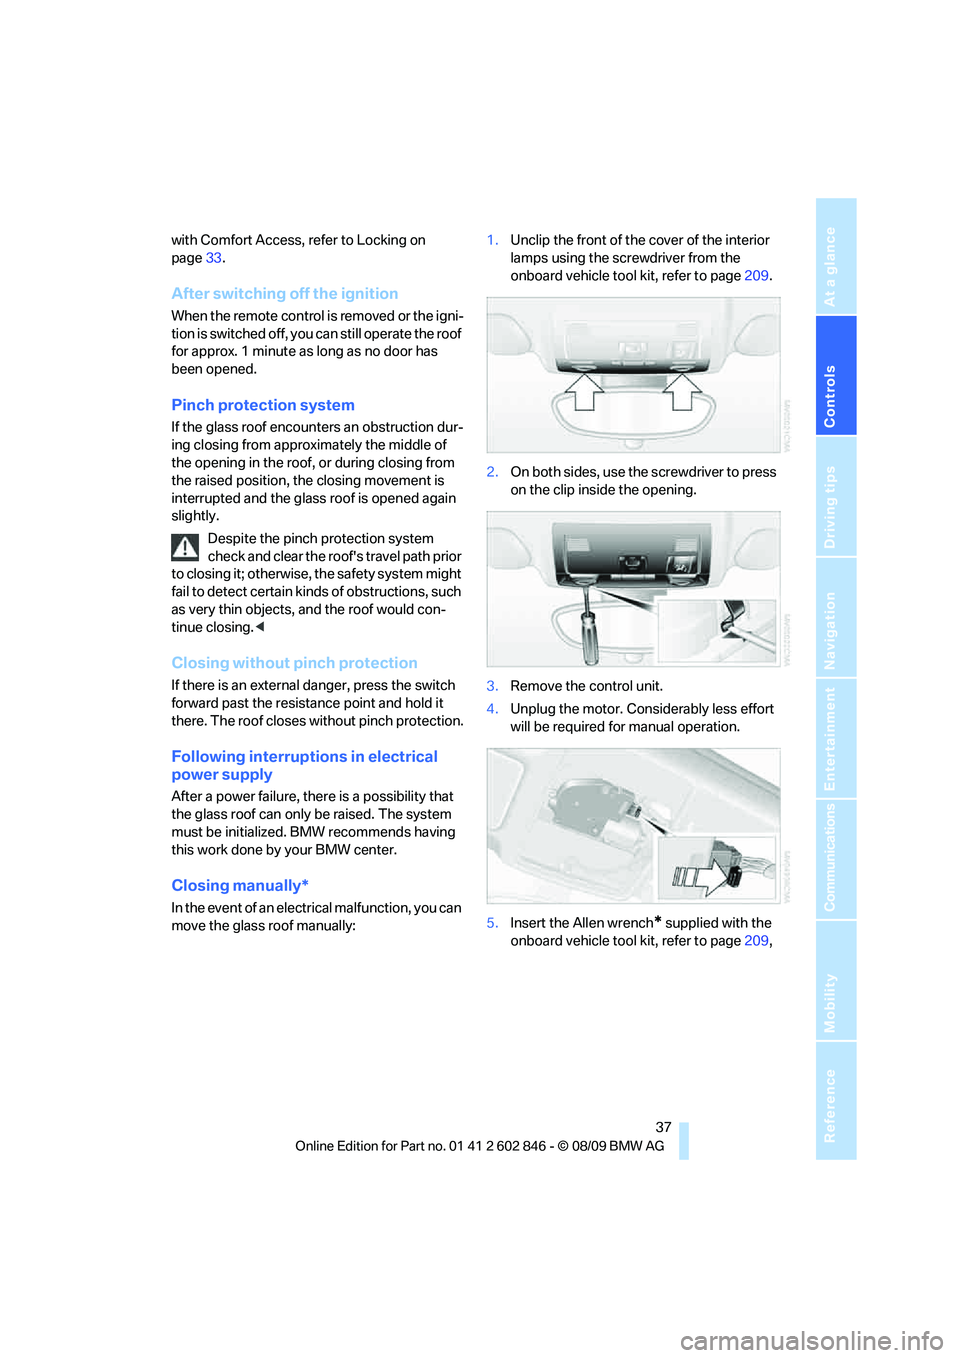
Closing manually*
In the event of an electrical malfunction, you can
move the glass roof manually:1.Unclip the front of the cover of the interior
lamps using the screwdriver from the
onboard vehicle tool kit, refer to page209.
2.On both sides, use the screwdriver to press
on the clip inside the opening.
3.Remove the control unit.
4.Unplug the motor. Considerably less effort
will be required for manual operation.
5.Insert the Allen wrench* supplied with the
onboard vehicle tool kit, refer to page209,
Page 52 of 250
Adjustments
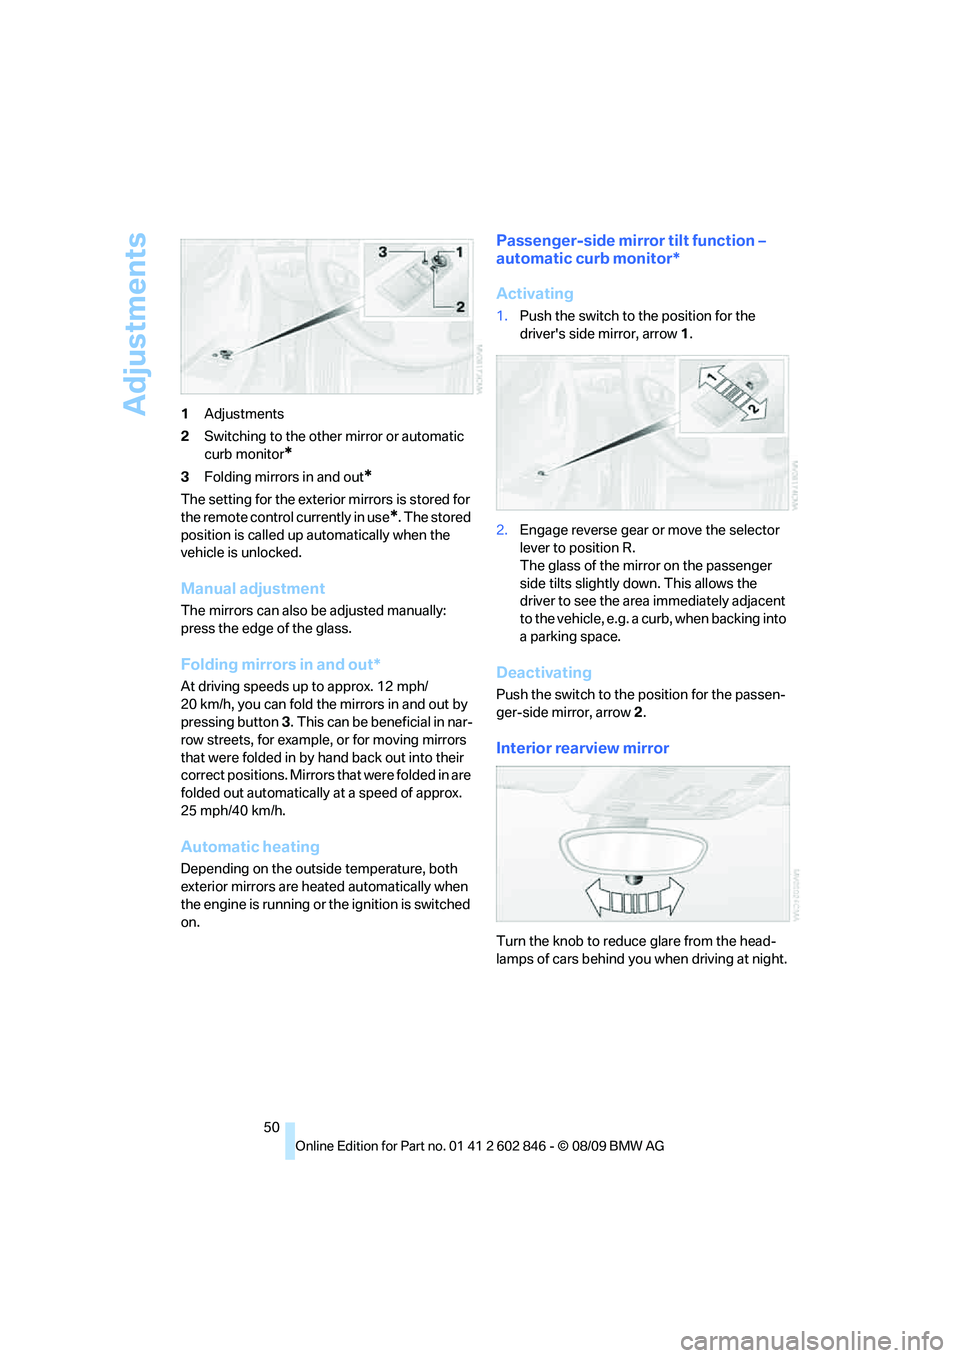
50 1Adjustments
2Switching to the other mirror or automatic
curb monitor
*
3Folding mirrors in and out*
The setting for the exterior mirrors is stored for
the remote control currently in use
*. The stored
position is called up automatically when the
vehicle is unlocked.
Manual adjustment
The mirrors can also be adjusted manually:
press the edge of the glass.
Folding mirrors in and out*
At driving speeds up to approx. 12 mph/
20 km/h, you can fold the mirrors in and out by
pressing button3. This can be beneficial in nar-
row streets, for example, or for moving mirrors
that were folded in by hand back out into their
correct positions. Mirrors that were folded in are
folded out automatically at a speed of approx.
25 mph/40 km/h.
Automatic heating
Depending on the outside temperature, both
exterior mirrors are heated automatically when
the engine is running or the ignition is switched
on.
Passenger-side mirror tilt function –
automatic curb monitor*
Activating
1.Push the switch to the position for the
driver's side mirror, arrow 1.
2.Engage reverse gear or move the selector
lever to position R.
The glass of the mirror on the passenger
side tilts slightly down. This allows the
driver to see the area immediately adjacent
to the vehicle, e.g. a curb, when backing into
a parking space.
Deactivating
Push the switch to the position for the passen-
ger-side mirror, arrow 2.
Interior rearview mirror
Turn the knob to reduce glare from the head-
lamps of cars behind you when driving at night.
Page 53 of 250
Controls
51Reference
At a glance
Driving tips
Communications
Navigation
Entertainment
Mobility
Interior and exterior mirrors, automatic
dimming feature*
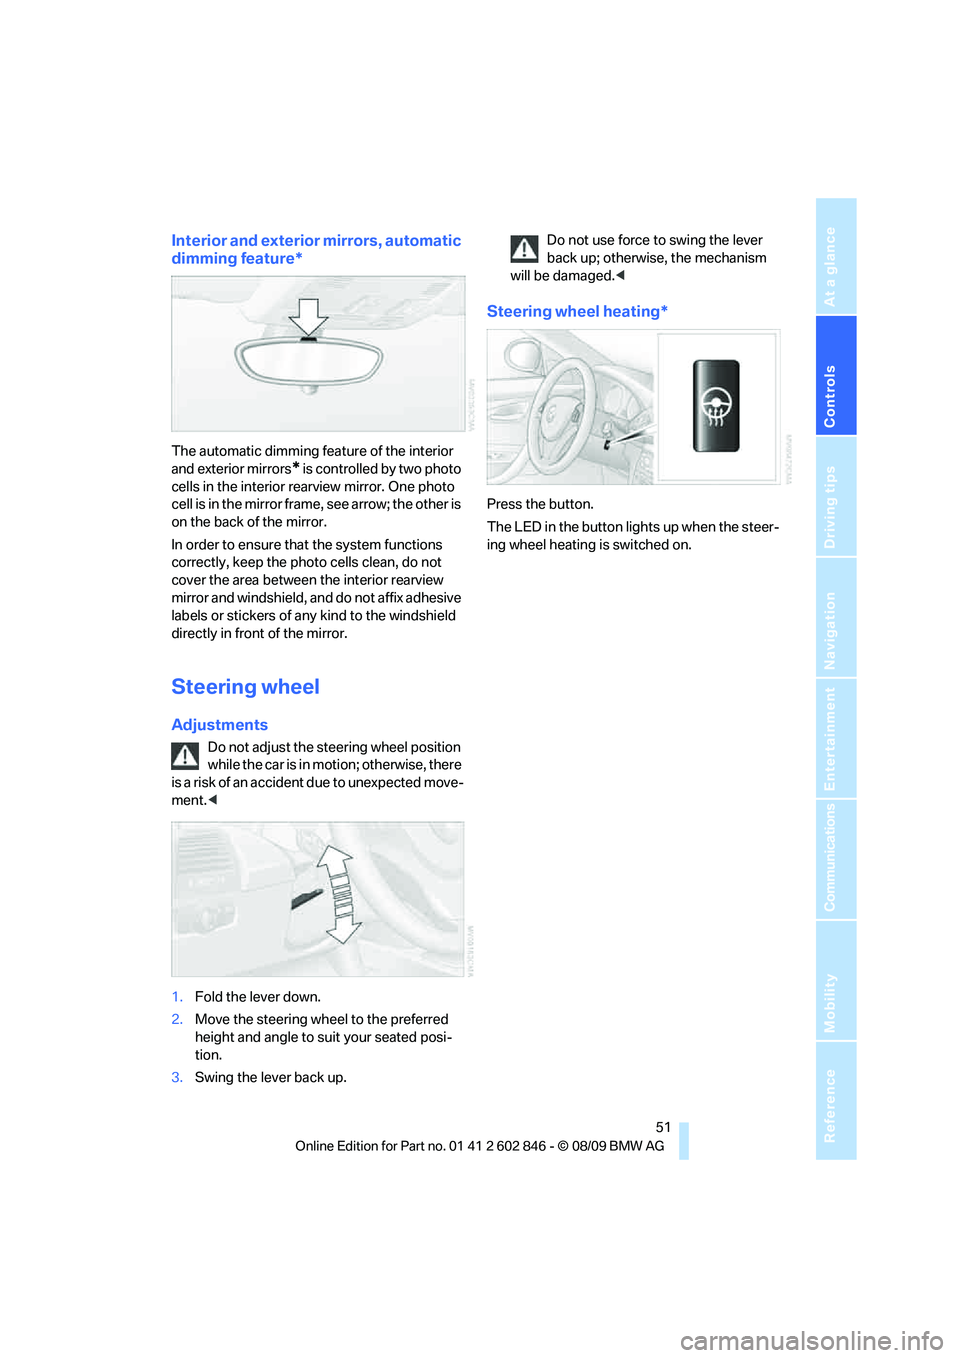
The automatic dimming feature of the interior
and exterior mirrors
* is controlled by two photo
cells in the interior rearview mirror. One photo
cell is in the mirror frame, see arrow; the other is
on the back of the mirror.
In order to ensure that the system functions
correctly, keep the photo cells clean, do not
cover the area between the interior rearview
mirror and windshield, and do not affix adhesive
labels or stickers of any kind to the windshield
directly in front of the mirror.
Steering wheel
Adjustments
Do not adjust the steering wheel position
while the car is in motion; otherwise, there
is a risk of an accident due to unexpected move-
ment.<
1.Fold the lever down.
2.Move the steering wheel to the preferred
height and angle to suit your seated posi-
tion.
3.Swing the lever back up.Do not use force to swing the lever
back up; otherwise, the mechanism
will be damaged.<
Steering wheel heating*
Press the button.
The LED in the button lights up when the steer-
ing wheel heating is switched on.
Page 62 of 250
Driving
60 Unusually rapid flashing of the indicator
lamp and the turn signals indicates that
one of the turn signal bulbs has failed.<
Indicating a turn briefly
Press the lever as far as the resistance point for
as long as you wish to indicate a turn.
Triple turn signal activation
Press the lever as far as the resistance point.
The turn signals flash three times.
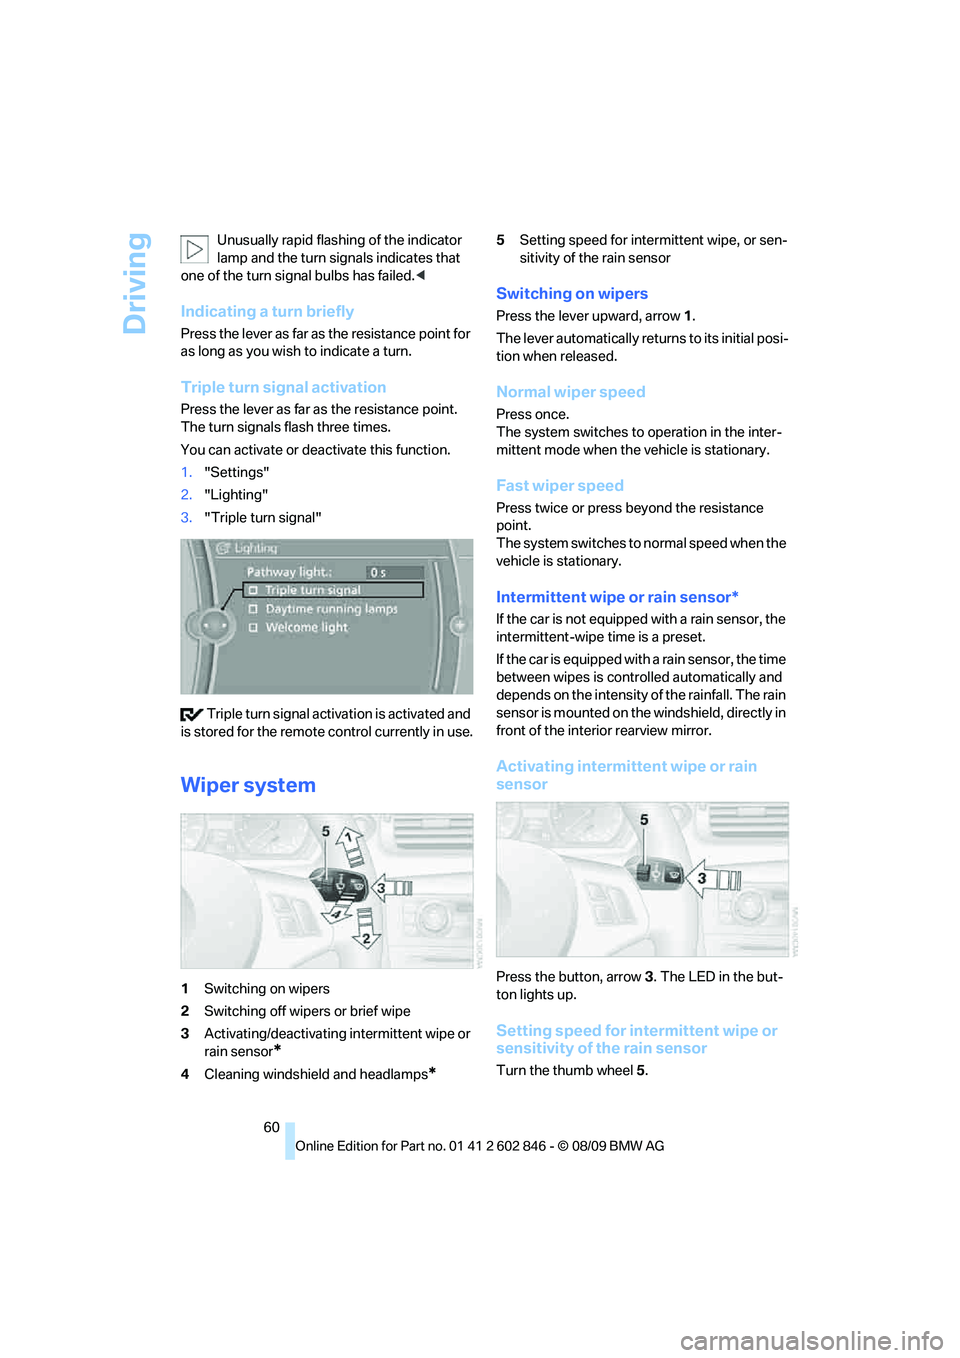
You can activate or deactivate this function.
1."Settings"
2."Lighting"
3."Triple turn signal"
Triple turn signal activation is activated and
is stored for the remote control currently in use.
Wiper system
1Switching on wipers
2Switching off wipers or brief wipe
3Activating/deactivating intermittent wipe or
rain sensor
*
4Cleaning windshield and headlamps*
5Setting speed for intermittent wipe, or sen-
sitivity of the rain sensor
Switching on wipers
Press the lever upward, arrow 1.
The lever automatically returns to its initial posi-
tion when released.
Normal wiper speed
Press once.
The system switches to operation in the inter-
mittent mode when the vehicle is stationary.
Fast wiper speed
Press twice or press beyond the resistance
point.
The system switches to normal speed when the
vehicle is stationary.
Intermittent wipe or rain sensor*
If the car is not equipped with a rain sensor, the
intermittent-wipe time is a preset.
If the car is equipped with a rain sensor, the time
between wipes is controlled automatically and
depends on the intensity of the rainfall. The rain
sensor is mounted on the windshield, directly in
front of the interior rearview mirror.
Activating intermittent wipe or rain
sensor
Press the button, arrow3. The LED in the but-
ton lights up.
Setting speed for intermittent wipe or
sensitivity of the rain sensor
Turn the thumb wheel5.
Page 85 of 250
Controls
83Reference
At a glance
Driving tips
Communications
Navigation
Entertainment
Mobility
Airbags
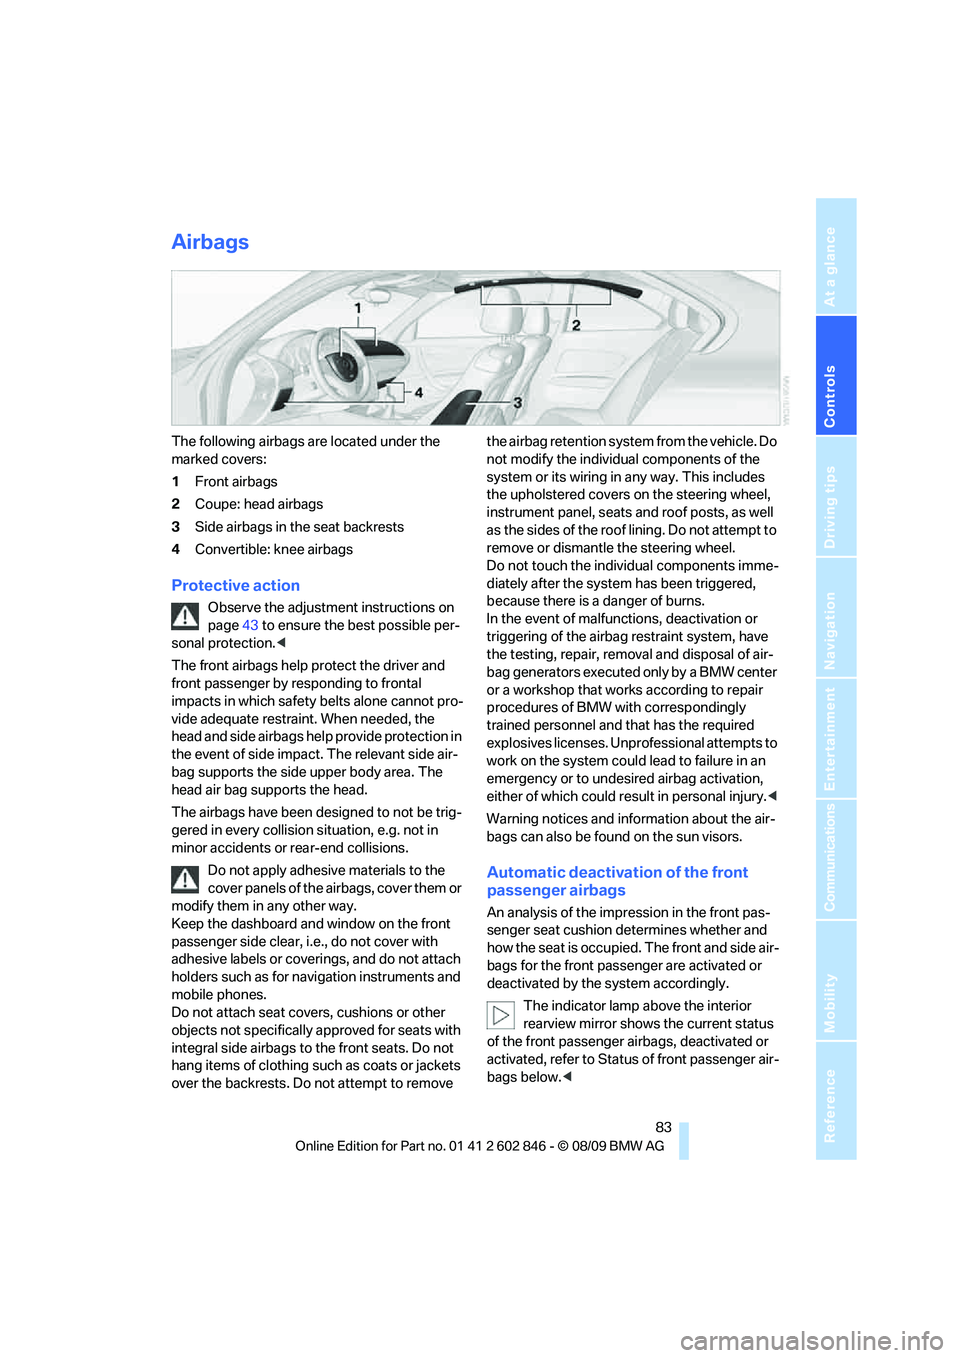
The following airbags are located under the
marked covers:
1Front airbags
2Coupe: head airbags
3Side airbags in the seat backrests
4Convertible: knee airbags
Protective action
Observe the adjustment instructions on
page43 to ensure the best possible per-
sonal protection.<
The front airbags help protect the driver and
front passenger by responding to frontal
impacts in which safety belts alone cannot pro-
vide adequate restraint. When needed, the
head and side airbags help provide protection in
the event of side impact. The relevant side air-
bag supports the side upper body area. The
head air bag supports the head.
The airbags have been designed to not be trig-
gered in every collision situation, e.g. not in
minor accidents or rear-end collisions.
Do not apply adhesive materials to the
cover panels of the airbags, cover them or
modify them in any other way.
Keep the dashboard and window on the front
passenger side clear, i.e., do not cover with
adhesive labels or coverings, and do not attach
holders such as for navigation instruments and
mobile phones.
Do not attach seat covers, cushions or other
objects not specifically approved for seats with
integral side airbags to the front seats. Do not
hang items of clothing such as coats or jackets
over the backrests. Do not attempt to remove the airbag retention system from the vehicle. Do
not modify the individual components of the
system or its wiring in any way. This includes
the upholstered covers on the steering wheel,
instrument panel, seats and roof posts, as well
as the sides of the roof lining. Do not attempt to
remove or dismantle the steering wheel.
Do not touch the individual components imme-
diately after the system has been triggered,
because there is a danger of burns.
In the event of malfunctions, deactivation or
triggering of the airbag restraint system, have
the testing, repair, removal and disposal of air-
bag generators executed only by a BMW center
or a workshop that works according to repair
procedures of BMW with correspondingly
trained personnel and that has the required
explosives licenses. Unprofessional attempts to
work on the system could lead to failure in an
emergency or to undesired airbag activation,
either of which could result in personal injury.<
Warning notices and information about the air-
bags can also be found on the sun visors.
Automatic deactivation of the front
passenger airbags
An analysis of the impression in the front pas-
senger seat cushion determines whether and
how the seat is occupied. The front and side air-
bags for the front passenger are activated or
deactivated by the system accordingly.
The indicator lamp above the interior
rearview mirror shows the current status
of the front passenger airbags, deactivated or
activated, refer to Status of front passenger air-
bags below.<
Page 88 of 250
Lamps
86
Lamps
Parking lamps/low beams
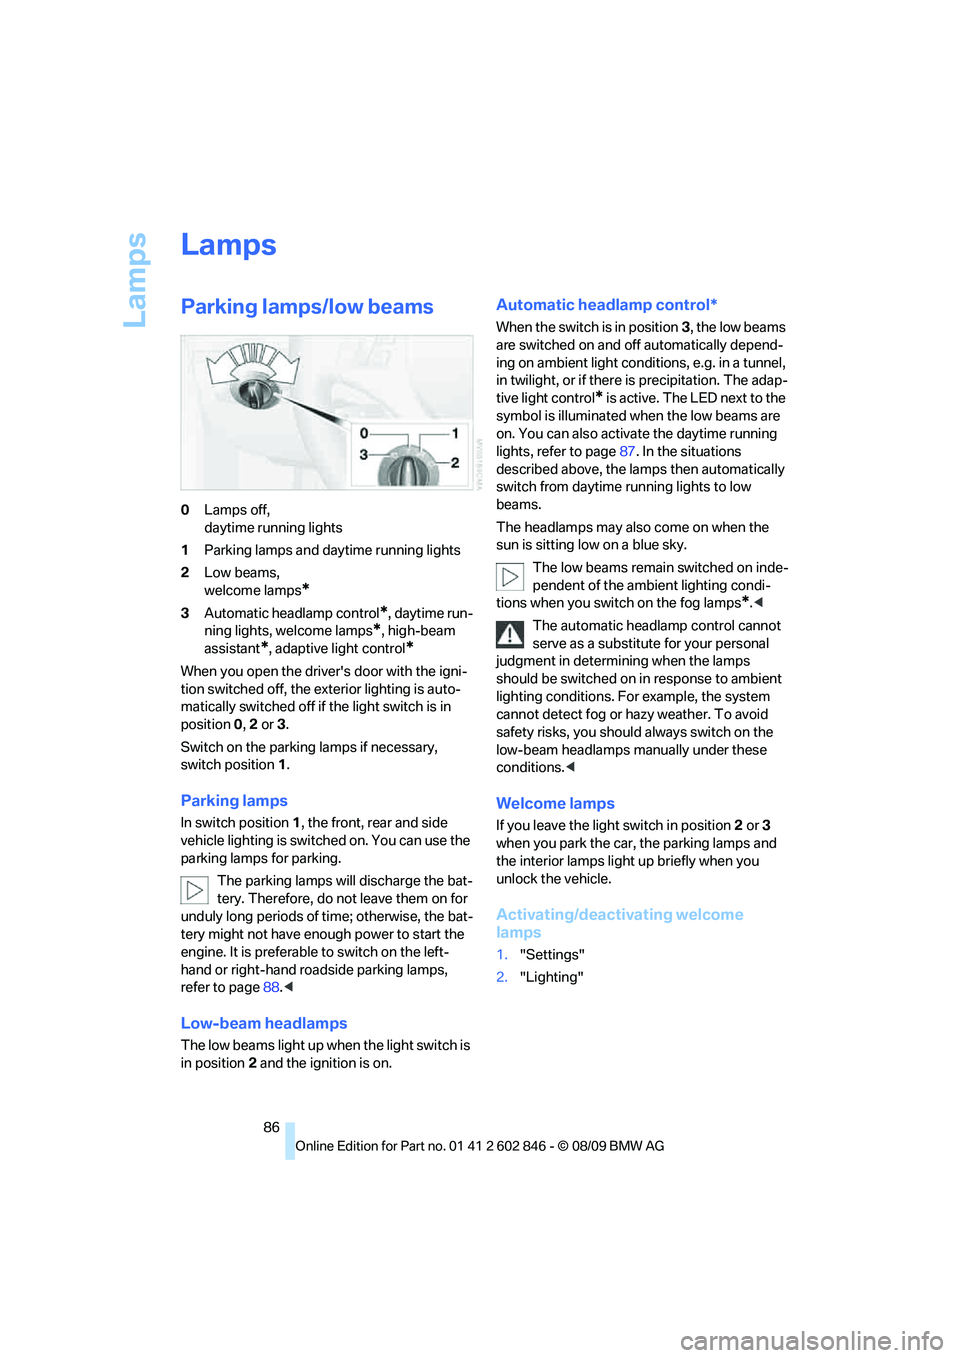
0Lamps off,
daytime running lights
1Parking lamps and daytime running lights
2Low beams,
welcome lamps
*
3Automatic headlamp control*, daytime run-
ning lights, welcome lamps
*, high-beam
assistant
*, adaptive light control*
When you open the driver's door with the igni-
tion switched off, the exterior lighting is auto-
matically switched off if the light switch is in
position 0, 2 or 3.
Switch on the parking lamps if necessary,
switch position 1.
Parking lamps
In switch position1, the front, rear and side
vehicle lighting is switched on. You can use the
parking lamps for parking.
The parking lamps will discharge the bat-
tery. Therefore, do not leave them on for
unduly long periods of time; otherwise, the bat-
tery might not have enough power to start the
engine. It is preferable to switch on the left-
hand or right-hand roadside parking lamps,
refer to page88.<
Low-beam headlamps
The low beams light up when the light switch is
in position 2 and the ignition is on.
Automatic headlamp control*
When the switch is in position3, the low beams
are switched on and off automatically depend-
ing on ambient light conditions, e.g. in a tunnel,
in twilight, or if there is precipitation. The adap-
tive light control
* is active. The LED next to the
symbol is illuminated when the low beams are
on. You can also activate the daytime running
lights, refer to page87. In the situations
described above, the lamps then automatically
switch from daytime running lights to low
beams.
The headlamps may also come on when the
sun is sitting low on a blue sky.
The low beams remain switched on inde-
pendent of the ambient lighting condi-
tions when you switch on the fog lamps
*.<
The automatic headlamp control cannot
serve as a substitute for your personal
judgment in determining when the lamps
should be switched on in response to ambient
lighting conditions. For example, the system
cannot detect fog or hazy weather. To avoid
safety risks, you should always switch on the
low-beam headlamps manually under these
conditions.<
Welcome lamps
If you leave the light switch in position 2 or 3
when you park the car, the parking lamps and
the interior lamps light up briefly when you
unlock the vehicle.
Activating/deactivating welcome
lamps
1."Settings"
2."Lighting"