2010 BMW 128I COUPE ECU
[x] Cancel search: ECUPage 85 of 250
Controls
83Reference
At a glance
Driving tips
Communications
Navigation
Entertainment
Mobility
Airbags
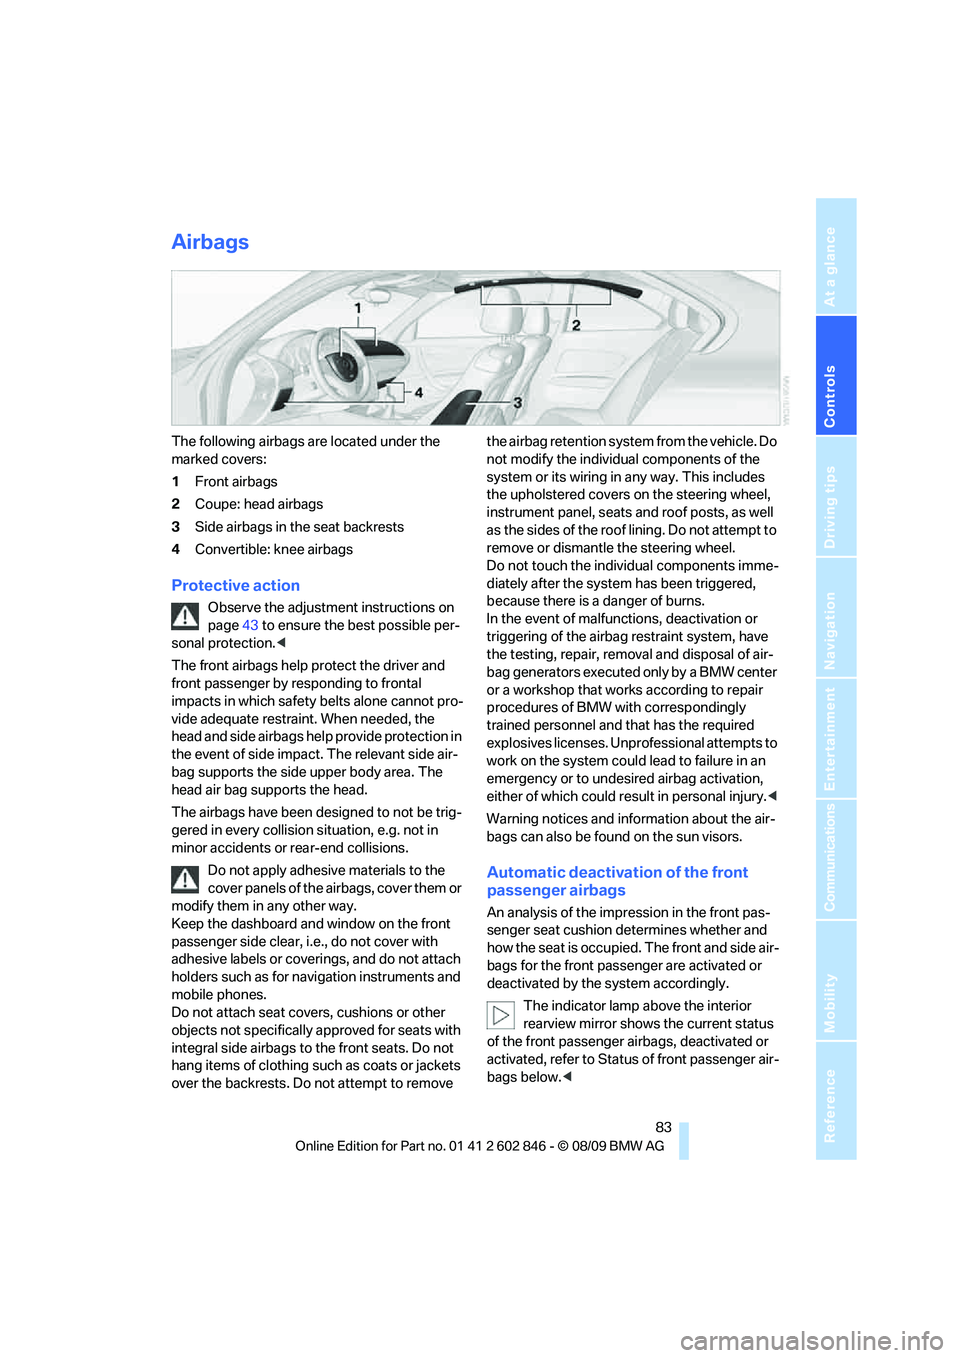
The following airbags are located under the
marked covers:
1Front airbags
2Coupe: head airbags
3Side airbags in the seat backrests
4Convertible: knee airbags
Protective action
Observe the adjustment instructions on
page43 to ensure the best possible per-
sonal protection.<
The front airbags help protect the driver and
front passenger by responding to frontal
impacts in which safety belts alone cannot pro-
vide adequate restraint. When needed, the
head and side airbags help provide protection in
the event of side impact. The relevant side air-
bag supports the side upper body area. The
head air bag supports the head.
The airbags have been designed to not be trig-
gered in every collision situation, e.g. not in
minor accidents or rear-end collisions.
Do not apply adhesive materials to the
cover panels of the airbags, cover them or
modify them in any other way.
Keep the dashboard and window on the front
passenger side clear, i.e., do not cover with
adhesive labels or coverings, and do not attach
holders such as for navigation instruments and
mobile phones.
Do not attach seat covers, cushions or other
objects not specifically approved for seats with
integral side airbags to the front seats. Do not
hang items of clothing such as coats or jackets
over the backrests. Do not attempt to remove the airbag retention system from the vehicle. Do
not modify the individual components of the
system or its wiring in any way. This includes
the upholstered covers on the steering wheel,
instrument panel, seats and roof posts, as well
as the sides of the roof lining. Do not attempt to
remove or dismantle the steering wheel.
Do not touch the individual components imme-
diately after the system has been triggered,
because there is a danger of burns.
In the event of malfunctions, deactivation or
triggering of the airbag restraint system, have
the testing, repair, removal and disposal of air-
bag generators executed only by a BMW center
or a workshop that works according to repair
procedures of BMW with correspondingly
trained personnel and that has the required
explosives licenses. Unprofessional attempts to
work on the system could lead to failure in an
emergency or to undesired airbag activation,
either of which could result in personal injury.<
Warning notices and information about the air-
bags can also be found on the sun visors.
Automatic deactivation of the front
passenger airbags
An analysis of the impression in the front pas-
senger seat cushion determines whether and
how the seat is occupied. The front and side air-
bags for the front passenger are activated or
deactivated by the system accordingly.
The indicator lamp above the interior
rearview mirror shows the current status
of the front passenger airbags, deactivated or
activated, refer to Status of front passenger air-
bags below.<
Page 104 of 250
Practical interior accessories
102
Coupe: through-loading
system
Opening
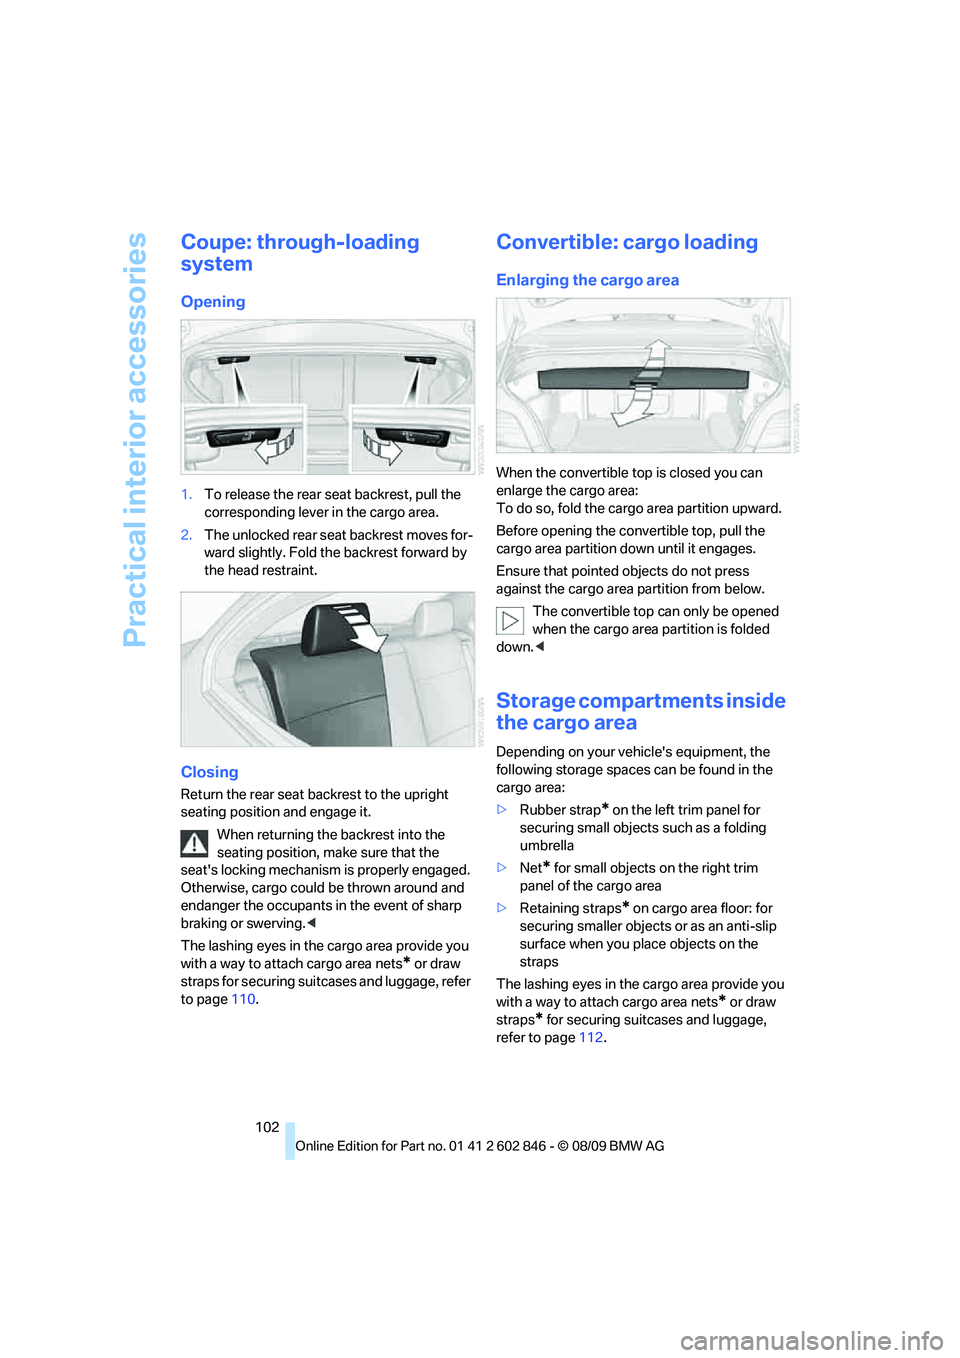
1.To release the rear seat backrest, pull the
corresponding lever in the cargo area.
2.The unlocked rear seat backrest moves for-
ward slightly. Fold the backrest forward by
the head restraint.
Closing
Return the rear seat backrest to the upright
seating position and engage it.
When returning the backrest into the
seating position, make sure that the
seat's locking mechanism is properly engaged.
Otherwise, cargo could be thrown around and
endanger the occupants in the event of sharp
braking or swerving.<
The lashing eyes in the cargo area provide you
with a way to attach cargo area nets
* or draw
straps for securing suitcases and luggage, refer
to page110.
Convertible: cargo loading
Enlarging the cargo area
When the convertible top is closed you can
enlarge the cargo area:
To do so, fold the cargo area partition upward.
Before opening the convertible top, pull the
cargo area partition down until it engages.
Ensure that pointed objects do not press
against the cargo area partition from below.
The convertible top can only be opened
when the cargo area partition is folded
down.<
Storage compartments inside
the cargo area
Depending on your vehicle's equipment, the
following storage spaces can be found in the
cargo area:
>Rubber strap
* on the left trim panel for
securing small objects such as a folding
umbrella
>Net
* for small objects on the right trim
panel of the cargo area
>Retaining straps
* on cargo area floor: for
securing smaller objects or as an anti-slip
surface when you place objects on the
straps
The lashing eyes in the cargo area provide you
with a way to attach cargo area nets
* or draw
straps
* for securing suitcases and luggage,
refer to page112.
Page 105 of 250
Controls
103Reference
At a glance
Driving tips
Communications
Navigation
Entertainment
Mobility
Coupe: ski bag*
The ski bag is designed for safe, clean transport
of up to 4 pairs of standard skis or up to
2snowboards.
With the ski bag you can stow skis with a length
of up to 6.6ft/2.0m. When skis of 6.6ft/2.0m
length are loaded, the overall capacity of the ski
bag is reduced due to its tapered design.
Loading
Ensure that the skis are clean when they are
loaded into the ski bag. Wrap sharp edges to
prevent damage.
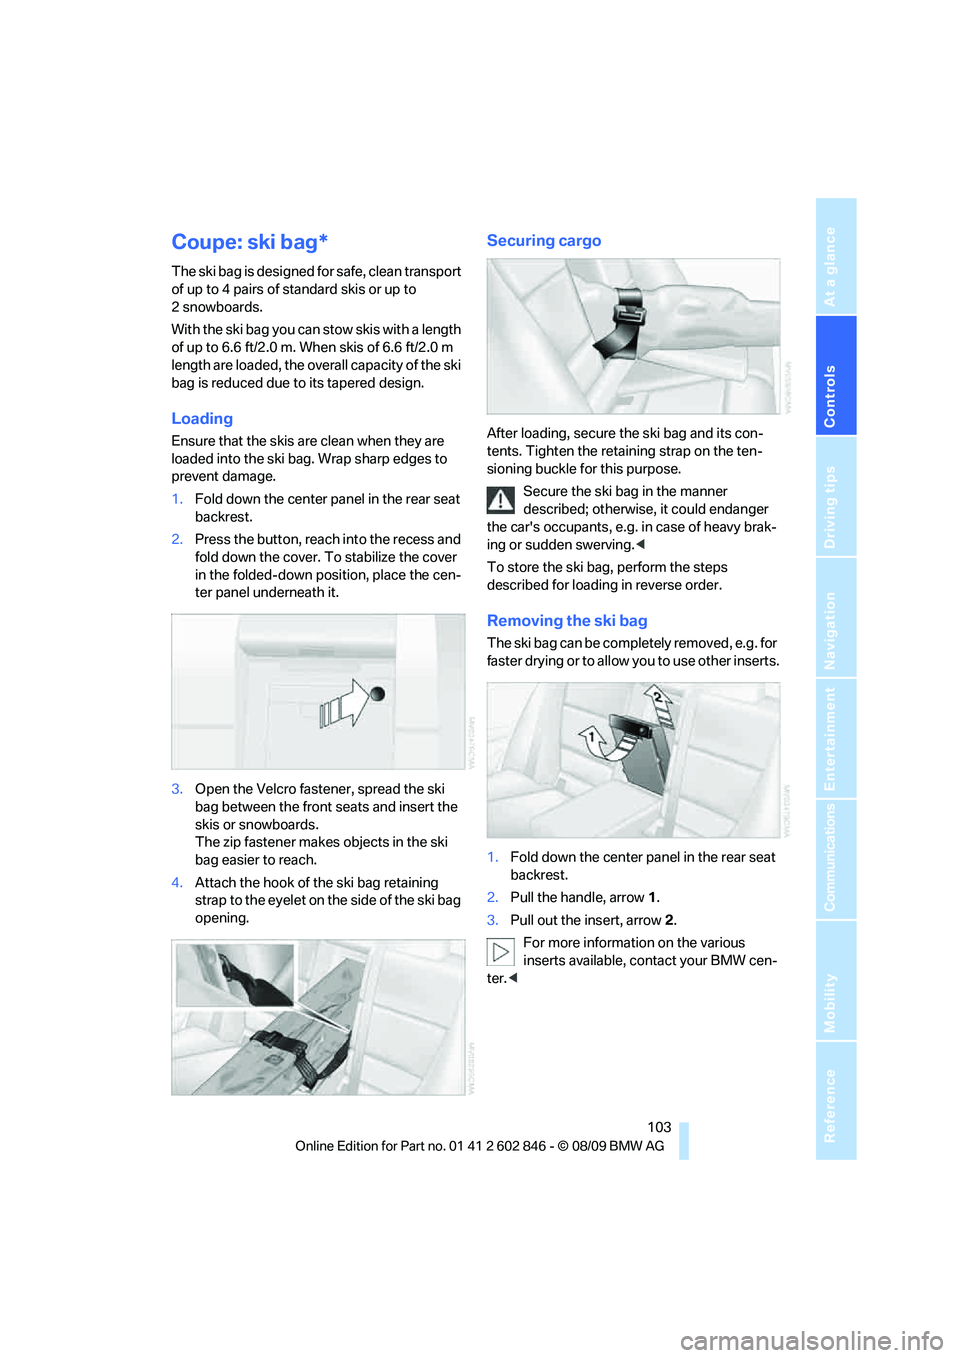
1.Fold down the center panel in the rear seat
backrest.
2.Press the button, reach into the recess and
fold down the cover. To stabilize the cover
in the folded-down position, place the cen-
ter panel underneath it.
3.Open the Velcro fastener, spread the ski
bag between the front seats and insert the
skis or snowboards.
The zip fastener makes objects in the ski
bag easier to reach.
4.Attach the hook of the ski bag retaining
strap to the eyelet on the side of the ski bag
opening.
Securing cargo
After loading, secure the ski bag and its con-
tents. Tighten the retaining strap on the ten-
sioning buckle for this purpose.
Secure the ski bag in the manner
described; otherwise, it could endanger
the car's occupants, e.g. in case of heavy brak-
ing or sudden swerving.<
To store the ski bag, perform the steps
described for loading in reverse order.
Removing the ski bag
The ski bag can be completely removed, e.g. for
faster drying or to allow you to use other inserts.
1.Fold down the center panel in the rear seat
backrest.
2.Pull the handle, arrow1.
3.Pull out the insert, arrow 2.
For more information on the various
inserts available, contact your BMW cen-
ter.<
Page 106 of 250
Practical interior accessories
104
Convertible: through-loading
opening with integrated
transport bag*
The transport bag is designed for safe, clean
transport of up to 4 pairs of standard skis or up
to 2 snowboards.
With the transport bag you can stow skis up to a
length of 6.6 ft /2.0 m. When skis of 6.6 ft/2.0 m
length are loaded, the overall capacity of the ski
bag is reduced due to its tapered design.
When using the transport bag, it is not
permissible to transport passengers in
the rear seats.<
Loading
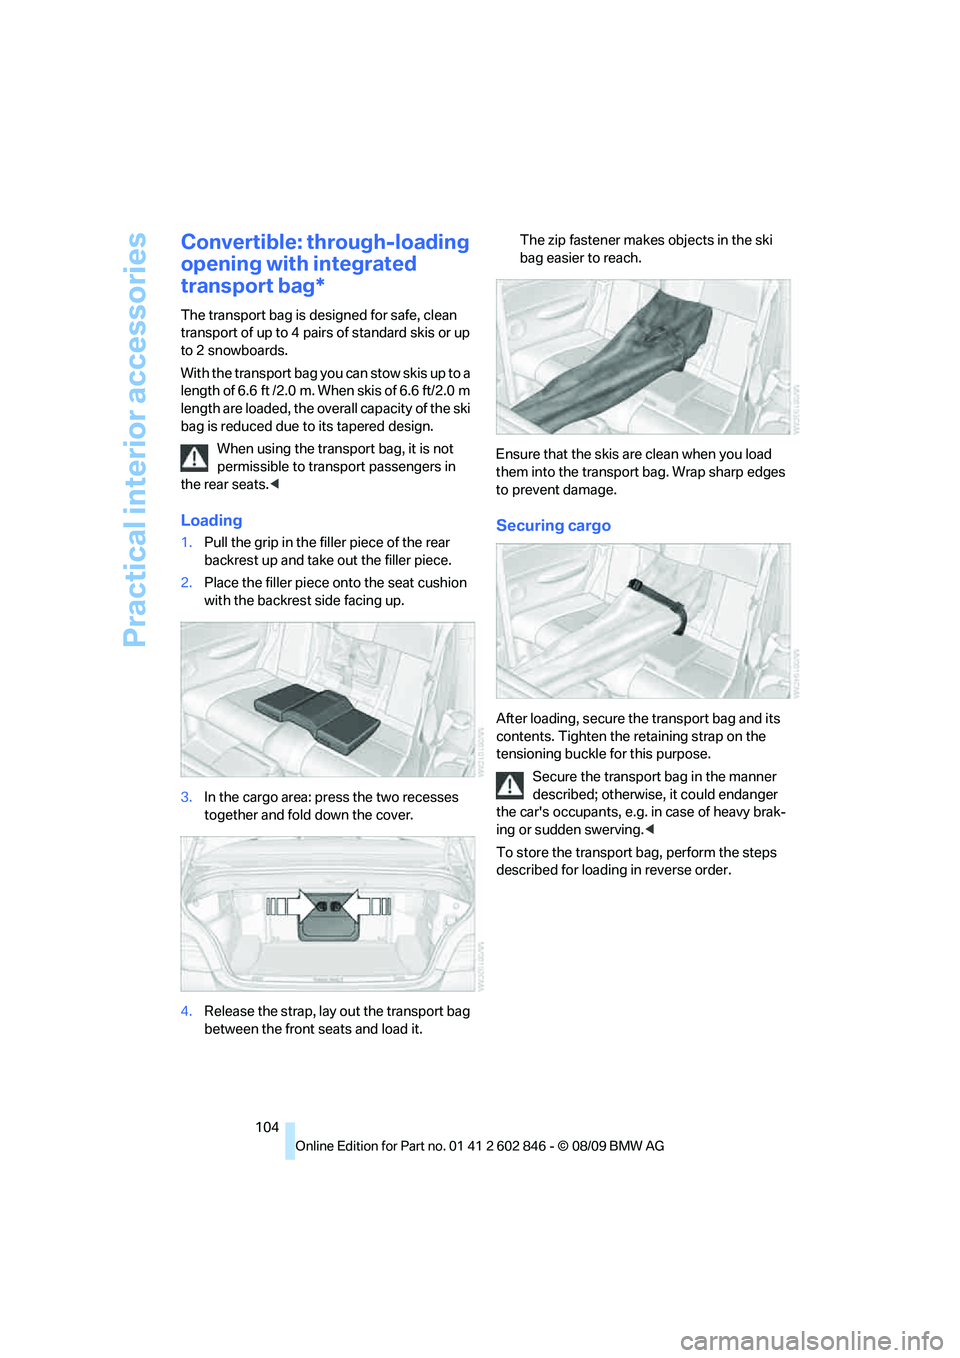
1.Pull the grip in the filler piece of the rear
backrest up and take out the filler piece.
2.Place the filler piece onto the seat cushion
with the backrest side facing up.
3.In the cargo area: press the two recesses
together and fold down the cover.
4.Release the strap, lay out the transport bag
between the front seats and load it. The zip fastener makes objects in the ski
bag easier to reach.
Ensure that the skis are clean when you load
them into the transport bag. Wrap sharp edges
to prevent damage.
Securing cargo
After loading, secure the transport bag and its
contents. Tighten the retaining strap on the
tensioning buckle for this purpose.
Secure the transport bag in the manner
described; otherwise, it could endanger
the car's occupants, e.g. in case of heavy brak-
ing or sudden swerving.<
To store the transport bag, perform the steps
described for loading in reverse order.
Page 113 of 250
Driving tips
111Reference
At a glance
Controls
Communications
Navigation
Entertainment
Mobility
area, as this could result in damage to the vehi-
cle.<
Determining loading limit
1.Locate the following statement on your
vehicle's placard
*:
The combined weight of occupants
and cargo should never exceed
XXX kg or YYY lbs. Otherwise, overloading
can result in damage to the vehicle and
unstable driving conditions.<
2.Determine the combined weight of the
driver and passengers that will be riding in
your vehicle.
3.Subtract the combined weight of the driver
and passengers from XXX kilograms or YYY
pounds.
4.The resulting figure equals the available
amount of cargo and luggage load capacity.
For example, if the YYY amount equals
1,400 lbs. and there will be five 150-lb. pas-
sengers in your vehicle, the amount of avail-
able cargo and luggage load capacity is
650 lbs:
1,400 lbs. minus 750 lbs. = 650 lbs.
5.Determine the combined weight of luggage
and cargo being loaded on the vehicle. That
weight may not safely exceed the available
cargo and luggage load capacity calculated
in step 4.
6.If your vehicle will be towing a trailer, part of
the load from your trailer will be transferred
to your vehicle. Consult the manual for
transporting a trailer to determine how this
may reduce the available cargo and luggage
load capacity of your vehicle.
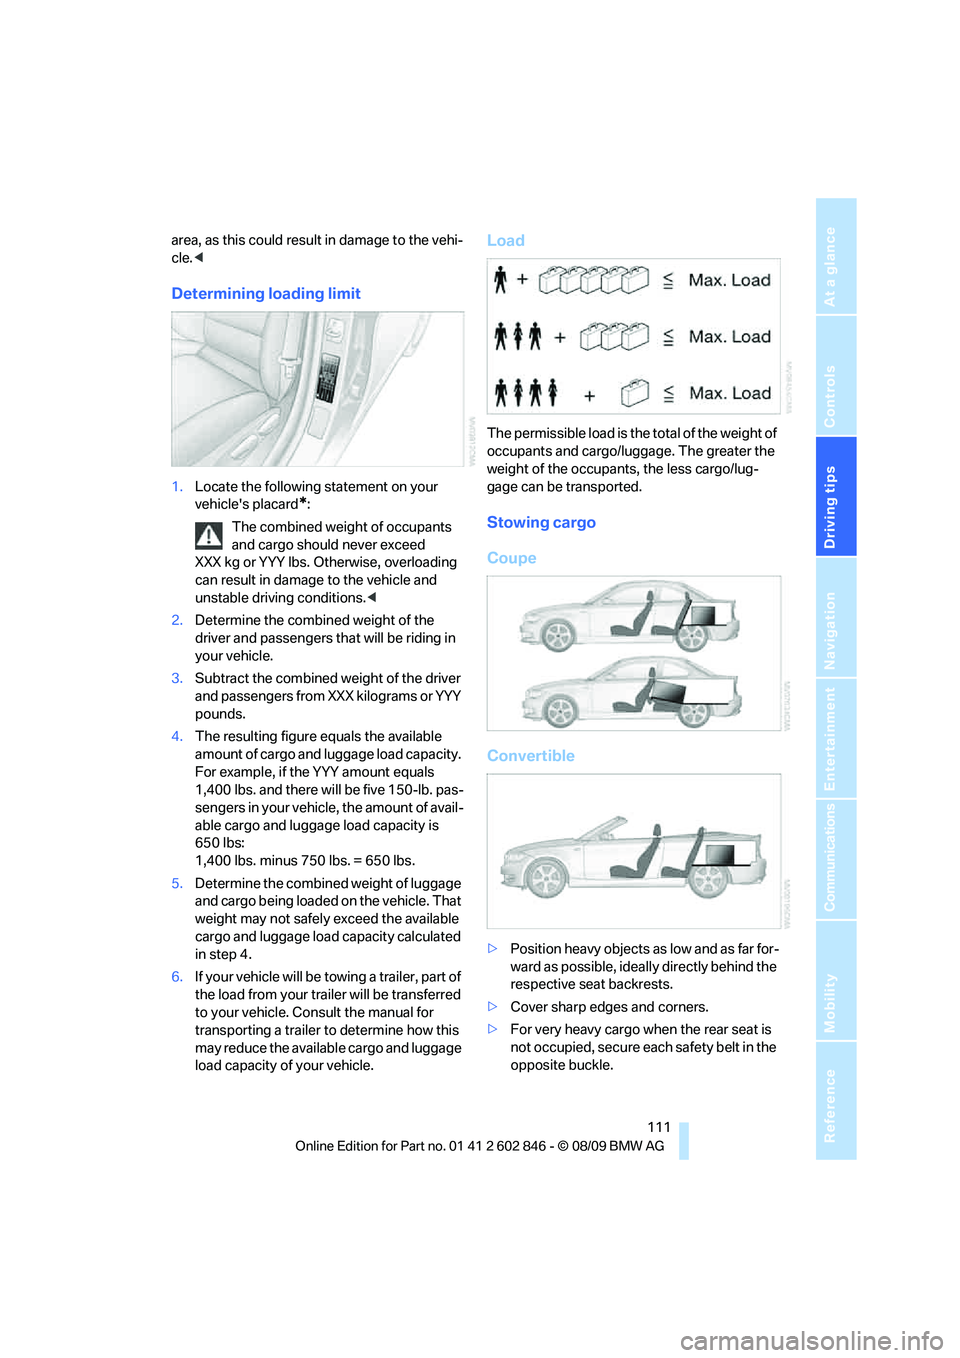
Load
The permissible load is the total of the weight of
occupants and cargo/luggage. The greater the
weight of the occupants, the less cargo/lug-
gage can be transported.
Stowing cargo
Coupe
Convertible
>Position heavy objects as low and as far for-
ward as possible, ideally directly behind the
respective seat backrests.
>Cover sharp edges and corners.
>For very heavy cargo when the rear seat is
not occupied, secure each safety belt in the
opposite buckle.
Page 114 of 250
Things to remember when driving
112
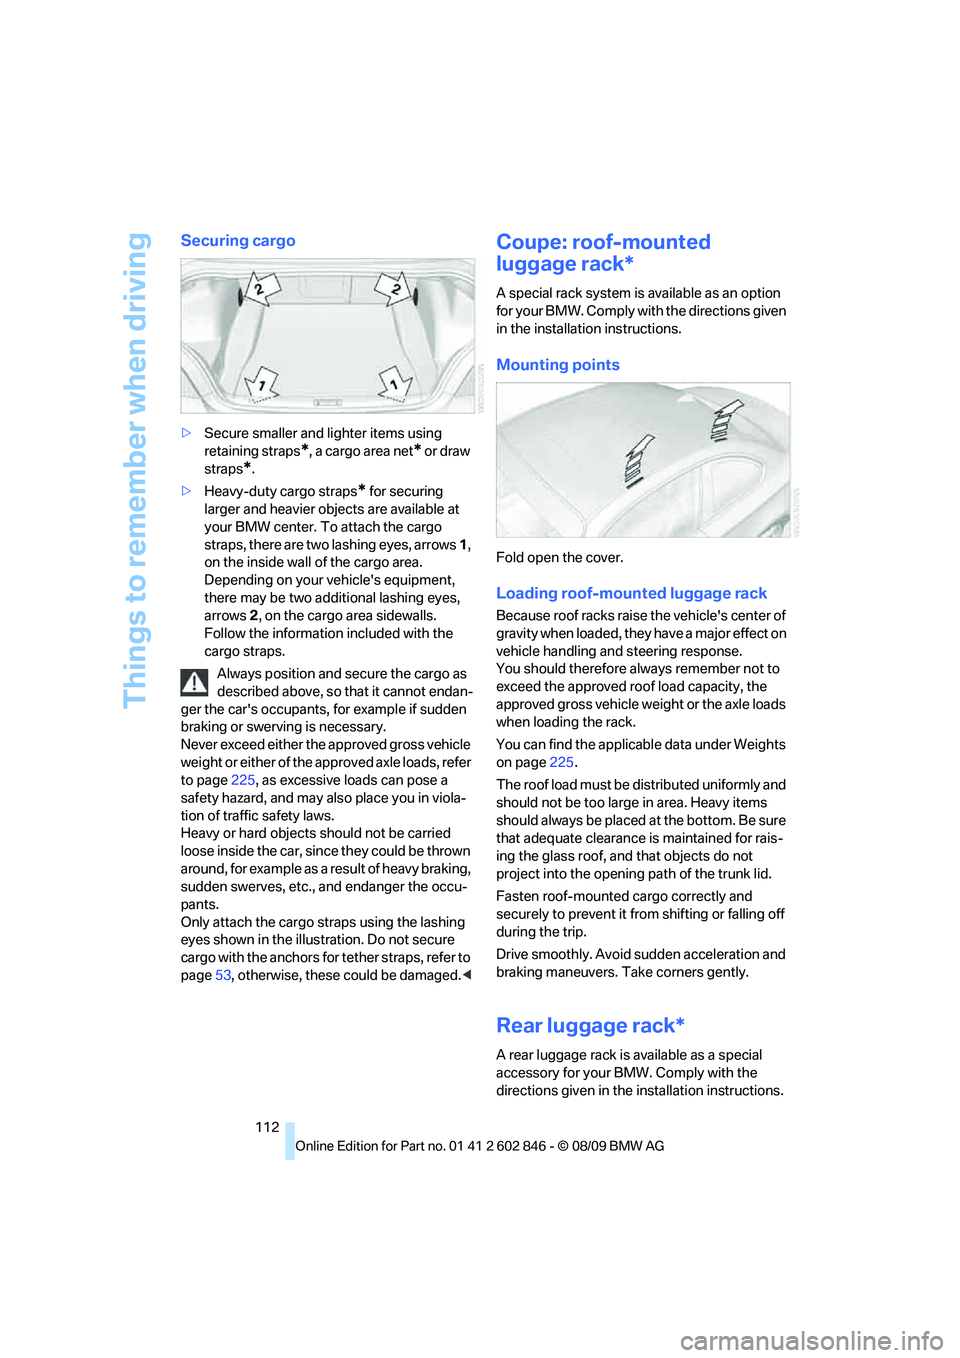
Securing cargo
>Secure smaller and lighter items using
retaining straps
*, a cargo area net* or draw
straps
*.
>Heavy-duty cargo straps
* for securing
larger and heavier objects are available at
your BMW center. To attach the cargo
straps, there are two lashing eyes, arrows 1,
on the inside wall of the cargo area.
Depending on your vehicle's equipment,
there may be two additional lashing eyes,
arrows2, on the cargo area sidewalls.
Follow the information included with the
cargo straps.
Always position and secure the cargo as
described above, so that it cannot endan-
ger the car's occupants, for example if sudden
braking or swerving is necessary.
Never exceed either the approved gross vehicle
weight or either of the approved axle loads, refer
to page225, as excessive loads can pose a
safety hazard, and may also place you in viola-
tion of traffic safety laws.
Heavy or hard objects should not be carried
loose inside the car, since they could be thrown
around, for example as a result of heavy braking,
sudden swerves, etc., and endanger the occu-
pants.
Only attach the cargo straps using the lashing
eyes shown in the illustration. Do not secure
cargo with the anchors for tether straps, refer to
page53, otherwise, these could be damaged.<
Coupe: roof-mounted
luggage rack*
A special rack system is available as an option
f o r y o u r B M W . C o m p l y w i t h t h e d i r e c t i o n s g i v e n
in the installation instructions.
Mounting points
Fold open the cover.
Loading roof-mounted luggage rack
Because roof racks raise the vehicle's center of
gravity when loaded, they have a major effect on
vehicle handling and steering response.
You should therefore always remember not to
exceed the approved roof load capacity, the
approved gross vehicle weight or the axle loads
when loading the rack.
You can find the applicable data under Weights
on page225.
The roof load must be distributed uniformly and
should not be too large in area. Heavy items
should always be placed at the bottom. Be sure
that adequate clearance is maintained for rais-
ing the glass roof, and that objects do not
project into the opening path of the trunk lid.
Fasten roof-mounted cargo correctly and
securely to prevent it from shifting or falling off
during the trip.
Drive smoothly. Avoid sudden acceleration and
braking maneuvers. Take corners gently.
Rear luggage rack*
A rear luggage rack is available as a special
accessory for your BMW. Comply with the
directions given in the installation instructions.
Page 170 of 250

Telephone
168 sion is dependent on your mobile phone,
refer to the operating instructions of the
mobile phone if necessary, and can take
several minutes.
>Four mobile phones can be paired.
>Specific settings may be necessary in some
mobile phones, e.g. authorization or a
secure connection, refer to the mobile
phone operating instructions.
If not all phone book entries are displayed:
>Transfer all phone book entries from the
SIM card to the mobile phone, if necessary.
>Phone book entries with special characters
may not be displayed.
Checks to perform if pairing is
unsuccessful
>Is the mobile phone supported by the
mobile phone preparation package? You
can obtain information on the Internet at:
www.bmw.com/bluetooth
>Do the Bluetooth passkeys on the mobile
phone and vehicle match? The same Blue-
tooth passkey must be entered on the
mobile phone's display and via iDrive.
>Did it take you more than 30 seconds to
enter the Bluetooth passkey? Then repeat
the pairing procedure.
>Are too many Bluetooth devices connected
to the mobile phone? If so, delete the con-
nections with other devices on the mobile
phone.
>Is the mobile phone no longer responding?
Switch the mobile phone off and on or
briefly disconnect the power supply.
>Repeat the pairing procedure.
>If all items on the list have been checked
and the mobile phone still cannot be paired,
please contact Customer Relations.
Connecting a particular mobile phone
If more than one mobile phone is detected by
the vehicle, the mobile phone at the top of the
list is connected. A different mobile phone can
be connected by selecting it.1."Telephone"
2."Bluetooth"
3.Select the desired mobile phone.
Unpairing the mobile phone from the
vehicle
1."Telephone"
2."Bluetooth"
3.Highlight the mobile phone that is to be
unpaired.
4.Open "Options".
5."Remove phone from list"
The unpaired mobile phone is deleted from
the list.
The phone book entries and the lists of
stored phone numbers are deleted as well.
Activating/deactivating the Bluetooth
link
The use of Bluetooth technology is not
permitted in all countries. Observe all
applicable local regulations. Temporarily deac-
tivate the Bluetooth link between the vehicle
and the mobile phone, if necessary.
If the Bluetooth link is deactivated, you can no
longer operate the mobile phone via the vehicle,
and other devices with a Bluetooth interface
Page 200 of 250
Under the hood
198
Under the hood
Do not work on the car unless you pos-
sess the necessary technical knowledge.
If you are unfamiliar with the statutory guide-
lines, have any work on the vehicle performed
only by a BMW center or by a workshop that
work according to BMW repair procedures with
correspondingly trained personnel. If this work
is not carried out properly, there is a danger of
subsequent damage and related safety haz-
ards.<
Hood
Releasing
Pull the lever.
Opening
To avoid damage, make sure that the
wiper arms are against the windshield
before you open the engine compartment. Do
not open the engine hood before the engine has
cooled down; otherwise, injuries may result.<
Press the release handle and open the hood.
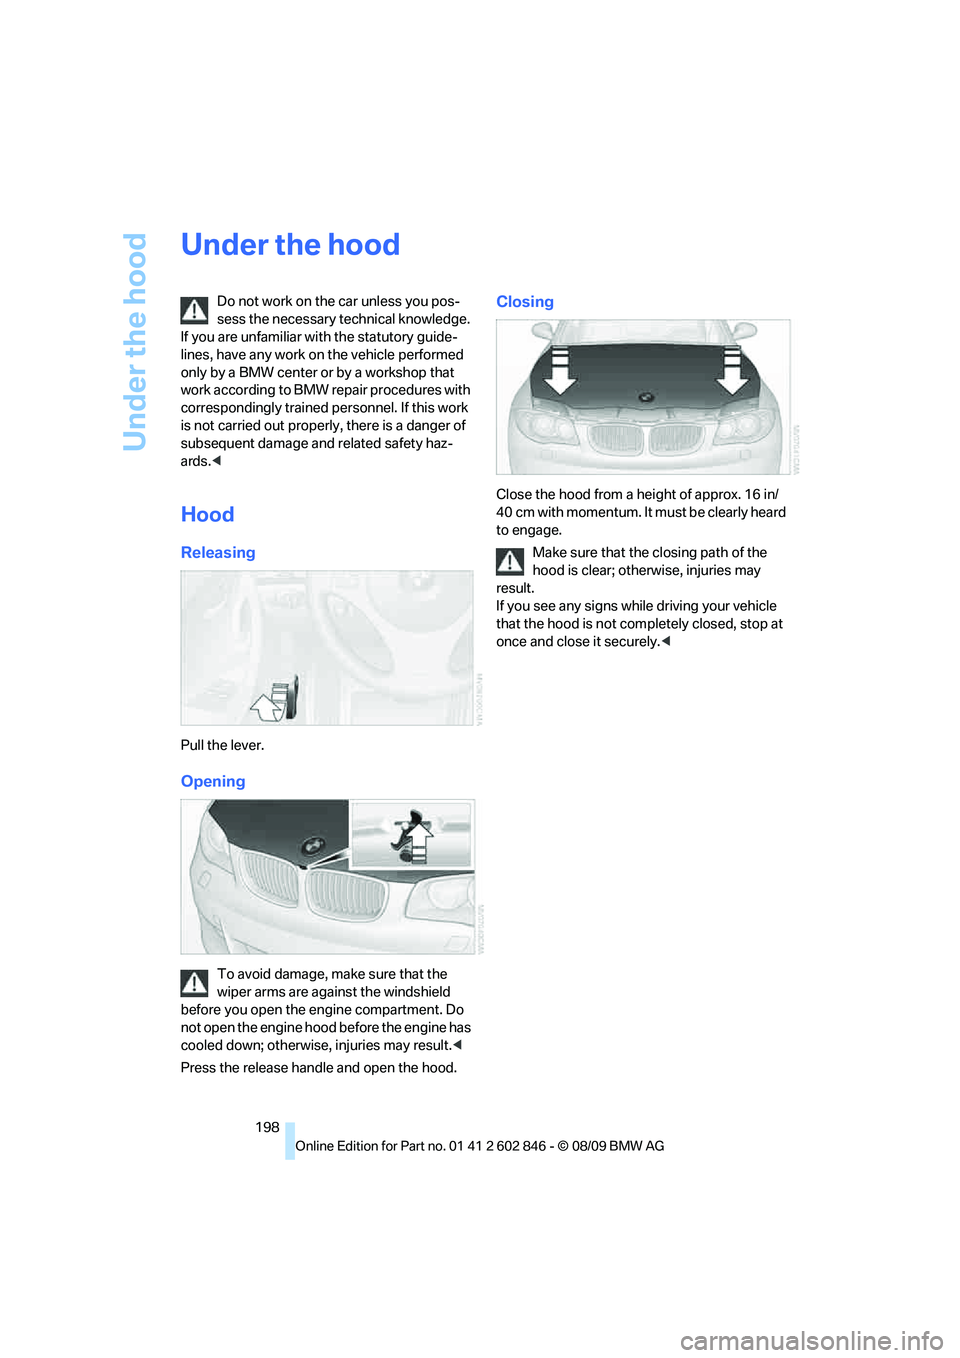
Closing
Close the hood from a height of approx. 16 in/
40 cm with momentum. It must be clearly heard
to engage.
Make sure that the closing path of the
hood is clear; otherwise, injuries may
result.
If you see any signs while driving your vehicle
that the hood is not completely closed, stop at
once and close it securely.<