Page 258 of 524

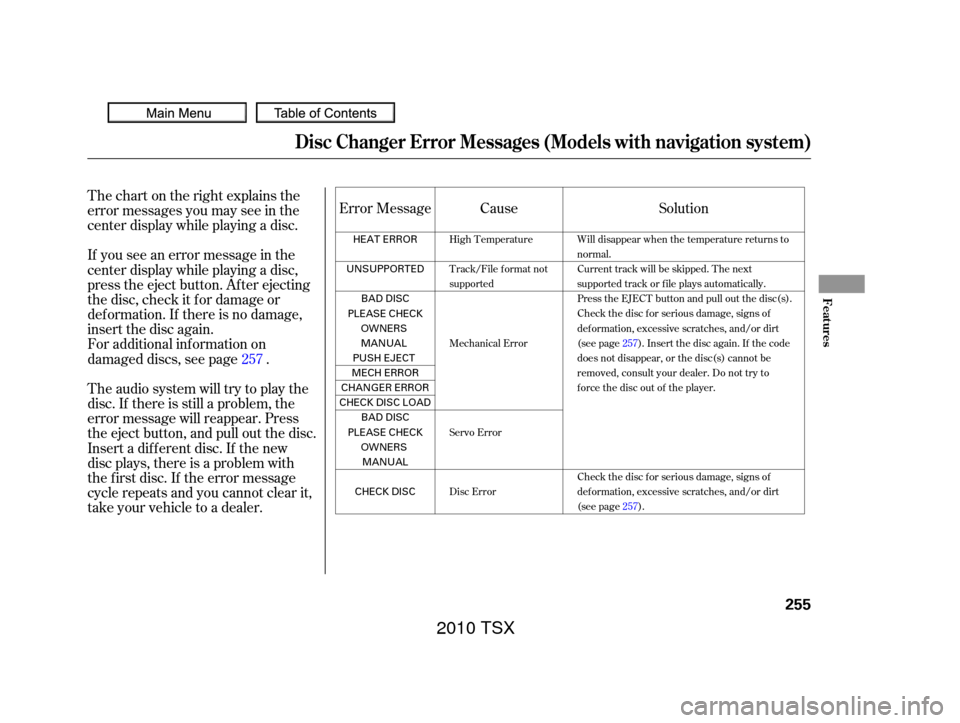
Thechartontherightexplainsthe
error messages you may see in the
center display while playing a disc.
If you see an error message in the
center display while playing a disc,
press the eject button. Af ter ejecting
the disc, check it f or damage or
deformation. If there is no damage,
insert the disc again.
For additional information on
damaged discs, see page .
Theaudiosystemwilltrytoplaythe
disc. If there is still a problem, the
error message will reappear. Press
the eject button, and pull out the disc.
Insert a dif f erent disc. If the new
disc plays, there is a problem with
the f irst disc. If the error message
cycle repeats and you cannot clear it,
take your vehicle to a dealer.Solution
Cause
Error Message
257
Will disappear when the temperature returns to
normal.
Current track will be skipped. The next
supported track or file plays automatically.
Press the EJECT button and pull out the disc(s).
Check the disc for serious damage, signs of
deformation, excessive scratches, and/or dirt
(see page 257). Insert the disc again. If the code
does not disappear, or the disc(s) cannot be
removed, consult your dealer. Do not try to
force the disc out of the player.
Check the disc for serious damage, signs of
deformation, excessive scratches, and/or dirt
(see page 257).
High Temperature
Track/File format not
supported
Mechanical Error
Servo Error
Disc Error
Disc Changer Error Messages (Models with navigation system)
Features
255
HEAT ERROR
UNSUPPORTED BAD DISC
PLEASE CHECK OWNERS
MANUAL
PUSH EJECT
MECH ERROR
CHANGER ERROR
CHECKDISCLOAD BAD DISC
PLEASE CHECK OWNERSMANUAL
CHECK DISC
2010 TSX
Page 259 of 524

When using CD-R or CD-RW discs,
use only high quality discs labeled
f or audio use.
When recording a CD-R or
CD-RW, the recording must be
closedforittobeusedbythedisc
changer.
When using DVD-R/RW discs,
they should meet DVD verif ication
standards.
Play only standard, round, 5-inch
(12 cm) discs. Smaller or odd-
shaped discs may jam in the drive
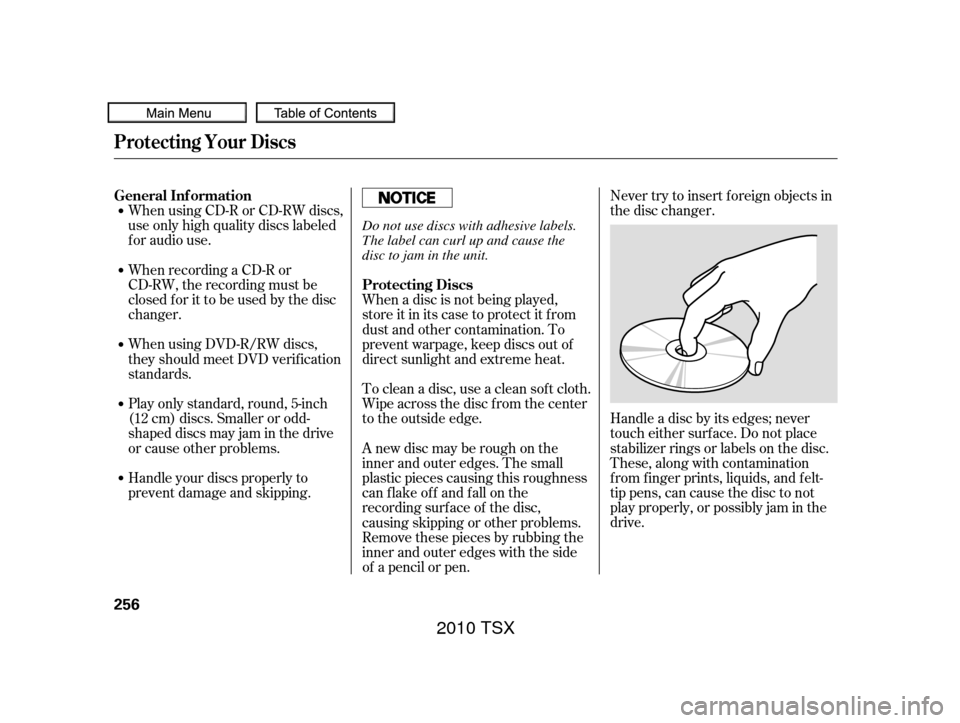
or cause other problems.Never try to insert f oreign objects in
the disc changer.
Handle a disc by its edges; never
touch either surf ace. Do not place
stabilizer rings or labels on the disc.
These, along with contamination
f rom f inger prints, liquids, and f elt-
tip pens, can cause the disc to not
play properly, or possibly jam in the
drive.
When a disc is not being played,
store it in its case to protect it f rom
dust and other contamination. To
prevent warpage, keep discs out of
direct sunlight and extreme heat.
To clean a disc, use a clean sof t cloth.
Wipe across the disc f rom the center
to the outside edge.
A new disc may be rough on the
inner and outer edges. The small
plastic pieces causing this roughness
can f lake of f and f all on the
recording surf ace of the disc,
causing skipping or other problems.
Remove these pieces by rubbing the
inner and outer edges with the side
of a pencil or pen.
Handle your discs properly to
prevent damage and skipping.
General Inf ormation
Protecting Discs
Protecting Your Discs
256
Do not use discs with adhesive labels.
The label can curl up and cause the
disc to jam in the unit.
2010 TSX
Page 260 of 524
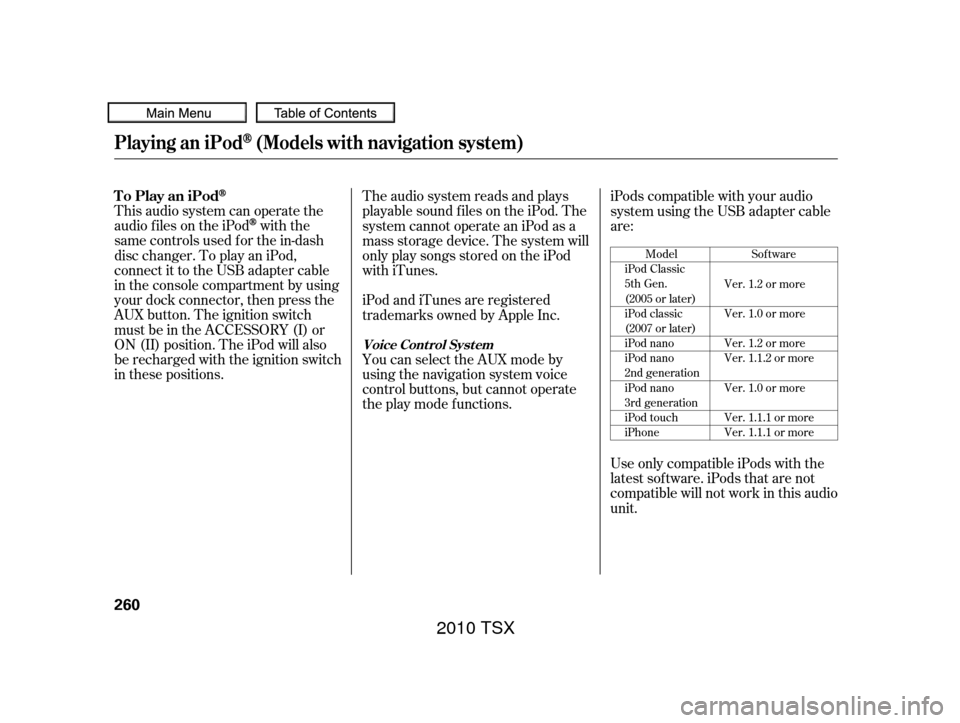
The in-dash disc player/changer has
a sophisticated and delicate
mechanism. If you insert a damaged
disc as indicated in this section, it
maybecomestuckinsideand
damage the audio unit.
Examples of these discs are shown
to the right:Bubbled, wrinkled, labeled, and excessively thick discs
Damaged discs
Poor quality discs
1.
2.
3.
CONT INUED
Additional Inf ormation on
Recommended Discs
Protecting Your Discs
Features
257
Sealed
Warped Burrs
Chipped/
Cracked
Bubbled/
Wrinkled
With Label/
Sticker Using Printer
Label Kit With Plastic
Ring
2010 TSX
Page 261 of 524
Small, irregular shaped discsDiscs with scratches, dirty discs
CD-R or CD-RW may not play due
to the recording conditions.
Scratches and f ingerprints on the
discs may cause the sound to skip. Recommended discs are printed
with the f ollowing logo.
Audio unit may not play the
following formats.
This audio unit cannot play a Dual-
disc
.
4.
5.
Protecting Your Discs
258
Fingerprints, scratches, etc.
3-inch (8-cm) CD Triangle Shape
Arrow Shape
Can Shape
2010 TSX
Page 262 of 524
Playing an iPod(Models with navigation system)
Features
259
INTERFACE DIAL
AUDIO BUTTON MAP BUTTON
CANCEL BUTTON USB ICON
CENTER DISPLAY
AUX BUTTON
SKIP BAR iPod ICON
2010 TSX
Page 263 of 524

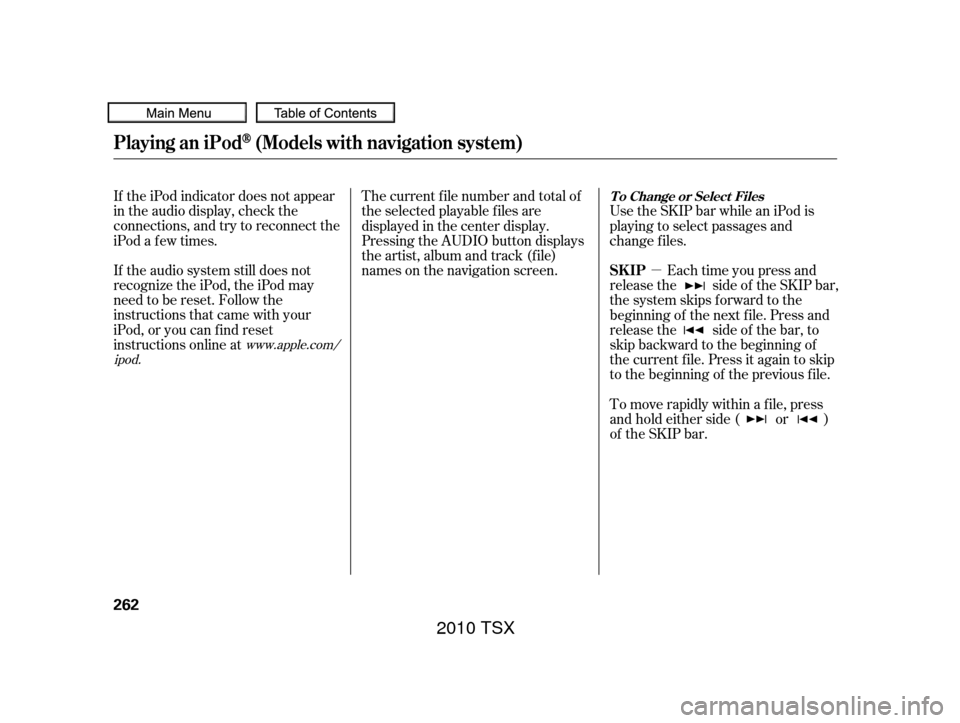
This audio system can operate the
audio f iles on the iPod
with the
same controls used f or the in-dash
disc changer. To play an iPod,
connect it to the USB adapter cable
in the console compartment by using
your dock connector, then press the
AUX button. The ignition switch
must be in the ACCESSORY (I) or
ON (II) position. The iPod will also
be recharged with the ignition switch
in these positions. The audio system reads and plays
playable sound f iles on the iPod. The
system cannot operate an iPod as a
mass storage device. The system will
only play songs stored on the iPod
with iTunes.
iPod and iTunes are registered
trademarks owned by Apple Inc.
You can select the AUX mode by
using the navigation system voice
control buttons, but cannot operate
theplaymodefunctions.iPods compatible with your audio
system using the USB adapter cable
are:
Use only compatible iPods with the
latest sof tware. iPods that are not
compatible will not work in this audio
unit.
Model
iPod Classic
5th Gen.
(2005 or later)
iPod classic
(2007 or later)
iPod nano
iPod nano
2nd generation
iPod nano
3rd generation
iPod touch
iPhone Sof tware
Ver. 1.2 or more
Ver. 1.0 or more
Ver. 1.2 or more
Ver. 1.1.2 or more
Ver. 1.0 or more
Ver. 1.1.1 or more
Ver. 1.1.1 or more
Playing an iPod(Models with navigation system)
To Play an iPod
Voice Cont rol Syst em
260
2010 TSX
Page 265 of 524

�µ
If the iPod indicator does not appear
in the audio display, check the
connections, and try to reconnect the
iPod a f ew times.
If the audio system still does not
recognize the iPod, the iPod may
need to be reset. Follow the
instructions that came with your
iPod, or you can f ind reset
instructions online at The current f ile number and total of
the selected playable f iles are
displayed in the center display.
Pressing the AUDIO button displays
the artist, album and track (f ile)
names on the navigation screen.
Use the SKIP bar while an iPod is
playing to select passages and
change f iles.
Each time you press and
release the side of the SKIP bar,
the system skips forward to the
beginning of the next f ile. Press and
release the side of the bar, to
skip backward to the beginning of
the current f ile. Press it again to skip
to the beginning of the previous file.
To move rapidly within a f ile, press
andholdeitherside( or )
of the SKIP bar.
www.apple.com/
ipod.
Playing an iPod(Models with navigation system)
T o Change or Select Files
SK IP
262
2010 TSX
Page 266 of 524
CONT INUED
You can also change files with the
interf ace dial. Press the AUDIO
button to show the audio control
display on the navigation screen.
Push the selector to the right side to
skip forward and to the left side to
skip backward.You can also select a file from any of
the iPod menus: playlists, artists,
albums and songs, by using the
interf ace dial. Press the AUDIO
button to display the audio control
display on the navigation screen.
Push up the interf ace selector to
display the iPod menu. Turn the
knob on the interf ace dial to select a
desired list.Push ENTER on the selector to
display the items on that list, then
turn the knob on the interface dial to
select a desired list. Pushing the
selector up or down moves a
selection to the top or bottom of the
screen items. Press ENTER to set
your selection.
Playing an iPod(Models with navigation system)
T o Select a File f rom iPod Menu
Features
263
2010 TSX