Page 289 of 612

�µ�µ
�µ
Adjusts the strength of
sound f rom the center speaker.
To adjust the
strength of the sound f rom the
subwoof er speaker, select it and
press ENTER on the interf ace
selector. Turn the interf ace dial to
the desired level, and enter your
selection by pressing ENTER on the
interf ace selector.
The SVC mode controls the volume
based on vehicle speed. The f aster
you go, the louder the audio volume
becomes. As you slow down, the
audio volume decreases.
The SVC has f our modes: OFF,
LOW, MID, and HIGH. The def ault
setting is MID. To change the SVC
mode, select SVC, then press
ENTER on the interf ace selector.
The current setting is shown on the screen. Turn the interf ace dial to the
desired level, and enter your
selection by pressing ENTER on the
interf ace selector. If you f eel the
sound is too loud, choose low. If you
f eel the sound is too quiet, choose
high.
Dolby
PL (ProLogic) II signal processing
creates multi-channel surround
sound f rom 2 channel stereo audio
sources. Dolby ProLogic II can only
activate when listening to DISC
(CD-DA,MP3,WMA,AAC),XM
Radio, AUX (USB, iPod
,AUX,
Audio), and HDD Audio.
When ProLogic II is available, ‘‘PL
II’’ is shown in the audio display.
When ProLogic II is not available in
the selected audio source, ‘‘DPL2 N/
A’’ is shown on the center display. To set this f eature on or of f , select
Dolby PL II, and press ENTER on
the interf ace selector. Rotate the
interf ace dial to ON or OFF, and
press ENTER.
Manuf actured under license f rom
Dolby Laboratories. Dolby, Pro
Logic, MLP Lossless and the double-
D symbol are trademarks of Dolby
Laboratories.
In some audio playing modes
(XM,AUX),whenDPLIIison,the
music coming f rom the rear
speakers may sound distorted. This
is due to compression of the music,
and it does not indicate a problem
with the setting.Bluetooth
CENT ER
SUBWOOFER
Dolby PL (ProL ogic) II
Playing the A M/FM Radio (Models with navigation system)
Speed-sensit ive VolumeCompensat ion (SVC)
286
NOTE:
09/07/29 17:36:39 31TK4610_291
2010 TL
Page 304 of 612

�Î�Î
�µ �Î This audio system plays CD-ROM,
CD-R/RW, DVD-ROM, and
DVD-R/RW compressed in MP3,
WMA, or AAC formats. You can
select up to 255 f olders or tracks.
To take the system out of disc mode,
press the AM/FM button, the
button, or the HDD/AUX
button. To return to disc mode, press
the DISC button.
Turn the interface dial to select the
Scan icon, and press ENTER on the
interf ace selector. You will hear a 10-
second sampling of each track on the
disc. When you return to disc mode,
the disc will begin playing f rom
where it lef t of f .
The specif ications f or compatible
MP3 f iles are:Sampling f requency:
32/44.1/48 kHz (MPEG1)
16/22.05/24 kHz (MPEG2)
8/11.025/12 kHz (MPEG2.5)
To turn this feature off, press the
SCAN side of the SCAN/A.SEL bar
again, or turn the interf ace dial to
select the OFF icon, and press
ENTER on the interf ace selector.
The system begins to play the last
track sampled.
Your vehicle has the engine start/
stop button instead of an ignition
switch. For more inf ormation to turn
the power mode of f , see page . If you turn the system of f while a
disc is playing, either with the VOL/knob or the engine start/stop
button, the disc will stay in the drive.
When you turn the system back on,
the disc will begin playing where it
left off. You can also press the MODE
buttononthesteeringwheelto
change modes.
: Including Root f older
178
Maximum
folders 255
255 Maximum
layers
8
8
Maximum
Files
999
3500
CONT INUED
Playing an MP3/WMA /A A C Disc
To Stop Playing a Disc
Playing a Disc (Models with navigation system)
Features
301
Disc
CD-ROM
CD-R
CD-RW
DVD-ROM
DVD-R
DVD-RW
09/07/29 17:41:23 31TK4610_306
2010 TL
Page 311 of 612
Playing Hard Disc Drive (HDD) Audio (Models with navigation system)
308
TITLE BUTTONAUDIO BUTTON NAVIGATION SCREEN
INTERFACE DIAL HDD/AUX BUTTON CENTER DISPLAY
SKIP BAR
CATEGORY BAR VOL/ (VOLUME/POWER)
KNOB
SCAN/A.SEL (SCAN/
AUTO SELECT) BAR
09/07/29 17:42:33 31TK4610_313
2010 TL
Page 314 of 612

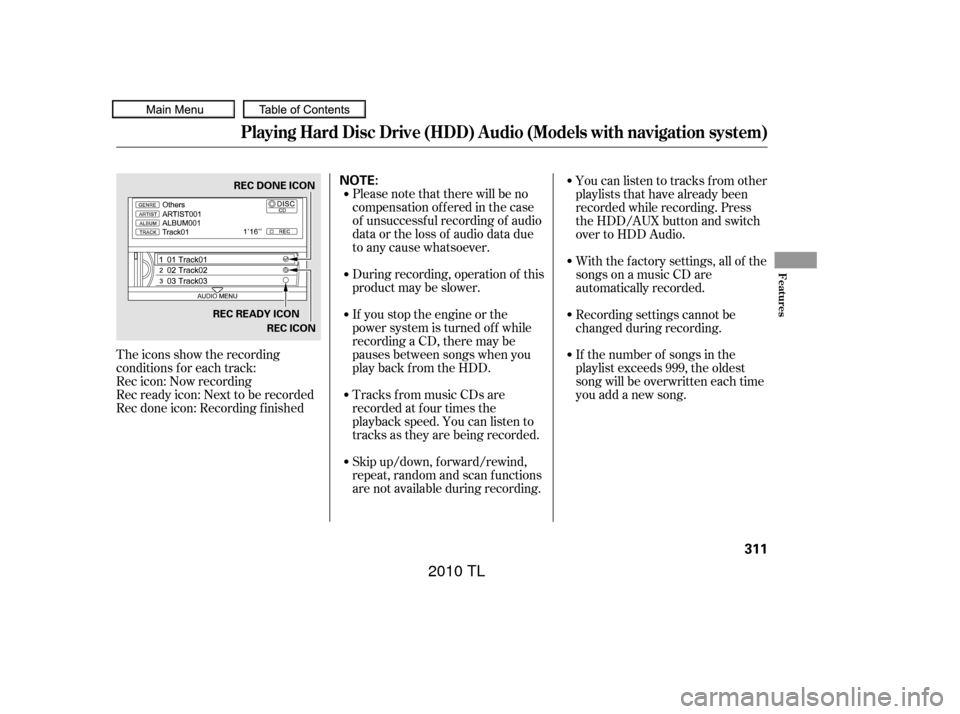
The icons show the recording
conditions f or each track:
Rec icon: Now recording
Rec ready icon: Next to be recorded
Rec done icon: Recording f inishedPlease note that there will be no
compensationofferedinthecase
of unsuccessf ul recording of audio
data or the loss of audio data due
to any cause whatsoever.
During recording, operation of this
product may be slower.
If you stop the engine or the
power system is turned of f while
recording a CD, there may be
pauses between songs when you
play back f rom the HDD.
Tracks from music CDs are
recorded at f our times the
playback speed. You can listen to
tracks as they are being recorded.
Skip up/down, f orward/rewind,
repeat, random and scan f unctions
are not available during recording.Youcanlistentotracksfromother
playlists that have already been
recorded while recording. Press
the HDD/AUX button and switch
over to HDD Audio.
With the factory settings, all of the
songs on a music CD are
automatically recorded.
Recording settings cannot be
changed during recording.
If the number of songs in the
playlist exceeds 999, the oldest
song will be overwritten each time
you add a new song.
Playing Hard Disc Drive (HDD) Audio (Models with navigation system)
Features
311
NOTE:REC DONE ICON
REC READY ICON REC ICON
09/07/29 17:43:12 31TK4610_316
2010 TL
Page 316 of 612

Select a track to record f rom the
music CD, push the HDD/AUX
button, then push the interface
selector down to display the audio
menu. Turn the interf ace dial to
select Rec to HDD, and then press
ENTER on the interf ace selector.To change the setting to
automatically record all of the tracks
on a music CD, move the interf ace
selector down on the HDD Audio
screen. Turn the interf ace dial to
select HDD Setup, and press ENTER
on the interf ace selector.
Turn the interf ace selector to select
Ripping,andpressENTERonthe
interf ace selector.
Turn the interf ace dial to select
AUTO, and press ENTER on the
interf ace selector.
To play tracks on HDD, push the
HDD/AUX button until the HDD
Audio screen appears. Playback will
start automatically with the track
previously selected.
Playing Hard Disc Drive (HDD) Audio (Models with navigation system)
T o Record a T rack Manually
Recording A ll of t he T racks on a
Music CD A utomaticallyPlaying T racks on HDD
Features
313
REC TO HDD ICON
09/07/29 17:43:34 31TK4610_318
2010 TL
Page 341 of 612
Playing an iPod(Models with navigation system)
338
SKIP BAR CENTER DISPLAY
NAVIGATION SCREEN
VOL/ (VOLUME/POWER)
KNOB
INTERFACE DIAL HDD/AUX BUTTON
CANCEL BUTTON AUDIO BUTTON
09/07/29 17:48:33 31TK4610_343
2010 TL
Page 342 of 612

The audio system reads and plays
playable sound f iles on the iPod. The
system cannot operate an iPod as a
mass storage device. The system will
only play songs stored on the iPod
with iTunes.
iPod and iTunes are registered
trademarks owned by Apple Inc.
This audio system can select and
play the audio f iles on the iPod
with
the same controls used f or the in-
dash disc player. To play an iPod,
connect it to the USB adapter cable
in the console compartment by using
your dock connector, then press the
HDD/AUX button. The power mode
must be ACCESSORY or ON. The
iPod will also be charged with the
power mode in these settings.
Your vehicle has the engine start/
stop button instead of an ignition
switch. For more inf ormation on
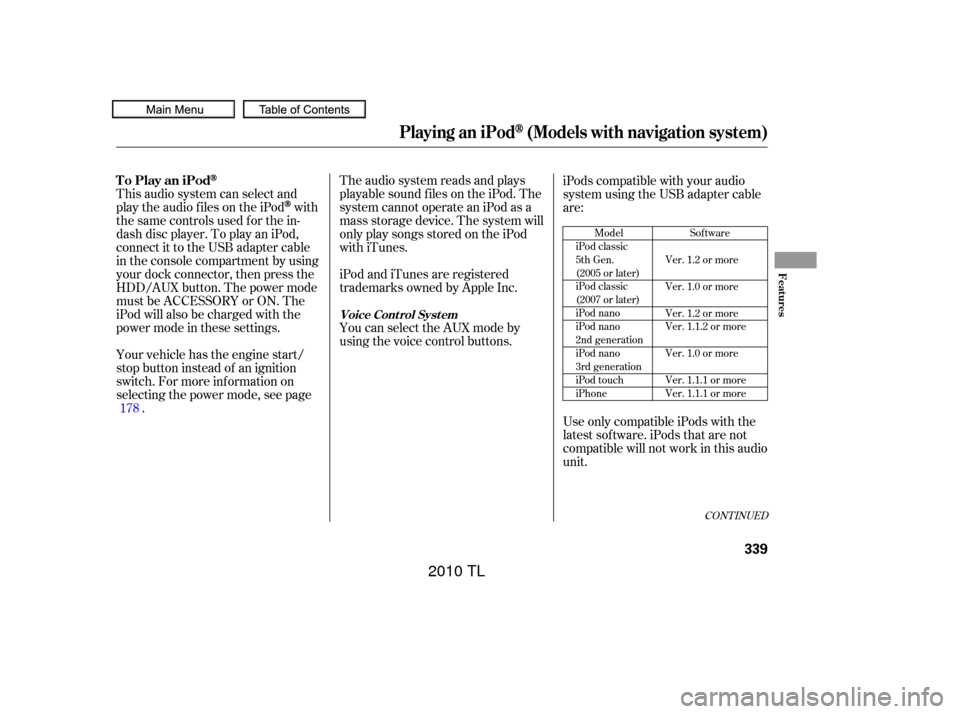
selecting the power mode, see page . iPods compatible with your audio
system using the USB adapter cable
are:
UseonlycompatibleiPodswiththe
latest sof tware. iPods that are not
compatible will not work in this audio
unit.
You can select the AUX mode by
using the voice control buttons.
178
Model
iPod classic
5th Gen.
(2005 or later)
iPod classic
(2007 or later)
iPod nano
iPod nano
2nd generation
iPod nano
3rd generation
iPod touch
iPhone Sof tware
Ver. 1.2 or more
Ver. 1.0 or more
Ver. 1.2 or more
Ver. 1.1.2 or more
Ver. 1.0 or more
Ver. 1.1.1 or more
Ver. 1.1.1 or more
CONT INUED
To Play an iPod
Voice Cont rol Syst em
Playing an iPod(Models with navigation system)
Features
339
09/07/29 17:48:46 31TK4610_344
2010 TL
Page 348 of 612

�Î
�ÎIf you see an error message in the
center display, see page .
The displayed message may
vary on models or versions. On
some models, there is no
message to disconnect.
When you disconnect the iPod while
it is playing, the center display and
the audio screen (if selected) show
USB NO DATA.
If you reconnect the same iPod, the
system may begin playing where it
lef t of f , depending on what mode the
iPod is in when it is reconnected.
To play the radio, press the AM/FM,
or button. Press the DISC
button to switch to the disc mode.
Press the HDD/AUX button to
switch the audio mode between
HDD Audio, USB and
Audio.
You can disconnect the iPod at any
time when you see ‘‘OK to
disconnect’’ message in the iPod
display. Always make sure you see
‘‘OK to disconnect’’ message in the
iPod display bef ore you disconnect it.
Make sure to f ollow the iPod’s
instructions on how to disconnect
the dock connector f rom the USB
adapter cable. You can also press the MODE
buttononthesteeringwheelto
change modes.
:
346
Bluetooth
Playing an iPod(Models with navigation system)
iPodError Messages
T o Stop Playing Your iPod
Disconnect ing an iPod
Features
345
When you connect your iPod to the
navigation system, the most recent
settings (Shuf f le, Repeat, etc.) will be
carried over.
09/07/29 17:49:53 31TK4610_350
2010 TL