Page 51 of 150

6-1
1
2
3
4
56
7
8
9
10
11
EBU19880
OPERATION
EBU19900
Read the Owner’s Manual carefully before riding
the ATV.
WARNING
EWB00630
Read the Owner’s Manual carefully to become
familiar with all controls in order to help pre-
vent any loss of control, which could cause an
accident or injury. If there is a control or func-
tion you do not understand, ask your Yamaha
dealer.
EBU20181
Starting a cold engine
WARNING
EWB00640
Always make sure all control cables work
smoothly before you begin riding in cold
weather. If the control cables are frozen or do
not work smoothly, you could be unable to
control the ATV, which could lead to an acci-
dent or collision.
NOTICE
ECB00150
See the “Engine break-in” section on page 6-5
prior to operating the engine for the first time.
1. Set the parking brake.
2. Turn the fuel cock to “ON”.
3. Turn the main switch to “ON” and the engine
stop switch to “”.
4. Shift the transmission into neutral. The neutral
indicator light should come on. If the indicator
light does not come on, have a Yamaha deal-
er check the electrical circuit.
TIP
This model is equipped with an ignition circuit cut-
off system. The engine can be started under the
following conditions.
�
The transmission is in neutral.
�
The clutch is disengaged with the transmission
in gear. However, it is recommended to shift into
neutral before starting the engine.
5. Use the starter (choke) in reference to the fig-
ure:
Page 55 of 150

6-5
1
2
3
4
56
7
8
9
10
11
with the engine off, and do not tow the ATV
for long distances. The transmission is prop-
erly lubricated only when the engine is run-
ning. Inadequate lubrication may damage
the transmission.
�
Always use the clutch when changing gears.
The engine, transmission and drive train are
not designed to withstand the shock of
forced shifting and can be damaged by shift-
ing without using the clutch.
EBU20672
Engine break-in
TIP
�
For ATVs equipped with an odometer or an hour
meter, follow the figures given in km (mi) or the
figures given in hours.
�
For ATVs not equipped with an odometer or
hour meter, follow the figures given in hours.
There is never a more important period in the life of
your engine than the first 320 km (200 mi) or 20
hours of riding. For this reason, you should read
the following material carefully.
Since the engine is brand new, do not put an ex-
cessive load on it for the first 320 km (200 mi) or 20hours. The various parts in the engine wear and
polish themselves to the correct operating clear-
ances. During this period, prolonged full-throttle
operation or any condition that might result in en-
gine overheating must be avoided.
0–160 km (0–100 mi) or 0–10 hours
Avoid prolonged operation above 1/2 throttle. Vary
the speed of the ATV regularly. Do not operate it at
one set throttle position.
160–320 km (100–200 mi) or 10–20 hours
Avoid prolonged operation above 3/4 throttle. Rev
the engine through the gears freely, but do not use
full throttle at any time.
320 km (200 mi) or 20 hours and beyond
The ATV can now be operated normally.
NOTICE
ECB00220
If any engine trouble should occur during the
engine break-in period, immediately have a
Yamaha dealer check the ATV.
EBU20721
Parking
When parking the ATV, stop the engine, shift into
Page 83 of 150

8-3
1
2
3
4
5
6
78
9
10
11
EBU21742
Periodic maintenance chart for the emission control system
TIP
�
For ATVs not equipped with an odometer or an hour meter, follow the month maintenance intervals.
�
For ATVs equipped with an odometer or an hour meter, follow the km (mi) or hours maintenance inter-
vals. However, keep in mind that if the ATV isn’t used for a long period of time, the month maintenance
intervals should be followed.
�
Items marked with an asterisk should be performed by a Yamaha dealer as they require special tools,
data and technical skills.
NO. ITEMCHECK OR MAINTENANCE
JOBINITIAL EVERY
Whichev-
er comes
firstmonth136612
km
(mi)320
(200)1300
(800)2500
(1600)2500
(1600)5000
(3200)
hours 20 80 160 160 3201
*
Fuel line
�
Check fuel hoses for cracks or other damage, and
replace if necessary.
√√√
2 Spark plug
�
Check condition and clean, regap, or replace if
necessary.
√√√√√
3
*
Valves
�
Check valve clearance and adjust if necessary.
√ √√√
4
*
Carburetor
�
Check starter (choke) operation and correct if nec-
essary.
�
Check engine idling speed and adjust if neces-
sary.
√√√√
5
*
Crankcase breather
system
�
Check breather hose for cracks or other damage,
and replace if necessary.
√√√
Page 86 of 150

8-6
1
2
3
4
5
6
78
9
10
11
10
*
Swingarm pivots
�
Check operation and for excessive play, and
replace bearings if necessary.
�
Lubricate with lithium-soap-based grease.
√√√
11
*
Upper and lower
arm pivots
�
Lubricate with lithium-soap-based grease.
√√√
12 Drive chain
�
Check chain slack and adjust if necessary.
�
Check rear wheel alignment and correct if necess-
sary.
�
Clean and lubricate.
√√√√√
13
*
Drive chain rollers
�
Check for wear and replace if necessary.
√√√
14
*
Chassis fasteners
�
Make sure that all nuts, bolts, and screws are
properly tightened.
√√√√√
15
*
Shock absorber
assemblies
�
Check operation and correct if necessary.
�
Check for oil leakage and replace if necessary.
√√√
16
*
Rear suspension
relay arm and con-
necting arm pivot-
ing points
�
Check operation and correct if necessary.
�
Lubricate with lithium-soap-based grease.
√√√√
17
*
Steering shaft
�
Lubricate with lithium-soap-based grease.
√√√
18
*
Steering system
�
Check operation and repair or replace if damaged.
�
Check toe-in and adjust if necessary.
√√√√√
19
*
Engine mount
�
Check for cracks or other damage, and replace if
necessary.
√√√
NO. ITEMCHECK OR MAINTENANCE
JOBINITIAL EVERY
Whichev-
er comes
firstmonth 1 3 6 6 12
km
(mi)320
(200)1300
(800)2500
(1600)2500
(1600)5000
(3200)
hours 20 80 160 160 320
Page 87 of 150
8-7
1
2
3
4
5
6
78
9
10
11
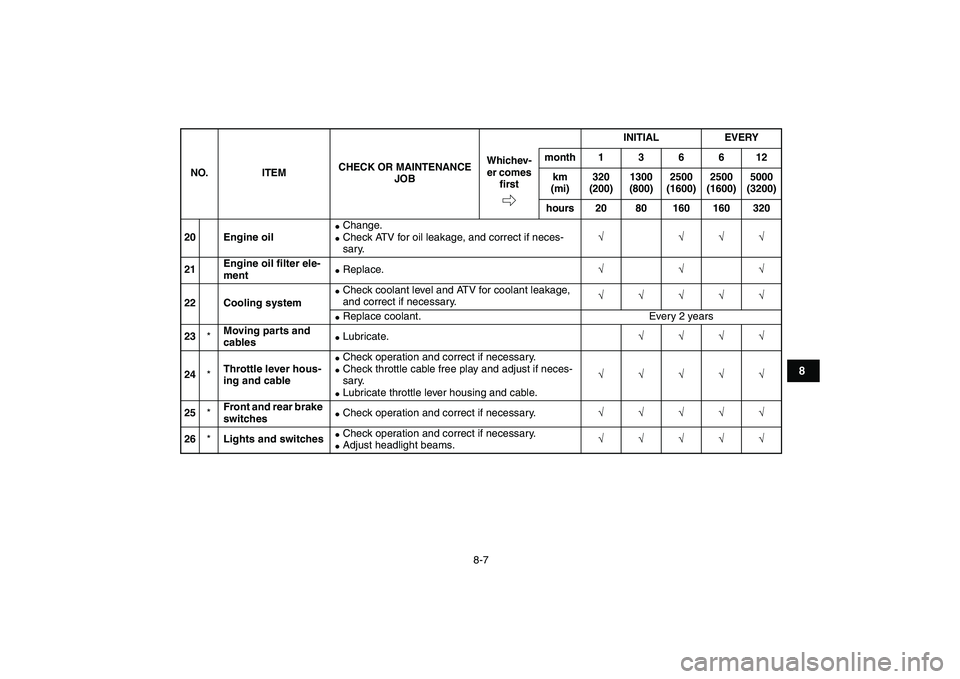
20 Engine oil
�
Change.
�
Check ATV for oil leakage, and correct if neces-
sary.
√ √√√
21Engine oil filter ele-
ment
�
Replace.
√√√
22 Cooling system
�
Check coolant level and ATV for coolant leakage,
and correct if necessary.
√√√√√
�
Replace coolant. Every 2 years
23
*
Moving parts and
cables
�
Lubricate.
√√√√
24
*
Throttle lever hous-
ing and cable
�
Check operation and correct if necessary.
�
Check throttle cable free play and adjust if neces-
sary.
�
Lubricate throttle lever housing and cable.
√√√√√
25
*
Front and rear brake
switches
�
Check operation and correct if necessary.
√√√√√
26
*
Lights and switches
�
Check operation and correct if necessary.
�
Adjust headlight beams.
√√√√√
NO. ITEMCHECK OR MAINTENANCE
JOBINITIAL EVERY
Whichev-
er comes
firstmonth136612
km
(mi)320
(200)1300
(800)2500
(1600)2500
(1600)5000
(3200)
hours 20 80 160 160 320
Page 90 of 150
8-10
1
2
3
4
5
6
78
9
10
11
To install the panel1. Place the panel in the original position, and
then install the quick fastener screw and the
bolts.
2. Install the seat.
EBU23241
Checking the spark plug
The spark plug is an important engine component,
which is easy to check. Since heat and deposits
will cause any spark plug to slowly erode, the spark
plug should be removed and checked in accor-
1. Bolt
1
1. Projection
2. Slot
1
1 22
Page 93 of 150
8-13
1
2
3
4
5
6
78
9
10
11
kit.
To check the spark plug
1. Check that the porcelain insulator around the
center electrode of the spark plug is a medi-
um-to-light tan (the ideal color when the ATV
is ridden normally).
TIP
If the spark plug shows a distinctly different color,
the engine could be operating improperly. Do not
attempt to diagnose such problems yourself. In-
stead, have a Yamaha dealer check the ATV.
2. Check the spark plug for electrode erosionand excessive carbon or other deposits, and
replace it if necessary.
To install the spark plug
1. Measure the spark plug gap with a wire thick-
ness gauge and, if necessary, adjust the gap
to specification.
1. Spark plug wrench
1
Specified spark plug:
NGK/CR8E
Spark plug gap:
0.7–0.8 mm (0.028–0.031 in)
1. Spark plug gap
Page 94 of 150

8-14
1
2
3
4
5
6
78
9
10
11
2. Clean the surface of the spark plug gasket
and its mating surface, and then wipe off any
grime from the spark plug threads.
3. Install the spark plug with the spark plug
wrench, and then tighten it to the specified
torque.
TIP
If a torque wrench is not available when installing
a spark plug, a good estimate of the correct torque
is 1/4–1/2 turn past finger tight. However, the spark
plug should be tightened to the specified torque as
soon as possible.
4. Install the spark plug cap.
5. Place the fuel tank in the original position, and
then install the bolt.
6. Remove the fuel tank cap by turning it coun-
terclockwise.
7. Place the panel in the original position.8. Install the fuel tank cap by turning it clockwise.
9. Install the bolts and the quick fastener screws.
10. Install the seat.
EBU23304
Engine oil and oil filter element
The engine oil level should be checked before
each ride. In addition, the oil must be changed and
the oil filter element replaced at the intervals spec-
ified in the periodic maintenance and lubrication
chart. Tightening torque:
Spark plug:
12.5 Nm (1.25 m·kgf, 9.0 ft·lbf)
1. Projection
2. Slot
21