Page 32 of 116

4-9
1
2
34
5
6
7
8
9
10
11
of gasoline or higher octane grade.
NOTICE
ECB00070
Use only unleaded gasoline. The use of leaded
gasoline will cause severe damage to internal
engine parts, such as the valves and piston
rings, as well as to the exhaust system.
WARNING
EWB00310
�
Do not overfill the fuel tank. Fuel expands
when it heats up. If the fuel tank is overfilled,
fuel could spill out due to heat from the en-
gine or the sun.
�
Be careful not to spill fuel, especially on the
engine or exhaust pipe which can cause a
fire and severe injury. Wipe up any spilled
fuel immediately.
�
Do not refuel right after the engine has been
running and is still very hot.
�
Be sure the fuel tank cap is closed securely.
EBU18820
Fuel cock
The fuel cock supplies fuel from the tank to the car-
buretor while also filtering it.The fuel cock lever positions are explained as fol-
lows and shown in the illustrations.
OFF
With the fuel cock lever in this position, fuel will not
flow. Always turn the fuel cock lever to this position
when the engine is not running.
1. Arrow mark positioned over “OFF”
RES
ONFUEL
OFF
1
Page 33 of 116
4-10
1
2
34
5
6
7
8
9
10
11
ON
With the fuel cock lever in this position, fuel flows
to the carburetor. Turn the fuel cock lever to this
position when starting the engine and riding.
RES
This indicates reserve. With the fuel cock lever in
this position, the fuel reserve is made available.
Turn the fuel cock lever to this position if you run
out of fuel while riding. When this occurs, refuel as
soon as possible and be sure to turn the fuel cock
lever back to “ON”!
EBU18860
Choke
The choke is used to start a cold engine.
Move the choke in direction (a) to turn on the
choke.
1. Arrow mark positioned over “ON”
ON
FUEL
RES
OFF
ON
1
1. Arrow mark positioned over “RES”
OFF
ONFUEL RES
RES
1
Page 34 of 116
4-11
1
2
34
5
6
7
8
9
10
11
Move the choke in direction (b) to turn off the
choke.
See the “Starting a cold engine” section on page
6-1 for proper operation.
EBU18870
Seat
To remove the seat
Pull the seat lock lever upward and pull up the seat
at the rear.
To install the seat
Insert the projection on the front of the seat into the
seat holder and push down on the seat at the rear.TIP
Make sure that the seat is securely fitted.
1. Fully open “ON”
2. Half open (warming up position)
3. Closed “OFF”
4. Choke
4
1
2
3
(b) (a)
1. Seat lock lever
1
Page 36 of 116

5-1
1
2
3
45
6
7
8
9
10
11
EBU19200
PRE-OPERATION CHECKS
EBU19222
Pre-operation check list
Before operating this ATV, be sure to check the items listed in the following table.
WARNING
EWB00480
Always inspect your ATV each time you use it to make sure it is in safe operating condition.
Always follow the inspection and maintenance procedures and schedules described in the Owner’s
Manual. Failure to inspect increases the possibility of an accident or equipment damage.
TIP
The maintenance of some items in the table has to be performed by a Yamaha dealer. Refer to the periodic
maintenance charts on page 8-3 to determine which service should be performed by a Yamaha dealer.
ITEM ROUTINE PAGE
Fuel
�
Check fuel level in fuel tank, and add recommended fuel if neces-
sary.
�
Check fuel line for leakage. Correct if necessary.4-8, 5-3
Engine oil
�
Check oil level in engine, and add recommended oil to specified
level if necessary.
�
Check ATV for oil leakage. Correct if necessary.5-3, 8-9
Final gear oil
�
Check ATV for oil leakage. Correct if necessary. 5-3, 8-12
Front brake
�
Check operation, and correct if necessary.
�
Lubricate cable if necessary.
�
Check lever free play, and adjust if necessary.5-3, 8-20, 8-21
Page 38 of 116

WARNING
EWB00520
�
Do not overfill the fuel tank. Fuel expands
when it heats")
5-3
1
2
3
45
6
7
8
9
10
11
EBU19540
Fuel
Make sure that there is sufficient fuel in the tank.
(See page 4-8.)
WARNING
EWB00520
�
Do not overfill the fuel tank. Fuel expands
when it heats up. If the fuel tank is overfilled,
fuel could spill out due to heat from the en-
gine or the sun.
�
Be careful not to spill fuel, especially on the
engine or exhaust pipe which can cause a
fire and severe injury. Wipe up any spilled
fuel immediately.
�
Do not refuel right after the engine has been
running and is still very hot.
�
Be sure the fuel tank cap is closed securely.
EBU19560
Engine oil
Make sure that the engine oil is at the specified lev-
el. Add oil as necessary. (See page 8-9.)
EBU19590
Final gear oil
Make sure that the final gear oil is at the specified
level. Add oil as necessary. (See page 8-12.)
EBU19650
Front and rear brakes
Brake levers
�
Check for correct free play in the brake levers. If
the free play is incorrect, adjust it. (See pages
8-21 and 8-23.)
�
Check operation of the levers. They should
move smoothly and there should be a firm feel-
ing when the brake is applied. If not, have the
ATV checked by a Yamaha dealer.
Brake operation
Test the brakes at slow speed after starting out to
make sure they are working properly. If the brakes
do not provide proper braking performance, check
the brakes for wear. (See page 8-20.)
WARNING
EWB00570
Always check the brakes at the start of every
ride. Do not ride the ATV if you find any prob-
lem with the brakes or you could lose braking
ability, which could lead to an accident. If a
problem cannot be corrected by the adjust-
ment procedures provided in this manual, have
the ATV checked by a Yamaha dealer.
Page 42 of 116

6-1
1
2
3
4
56
7
8
9
10
11
EBU19880
OPERATION
EBU19900
Read the Owner’s Manual carefully before riding
the ATV.
WARNING
EWB00630
Read the Owner’s Manual carefully to become
familiar with all controls in order to help pre-
vent any loss of control, which could cause an
accident or injury. If there is a control or func-
tion you do not understand, ask your Yamaha
dealer.
EBU20241
Starting a cold engine
WARNING
EWB00640
Always make sure all control cables work
smoothly before you begin riding in cold
weather. If the control cables are frozen or do
not work smoothly, you could be unable to
control the ATV, which could lead to an acci-
dent or collision.
NOTICE
ECB00150
See the “Engine break-in” section on page 6-5
prior to operating the engine for the first time.
1. Set the parking brake.
2. Turn the fuel cock to “ON”.
3. Turn the main switch to “ON” and the engine
stop switch to “RUN”.
4. Shift the transmission into neutral. The neutral
indicator light should come on. If the indicator
light does not come on, have a Yamaha deal-
er check the electrical circuit.
TIP
This model is equipped with an ignition circuit cut-
off system. The engine can be started under the
following conditions.
�
The transmission is in neutral.
�
The rear brake lever is applied with the drive se-
lect lever in the drive position. However, it is rec-
ommended to shift into neutral before starting
the engine.
Page 43 of 116
6-2
1
2
3
4
56
7
8
9
10
11
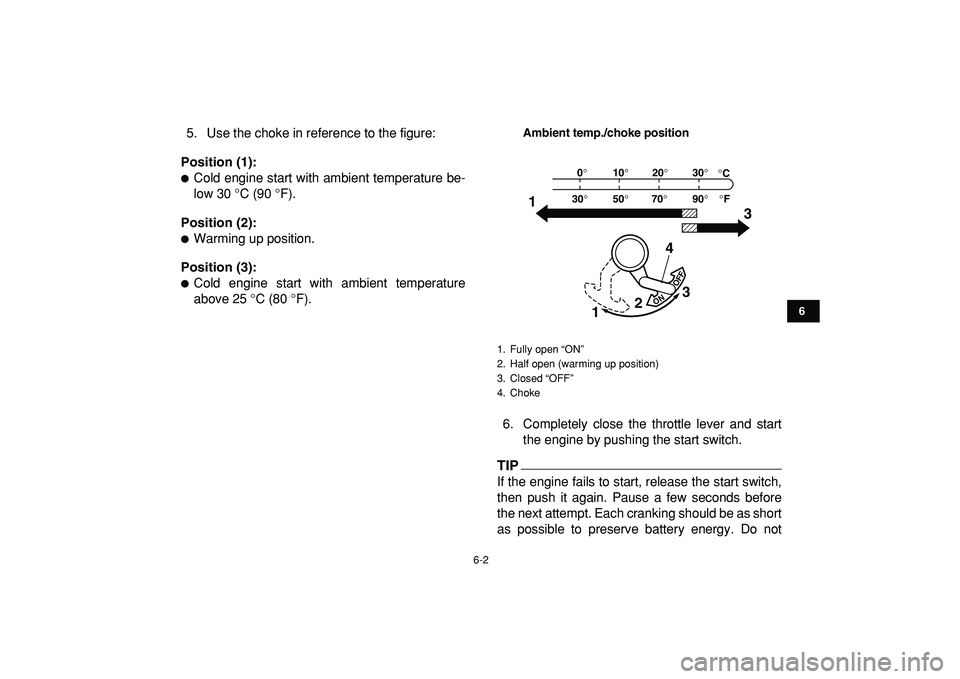
5. Use the choke in reference to the figure:
Position (1):
�
Cold engine start with ambient temperature be-
low 30 °C (90 °F).
Position (2):
�
Warming up position.
Position (3):
�
Cold engine start with ambient temperature
above 25 °C (80 °F).
Ambient temp./choke position
6. Completely close the throttle lever and start
the engine by pushing the start switch.
TIP
If the engine fails to start, release the start switch,
then push it again. Pause a few seconds before
the next attempt. Each cranking should be as short
as possible to preserve battery energy. Do not
1. Fully open “ON”
2. Half open (warming up position)
3. Closed “OFF”
4. Choke
ON
OFF
0°
30°10°20°30°
50°70°90°°F °C
4 1
133
2
Page 44 of 116
, the choke should be returned to posi-
tion (2) to")
6-3
1
2
3
4
56
7
8
9
10
11
crank the engine more than 10 seconds on each
attempt.
7. If the engine is started with the choke in posi-
tion (1), the choke should be returned to posi-
tion (2) to warm up the engine. If the engine is
started with the choke in position (2), keep the
choke in this position to warm up the engine.
NOTICE
ECB00160
For maximum engine life, always warm the en-
gine up before starting off. Never accelerate
hard when the engine is cold!
8. Continue warming up the engine until it idles
smoothly, then return the choke to position (3)
before riding.
TIP
The engine is warm when it responds normally to
the throttle with the choke turned off.
EBU20301
Starting a warm engine
Follow the same procedure as for starting a cold
engine, with the exception that the choke is not re-
quired when the engine is warm. Instead, start the
engine with the throttle slightly open.
EBU27880
Shifting
This ATV has an automatic, centrifugal clutch.
To shift into the drive position, release the throttle
lever and apply the parking brake.
To shift into neutral, stop the ATV by releasing the
throttle lever and applying the brakes smoothly
and evenly.
EBU20630
To start out and accelerate
1. Release the throttle lever.
NOTICE
ECB00210
Always close the throttle before shifting the
transmission into drive, otherwise damage to
the engine and drive train may result.
2. Apply the parking brake. (See page 6-5.)
3. Shift the transmission into drive.

 to turn off the
choke.
See the “Starting a cold engine” section on page
6-1 for proper operation.
EBU18870
Seat
To remove the s")