Page 62 of 116

7-13
1
2
3
4
5
67
8
9
10
11
WARNING
EWB01570
Always follow proper procedures for turning
as described in this Owner’s Manual. Practice
turning at low speeds before attempting to turn
at faster speeds. Do not turn at speeds too fast
for your skills or the conditions.
As you approach a curve, slow down and begin to
turn the handlebars in the desired direction. As you
do so, put your weight on the footboard to the out-
side of the turn (opposite your desired direction)
and lean your upper body into the turn. Use the
throttle to maintain an even speed through the
turn. This maneuver will let the wheel on the inside
of the turn slip slightly, allowing the ATV to make
the turn properly.
This procedure should be practiced at slow speed
many times in a large unpaved area with no obsta-
cles. If an incorrect technique is used, your ATV
may continue to go straight. If the ATV doesn’t
turn, come to a stop and then practice the proce-
dure again. If the riding surface is slippery or loose,
it may help to position more of your weight over the
front wheels by moving forward on the seat.
Once you have learned this technique, you should
be able to perform it at higher speeds or in tighter
1. Lean towards inside of turn.
2. Support your weight on the outer footboard.
1
2
Page 64 of 116
7-15
1
2
3
4
5
67
8
9
10
11
If you are climbing a hill and you find that you have
not properly judged your ability to make it to the
top, you should turn the ATV around while you still
have forward motion (provided you have the room
to do so) and go down the hill.
WARNING
EWB01600
Never attempt to turn the ATV around on any
hill until you have mastered the turning tech-
nique as described in the Owner’s Manual on
level ground. Be very careful when turning on
any hill. Avoid crossing the side of a steep hillif possible.
When crossing the side of a hill:
�
Always follow proper procedures as de-
scribed in the Owner’s Manual.
�
Avoid hills with excessively slippery or loose
surfaces.
�
Shift your weight to the uphill side of the
ATV.
If your ATV has stalled or stopped and you believe
you can continue up the hill, restart carefully to
make sure you do not lift the front wheels which
could cause you to lose control. If you are unable
OK
OK
Page 66 of 116

7-17
1
2
3
4
5
67
8
9
10
11
hill. Avoid sharp angles which could allow the ATV
to tip or roll over. Carefully choose your path and
ride no faster than you will be able to react to ob-
stacles which may appear.
WARNING
EWB01620
Always follow proper procedures for going
down hills as described in this Owner’s Manu-
al.
Note: a special technique is required when
braking as you go down a hill.
�
Always check the terrain carefully before
you start down any hill.
�
Shift your weight backward.
�
Never go down a hill at high speed.
�
Avoid going down a hill at an angle that
would cause the ATV to lean sharply to one
side. Go straight down the hill where possi-
ble.CROSSING A SLOPE
Traversing a sloping surface on your ATV requires
you to properly position your weight to maintain
proper balance. Be sure that you have learned the
basic riding skills on flat ground before attempting
to cross a sloping surface. Avoid slopes with slip-
pery surfaces or rough terrain that may upset your
balance.
As you travel across a slope, lean your body in the
uphill direction. It may be necessary to correct the
steering when riding on loose surfaces by pointing
the front wheels slightly uphill. When riding on
OK
Page 69 of 116
7-20
1
2
3
4
5
67
8
9
10
11
RIDING OVER ROUGH TERRAIN
Riding over rough terrain should be done with cau-
tion. Look out for obstacles which could cause
damage to the ATV or could lead to an upset or ac-
cident. Be sure to keep your feet firmly mounted on
the footboards at all times. Avoid jumping the ATV
as loss of control and damage to the ATV may re-
sult.
WARNING
EWB01650
Before operating in a new area, check for ob-
stacles. Never attempt to ride over large obsta-
cles, such as large rocks or fallen trees. Whenyou go over obstacles, always follow proper
procedures as described in the Owner’s Manu-
al.
SLIDING AND SKIDDING
Care should be used when riding on loose or slip-
pery surfaces since the ATV may slide. If unex-
pected and uncorrected, sliding could lead to an
accident.
To reduce the tendency for the front wheels to slide
in loose or slippery conditions, positioning your
weight over the front wheels will sometimes help.
1. Air filter case check hose
1
Page 70 of 116

7-21
1
2
3
4
5
67
8
9
10
11
If the rear wheels of your ATV start to slide side-
ways, control can usually be regained (if there is
room to do so) by steering in the direction of the
slide. Applying the brakes or accelerating is not
recommended until you have corrected the slide.
With practice, over a period of time, skill at con-
trolled sliding can be developed. The terrain
should be chosen carefully before attempting such
maneuvers, since both stability and control are re-
duced. Bear in mind that sliding maneuvers should
always be avoided on extremely slippery surfaces
such as ice, since all control may be lost.
WARNING
EWB01661
Learn to safely control skidding or sliding by
practicing at low speeds and on level, smooth
terrain.
On extremely slippery surfaces, such as ice,
go slowly and be very cautious in order to re-
duce the chance of skidding or sliding out of
control.
WHAT TO DO IF...
This section is designed to be a reference guide
only. Be sure to read each section on riding tech-
niques completely.
WHAT TO DO...
�
If your ATV doesn’t turn when you want it to:
Bring the ATV to a stop and practice the turning
maneuvers again. Be sure you are putting your
weight on the footboard to the outside of the
turn. Position your weight over the front wheels
for better control. (See page 7-12.)
�
If your ATV begins to tip while turning:
Lean more into the turn to regain balance. If nec-
essary, gradually let off the throttle and/or steer
to the outside of the turn. (See page 7-12.)
Page 76 of 116

8-5
1
2
3
4
5
6
78
9
10
11
EBU21864
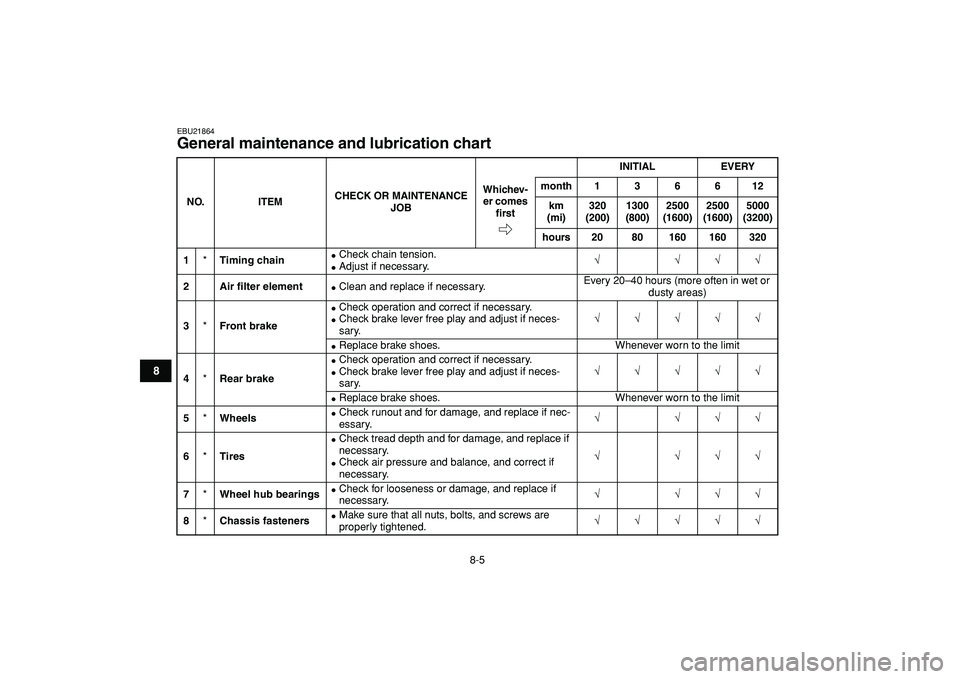
General maintenance and lubrication chart
NO. ITEMCHECK OR MAINTENANCE
JOBINITIAL EVERY
Whichev-
er comes
firstmonth 1 3 6 6 12
km
(mi)320
(200)1300
(800)2500
(1600)2500
(1600)5000
(3200)
hours 20 80 160 160 3201
*
Timing chain
�
Check chain tension.
�
Adjust if necessary.
√ √√√
2 Air filter element
�
Clean and replace if necessary.Every 20–40 hours (more often in wet or
dusty areas)
3
*
Front brake
�
Check operation and correct if necessary.
�
Check brake lever free play and adjust if neces-
sary.
√√√√√
�
Replace brake shoes. Whenever worn to the limit
4
*
Rear brake
�
Check operation and correct if necessary.
�
Check brake lever free play and adjust if neces-
sary.
√√√√√
�
Replace brake shoes. Whenever worn to the limit
5
*
Wheels
�
Check runout and for damage, and replace if nec-
essary.
√ √√√
6
*
Tires
�
Check tread depth and for damage, and replace if
necessary.
�
Check air pressure and balance, and correct if
necessary.
√ √√√
7
*
Wheel hub bearings
�
Check for looseness or damage, and replace if
necessary.
√ √√√
8
*
Chassis fasteners
�
Make sure that all nuts, bolts, and screws are
properly tightened.
√√√√√
Page 95 of 116

8-24
1
2
3
4
5
6
78
9
10
11
adjusting nut on the brake cable at the rear
wheel hub in direction (a), and to decrease it,
turn the nut in direction (b).
7. Tighten the locknut at the brake lever.
TIP
If the specified free play cannot be obtained as de-
scribed above or if the rear brake does not operate
correctly, have a Yamaha dealer check the internal
rear brake mechanism.
WARNING
EWB02080
Operating with improperly serviced or adjust-
ed brakes could cause loss of braking ability,
which could lead to an accident.
After servicing:
�
Make sure the brakes operate smoothly and
that the free play is correct.
�
Make sure the brakes do not drag.
Replacement of brake components requires
professional knowledge. These procedures
should be performed by a Yamaha dealer.
EBU24900
Checking and lubricating the cables
The operation and the condition of all control ca-
bles should be checked before each ride, and the
cables and cable ends should be lubricated if nec-
essary. If a cable is damaged or does not move
smoothly, have a Yamaha dealer check or replace
it.
1. Brake lever free play adjusting nut
1
(a)(b)
Recommended lubricant:
Engine oil
Page 96 of 116

8-25
1
2
3
4
5
6
78
9
10
11
WARNING
EWB02130
Inspect cables frequently and replace if dam-
aged. Corrosion can result when the cable
sheaths become damaged, and cables can
also become frayed or kinked, which could re-
strict the operation of controls and lead to an
accident or injury.
EBU28702
Checking and lubricating the front and
rear brake levers
The operation of the front and rear brake levers
should be checked before each ride, and the lever
pivots should be lubricated if necessary.
EBU24962
Checking the wheel hub bearings
The front and rear wheel hub bearings must be
checked at the intervals specified in the periodic
maintenance and lubrication chart. If there is play
in a wheel hub or if a wheel does not turn smoothly,
have a Yamaha dealer check the wheel hub bear-ings.
EBU28822
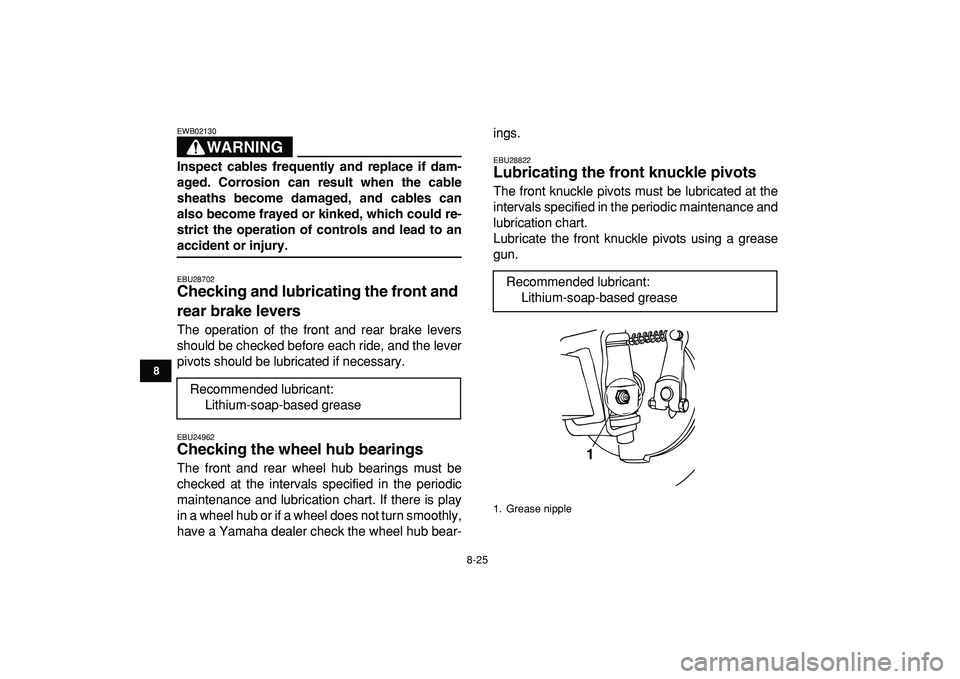
Lubricating the front knuckle pivots
The front knuckle pivots must be lubricated at the
intervals specified in the periodic maintenance and
lubrication chart.
Lubricate the front knuckle pivots using a grease
gun.
Recommended lubricant:
Lithium-soap-based grease
Recommended lubricant:
Lithium-soap-based grease
1. Grease nipple
1