Page 29 of 80

OPERATION AND IMPORTANT RIDING POINTS
5-1
5
EAU15951
Read the Owner’s Manual carefully to
become familiar with all controls. If
there is a control or function you do not
understand, ask your Yamaha dealer.
WARNING
EWA10271
Failure to familiarize yourself with
the controls can lead to loss of con-
trol, which could cause an accidentor injury.
EAU43184
Starting the engine In order for the ignition circuit cut-off
system to enable starting, one of the
following conditions must be met:�
The transmission is in the neutral
position.
�
The transmission is in gear with
the clutch lever pulled and the sid-
estand up.
See page 3-11 for more informa-
tion.
1. Turn the key to “ON”.
2. Shift the transmission into the neu-
tral position. (See page 5-2.) The
neutral indicator light should come
on. If not, ask a Yamaha dealer to
check the electrical circuit.
3. Start the engine by pushing the
start switch or by pushing the kick-
starter lever down. NOTICE: For
maximum engine life, never ac-
celerate hard when the engine is
cold!
[ECA11041]
If the engine fails to start when us-
ing the start switch, release it, wait
a few seconds, and then try again.
Each starting attempt should be as
short as possible to preserve thebattery. Do not crank the engine
more than 10 seconds on any one
attempt. If the engine does not
start with the starter motor, try us-
ing the kickstarter.
U3D9E2E0.book Page 1 Thursday, November 6, 2008 10:54 AM
Page 30 of 80

OPERATION AND IMPORTANT RIDING POINTS
5-2
5
EAU16671
Shifting Shifting gears lets you control the
amount of engine power available for
starting off, accelerating, climbing hills,
etc.
The gear positions are shown in the il-
lustration.TIPTo shift the transmission into the neu-
tral position, press the shift pedal down
repeatedly until it reaches the end of itstravel, and then slightly raise it.
NOTICE
ECA10260
�
Even with the transmission in
the neutral position, do not
coast for long periods of time
with the engine off, and do not
tow the motorcycle for long dis-
tances. The transmission is
properly lubricated only when
the engine is running. Inade-
quate lubrication may damage
the transmission.
�
Always use the clutch while
changing gears to avoid damag-
ing the engine, transmission,
and drive train, which are not
designed to withstand theshock of forced shifting.
EAU16810
Tips for reducing fuel con-
sumption Fuel consumption depends largely on
your riding style. Consider the following
tips to reduce fuel consumption:�
Shift up swiftly, and avoid high en-
gine speeds during acceleration.
�
Do not rev the engine while shifting
down, and avoid high engine
speeds with no load on the engine.
�
Turn the engine off instead of let-
ting it idle for an extended length of
time (e.g., in traffic jams, at traffic
lights or at railroad crossings).
1. Shift pedal
2. Neutral positionU3D9E2E0.book Page 2 Thursday, November 6, 2008 10:54 AM
Page 34 of 80
PERIODIC MAINTENANCE AND ADJUSTMENT
6-3
6
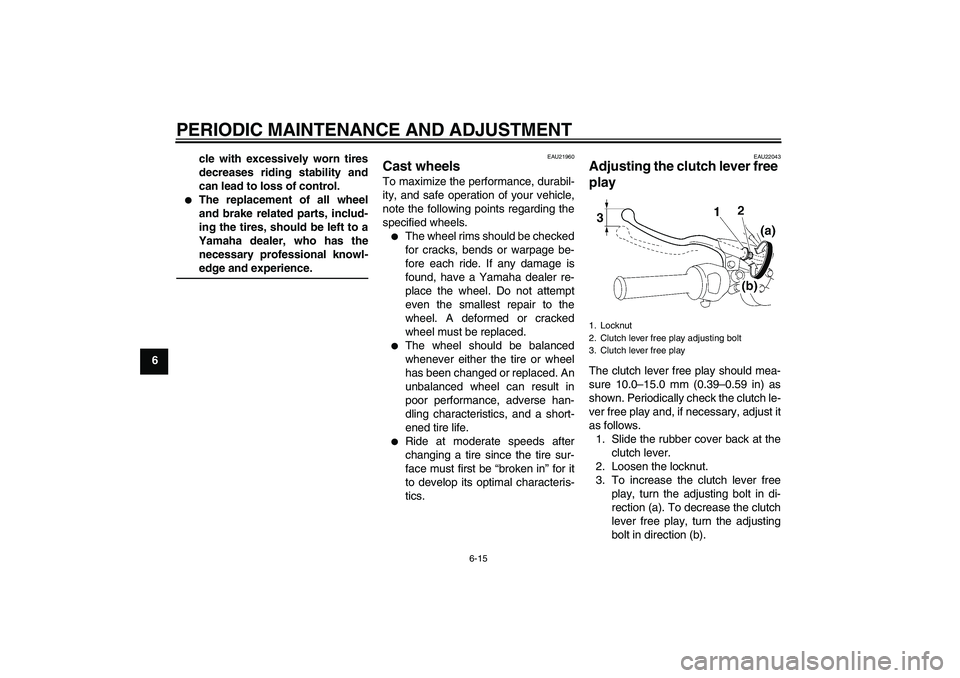
EAU17716
General maintenance and lubrication chart NO. ITEM CHECK OR MAINTENANCE JOBODOMETER READING
ANNUAL
CHECK 1000 km
(600 mi)6000 km
(3500 mi)12000 km
(7000 mi)18000 km
(10500 mi)24000 km
(14000 mi)
1 Air filter elementClean.√√
Replace.√√
2ClutchCheck operation.
Adjust.√√√√√
3*Front brakeCheck operation, fluid level and
vehicle for fluid leakage.√√√√√√
Replace brake pads. Whenever worn to the limit
4*Rear brakeCheck operation and adjust brake
pedal free play.√√√√√√
Replace brake shoes. Whenever worn to the limit
5*Brake hoseCheck for cracks or damage.√√√√√
Replace. Every 4 years
6*WheelsCheck runout and for damage.√√√√
7*TiresCheck tread depth and for dam-
age.
Replace if necessary.
Check air pressure.
Correct if necessary.√√√√√
8*Wheel bearingsCheck bearing for looseness or
damage.√√√√
9*Swingarm pivot
bushesCheck bush assemblies for loose-
ness.√√√√
Lubricate with lithium-soap-based
grease.Every 50000 km (30000 mi)
U3D9E2E0.book Page 3 Tuesday, November 11, 2008 11:07 AM
Page 41 of 80

PERIODIC MAINTENANCE AND ADJUSTMENT
6-10
6 4. Install the engine oil drain bolt, and
then tighten it to the specified
torque.
5. Refill with the specified amount of
the recommended engine oil, and
then install and tighten the engine
oil filler cap.
NOTICE
ECA11620
�
In order to prevent clutch slip-
page (since the engine oil also
lubricates the clutch), do not
mix any chemical additives. Do
not use oils with a diesel speci-
fication of “CD” or oils of a high-
er quality than specified. In
addition, do not use oils labeled
“ENERGY CONSERVING II” or
higher.
�
Make sure that no foreign mate-rial enters the crankcase.
6. Start the engine, and then let it idle
for several minutes while checking
it for oil leakage. If oil is leaking, im-
mediately turn the engine off and
check for the cause.
7. Turn the engine off, and then
check the oil level and correct it if
necessary.
EAU37122
Cleaning the air filter element The air filter element should be cleaned
at the intervals specified in the periodic
maintenance and lubrication chart.
Clean the air filter element more fre-
quently if you are riding in unusually
wet or dusty areas.
1. Remove panel A. (See page 6-6.)
2. Remove the air filter case cover by
removing the screws.
3. Remove the air filter element.
Tightening torque:
Engine oil drain bolt:
20 Nm (2.0 m·kgf, 14 ft·lbf)
Recommended engine oil:
See page 8-1.
Oil change quantity:
1.00 L (1.06 US qt, 0.88 Imp.qt)
1. Screw
2. Air filter case cover
U3D9E2E0.book Page 10 Thursday, November 6, 2008 10:54 AM
Page 46 of 80
PERIODIC MAINTENANCE AND ADJUSTMENT
6-15
6cle with excessively worn tires
decreases riding stability and
can lead to loss of control.
�
The replacement of all wheel
and brake related parts, includ-
ing the tires, should be left to a
Yamaha dealer, who has the
necessary professional knowl-edge and experience.
EAU21960
Cast wheels To maximize the performance, durabil-
ity, and safe operation of your vehicle,
note the following points regarding the
specified wheels.�
The wheel rims should be checked
for cracks, bends or warpage be-
fore each ride. If any damage is
found, have a Yamaha dealer re-
place the wheel. Do not attempt
even the smallest repair to the
wheel. A deformed or cracked
wheel must be replaced.
�
The wheel should be balanced
whenever either the tire or wheel
has been changed or replaced. An
unbalanced wheel can result in
poor performance, adverse han-
dling characteristics, and a short-
ened tire life.
�
Ride at moderate speeds after
changing a tire since the tire sur-
face must first be “broken in” for it
to develop its optimal characteris-
tics.
EAU22043
Adjusting the clutch lever free
play The clutch lever free play should mea-
sure 10.0–15.0 mm (0.39–0.59 in) as
shown. Periodically check the clutch le-
ver free play and, if necessary, adjust it
as follows.
1. Slide the rubber cover back at the
clutch lever.
2. Loosen the locknut.
3. To increase the clutch lever free
play, turn the adjusting bolt in di-
rection (a). To decrease the clutch
lever free play, turn the adjusting
bolt in direction (b).1. Locknut
2. Clutch lever free play adjusting bolt
3. Clutch lever free play
U3D9E2E0.book Page 15 Thursday, November 6, 2008 10:54 AM
Page 47 of 80
PERIODIC MAINTENANCE AND ADJUSTMENT
6-16
6
TIPIf the specified clutch lever free play
could be obtained as described above,skip steps 4–7.
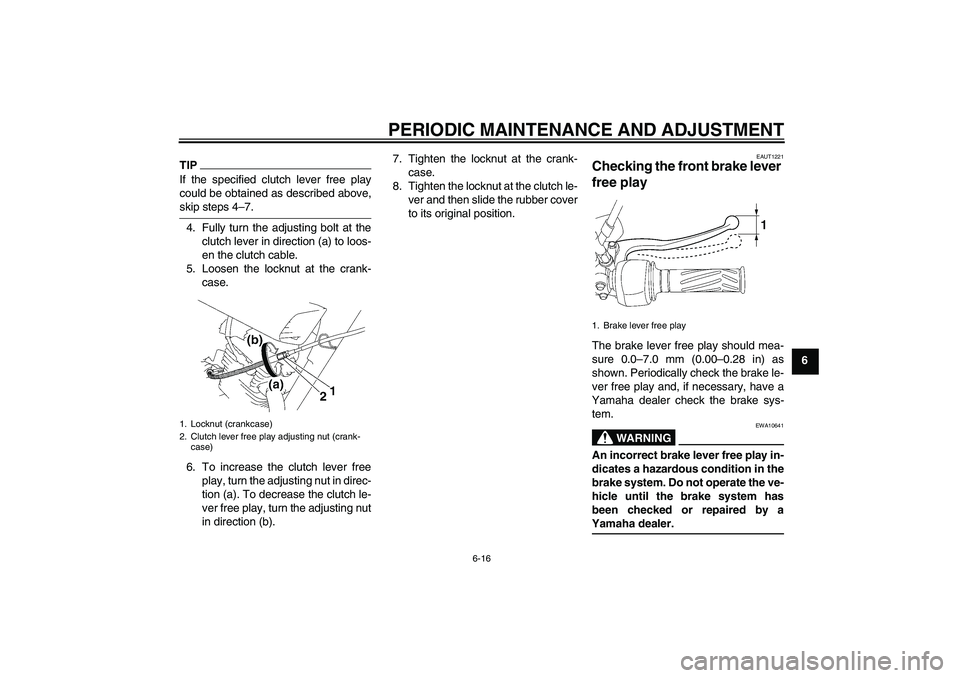
4. Fully turn the adjusting bolt at the
clutch lever in direction (a) to loos-
en the clutch cable.
5. Loosen the locknut at the crank-
case.
6. To increase the clutch lever free
play, turn the adjusting nut in direc-
tion (a). To decrease the clutch le-
ver free play, turn the adjusting nut
in direction (b).7. Tighten the locknut at the crank-
case.
8. Tighten the locknut at the clutch le-
ver and then slide the rubber cover
to its original position.
EAUT1221
Checking the front brake lever
free play The brake lever free play should mea-
sure 0.0–7.0 mm (0.00–0.28 in) as
shown. Periodically check the brake le-
ver free play and, if necessary, have a
Yamaha dealer check the brake sys-
tem.
WARNING
EWA10641
An incorrect brake lever free play in-
dicates a hazardous condition in the
brake system. Do not operate the ve-
hicle until the brake system has
been checked or repaired by aYamaha dealer.
1. Locknut (crankcase)
2. Clutch lever free play adjusting nut (crank-
case)
1. Brake lever free play
U3D9E2E0.book Page 16 Thursday, November 6, 2008 10:54 AM
Page 54 of 80
PERIODIC MAINTENANCE AND ADJUSTMENT
6-23
6
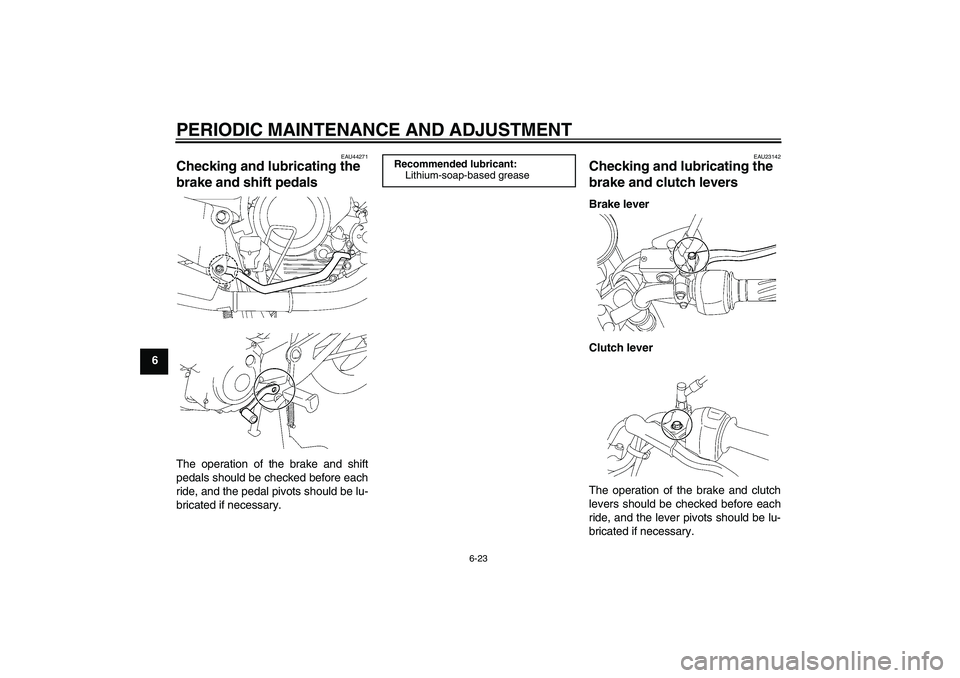
EAU44271
Checking and lubricating the
brake and shift pedals The operation of the brake and shift
pedals should be checked before each
ride, and the pedal pivots should be lu-
bricated if necessary.
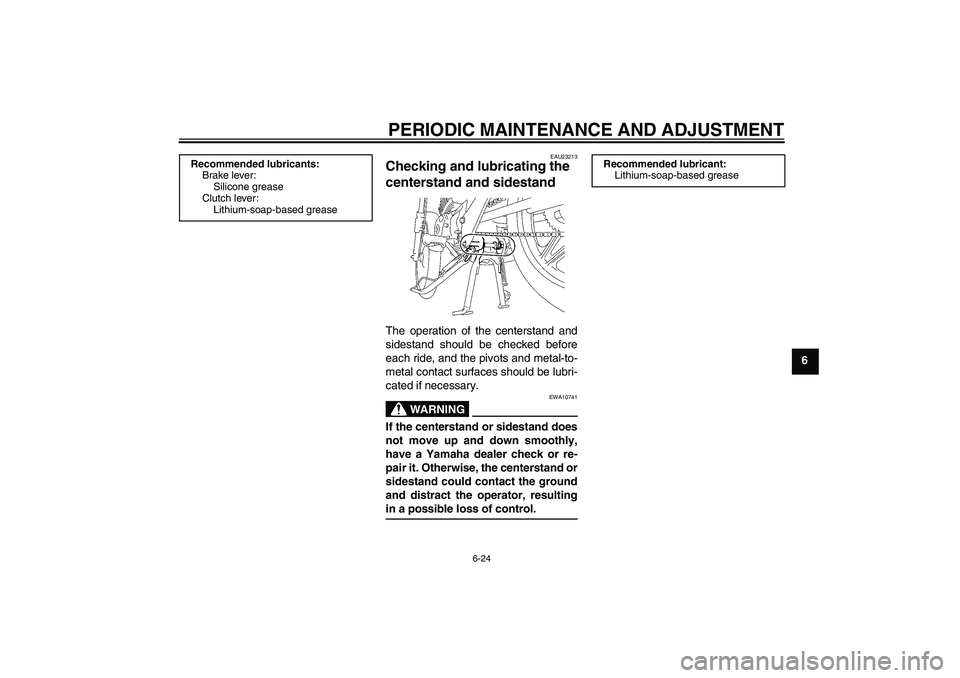
EAU23142
Checking and lubricating the
brake and clutch levers Brake lever
Clutch lever
The operation of the brake and clutch
levers should be checked before each
ride, and the lever pivots should be lu-
bricated if necessary.
Recommended lubricant:
Lithium-soap-based grease
U3D9E2E0.book Page 23 Thursday, November 6, 2008 10:54 AM
Page 55 of 80
PERIODIC MAINTENANCE AND ADJUSTMENT
6-24
6
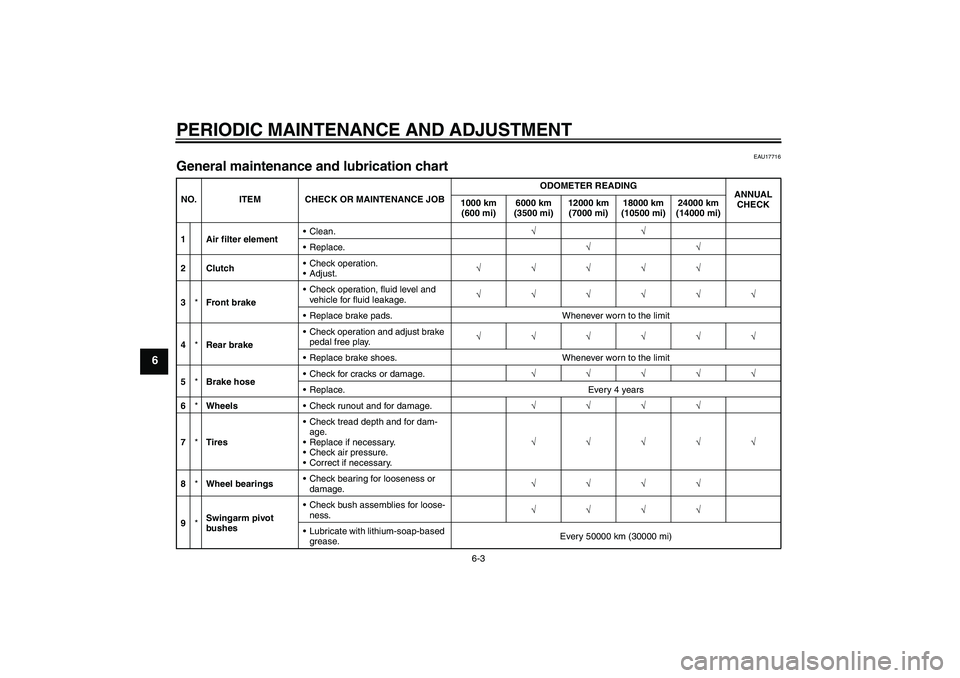
EAU23213
Checking and lubricating the
centerstand and sidestand The operation of the centerstand and
sidestand should be checked before
each ride, and the pivots and metal-to-
metal contact surfaces should be lubri-
cated if necessary.
WARNING
EWA10741
If the centerstand or sidestand does
not move up and down smoothly,
have a Yamaha dealer check or re-
pair it. Otherwise, the centerstand or
sidestand could contact the ground
and distract the operator, resultingin a possible loss of control.
Recommended lubricants:
Brake lever:
Silicone grease
Clutch lever:
Lithium-soap-based grease
Recommended lubricant:
Lithium-soap-based grease
U3D9E2E0.book Page 24 Thursday, November 6, 2008 10:54 AM