Page 40 of 82

PERIODIC MAINTENANCE AND ADJUSTMENT
6-1
6
EAU17281
Periodic inspection, adjustment, and lu-
brication will keep your vehicle in the
safest and most efficient condition pos-
sible. Safety is an obligation of the vehi-
cle owner/operator. The most important
points of vehicle inspection, adjust-
ment, and lubrication are explained on
the following pages.
The intervals given in the periodic
maintenance and lubrication chart
should be simply considered as a gen-
eral guide under normal riding condi-
tions. However, depending on the
weather, terrain, geographical location,
and individual use, the maintenance in-
tervals may need to be shortened.
WARNING
EWA10321
Failure to properly maintain the ve-
hicle or performing maintenance ac-
tivities incorrectly may increase
your risk of injury or death during
service or while using the vehicle. If
you are not familiar with vehicle ser-
vice, have a Yamaha dealer performservice.
WARNING
EWA15121
Turn off the engine when performing
maintenance unless otherwise
specified.�
A running engine has moving
parts that can catch on body
parts or clothing and electrical
parts that can cause shocks or
fires.
�
Running the engine while ser-
vicing can lead to eye injury,
burns, fire, or carbon monoxide
poisoning – possibly leading to
death. See page 1-1 for more in-
formation about carbon monox-ide.WARNING
EWA10330
This scooter is designed for use on
paved roads only. If this scooter is
operated in abnormally dusty, mud-
dy or wet conditions, the air filter el-
ement should be cleaned or
replaced more frequently, otherwise
rapid engine wear may result. Con-
sult a Yamaha dealer for propermaintenance intervals.
EAU17471
Owner’s tool kit The owner’s tool kit is located inside the
rear storage compartment. (See page
3-13.)
The service information included in this
manual and the tools provided in the
owner’s tool kit are intended to assist
you in the performance of preventive
maintenance and minor repairs. How-
ever, additional tools such as a torque
wrench may be necessary to perform
certain maintenance work correctly.TIPIf you do not have the tools or experi-
ence required for a particular job, havea Yamaha dealer perform it for you.
U16PE1E0.book Page 1 Monday, July 28, 2008 9:57 AM
Page 47 of 82

PERIODIC MAINTENANCE AND ADJUSTMENT
6-8
6 Before installing a spark plug, the spark
plug gap should be measured with a
wire thickness gauge and, if necessary,
adjusted to specification.
Clean the surface of the spark plug
gasket and its mating surface, and then
wipe off any grime from the spark plug
threads.
TIPIf a torque wrench is not available when
installing a spark plug, a good estimate
of the correct torque is 1/4–1/2 turn
past finger tight. However, the spark
plug should be tightened to the speci-fied torque as soon as possible.
EAUM2271
Engine oil The engine oil level should be checked
before each ride. In addition, the oil
must be changed at the intervals spec-
ified in the periodic maintenance and
lubrication chart and when the service
indicator light comes on.
To check the engine oil level
1. Place the scooter on the center-
stand. A slight tilt to the side can
result in a false reading.
2. Start the engine, warm it up for
several minutes, and then turn it
off.
3. Wait a few minutes until the oil set-
tles, remove the oil filler cap, wipe
the dipstick clean, insert it back
into the oil filler hole (without
screwing it in), and then remove it
again to check the oil level.TIPThe engine oil should be between theminimum and maximum level marks.
1. Spark plug gapSpark plug gap:
0.8–0.9 mm (0.031–0.035 in)
Tightening torque:
Spark plug:
12.5 Nm (1.25 m·kgf, 9.0 ft·lbf)
1
ZAUM0037
U16PE1E0.book Page 8 Monday, July 28, 2008 9:57 AM
Page 52 of 82

PERIODIC MAINTENANCE AND ADJUSTMENT
6-13
6
EAU33031
Changing the coolant
The coolant must be changed at the in-
tervals specified in the periodic mainte-
nance and lubrication chart. Have a
Yamaha dealer change the coolant.
WARNING! Never attempt to remove
the radiator cap when the engine is
hot.
[EWA10381]EAUM2242
Air filter and V-belt case air fil-
ter elements The air filter element should be re-
placed and the V-belt case air filter ele-
ment should be cleaned at the intervals
specified in the periodic maintenance
and lubrication chart. Service the air fil-
ter elements more frequently if you are
riding in unusually wet or dusty areas.
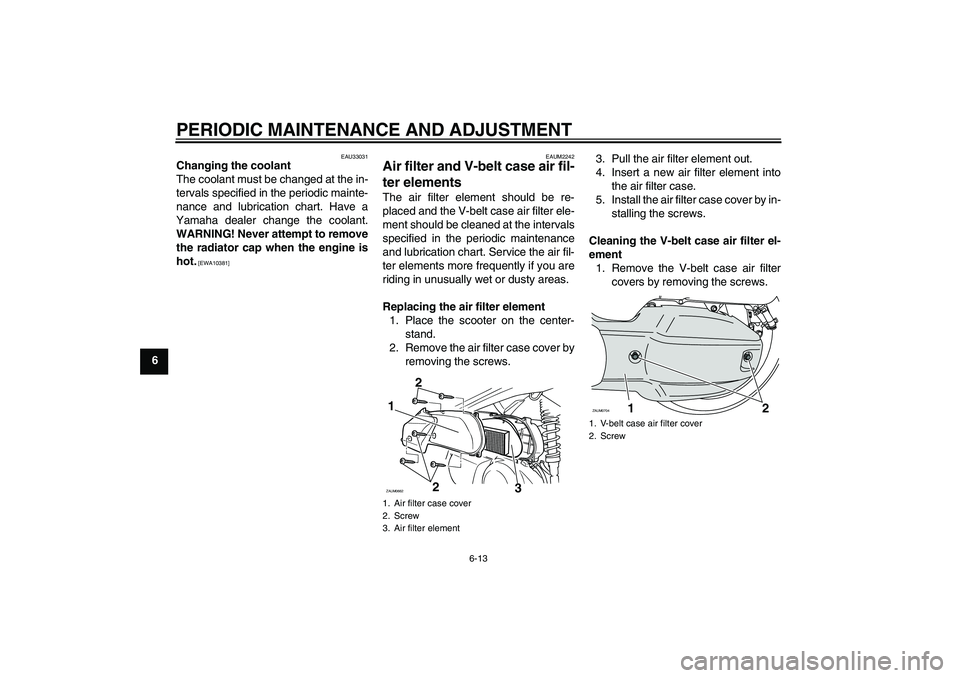
Replacing the air filter element
1. Place the scooter on the center-
stand.
2. Remove the air filter case cover by
removing the screws.3. Pull the air filter element out.
4. Insert a new air filter element into
the air filter case.
5. Install the air filter case cover by in-
stalling the screws.
Cleaning the V-belt case air filter el-
ement
1. Remove the V-belt case air filter
covers by removing the screws.1. Air filter case cover
2. Screw
3. Air filter element1
2 2ZAUM0662
3
1. V-belt case air filter cover
2. Screw
2 1
ZAUM0704
U16PE1E0.book Page 13 Monday, July 28, 2008 9:57 AM