PERIODIC MAINTENANCE AND ADJUSTMENT
6-38
2
3
4
5
67
8
9
TIP
Make sure that there is enough space
between the brake pads before install-
ing the brake caliper onto the brake
disc.
2. Insert the wheel axle.
3. Install the axle nut.
4. Lower the front wheel so that it is
on the ground.
5. Tighten the axle nut and the wheel
axle pinch bolts to their specified
torques.
6. Push down hard on the handlebar
several times to check for proper
fork operation.
EAU25080
Rear wheel
EAU45181
To remove the rear wheel
WARNING
EWA10821
To avoid injury, securely support the
vehicle so there is no danger of it
falling over.
1. Loosen the axle nut.
2. Lift the rear wheel off the ground
according to the procedure on
page 6-36.
3. Remove the axle nut and washer.
4. Loosen the locknut and drive chain
adjusting bolt on each side of the
swingarm.5. While supporting the brake caliper,
pull the wheel axle out.
Tightening torques:
Axle nut:
63 Nm (6.3 m·kgf, 45.6 ft·lbf)
Wheel axle pinch bolt:
23 Nm (2.3 m·kgf, 16.6 ft·lbf)
1. Axle nut
2. Washer
3. Drive chain slack adjusting bolt
4. Locknut
5. Brake caliper
1. Wheel axle
1
34
2
51
PERIODIC MAINTENANCE AND ADJUSTMENT
6-42
2
3
4
5
67
8
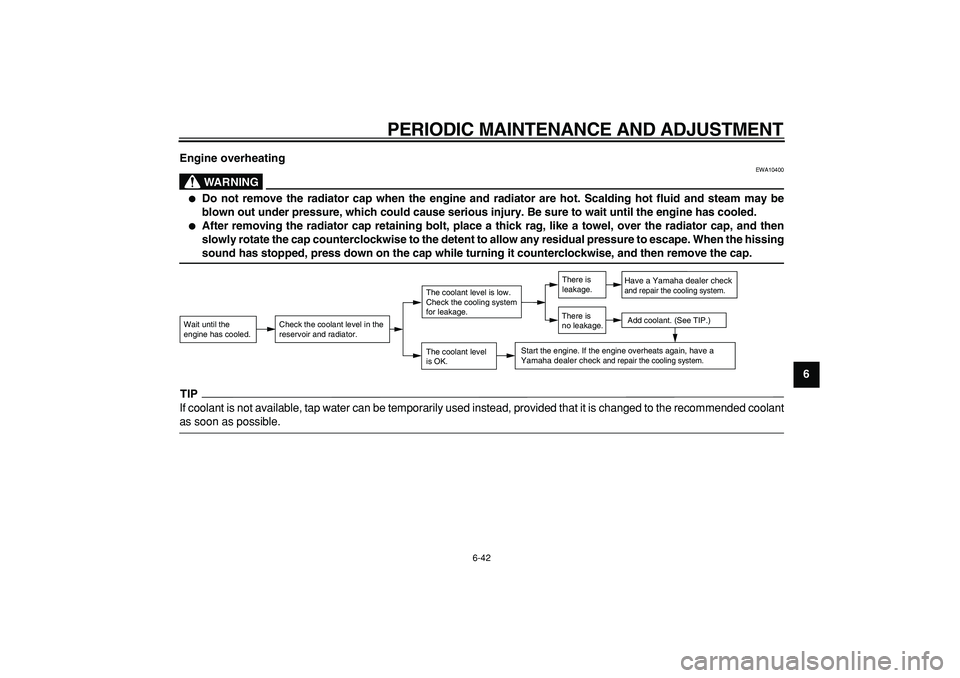
9 Engine overheating
WARNING
EWA10400
�
Do not remove the radiator cap when the engine and radiator are hot. Scalding hot fluid and steam may be
blown out under pressure, which could cause serious injury. Be sure to wait until the engine has cooled.
�
After removing the radiator cap retaining bolt, place a thick rag, like a towel, over the radiator cap, and then
slowly rotate the cap counterclockwise to the detent to allow any residual pressure to escape. When the hissing
sound has stopped, press down on the cap while turning it counterclockwise, and then remove the cap.
TIP
If coolant is not available, tap water can be temporarily used instead, provided that it is changed to the recommended coolant
as soon as possible.
Wait until the
engine has cooled.
Check the coolant level in the
reservoir and radiator.
The coolant level
is OK.The coolant level is low.
Check the cooling system
for leakage.
Have a Yamaha dealer checkand repair the cooling system.Add coolant. (See TIP.)
Start the engine. If the engine overheats again,
have a
Yamaha dealer check
and repair the cooling system.
There is
leakage.
There is
no leakage.
INDEX
A
Air filter element and check hose,
cleaning .................................................6-16
Auxiliary light bulb, replacing ...................6-36
B
Battery .....................................................6-31
Brake and clutch levers, checking and
lubricating ..............................................6-28
Brake fluid, changing ...............................6-25
Brake fluid level, checking .......................6-24
Brake lever ..............................................3-10
Brake lever free play, adjusting ...............6-22
Brake pedal .............................................3-10
Brake pedal, checking and lubricating .....6-28
C
Cables, checking and lubricating .............6-27
Care ...........................................................7-1
Catalytic converter ...................................3-13
Clutch lever ................................................3-9
Clutch lever free play, adjusting ..............6-21
Coolant ....................................................6-13
Coolant temperature warning light .............3-2
D
Dimmer switch ...........................................3-9
Drive chain, cleaning and lubricating .......6-26
Drive chain slack .....................................6-25
E
Engine break-in .........................................5-3
Engine idling speed .................................6-18
Engine oil and oil filter element ................6-10
Engine stop switch.....................................3-9
Engine trouble warning light ......................3-3
EXUP system ..........................................3-18
F
Front and rear brake pads, checking....... 6-23
Front fork, adjusting................................. 3-14
Front fork, bleeding ................................. 3-16
Front fork, checking ................................. 6-29
Fuel ......................................................... 3-11
Fuel consumption, tips for reducing .......... 5-3
Fuel level warning light .............................. 3-2
Fuel tank cap ........................................... 3-11
Fuses, replacing ...................................... 6-32
H
Handlebar switches ................................... 3-8
Headlight bulb, replacing ......................... 6-33
Helmet holder .......................................... 3-14
High beam indicator light ........................... 3-2
Horn switch................................................ 3-9
I
Identification numbers ............................... 9-1
Ignition circuit cut-off system ................... 3-19
Indicator and warning lights....................... 3-2
K
Key identification number .......................... 9-1
L
License plate light bulb, replacing ........... 6-35
M
Main switch/steering lock .......................... 3-1
Maintenance and lubrication, periodic ....... 6-3
Maintenance, emission control system ..... 6-2
Matte color, caution ................................... 7-1
Model label ................................................ 9-2
Multi-function display ................................. 3-3
N
Neutral indicator light................................. 3-2
P
Panels, removing and installing ................ 6-7
Parking ...................................................... 5-4
Part locations ............................................ 2-1
R
Rear brake light switch, adjusting ........... 6-23
Rear suspension, lubricating ................... 6-29
S
Safety information ..................................... 1-1
Seat ......................................................... 3-13
Shifting ...................................................... 5-2
Shift pedal ............................................... 3-10
Shock absorber assembly, adjusting ...... 3-17
Sidestand ................................................ 3-19
Sidestand, checking and lubricating........ 6-29
Spark plug, checking ................................. 6-9
Specifications ............................................ 8-1
Starting the engine .................................... 5-1
Start switch................................................ 3-9
Steering, checking................................... 6-30
Storage...................................................... 7-3
Supporting the motorcycle ...................... 6-36
T
Tail/brake light ......................................... 6-34
Throttle cable free play, checking ........... 6-18
Throttle grip and cable, checking and
lubricating ............................................. 6-27
Tires ........................................................ 6-19
Tool kit....................................................... 6-1
Troubleshooting ...................................... 6-39
Troubleshooting charts............................ 6-41
Turn signal indicator light .......................... 3-2
Turn signal light bulb, replacing .............. 6-35
Turn signal switch ..................................... 3-9