Page 57 of 96

PERIODIC MAINTENANCE AND ADJUSTMENT
6-13
2
3
4
5
67
8
9
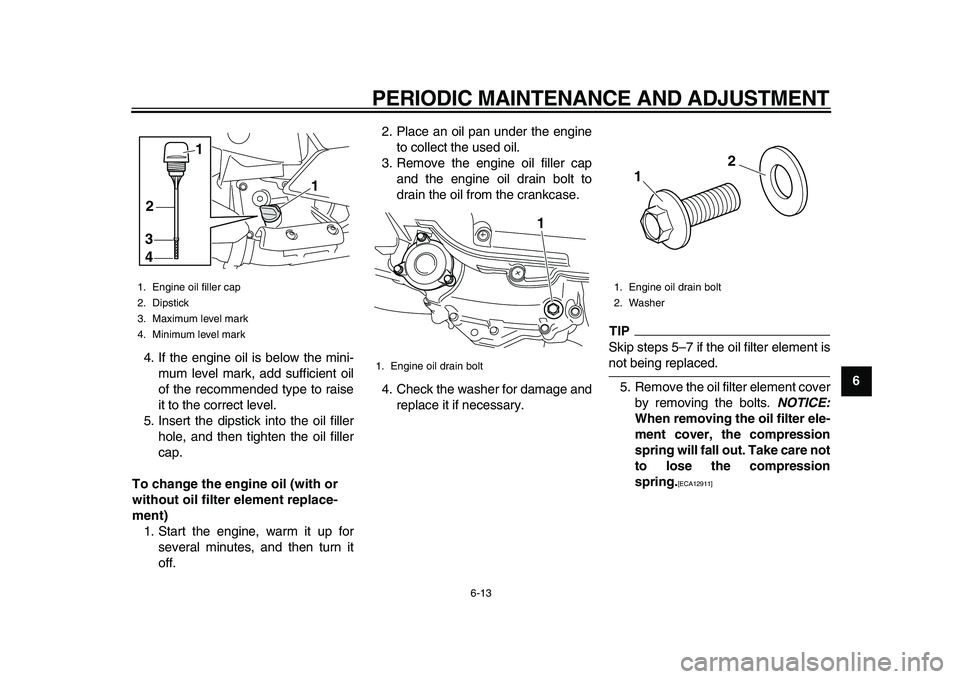
4. If the engine oil is below the mini-
mum level mark, add sufficient oil
of the recommended type to raise
it to the correct level.
5. Insert the dipstick into the oil filler
hole, and then tighten the oil filler
cap.
To change the engine oil (with or
without oil filter element replace-
ment)
1. Start the engine, warm it up for
several minutes, and then turn it
off.2. Place an oil pan under the engine
to collect the used oil.
3. Remove the engine oil filler cap
and the engine oil drain bolt to
drain the oil from the crankcase.
4. Check the washer for damage and
replace it if necessary.
TIP
Skip steps 5–7 if the oil filter element is
not being replaced.
5. Remove the oil filter element cover
by removing the bolts.
NOTICE:
When removing the oil filter ele-
ment cover, the compression
spring will fall out. Take care not
to lose the compression
spring.
[ECA12911]
1. Engine oil filler cap
2. Dipstick
3. Maximum level mark
4. Minimum level mark
1
3
4
1
2
1. Engine oil drain bolt
1
1. Engine oil drain bolt
2. Washer
2
1
Page 58 of 96

PERIODIC MAINTENANCE AND ADJUSTMENT
6-14
1
2
3
4
5
6
7
8
9
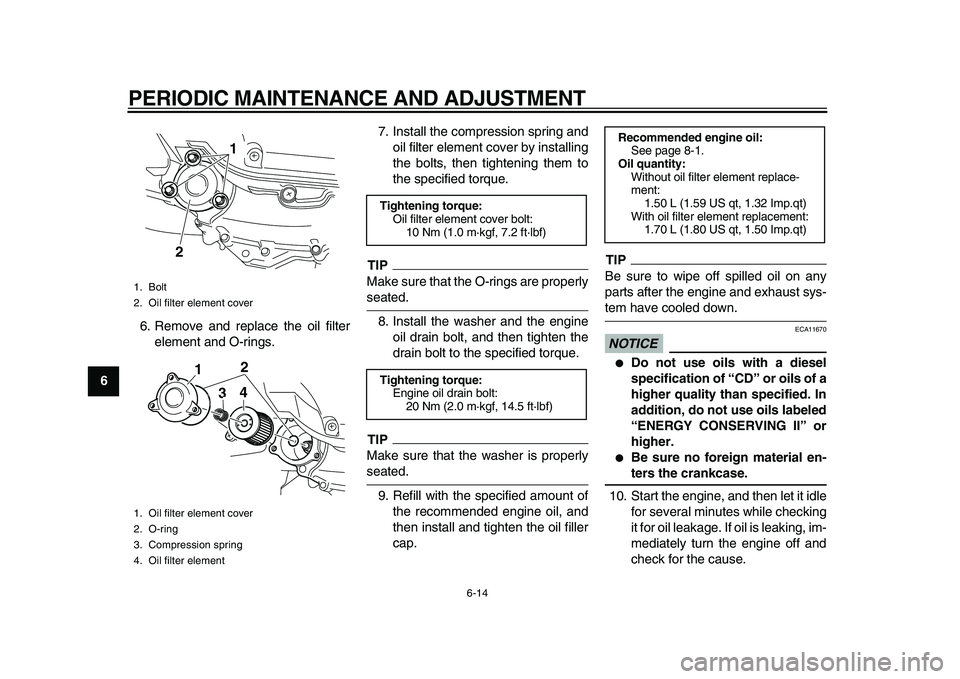
6. Remove and replace the oil filter
element and O-rings.7. Install the compression spring and
oil filter element cover by installing
the bolts, then tightening them to
the specified torque.
TIP
Make sure that the O-rings are properly
seated.
8. Install the washer and the engine
oil drain bolt, and then tighten the
drain bolt to the specified torque.
TIP
Make sure that the washer is properly
seated.
9. Refill with the specified amount of
the recommended engine oil, and
then install and tighten the oil filler
cap.
TIP
Be sure to wipe off spilled oil on any
parts after the engine and exhaust sys-
tem have cooled down.
NOTICE
ECA11670
�
Do not use oils with a diesel
specification of “CD” or oils of a
higher quality than specified. In
addition, do not use oils labeled
“ENERGY CONSERVING II” or
higher.
�
Be sure no foreign material en-
ters the crankcase.
10. Start the engine, and then let it idle
for several minutes while checking
it for oil leakage. If oil is leaking, im-
mediately turn the engine off and
check for the cause.
1. Bolt
2. Oil filter element cover
1. Oil filter element cover
2. O-ring
3. Compression spring
4. Oil filter element
21
1
2
3
4
Tightening torque:
Oil filter element cover bolt:
10 Nm (1.0 m·kgf, 7.2 ft·lbf)
Tightening torque:
Engine oil drain bolt:
20 Nm (2.0 m·kgf, 14.5 ft·lbf)
Recommended engine oil:
See page 8-1.
Oil quantity:
Without oil filter element replace-
ment:
1.50 L (1.59 US qt, 1.32 Imp.qt)
With oil filter element replacement:
1.70 L (1.80 US qt, 1.50 Imp.qt)
Page 59 of 96

PERIODIC MAINTENANCE AND ADJUSTMENT
6-15
2
3
4
5
67
8
9
11. Reset the oil change indicator ac-
cording to the following procedure.
To reset the oil change indicator
1. Turn the key to “ON”.
2. Hold the “OIL CHANGE” button
pushed for two to eight seconds.
3. Release the “OIL CHANGE” but-
ton, and the oil change indicator
will go off.
TIP
If the engine oil is changed before the
oil change indicator comes on (i.e. be-
fore the periodic oil change interval has
been reached), the indicator must be
reset after the oil change for the next
periodic oil change to be indicated atthe correct time. To reset the oil change
indicator before the periodic oil change
interval has been reached, follow the
above procedure, but note that the indi-
cator will come on for 1.4 seconds after
releasing the “OIL CHANGE” button,
otherwise repeat the procedure.
EAU20064
Final transmission oil
The final transmission case must be
checked for oil leakage before each
ride. If any leakage is found, have a
Yamaha dealer check and repair the
scooter. In addition, the final transmis-
sion oil must be changed as follows at
the intervals specified in the periodic
maintenance and lubrication chart.
1. Start the engine, warm up the final
transmission oil by riding the
scooter for several minutes, and
then stop the engine.
2. Place the scooter on the center-
stand.
3. Place an oil pan under the final
transmission case to collect the
used oil.
4. Remove the final transmission oil
filler cap and final transmission
drain bolt to drain the oil from the fi-
nal transmission case.
1.“OIL CHANGE” button
1
Page 60 of 96

PERIODIC MAINTENANCE AND ADJUSTMENT
6-16
1
2
3
4
5
6
7
8
9
5. Install the final transmission oil
drain bolt, and then tighten it to the
specified torque.
6. Refill with the specified amount of
the recommended final transmis-
sion oil, and then install and tighten
the oil filler cap.
WARNING! Make
sure that no foreign material en-
ters the final transmission case.
Make sure that no oil gets on the
tire or wheel.
[EWA11311]
7. Check the final transmission case
for oil leakage. If oil is leaking,
check for the cause.
EAU20070
Coolant
The coolant level should be checked
before each ride. In addition, the cool-
ant must be changed at the intervals
specified in the periodic maintenance
and lubrication chart.
EAU34193
To check the coolant level
1. Place the vehicle on a level sur-
face and hold it in an upright posi-
tion.
TIP
�
The coolant level must be checked
on a cold engine since the level
varies with engine temperature.
�
Make sure that the vehicle is posi-
tioned straight up when checking
the coolant level. A slight tilt to the
side can result in a false reading.
2. Pull up the right floorboard mat as
shown.
1. Final transmission oil filler cap
2. Final transmission oil drain bolt
Tightening torque:
Final transmission oil drain bolt:
20 Nm (2.0 m·kgf, 14.5 ft·lbf)
2
1
Recommended final transmission
oil:
See page 8-1.
Oil quantity:
0.25 L (0.26 US qt, 0.22 Imp.qt)