2009 YAMAHA GIGGLE50 ECU
[x] Cancel search: ECUPage 10 of 74

1-10
EAU10221
Q QQ Q
Q
SAFETY INFORMATION
1
2
3
4
5
6
7
8
9
1-3
symptoms of carbon monoxide poison-
ing, leave the area immediately, get
fresh air, and SEEK MEDICAL TREAT-
MENT.●
Do not run engine indoors. Even if
you try to ventilate engine exhaust
with fans or open windows and
doors, carbon monoxide can rap-
idly reach dangerous levels.
●
Do not run engine in poorly venti-
lated or partially enclosed areas
such as barns, garages, or car-
ports.
●
Do not run engine outdoors where
engine exhaust can be drawn into
a building through openings such
as windows and doors.
Loading
Adding accessories or cargo to your
scooter can adversely affect stability
and handling if the weight distribution of
the scooter is changed. To avoid the
possibility of an accident, use extreme
caution when adding cargo or accesso-
ries to your scooter. Use extra care whenriding a scooter that has added cargo or
accessories. Here, along with the infor-
mation about accessories below, are
some general guidelines to follow if load-
ing cargo to your scooter:
The total weight of the operator, pas-
senger, accessories and cargo must
not exceed the maximum load limit.
Operation of an overloaded vehicle
could cause an accident.
Maximum load:
177 kg (390 lb)When loading within this weight limit,
keep the following in mind:●
Cargo and accessory weight should
be kept as low and close to the
scooter as possible. Securely pack
your heaviest items as close to the
center of the vehicle as possible
and make sure to distribute the
weight as evenly as possible on
both sides of the scooter to mini-
mize imbalance or instability.
●
Shifting weights can create a sud-
den imbalance. Make sure that ac-
cessories and cargo are securely
attached to the scooter before riding.
Check accessory mounts and
cargo restraints frequently.
Properly adjust the suspension
for your load (suspension-
adjustable models only), and
check the condition and
pressure of your tires.
Never attach any large or
heavy items to the handlebar,
front fork, or front fender. Such
items can create unstable
handling or a slow steering
response.
This vehicle is not designed to
pull a trailer or to be attached to
a sidecar.
Genuine Yamaha Accessories
Choosing accessories for your vehicle
is an important decision. Genuine
Yamaha accessories, which are avail-
Page 24 of 74

3-24
1
2
3
4
5
6
7
8
9
EAU1044E
INSTRUMENT AND CONTROL FUNCTIONS
3-8
smoking, or while in the vicinity of
sparks, open flames, or other
sources of ignition such as the pi-
lot lights of water heaters and
clothes dryers.
2. Do not overfill the fuel tank. Stop
filling when the fuel reaches the
bottom of the filler tube. Because
fuel expands when it heats up, heat
from the engine or the sun can
cause fuel to spill out of the fuel
tank.
3. Wipe up any spilled fuel immedi-
ately.
NOTICE:
Immediately wipe
off spilled fuel with a clean, dry,
soft cloth, since fuel may dete-
riorate painted surfaces or plas-
tic parts.
[ECA10071]
4. Be sure to securely close the fuel
tank cap.
EWA15151
WARNING
Gasoline is poisonous and can
cause injury or death. Handle gaso-
line with care. Never siphon gasoline
by mouth. If you should swallowsome gasoline or inhale a lot of gaso-
line vapor, or get some gasoline in
your eyes, see your doctor immedi-
ately. If gasoline spills on your skin,
wash with soap and water. If gaso-
line spills on your clothing, change
your clothes.
EAU33520
Recommended fuel:
REGULAR UNLEADED GASOLINE
ONLY
Fuel tank capacity:
4.5 L (1.19 US gal) (0.99 Imp.gal)
ECA11400
NOTICEUse only unleaded gasoline. The use
of leaded gasoline will cause severe
damage to internal engine parts, such
as the valves and piston rings, as well
as to the exhaust system.Your Yamaha engine has been designed
to use regular unleaded gasoline with a
research octane number of 91 or higher.
If knocking (or pinging) occurs, use a
EAU13212
FuelZAUM00**
1
1. Fuel tank filler tubeMake sure there is sufficient gasoline
in the tank.
EWA10881
WARNING
Gasoline and gasoline vapors are
extremely flammable. To avoid fires
and explosions and to reduce the
risk of injury when refueling, follow
these instructions.1. Before refueling, turn off the engine
and be sure that no one is sitting
on the vehicle. Never refuel while Fuel
Page 26 of 74

3-26
1
2
3
4
5
6
7
8
9
EAU1044E
INSTRUMENT AND CONTROL FUNCTIONS
3-10
Kickstarter
Seat
Helmet holder
EAU13891
SeatZAUM00**To open the seat
1. Insert the key in the lock, and then
turn it as shown.
2. Fold the seat up.
To close the seat
1. Fold the seat down, and then push
it down to lock it in place.
2. Remove the key.TIP
Make sure that the seat is properly se-
cured before riding.
EAUT2041
Helmet holderZAUM00**
1
1. Helmet holderThe helmet holder is located under the
seat.
To secure a helmet to the helmet
holder
1. Open the seat. (See page 3-10.)
2. Pull the helmet holder up.
3. Attach the helmet to the helmet
holder and then push the helmet
holder down.
4. Securely close the seat. WARNING!
Never ride with a helmet attached
to the helmet holder, since the
EAU13680
KickstarterZAUM00**
1
1. KickstarterTo start the engine, fold out the
kickstarter lever, move it down lightly
with your foot until the gears engage,
and then push it down smoothly but
forcefully.
Page 27 of 74

3-27
1
2
3
4
5
6
7
8
9
EAU1044E
INSTRUMENT AND CONTROL FUNCTIONS
3-11
EAUT2470
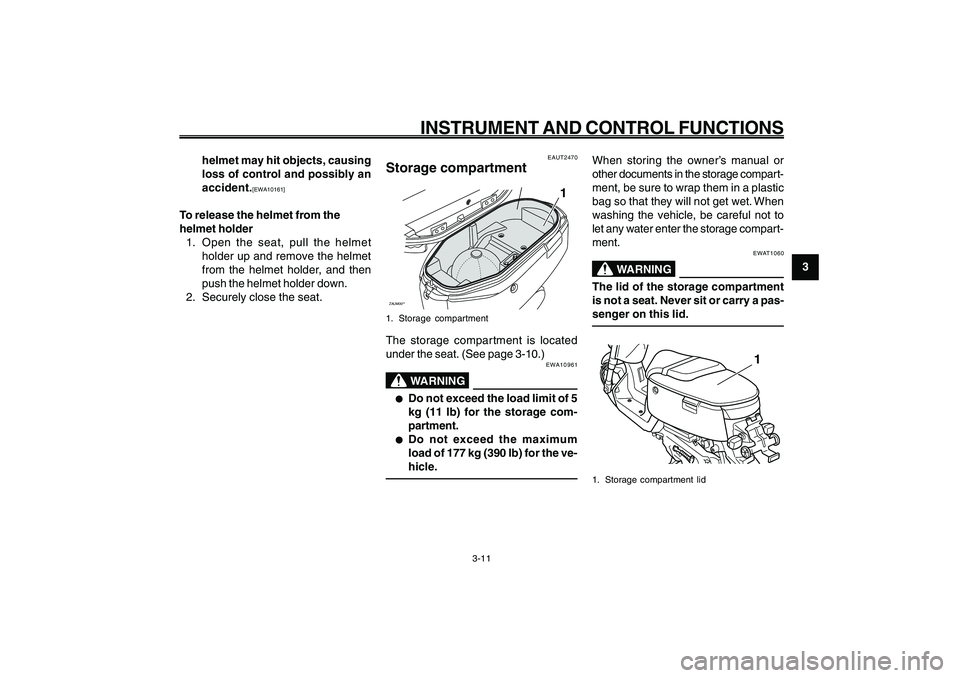
Storage compartmentZAUM00**
1
1. Storage compartmentThe storage compartment is located
under the seat. (See page 3-10.)
EWA10961
WARNING
● ●● ●
●
Do not exceed the load limit of 5
kg (11 lb) for the storage com-
partment.
● ●● ●
●
Do not exceed the maximum
load of 177 kg (390 lb) for the ve-
hicle.
Storage compar tment
When storing the owner’s manual or
other documents in the storage compart-
ment, be sure to wrap them in a plastic
bag so that they will not get wet. When
washing the vehicle, be careful not to
let any water enter the storage compart-
ment.
EWAT1060
WARNING
The lid of the storage compartment
is not a seat. Never sit or carry a pas-
senger on this lid.
1
1. Storage compartment lid
helmet may hit objects, causing
loss of control and possibly an
accident.
[EWA10161]
To release the helmet from the
helmet holder
1. Open the seat, pull the helmet
holder up and remove the helmet
from the helmet holder, and then
push the helmet holder down.
2. Securely close the seat.
Page 52 of 74

6-52
1
2
3
4
5
6
7
8
9
EAU1722A
PERIODIC MAINTENANCE AND ADJUSTMENT
6-17
Centerstand, checking and lubricating
Front fork, checking
EAU23192
Checking and lubricating the
centerstandThe operation of the centerstand should
be checked before each ride, and the
pivots and metal-to-metal contact sur-
faces should be lubricated if necessary.
EWA11301
WARNING
If the centerstand does not move up
and down smoothly, have a Yamaha
dealer check or repair it. Otherwise,
the centerstand could contact the
ground and distract the operator, re-
sulting in a possible loss of control.Recommended lubricant:
Lithium-soap-based grease
EAU23272
Checking the front forkThe condition and operation of the front
fork must be checked as follows at the
intervals specified in the periodic main-
tenance and lubrication chart.
To check the condition
Check the inner tubes for scratches,
damage and excessive oil leakage.
To check the operation
1. Place the vehicle on a level sur-
face and hold it in an upright posi-
tion. WARNING! To avoid injury,
securely support the vehicle so
there is no danger of it falling
over.
[EWA10751]
2. While applying the front brake, push
down hard on the handlebars sev-
eral times to check if the front fork
compresses and rebounds
smoothly.
ZAUM00**
ECA10590
NOTICEIf any damage is found or the front
fork does not operate smoothly, have
a Yamaha dealer check or repair it.
Page 53 of 74

6-53
1
2
3
4
5
6
7
8
9
EAU1722A
PERIODIC MAINTENANCE AND ADJUSTMENT
6-18
Steering, checking
Wheel bearings, checking
EAU45511
Checking the steeringWorn or loose steering bearings may
cause danger. Therefore, the operation
of the steering must be checked as fol-
lows at the intervals specified in the
periodic maintenance and lubrication
chart.
1. Place the vehicle on the
centerstand. WARNING! To avoid
injury, securely support the ve-
hicle so there is no danger of it
falling over.
[EWA10751]
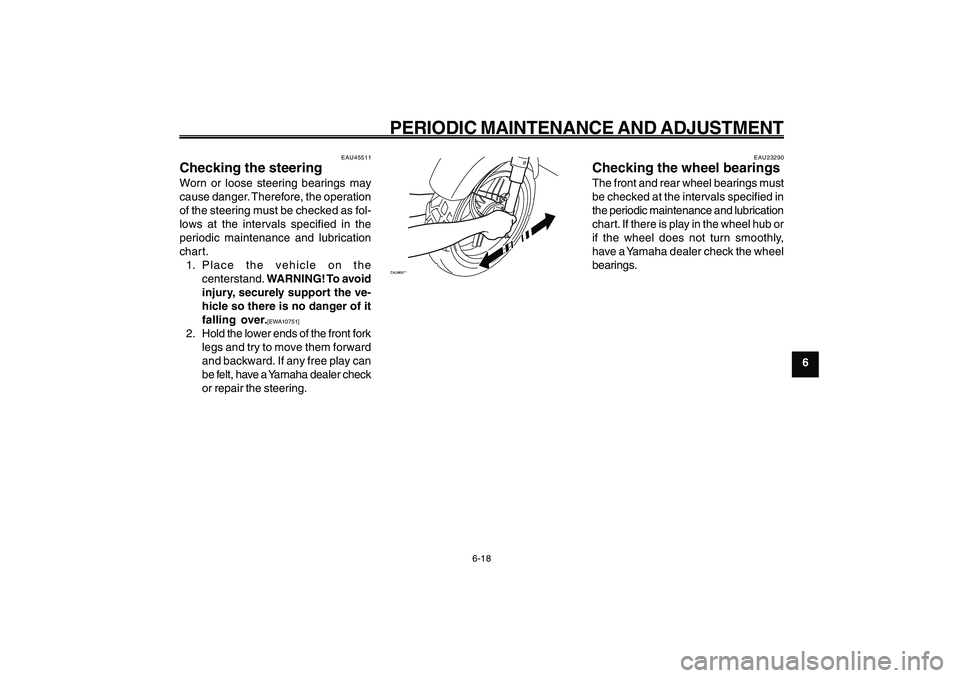
2. Hold the lower ends of the front fork
legs and try to move them forward
and backward. If any free play can
be felt, have a Yamaha dealer check
or repair the steering.
ZAUM00**
EAU23290
Checking the wheel bearingsThe front and rear wheel bearings must
be checked at the intervals specified in
the periodic maintenance and lubrication
chart. If there is play in the wheel hub or
if the wheel does not turn smoothly,
have a Yamaha dealer check the wheel
bearings.
Page 56 of 74

6-56
1
2
3
4
5
6
7
8
9
EAU1722A
PERIODIC MAINTENANCE AND ADJUSTMENT
6-21
1. Remove the headlight unit by re-
moving the screws.ZAUM00**1
2(✕2)
1. Headlight unit
2. Screw2. Disconnect the headlight coupler,
and then remove the bulb cover.ZAUM00**
2
1
1. Headlight coupler
2. Bulb cover
3. Remove the headlight bulb holder
by turning it counterclockwise, and
then remove the burnt-out bulb.ZAUM00**
1
1. Headlight bulb holder4. Place a new headlight bulb into po-
sition, and then secure it with the
bulb holder.
5. Install the headlight bulb cover, and
then connect the coupler.
6. Install the headlight unit by install-
ing the screws.
7. Have a Yamaha dealer adjust the
headlight beam if necessary. Headlight bulb, replacing
EAU23782
Replacing the headlight bulbThis model is equipped with a quartz
bulb headlight. If the headlight bulb burns
out, replace it as follows.
ECA10660
NOTICEDo not touch the glass part of the
headlight bulb to keep it free from oil,
otherwise the transparency of the
glass, the luminosity of the bulb, and
the bulb life will be adversely affected.
Thoroughly clean off any dirt and fin-
gerprints on the headlight bulb us-
ing a cloth moistened with alcohol
or thinner.