Page 64 of 98

Operation
57
EJU37181Shifting
WARNING
EWJ01230
�Do not use the reverse function to slow
down or stop the watercraft as it could
cause you to lose control, be ejected, or
impact the handlebars.
�Make sure that there are no obstacles or
people behind you before shifting into
reverse.
�Do not touch the reverse gate while the
shift lever is being operated, otherwise
you could be pinched.
To shift into reverse:
(1) Release the throttle lever and let the en-
gine speed return to idle.
(2) Pull the shift lever toward you.
To shift into forward:
(1) Release the throttle lever and let the en-
gine speed return to idle.(2) Push the shift lever away from you.
EJU32882Leaving the watercraft
If leaving the watercraft, select the lock mode
of the Yamaha Security System and remove
the engine shut-off cord (lanyard) to reduce
the chance of accidental starting or unautho-
rized use by children or others. (See page 33
for Yamaha Security System lock and unlock
mode selection procedures.)
UF2C70E0.book Page 57 Monday, November 3, 2008 10:16 AM
Page 68 of 98
 Swim to the rear of the watercraft and
place both hands on the boarding plat-
form, pull yourself up, and then grasp the
reboarding grip with one hand.
(2) Pul")
Operation
61
EJU37460Boarding alone
(1) Swim to the rear of the watercraft and
place both hands on the boarding plat-
form, pull yourself up, and then grasp the
reboarding grip with one hand.
(2) Pull yourself up to a kneeling position on
the platform, and then move to the seat
and sit astride.(3) Attach the engine shut-off cord (lanyard)
to your left wrist, and then attach the clip
to the engine shut-off switch.
(4) Grip the handlebars with both hands,
place both feet on the floor of the footwell,
start the engine, and then look in all direc-
tions before starting off.
TIP:
This watercraft is equipped with a reboarding
step, which you can lower to make reboarding
easier. The step returns automatically to the
up position after you have boarded.
EJU33164Boarding with passengers
WARNING
EWJ00660
Severe internal injuries can occur if water
is forced into body cavities as a result of
being near the jet thrust nozzle. Do not ap-
ply throttle until the passengers are seated
with their feet on the floor of the footwell
and are securely holding on to the person
in front of them or to the handgrip provid-
ed.
TIP:
The heavier the total weight of the operator
and passengers, the more difficult it will be to
balance the watercraft. Do not operate the
watercraft when the total weight exceeds 240
kg (530 lb) including any cargo.
UF2C70E0.book Page 61 Monday, November 3, 2008 10:16 AM
Page 69 of 98
 Climb on board as noted in the previous
section, and sit astride the seat.
(2) Attach the engine shut-off cord (lanyard)
to your left wrist, and then attach the clip
to the engine shu")
Operation
62
(1) Climb on board as noted in the previous
section, and sit astride the seat.
(2) Attach the engine shut-off cord (lanyard)
to your left wrist, and then attach the clip
to the engine shut-off switch.
(3) Have the passengers move to the rear of
the watercraft.
(4) Have a passenger board and sit astride
the seat. If a second passenger is board-
ing, have him or her follow the same pro-
cedure. When a passenger is boarding,both the passengers and the operator
should try to balance the watercraft.
(5) Check that the passengers have their
feet on the floor of the footwell and are
securely holding on to the person in front
of them or to the handgrip provided. Nev-
er allow a passenger to ride in front of the
operator.
(6) Start the engine, look in all directions, and
then accelerate to planing speed.
To board when it is difficult to balance the wa-
tercraft at a standstill:
(1) While the passengers are steadying the
watercraft, pull yourself up onto the
boarding platform into a kneeling posi-
UF2C70E0.book Page 62 Monday, November 3, 2008 10:16 AM
Page 75 of 98
 Flush the cooling system to prevent it
from clogging with salt, sand, or dirt. (See
page 69 for flushing procedures.)
(6) Rinse the engine and engine compart-
ment with a small amount")
Operation
68
(5) Flush the cooling system to prevent it
from clogging with salt, sand, or dirt. (See
page 69 for flushing procedures.)
(6) Rinse the engine and engine compart-
ment with a small amount of water.
NOTICE: Do not use high-pressure
water when rinsing the engine or en-
gine compartment as severe engine
damage could result.
[ECJ00571]
(7) Wipe the engine and engine compart-
ment dry with a clean cloth (repeat step 3,
if necessary).
(8) Wipe the hull, handlebars, and jet unit dry
with a clean cloth.
(9) Spray a rust inhibitor on metallic parts to
minimize corrosion.
(10) Allow the engine compartment to air dry
completely before installing the seats.
EJU33462
Transporting
Before putting the watercraft on a trailer or
transporting it, be sure to put the shift lever in
the forward position. When transporting the
watercraft on a trailer, secure the tie downs to
the trailer through the bow eye and stern
eyes. NOTICE: Do not attach ropes or tie
downs to any part of the watercraft other
than the bow eye and stern eyes to secure
the watercraft to the trailer. Otherwise, the
watercraft may be damaged. Wrap the
ropes or tie downs with towels or rags
where they touch the body of the water-
craft to avoid scratches or damage. Do not
transport the watercraft with the shift lever
in the reverse position. Otherwise, the re-
verse gate may hit an obstacle, which
could cause damage.
[ECJ00642]
UF2C70E0.book Page 68 Monday, November 3, 2008 10:16 AM
Page 76 of 98

Maintenance and care
69
EJU33490
Storage
WARNING
EWJ00330
Always place the watercraft upright in a
horizontal position when storing it, other-
wise fuel could leak out into the engine or
engine compartment, which could create a
fire hazard.
Storage for long periods of time, such as win-
ter storage, requires preventive maintenance
to ensure against deterioration. It is advisable
to have the watercraft serviced by a Yamaha
dealer prior to storage. However, the following
procedures can be performed by the owner.
EJU37570Flushing the cooling system
Flushing the cooling system is essential to
prevent it from clogging with salt, sand, or dirt.
(1) Place the watercraft in a horizontal posi-
tion.
(2) Remove the rear seat and watertight
compartment. (See page 24 for seat re-
moval and installation procedures.)
(3) Remove the flushing hose connector
cap, and then insert the garden hose
adapter into the flushing hose connector
and turn it until it is securely connected.(4) Connect the garden hose adapter to a
water tap using a garden hose.
TIP:
A garden hose is not included.
(5) Start the engine, and then immediately
turn the water supply on until water flows
out continually from the jet thrust nozzle.
NOTICE: Do not run the engine for
more than 15 seconds without supply-
ing water or over 4000 r/min on land,
otherwise the engine could overheat.
[ECJ01050]
TIP:
If you will be storing the watercraft for a pro-
longed period, such as winter storage, top off
the fuel tank with fresh gasoline and add fuel
stabilizer and conditioner to the fuel tank ac-
cording to the manufacturer’s instruction be-
fore starting the engine.
(6) Run the engine at idling speed for about
3 minutes watching the engine condition.
If the engine stops while flushing, turn the
water supply off immediately and repeat
the above steps. NOTICE: Do not sup-
ply water to the cooling water passag-
es when the engine is not running. The
water could flow back through the
muffler into the engine, causing se-
vere engine damage.
[ECJ00122]
(7) Turn the water supply off, and then force
the remaining water out of the cooling
1Flushing hose connector cap
2Garden hose adapter
3Flushing hose connector
1
3 2
UF2C70E0.book Page 69 Monday, November 3, 2008 10:16 AM
Page 84 of 98
 Remove the spark plug.
Measure th")
Maintenance and care
77
TIP:
If removing the spark plug cap nearest the
stern, remove the plastic tie that is securing
the wiring harness before removing the cap.
(4) Remove the spark plug.
Measure the spark plug gap with a wire
thickness gauge. Replace the spark plug
or adjust the gap to specification if neces-
sary.
To install a spark plug:
(1) Clean the gasket surface.
(2) Wipe any dirt from the threads of the
spark plug.(3) Install the spark plug, and then tighten it
to the specified torque.
TIP:
If a torque wrench is not available when you
are installing a spark plug, a good estimate of
the correct torque is 1/4 turn to 1/2 turn past
finger tight using the spark plug wrench in-
cluded in the tool kit. Have the spark plug ad-
justed to the correct torque with a torque
wrench as soon as possible.
(4) Wipe off any water on the spark plug or
inside the spark plug cap, and then install
the cap. Push the spark plug cap down
until it is securely installed, and then in-
stall the spark plug cap bolts and tighten
them to the specified torque.
If the spark plug cap nearest the stern
was removed, secure the wiring harness
by installing the plastic tie after installing
the cap.
(5) Install the engine cover and engine cover
screws, and then install the seats.
EJU37490Lubrication points
To keep moving parts sliding or rotating
smoothly, coat them with water-resistant
grease.
1Spark plug cap bolt
2Spark plug cap
3Plastic tie
1Spark plug gap
Spark plug gap:
0.8–0.9 mm (0.031–0.035 in)
1
2
3
Spark plug tightening torque:
24.5 Nm (2.50 kgf-m, 18.1 ft-lb)
Spark plug cap bolt tightening torque:
7.6 Nm (0.77 kgf-m, 5.6 ft-lb)
Recommended water-resistant grease:
Yamaha Marine Grease/Yamaha
Grease A
UF2C70E0.book Page 77 Monday, November 3, 2008 10:16 AM
Page 85 of 98
Maintenance and care
78
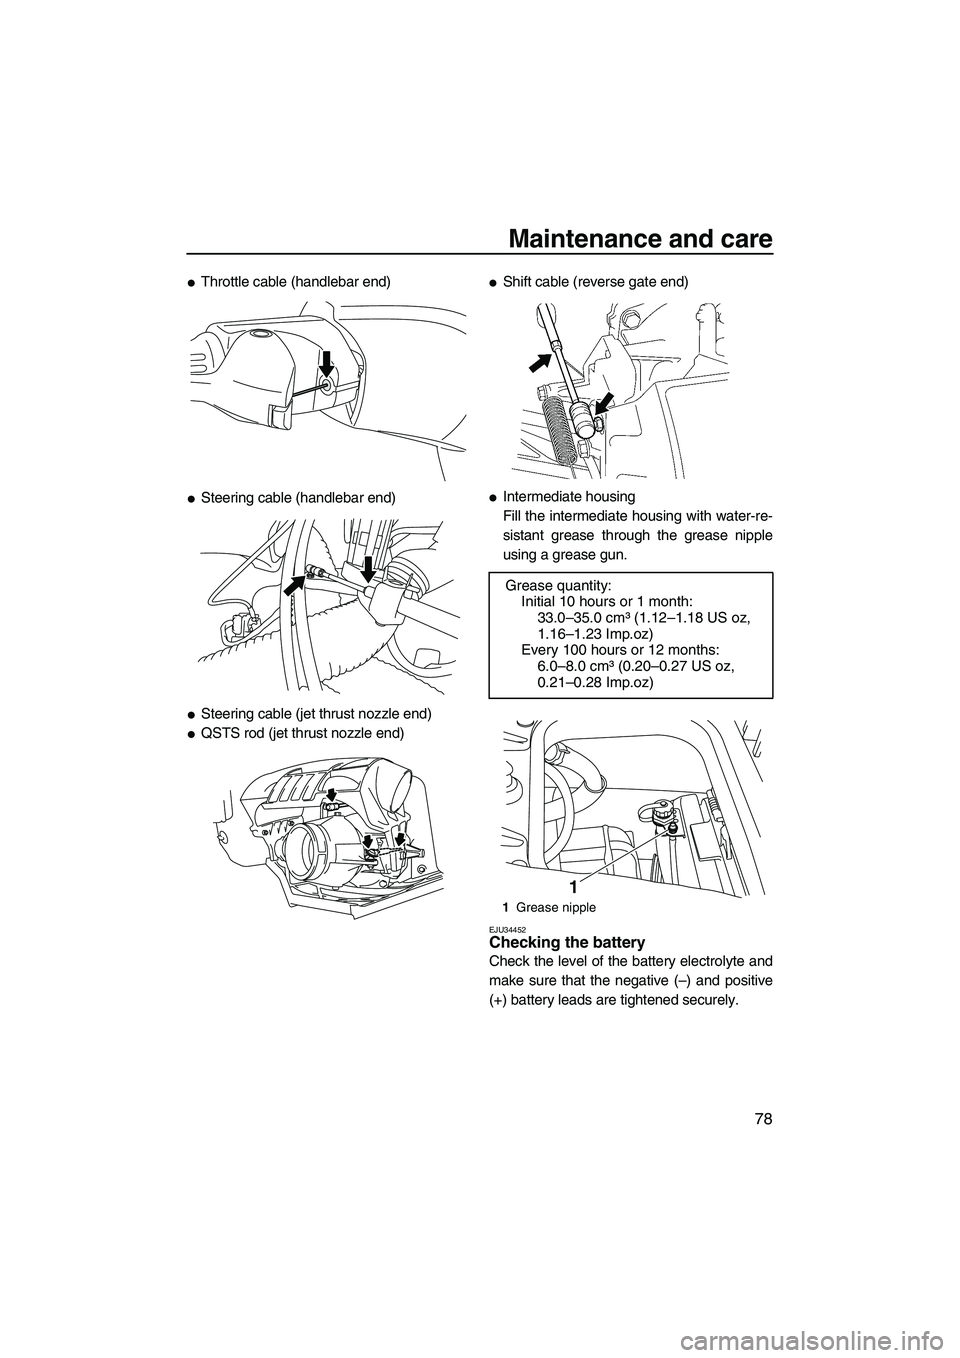
�Throttle cable (handlebar end)
�Steering cable (handlebar end)
�Steering cable (jet thrust nozzle end)
�QSTS rod (jet thrust nozzle end)
�Shift cable (reverse gate end)
�Intermediate housing
Fill the intermediate housing with water-re-
sistant grease through the grease nipple
using a grease gun.
EJU34452Checking the battery
Check the level of the battery electrolyte and
make sure that the negative (–) and positive
(+) battery leads are tightened securely.
Grease quantity:
Initial 10 hours or 1 month:
33.0–35.0 cm³ (1.12–1.18 US oz,
1.16–1.23 Imp.oz)
Every 100 hours or 12 months:
6.0–8.0 cm³ (0.20–0.27 US oz,
0.21–0.28 Imp.oz)
1Grease nipple
1
UF2C70E0.book Page 78 Monday, November 3, 2008 10:16 AM
Page 87 of 98
Maintenance and care
80
(3) Secure the battery in place. WARNING!
Fire or explosion could result if the
breather hose is damaged, obstruct-
ed, or not connected properly.
[EWJ00451]
EJU34491
Fuel injection system
If the fuel injection system is malfunctioning,
have a Yamaha dealer service the watercraft.
EJU37500Checking the trolling speed
(1) Place the watercraft in the water.
(2) Start the engine and warm it up. Use the
tachometer in the dual analog meter unit
to check the trolling speed.
If the trolling speed is out of specification,
have a Yamaha dealer service the watercraft.
1Negative (–) battery terminal: Black lead
2Positive (+) battery terminal: Red lead
3Breather hose
Trolling speed:
1250 ±100 r/min
12
3
UF2C70E0.book Page 80 Monday, November 3, 2008 10:16 AM
![YAMAHA FZS 2009 Owners Manual Maintenance and care
80
(3) Secure the battery in place. WARNING!
Fire or explosion could result if the
breather hose is damaged, obstruct-
ed, or not connected properly.
[EWJ00451]
EJU34491
Fuel inj](/manual-img/51/50223/w960_50223-86.png "YAMAHA FZS 2009 Owners Manual Maintenance and care
80
(3) Secure the battery in place. WARNING!
Fire or explosion could result if the
breather hose is damaged, obstruct-
ed, or not connected properly.
[EWJ00451]
EJU34491
Fuel inj")