Page 59 of 104
PERIODIC MAINTENANCE AND ADJUSTMENT
6-10
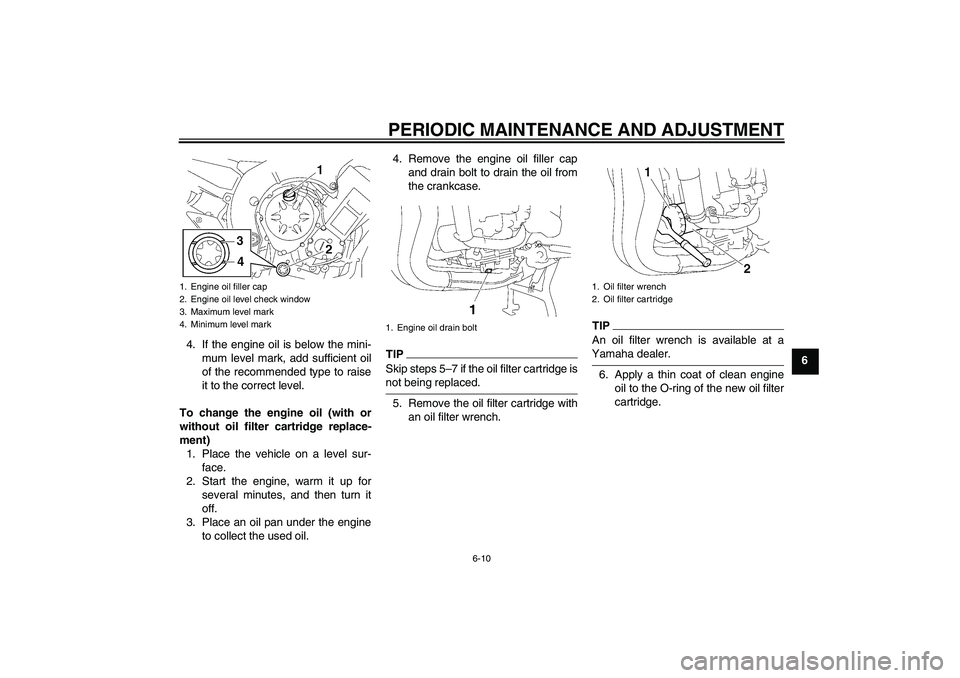
6 4. If the engine oil is below the mini-
mum level mark, add sufficient oil
of the recommended type to raise
it to the correct level.
To change the engine oil (with or
without oil filter cartridge replace-
ment)
1. Place the vehicle on a level sur-
face.
2. Start the engine, warm it up for
several minutes, and then turn it
off.
3. Place an oil pan under the engine
to collect the used oil.4. Remove the engine oil filler cap
and drain bolt to drain the oil from
the crankcase.
TIPSkip steps 5–7 if the oil filter cartridge isnot being replaced.
5. Remove the oil filter cartridge with
an oil filter wrench.
TIPAn oil filter wrench is available at aYamaha dealer.
6. Apply a thin coat of clean engine
oil to the O-ring of the new oil filter
cartridge.
1. Engine oil filler cap
2. Engine oil level check window
3. Maximum level mark
4. Minimum level mark
1. Engine oil drain bolt
1. Oil filter wrench
2. Oil filter cartridge
U3C3E3E0.book Page 10 Thursday, July 10, 2008 2:03 PM
Page 61 of 104
PERIODIC MAINTENANCE AND ADJUSTMENT
6-12
6 10. Start the engine, and then let it idle
for several minutes while checking
it for oil leakage. If oil is leaking, im-
mediately turn the engine off and
check for the cause.
TIPAfter the engine is started, the engine
oil level warning light should go off if theoil level is sufficient.NOTICE
ECA10400
If the oil level warning light flickers
or remains on, immediately turn the
engine off and have a Yamaha dealercheck the vehicle.11. Turn the engine off, and then
check the oil level and correct it if
necessary.
EAU20070
Coolant The coolant level should be checked
before each ride. In addition, the cool-
ant must be changed at the intervals
specified in the periodic maintenance
and lubrication chart.
EAU40042
To check the coolant level
1. Place the vehicle on the center-
stand.TIP�
The coolant level must be checked
on a cold engine since the level
varies with engine temperature.
�
Make sure that the vehicle is posi-
tioned straight up when checking
the coolant level. A slight tilt to the
side can result in an incorrectreading.
2. Check the coolant level in the cool-
ant reservoir.
TIPThe coolant should be between theminimum and maximum level marks.
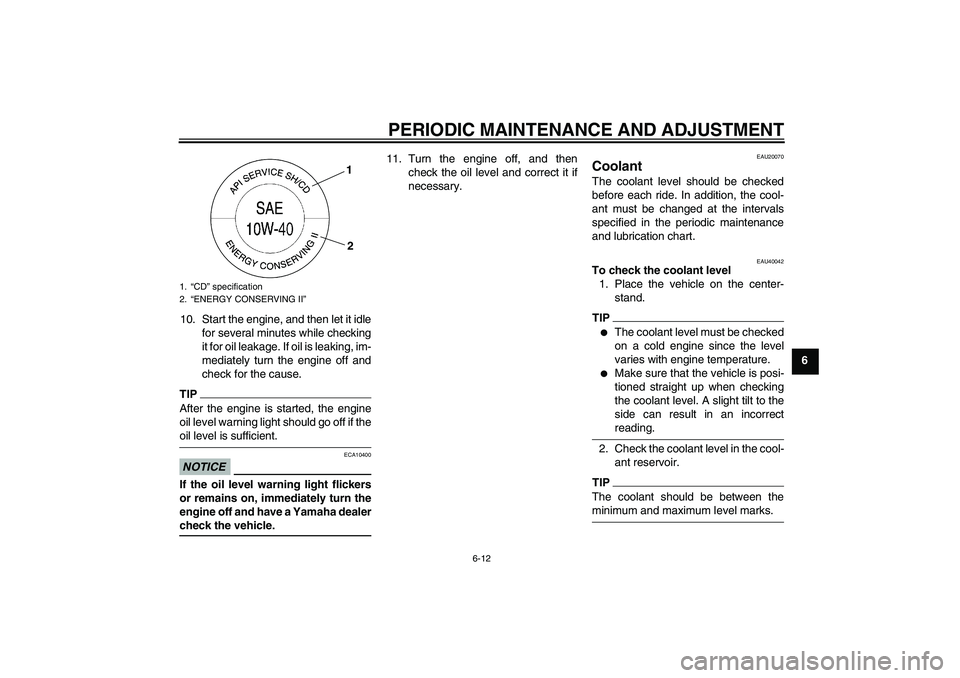
1.“CD” specification
2.“ENERGY CONSERVING II”
1
2
U3C3E3E0.book Page 12 Thursday, July 10, 2008 2:03 PM
Page 62 of 104
PERIODIC MAINTENANCE AND ADJUSTMENT
6-13
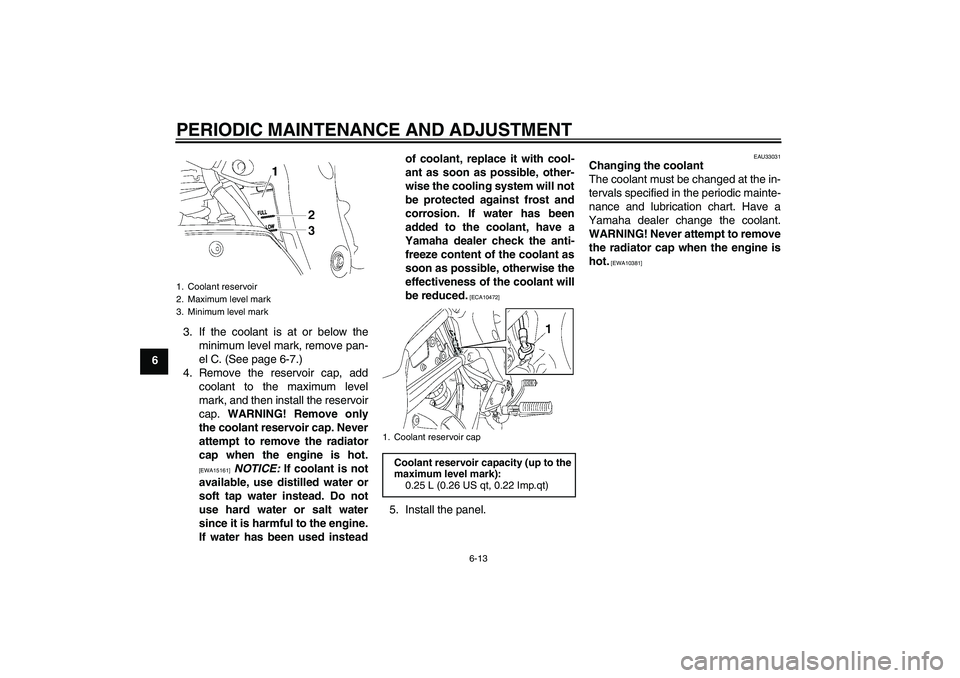
63. If the coolant is at or below the
minimum level mark, remove pan-
el C. (See page 6-7.)
4. Remove the reservoir cap, add
coolant to the maximum level
mark, and then install the reservoir
cap. WARNING! Remove only
the coolant reservoir cap. Never
attempt to remove the radiator
cap when the engine is hot.
[EWA15161]
NOTICE: If coolant is not
available, use distilled water or
soft tap water instead. Do not
use hard water or salt water
since it is harmful to the engine.
If water has been used insteadof coolant, replace it with cool-
ant as soon as possible, other-
wise the cooling system will not
be protected against frost and
corrosion. If water has been
added to the coolant, have a
Yamaha dealer check the anti-
freeze content of the coolant as
soon as possible, otherwise the
effectiveness of the coolant will
be reduced.
[ECA10472]
5. Install the panel.
EAU33031
Changing the coolant
The coolant must be changed at the in-
tervals specified in the periodic mainte-
nance and lubrication chart. Have a
Yamaha dealer change the coolant.
WARNING! Never attempt to remove
the radiator cap when the engine is
hot.
[EWA10381]
1. Coolant reservoir
2. Maximum level mark
3. Minimum level mark
1. Coolant reservoir capCoolant reservoir capacity (up to the
maximum level mark):
0.25 L (0.26 US qt, 0.22 Imp.qt)
U3C3E3E0.book Page 13 Thursday, July 10, 2008 2:03 PM
Page 65 of 104
PERIODIC MAINTENANCE AND ADJUSTMENT
6-16
6 14. Install the rider seat.
EAU34301
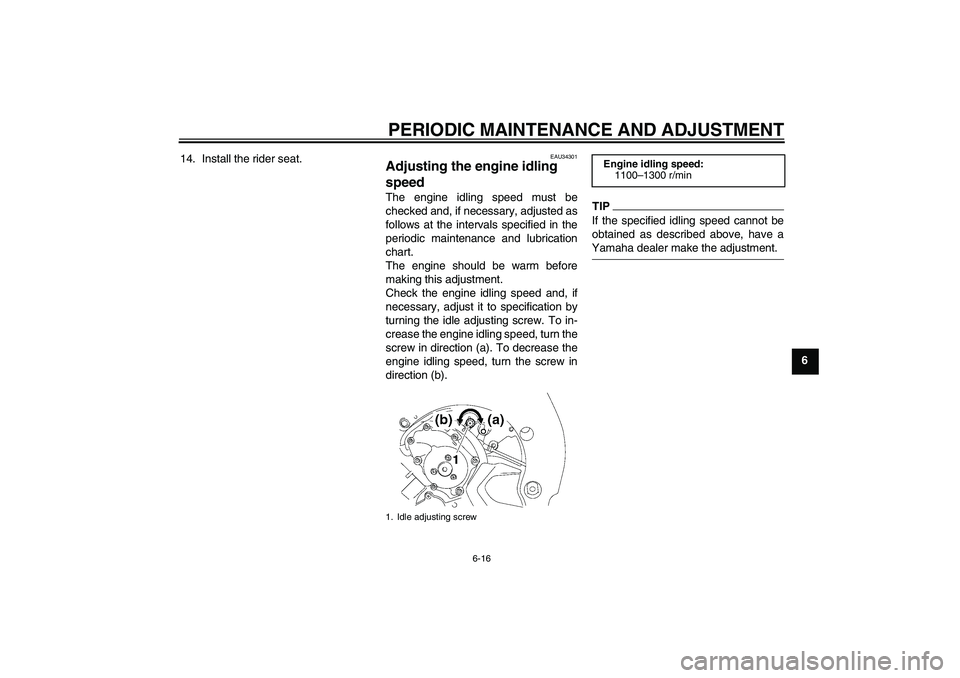
Adjusting the engine idling
speed The engine idling speed must be
checked and, if necessary, adjusted as
follows at the intervals specified in the
periodic maintenance and lubrication
chart.
The engine should be warm before
making this adjustment.
Check the engine idling speed and, if
necessary, adjust it to specification by
turning the idle adjusting screw. To in-
crease the engine idling speed, turn the
screw in direction (a). To decrease the
engine idling speed, turn the screw in
direction (b).
TIPIf the specified idling speed cannot be
obtained as described above, have aYamaha dealer make the adjustment.
1. Idle adjusting screw
Engine idling speed:
1100–1300 r/min
U3C3E3E0.book Page 16 Thursday, July 10, 2008 2:03 PM
Page 66 of 104
PERIODIC MAINTENANCE AND ADJUSTMENT
6-17
6
EAU21382
Checking the throttle cable
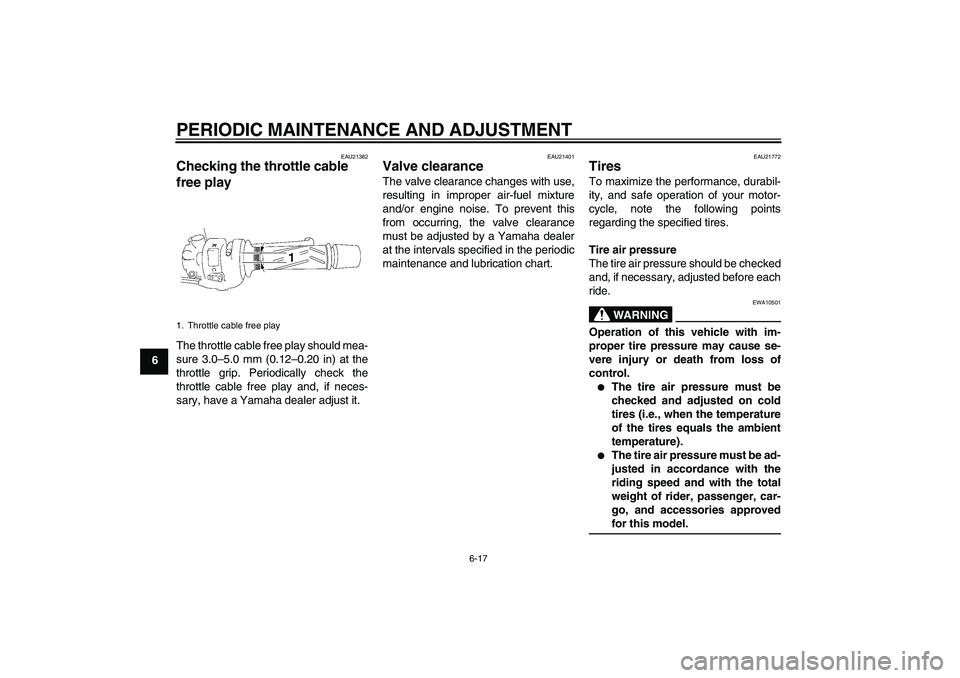
free play The throttle cable free play should mea-
sure 3.0–5.0 mm (0.12–0.20 in) at the
throttle grip. Periodically check the
throttle cable free play and, if neces-
sary, have a Yamaha dealer adjust it.
EAU21401
Valve clearance The valve clearance changes with use,
resulting in improper air-fuel mixture
and/or engine noise. To prevent this
from occurring, the valve clearance
must be adjusted by a Yamaha dealer
at the intervals specified in the periodic
maintenance and lubrication chart.
EAU21772
Tires To maximize the performance, durabil-
ity, and safe operation of your motor-
cycle, note the following points
regarding the specified tires.
Tire air pressure
The tire air pressure should be checked
and, if necessary, adjusted before each
ride.
WARNING
EWA10501
Operation of this vehicle with im-
proper tire pressure may cause se-
vere injury or death from loss of
control.�
The tire air pressure must be
checked and adjusted on cold
tires (i.e., when the temperature
of the tires equals the ambient
temperature).
�
The tire air pressure must be ad-
justed in accordance with the
riding speed and with the total
weight of rider, passenger, car-
go, and accessories approvedfor this model.
1. Throttle cable free playU3C3E3E0.book Page 17 Thursday, July 10, 2008 2:03 PM
Page 74 of 104
PERIODIC MAINTENANCE AND ADJUSTMENT
6-25
6may contain substances that
could damage the O-rings.
[ECA11111]EAU23101
Checking and lubricating the
cables The operation of all control cables and
the condition of the cables should be
checked before each ride, and the ca-
bles and cable ends should be lubricat-
ed if necessary. If a cable is damaged
or does not move smoothly, have a
Yamaha dealer check or replace it.
WARNING! Damage to the outer
sheath may interfere with proper ca-
ble operation and will cause the in-
ner cable to rust. Replace a
damaged cable as soon as possible
to prevent unsafe conditions.
[EWA10721]EAU23111
Checking and lubricating the
throttle grip and cable The operation of the throttle grip should
be checked before each ride. In addi-
tion, the cable should be lubricated at
the intervals specified in the periodic
maintenance chart.
Recommended lubricant:
Engine oil
U3C3E3E0.book Page 25 Thursday, July 10, 2008 2:03 PM
Page 89 of 104
PERIODIC MAINTENANCE AND ADJUSTMENT
6-40
6
EAU42501
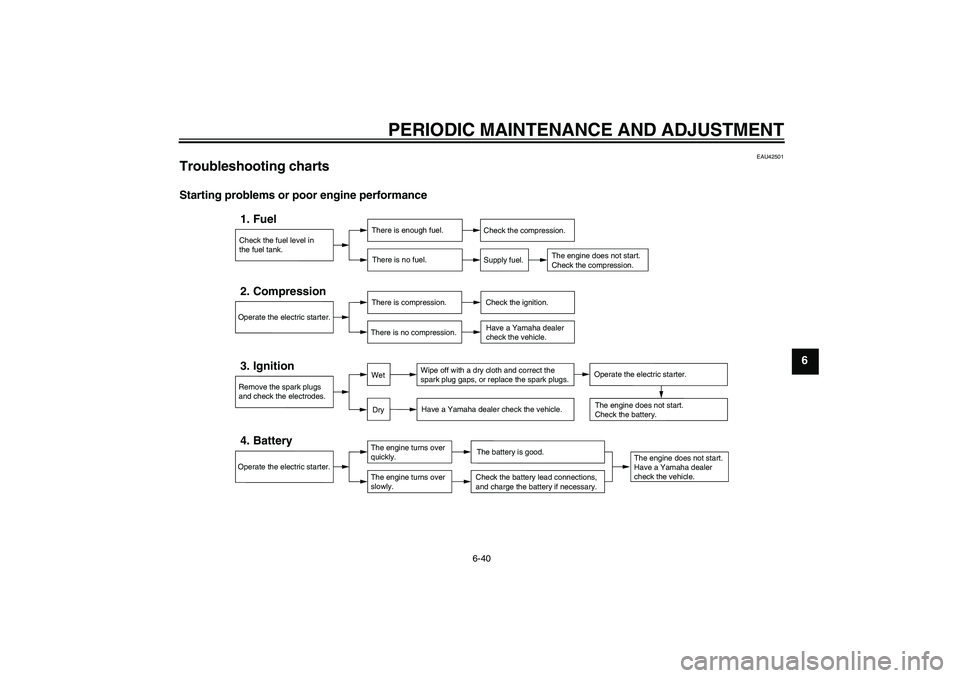
Troubleshooting charts Starting problems or poor engine performance
Check the fuel level in
the fuel tank.1. Fuel
There is enough fuel.
There is no fuel.
Check the compression.
Supply fuel.
The engine does not start.
Check the compression.
Operate the electric starter.2. Compression
There is compression.
There is no compression.
Check the ignition.
Have a Yamaha dealer
check the vehicle.
Remove the spark plugs
and check the electrodes.3. Ignition
Wipe off with a dry cloth and correct the
spark plug gaps, or replace the spark plugs.
Have a Yamaha dealer check the vehicle.
The engine does not start.
Have a Yamaha dealer
check the vehicle.
The engine does not start.
Check the battery.
Operate the electric starter.4. Battery
The engine turns over
quickly.
The engine turns over
slowly.
The battery is good.Check the battery lead connections,
and charge the battery if necessary.
DryWet
Operate the electric starter.
U3C3E3E0.book Page 40 Thursday, July 10, 2008 2:03 PM
Page 90 of 104
PERIODIC MAINTENANCE AND ADJUSTMENT
6-41
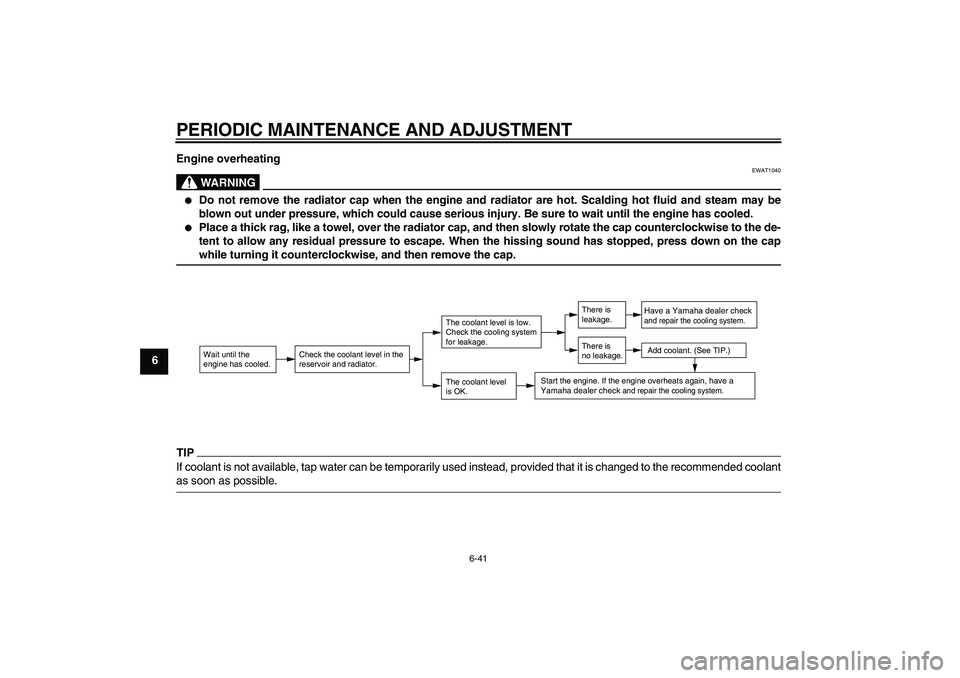
6Engine overheating
WARNING
EWAT1040
�
Do not remove the radiator cap when the engine and radiator are hot. Scalding hot fluid and steam may be
blown out under pressure, which could cause serious injury. Be sure to wait until the engine has cooled.
�
Place a thick rag, like a towel, over the radiator cap, and then slowly rotate the cap counterclockwise to the de-
tent to allow any residual pressure to escape. When the hissing sound has stopped, press down on the capwhile turning it counterclockwise, and then remove the cap.
TIPIf coolant is not available, tap water can be temporarily used instead, provided that it is changed to the recommended coolantas soon as possible.
Wait until the
engine has cooled.
Check the coolant level in the
reservoir and radiator.
The coolant level
is OK.The coolant level is low.
Check the cooling system
for leakage.
Have a Yamaha dealer checkand repair the cooling system.Add coolant. (See TIP.)
Start the engine. If the engine overheats again,
have a
Yamaha dealer check
and repair the cooling system.
There is
leakage.
There is
no leakage.
U3C3E3E0.book Page 41 Thursday, July 10, 2008 2:03 PM
![YAMAHA FZ1 S 2009 Owners Manual PERIODIC MAINTENANCE AND ADJUSTMENT
6-25
6may contain substances that
could damage the O-rings.
[ECA11111]EAU23101
Checking and lubricating the
cables The operation of all control cables and
the cond](/manual-img/51/49994/w960_49994-73.png "YAMAHA FZ1 S 2009 Owners Manual PERIODIC MAINTENANCE AND ADJUSTMENT
6-25
6may contain substances that
could damage the O-rings.
[ECA11111]EAU23101
Checking and lubricating the
cables The operation of all control cables and
the cond")