2009 VOLVO S40 child lock
[x] Cancel search: child lockPage 45 of 286

01 Safety
Top tether anchors
0145 Top tether anchors
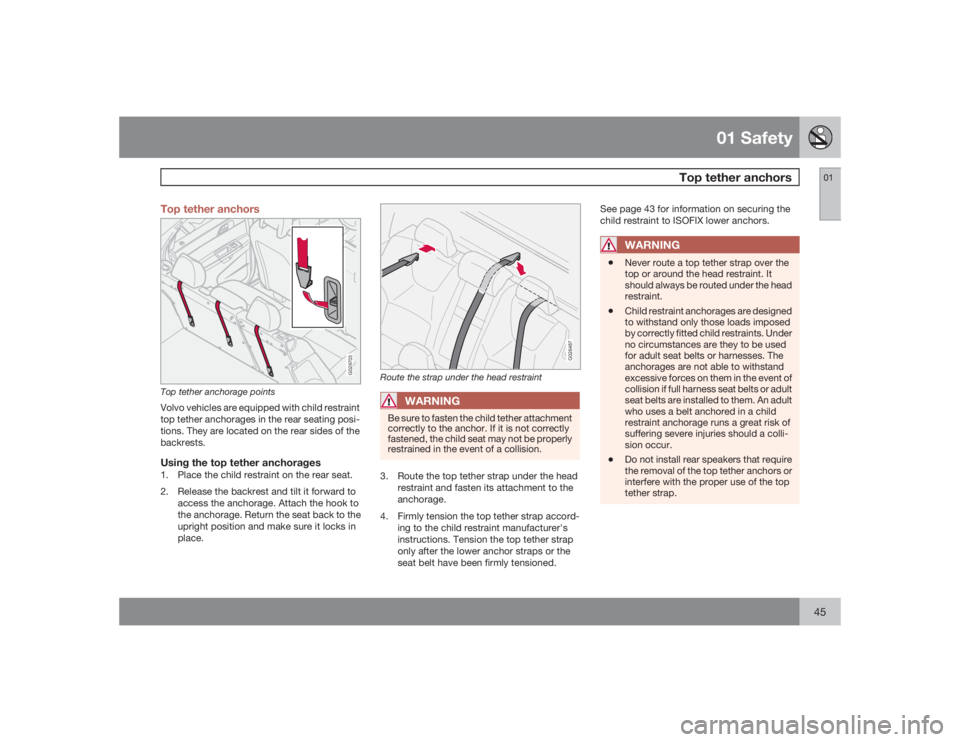
G029703
Top tether anchorage pointsVolvo vehicles are equipped with child restraint
top tether anchorages in the rear seating posi-
tions. They are located on the rear sides of the
backrests.Using the top tether anchorages1. Place the child restraint on the rear seat.
2. Release the backrest and tilt it forward to
access the anchorage. Attach the hook to
the anchorage. Return the seat back to the
upright position and make sure it locks in
place.
G026487
Route the strap under the head restraint
WARNING
Be sure to fasten the child tether attachment
correctly to the anchor. If it is not correctly
fastened, the child seat may not be properly
restrained in the event of a collision.3. Route the top tether strap under the head
restraint and fasten its attachment to the
anchorage.
4. Firmly tension the top tether strap accord-
ing to the child restraint manufacturer's
instructions. Tension the top tether strap
only after the lower anchor straps or the
seat belt have been firmly tensioned.See page 43 for information on securing the
child restraint to ISOFIX lower anchors.
WARNING
•
Never route a top tether strap over the
top or around the head restraint. It
should always be routed under the head
restraint.
•
Child restraint anchorages are designed
to withstand only those loads imposed
by correctly fitted child restraints. Under
no circumstances are they to be used
for adult seat belts or harnesses. The
anchorages are not able to withstand
excessive forces on them in the event of
collision if full harness seat belts or adult
seat belts are installed to them. An adult
who uses a belt anchored in a child
restraint anchorage runs a great risk of
suffering severe injuries should a colli-
sion occur.
•
Do not install rear speakers that require
the removal of the top tether anchors or
interfere with the proper use of the top
tether strap.
Page 76 of 286

02 Instruments and controlsPower windows
0276
Operation
G017439
Control panel in driver's door
Open/close front windowsOpen/close rear windows
The power windows are controlled by buttons
in the arm rests.
•
The ignition must be ON (ignition key in
positionI,II or the engine running) for the
power windows to function.
•
The power windows will also function after
the ignition has been switched off as long
as neither of the front doors has been
opened.
Opening a windowLightly press down the front edge of any of the
buttons (A or B) to the first detent ("stop") to
open a window to the position of your choice.
WARNING
•
Always remove the ignition key when
the vehicle is unattended.
•
Never leave children unattended in the
vehicle.
•
Make sure that the windows are com-
pletely unobstructed before they are
operated.
•
Press the front part of any of the buttons (A
or B) as far down as possible and release
to automatically open the window com-
pletely.
•
To stop the window at any time, pull the
button up.NOTE
To reduce buffeting wind noise if the rear
windows are opened, also open the front
windows slightly.Closing a window•
Lightly pull up the front edge of any of the
buttons (A or B) to the first detent ("stop")to close a window to the position of your
choice.
•
Pull the front part of any of the buttons (A
or B) up as far as possible and release to
automatically close the window com-
pletely. To stop the window at any time,
press the button down.
Lockout switch for rear windows
G017440
Lockout switchThe electrically operated rear door windows
can be disabled by a switch located on the
driver's door (see illustration).
If the light in the switch is OFF: The rear door
windows can be raised or lowered with the
Page 106 of 286

04 InteriorFront seats
04106
Three different seating positions can be stored
in the seat's memory. The memory buttons are
located on the outboard side of the driver's
seat (see the illustration above). The following
example explains how memory button 1 can be
programmed. Buttons 2 and 3 can be pro-
grammed in the same way.
To program (store) a seat position in memory
button1:
1. Adjust the seat to the desired position.
2.
Press and hold down the "M" (Memory)
button.
3.
With the "M" button depressed, press
memory button 1 to store the seat's current
position.
To move the seat to the position that it was in
when memory button 1 was programmed,
press and hold down button 1 until the seat
stops moving.
As a safety precaution, the seat will stop auto-
matically if the button is released before the
seat has reached the preset position.Central locking system remote control
and driver's seat memoryThe remote control transmitter can also be
equipped with an optional function that con-
trols the electrically operated driver's seat in
the following way:1. Adjust the seat to the desired position.
2. When you leave the car, lock it using the
remote control.
3. The next time the driver's door is unlocked
with the same remote control and that door
is opened within 2 minutes, the driver's
seat and side door mirrors will automati-
cally move to the position that they were in
when the doors were most recently locked
with the same remote control.
NOTE
The memory function in the remote control
operates independently the memory func-
tion in the seat.
WARNING
•
Because the driver's seat can be
adjusted with the ignition off, children
should never be left unattended in the
car.
•
Movement of the seat can be STOPPED
at any time by pressing any button on
the power seat control panel.
•
Do not adjust the seat while driving. The
seat should be adjusted so that the
brake pedal can be depressed fully. In
addition, position the seat as far rear-
ward as comfort and control allow.
•
The seat rails on the floor must not be
obstructed in any way when the seat is
in motion.
Page 116 of 286

116
Remote control and key blade.............................................................. 118
Valet locking ......................................................................................... 122
Keyless drive (option as available)........................................................ 123
Locking and unlocking.......................................................................... 127
Child safety locks.................................................................................. 129
Alarm (option)........................................................................................ 130
Page 129 of 286

05 Locks and alarm
Child safety locks
05
129 Manual child safety locks, rear doors
G014697
The controls are located on the rear inside
edges of the doors, and are only accessible
when the doors are open.
1. Remove the key blade from the remote
control, see page 120.
2. Turn the control with the key blade.
The door cannot be opened from the
inside.The door can be opened from the inside.
Page 196 of 286

07 Wheels and tiresTire Sealing System
07196
NOTE
•
After use, the sealing compound bottle,
the hose, and certain other system
components must be replaced. Please
consult your Volvo retailer for replace-
ment parts.
•
If the sealing compound bottle’s expi-
ration date has passed, please take it to
a Volvo retailer or a recycling station
that can properly dispose of harmful
substances.
Inflating tiresThe tire sealing system can be used to inflate
the tires. To do so:
1. Park the car in a safe place.
2. The compressor should be switched off.
Ensure that the on/off switch is in posi-
tion0 (the 0 side of the switch should be
pressed down).
3. Take out the electrical wire and hose.
4. Remove the valve cap from the tire’s infla-
tion valve and screw the hose connector
onto the valve as tightly as possible by
hand.
5. Connect the electrical wire to the nearest
12-volt socket in the vehicle.6. Start the vehicle’s engine.
WARNING
•The vehicle’s engine should be running
when the tire sealing system is used to
avoid battery drain. Therefore, be sure
the vehicle is parked in a well ventilated
place, or outdoors, before using the sys-
tem.•Children should never be left unattended
in the vehicle when the engine is running.
7. Check the tire’s inflation pressure on the
gauge. Switch off the compressor briefly to
get a clear reading from the pressure
gauge.
8. Refer to the tire inflation tables for the cor-
rect inflation pressure. If the tire needs to
be inflated, start the tire sealing system’s
compressor (press the on/off switch to
position I). If necessary, release air from the
tire by turning the air release knob coun-
terclockwise.
CAUTION
The compressor should not be used for
more than 10 minutes at a time to avoid
overheating.
9. Turn off the compressor (press the on/off
switch to position 0) when the correct infla-
tion pressure has been reached.
10. Unscrew the hose from the tire’s inflation
valve and reinstall the valve cap.
11. Disconnect the electrical wire from the
12-volt socket.
Page 277 of 286

12 Index
12
277
fluid.....................................................219
general information............................. 153
Bulbs
headlights........................................... 223
list of................................................... 272
Bulbs, replacing....................................... 223
CCapacities, fluids..................................... 267
Capacity weight............................... 183, 265
Catalytic converter, three-way................. 274
CD changer.............................................. 249
CD player................................................. 249
Cell phone, hands-free connection......... 254
Central locking system - remote control. 118
Chains...................................................... 186
Changing a wheel.................................... 190
Child restraints
recalls and registration......................... 46
Child restraint systems.............................. 37
booster cushions.................................. 42
convertible seats.................................. 40
infant seats........................................... 38ISOFIX/LATCH anchors........................ 43
top tether anchors................................ 45
Child safety................................................ 35
booster cushions.................................. 42
child restraint systems.......................... 37
convertible seats.................................. 40
infant seats........................................... 38
Child safety locks....................................129
Climate system
air distribution..................................... 101
air vents................................................ 94
Electronic Climate Control.................... 98
manual climate control......................... 95
passenger compartment filter.............. 92
refrigerant.....................................92, 267
Climate system, general information......... 92
Clock
setting...................................................83
Coat hanger............................................. 110
Cold weather precautions........................ 137
Compact disc care..................................251
Compass in rearview mirror....................... 78
Conserving electrical current................... 138
Convertible seats....................................... 40Coolant.................................................... 267
changing............................................. 218
checking level of................................. 218
Courtesy lighting...................................... 107
Crash mode............................................... 34
Cruise control............................................ 70
Cup holders.....................................109, 111
Curb weight.....................................183, 265
DDetachable key blade.............................. 120
Detachable trailer hitch............................ 162
Dimensions.............................................. 264
Disabling the passenger's side front air-
bag............................................................. 26
Disconnecting the front passenger’s air-
bag............................................................. 26
Display....................................................... 60
Dolby Pro Logic II (DPL II)........................ 243
Door mirrors............................................... 79
Driving economically................................ 136
Driving through water..............................137
Page 279 of 286

12 Index
12
279
HHand brake (parking brake)....................... 75
Hands-free connection (cell phone) (Cell
phone, hands-free connection)................ 254
Hazard warning flashers............................ 74
Headlights.................................................. 63
Active Bi-Xenon (option)....................... 63
changing bulbs................................... 223
high and low beams............................. 66
high beam flash.................................... 66
Headlight washers..................................... 72
Head restraints, rear seat........................113
High beam flash......................................... 66
High beams................................................ 66
Home safe lighting............................... 66, 84
Hood, opening......................................... 214IIgnition switch.......................................... 143
Immobilizer.............................................. 144
Immobilizer (start inhibitor)...................... 118
Indicator and warning symbols............ 53, 55Infant seats................................................ 38
Inflatable Curtain........................................ 30
Inflation pressure..................................... 176
Inflation pressure, checking..................... 177
Inflation pressure table
Canadian models................................ 179
US models.......................................... 178
Information display..............................53, 60
messages in.......................................... 60
Information symbol.................................... 55
Inspection, preparing for......................... 212
Inspection readiness................................ 212
Instrument overview.................................. 50
Instrument panel.................................. 50, 53
Instrument panel lighting........................... 64
Interior lighting......................................... 107
iPOD connector (audio system)...............241
ISOFIX/LATCH anchors............................. 43
JJacket hanger.......................................... 110
Jump starting........................................... 159
KKey blade.........................................120, 124
Keyless drive
location of antennas (pacemaker warn-
ing)...................................................... 125
locking and unlocking the vehicle...... 123
power seat memory............................ 124
starting the engine.............................. 146
Keylock.................................................... 144
Kickdown.................................................150LLabel information..................................... 262
LATCH (ISOFIX) anchors........................... 43
Lighting panel............................................ 63
Load anchoring eyelets........................... 115
Loading the vehicle
roof loads............................................ 163
Locking
from the inside.................................... 127
glove compartment............................. 128
Locking the vehicle.................................. 123
Locks, child safety................................... 129