2009 VOLKSWAGEN SCIROCCO mirror controls
[x] Cancel search: mirror controlsPage 8 of 138
Downloaded from www.Manualslib.com manuals search engine 0 N ,..; 0
'e h ic le interior
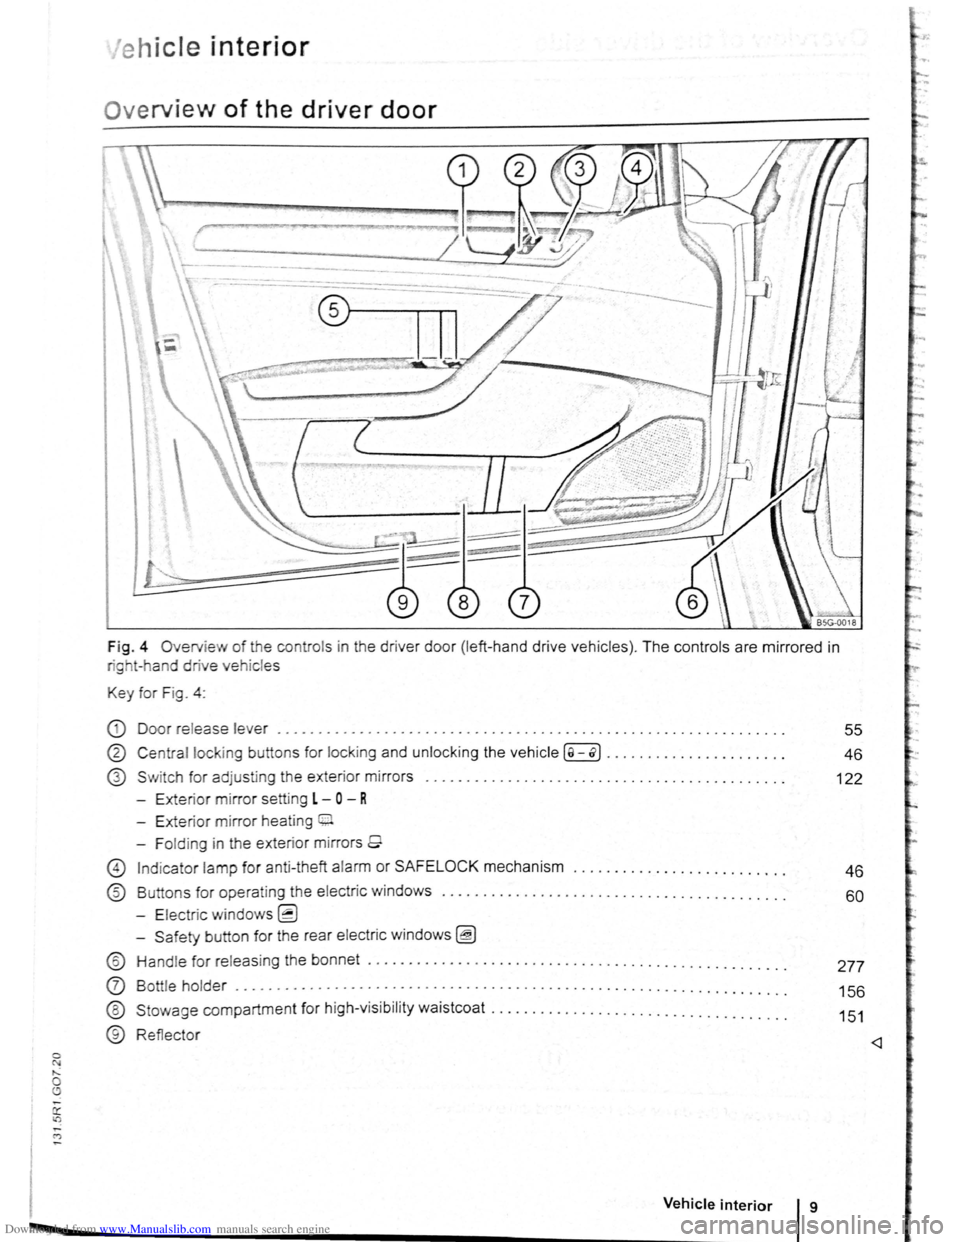
Ov erview of the driver door
Fig . 4 Overv ie w of the contro ls in the drive r doo r (left -ha nd dr ive ve hicles ). The controls are mirrored in
rig t- h and drive vehic le s
Key for Fig . 4 :
CD Door release lever ........................... ............ ..... . ................ .
® Centra l lock ing butt on s for locking and unlo cking the vehicle ( a -o>] ............... ...... .
G) S w itch for adjusting the exter ior mirror s
- Exte ri
or mirror setting L -0 - R
- Exterior mirror heat ing 0.
- Fo ld ing in the exterior mirrors 9
55
46
122
G) Ind icator lamp for anti -theft alarm or SAFELOCK mechanism . . . . . . . . . . . . . . . . . . . . . . . . . . 4 6
® Buttons for oper atin g t he electric windows . . . . . . . . . . . . . . . . . . . . . . . . . . . . . . . . . . . . . . . . . . 60
- Electric windows~
-S afety button for the rear electric windo ws ~
® Hand le for releas ing the bonne t ....................................... .... ...... . .
0 Bott le holder ................................... . .............................. .
®
®
Stowage compartmen t for high-visi bility waist coa t .. ................................. .
Reflecto r
Vehicle interior g
277
156
151
Page 49 of 138
Downloaded from www.Manualslib.com manuals search engine M chanica l controls on the front seat
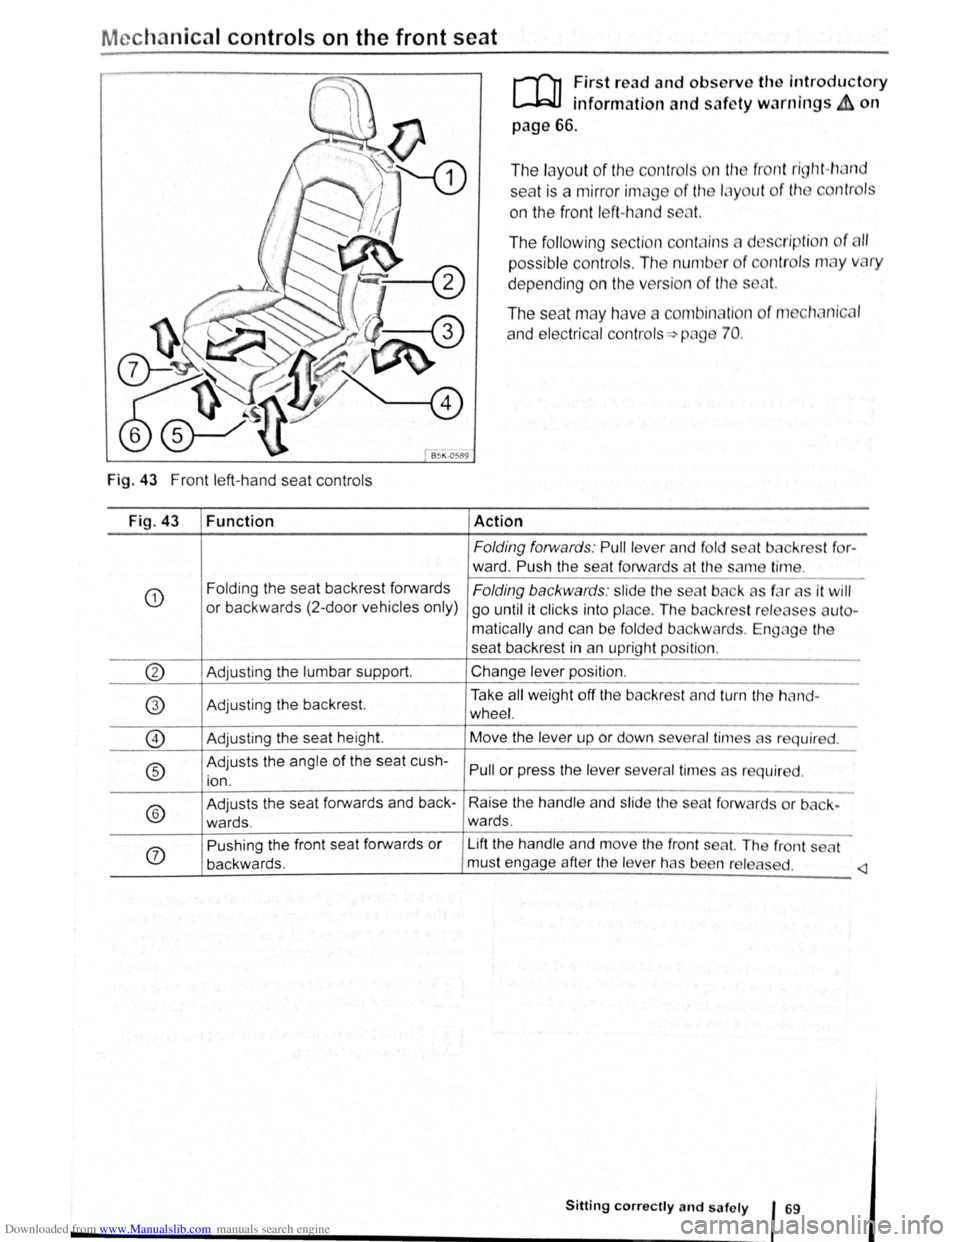
Fig. 43 Front left-hand seat controls
Fig. 43
CD
Function
Folding the seat backrest forwards
or backwards (2-door vehicl es only)
if'l1 First read and obscrvo th introductory
L-.lr::JJ inforn1ation and safety warnings~ on
page 66.
The la yout of the contr I~ n tt1 fr nt ri~jt1t-h·1nd
seat is a mirror imElg f th 1 ... y ut f th ntr I
on the front left- h nd s ot.
The following secti n c ntain d s ripti n f 11
possibl e controls. Th nun1b r f ntr I n1 y v ry
depending on the v r ion of tl1
The seat m ay h v e con1bin, ti n o f 111 t1~.. nic I
and electrical contr ols-=> png 70.
Action
Folding forwards: Pull le ver a nd fold s
ward. Push the se at forw ards at th e an1 tirl"l
Folding backwards : slide the se t b k s f r
go until it clicks into place. The
b ckr t r I o
matic ally and can be fold ed b ackward . Engag
t for-
it will
s ut -
th
seat backrest in an up rig ht position .
--~------------------@ Adjusting the lumbar support . Change lev er position .
----~--~~--~~--------~-------1----~----~------------------
f'3 Take all weig ht off the bac kres t and turn th h nd-
\:V Ad just ing the backrest. wheel.
0 Adjusting the seat height.
® Adjusts the angle of the sea t cush
ion . Move
the le v
er up or down sev era l tirn a s r quir d.
Pull or press the le ve r severa l tin 1es as r qui r d.
--------~------------------------~----------------------------
®
Adjusts the seat forwards and back -Raise the handl e and slide the sea t forw rd or b ck-
wards . wards .
--------~------------------------~----------------------------
(j)
Pushing the front seat forwards or Lift the hand le and move the fron t seat. Th front t
backwards. must engage after
the le ve r has been r I a d.
Sitting correctly and safely 69
Page 70 of 138
Downloaded from www.Manualslib.com manuals search engine Place the windscreen wiper arms back onto the
winds creen before driving away. With the ignition
swit ched on, briefly press the windscreen wiper
lever
down to bring the windscreen wiper arms
ba ck
to the original position.
Lifting the windscreen wiper blades
• Move the wiper arms to the service position be
fore lifting ~CD.
• When lifting a wiper arm hold it only by the wip
er blade mounting .
Rain sensor
1}®
c®
85K ·0419
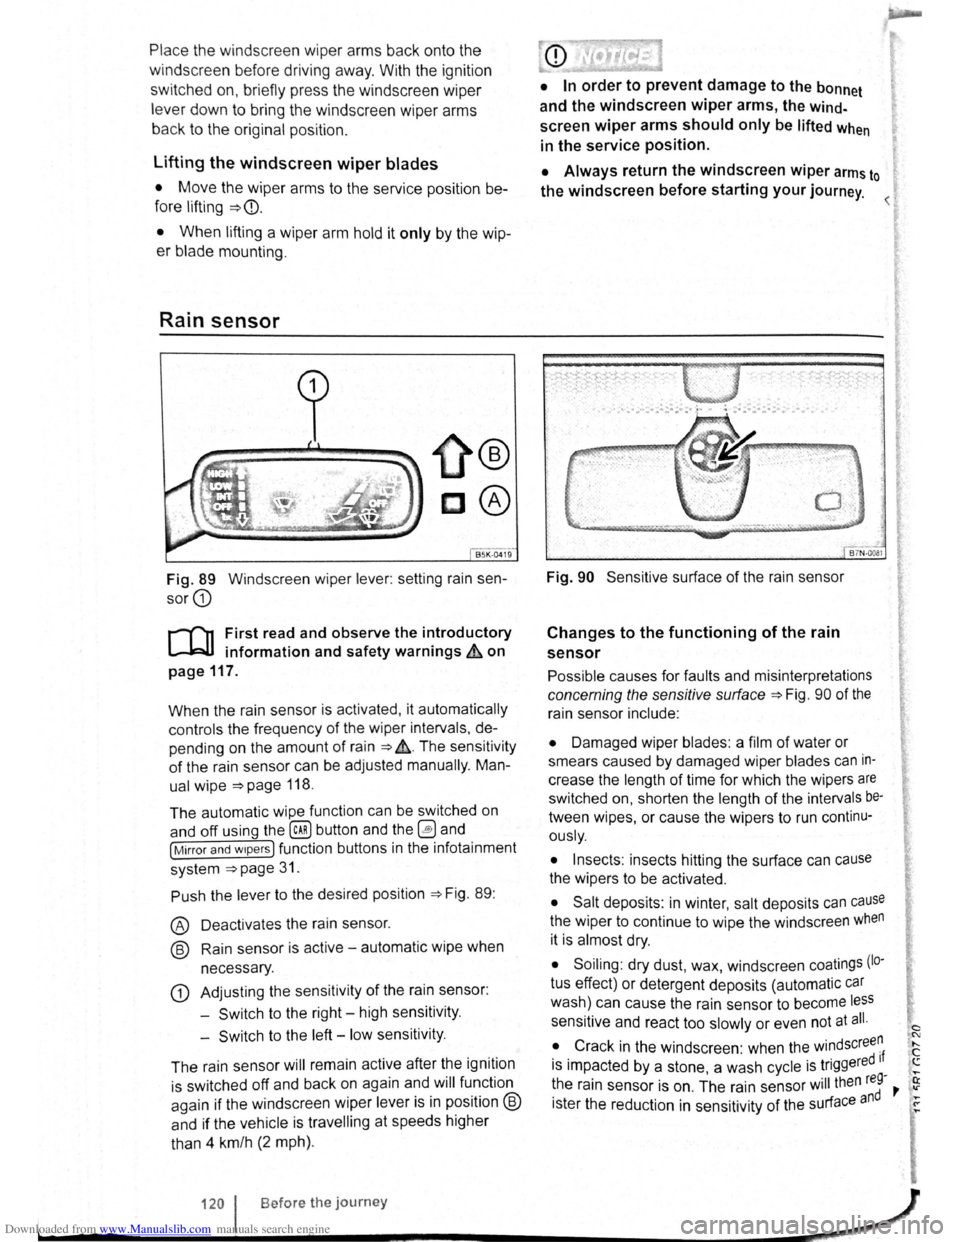
Fig. 89 Windscreen wiper lever: setting rain sen
sor G)
r-('n First read and observe the introductory
L-J,::JJ information and safety warnings & on
page
117.
When the rain sensor is activated , it automatically
controls the frequency
of the wiper intervals, de
pending on the amount of rain ~ ,&. The sensitivity
of the rain sensor can be adjusted manually. Man
ual
wipe ~page 118 .
The automatic wipe function can be switched on
and off using the
(ill) button and the 0 and
[Mirror and wipers ] function buttons in the infotainment
system
~page 31.
Push the lever to the desired position ~Fig. 89:
® Deactivat es the rain sensor.
@ Rain sensor is active -automatic wipe when
necessary .
G) Adjusting the sensitivity of the rain sensor :
-
Switch to the right -high sensitivity.
-
Switch to the left -low sensitivity .
The rain sensor
will remain active after the ignition
is switched off and back on again and
will function
again
if the windscreen wiper lever is in position @
and if the vehicle is travelling at speeds higher
than 4 km/h
(2 mph).
• In order to prevent damage to the bonnet
and the windscreen
wiper arms, the wind
screen wiper arms should only be lifted when
in the service position.
• Always return the windscreen wiper arms to
the windscreen before starting your journey.
Fig. 90 Sensitive surface of the rain sensor
Changes to the functioning of the rain
sensor
Possible causes for faults and misinterpretations
concerning the sensitive surface~ Fig. 90 of the
rain sensor include:
• Damaged wiper blades: a film of water or
smears caused by damaged wiper blades
can in
crease the length of time for which the wipers are
switched on, shorten the length of the intervals be
tween wipes, or cause the wipers to run continu
ously.
• Insects: insects hitting the surface can cause
the wipers to be activated.
• Salt deposits : in winter, salt deposits can cause
the wiper to continue to wipe the windscreen when
it is almost dry.
• Soiling : dry dust, wax, windscreen coatings (lo·
tus effect) or detergent deposits (automatic car
wash) can cause the rain sensor to become less
sensitive and react too slowly or even not at all.
• Crack
in the windscreen : when the windscree~
is impacted by a stone, a wash cycle is triggered If ....
~he rain sensor is on . The rain sensor will then reg-,. ~
1ster the reduction in sensitivity of the surface and ~
120 I Before the journey _,}
~----~------------------~~
Page 77 of 138
Downloaded from www.Manualslib.com manuals search engine rfl If tho lo vo r Is move d accid entally to N when
L!J dr iving , take yo ur foot off the accele rato r.
WiJil fo r tile e ng in e ~~v s in t~e ne utral po sitio n be-
fo re solo ctin g a pos1!1o n agam.
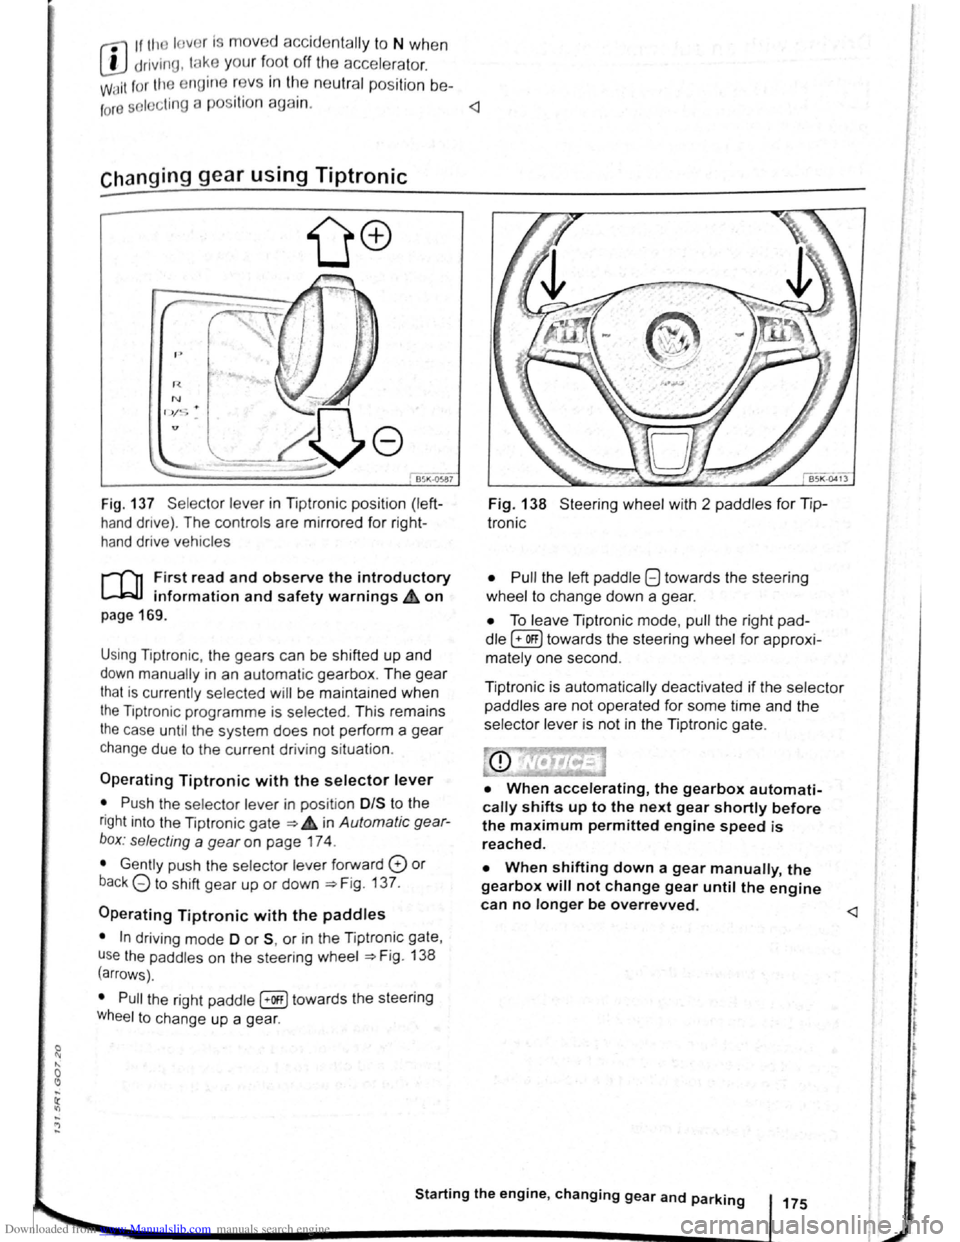
Fig. 137 Se lecto r leve r in Tiptronic position (left
hand drive) . The controls are mirrored for right
hand drive vehicles
rT'n F irst read and observe the introductory
L-.W.I information and safety warnings.& on
page 169 .
Using Tiptronic , the ge ars can be shifted up and
down manually in an automat ic gearbox . The gear
that is currently selected will be maintained when
the Tiptronic programme is selected . This remains
the case until the system does not perform a gear
change due to the current driv ing situation .
Operating Tiptronic with the selector lever
• Push the selector lever in pos it ion 0/S t o the
right into the Tiptronic gate ~ 4 in Automatic gear
b o x: selecting a
gear on page 174 .
• Gently push the selecto r lever forward 0 or
back G to shift gear up or down ~Fig. 137.
Operating Tiptronic with the paddles
• In driving mode 0 or S, or in the Tiptronic gate,
u se
the paddles o n the steering wheel ~Fig. 138
(arrows) .
• Pull the right paddle [+Off] towards the steering
Wheel to change up a gea r.
Fig. 138 Steer ing wheel with 2 padd les for Tip
Ironic
• Pull
the left paddle 8 towards the stee ring
whe el to cha nge down a gea r.
• To leave Tiptronic mode, pull the right pad
dle (+OFF) towa rds the steering whee l for approxi
mat ely one second .
Tiptronic is
automatically deactivated if the selector
paddles
are not operated for some time and the
selector lever is not in the Tiptronic gate.
• When accelerating, the gearbox automati
cally shifts up to the next gear shortly before
the maximum permitted engine speed is
reached.
• When shifting down a gear manually, the
gearbox will not change gear until the engine
can no longer be overrevved.
l t t
t
r
Page 137 of 138
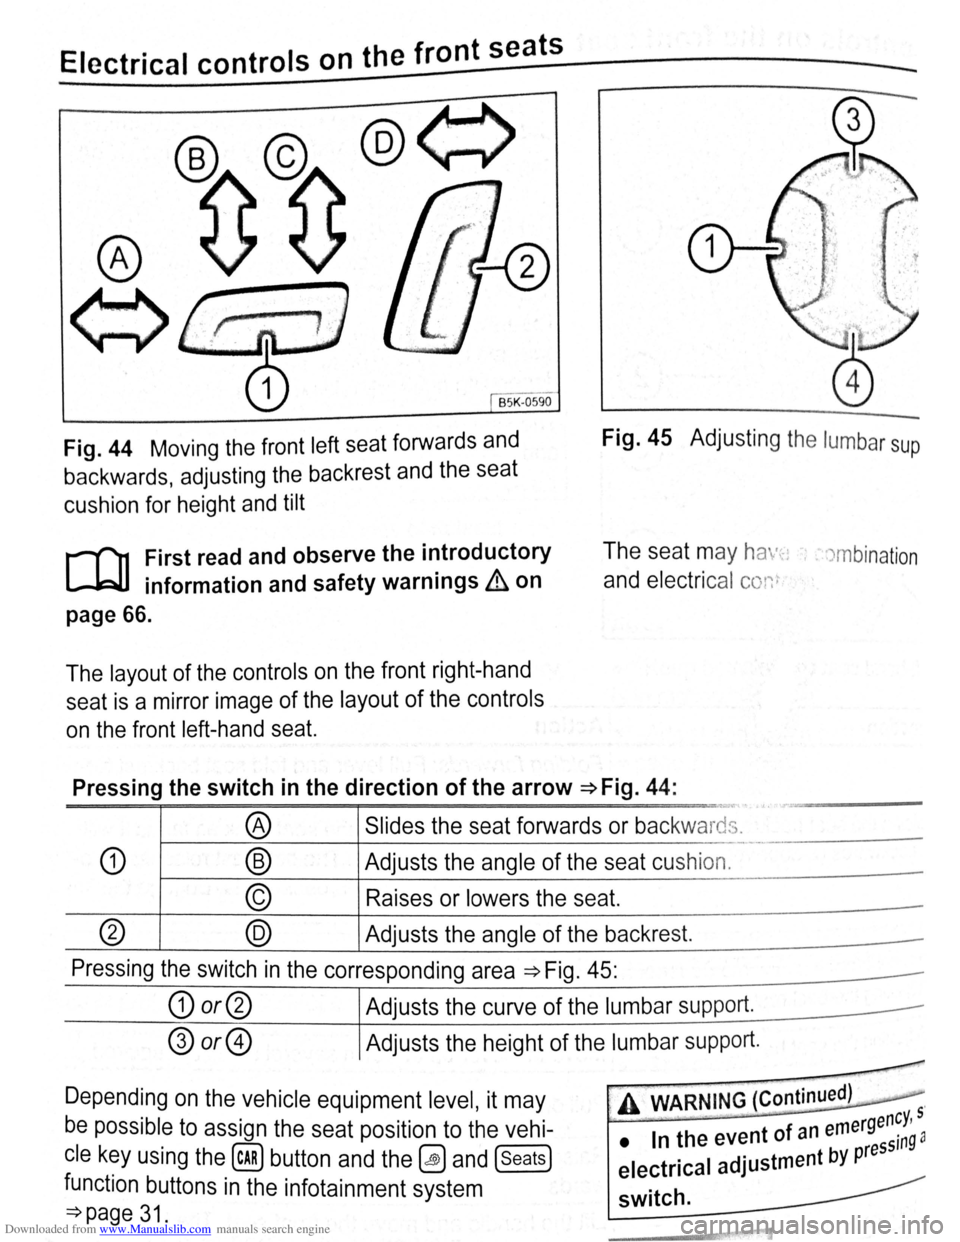
Downloaded from www.Manualslib.com manuals search engine ~E~Ie~c~tr~ic~a~l~c~o~n~tr~o~ls~o~n~th~e~f~r~o~n~t~se~a~t~s--~==========~---
BSK -0590
Fig. 44 Moving the front left seat forwards and
backwards, adjusting the backrest and the seat
cushion for height and tilt
Fig. 45 Adjusting the lumbar sup
r-f'n First read and observe the i~troductory
lJ=JJ information and safety warn1ngs & on
The seat may ha ·-~: , . )mbination
and electrical conr
page 66.
The layout of the controls on the front right-hand
seat is a mirror image of the layout of the controls
on the front left-hand seat.
Pressing the switch in the direction of the arrow ~Fig. 44:
··-
® Slides the seat forwards or backwards.
L.
-· -·--
CD ® Adjusts the angle of the seat cushion.
© Raises or lowers the seat.
(?) @ Adjusts the angle of the backrest.
Pressing the switch in the corresponding area ~Fig. 45:
G) or@ Adjusts the curve of the lumbar supp ort.
® or@ Adjusts the height of the lumbar support.
-
Depending on the vehicle equipment level, it may
be possible to assign the seat position to the vehi
cle key using the (cAR) button and the~ and (seats)
function buttons in the infotainment system
=:}page 31.
, A WARNING (Continued) .
-rgency, 5
• In the event of an eme ssin9 a
electrical adjustment by pre
switch.