2009 VOLKSWAGEN JETTA engine
[x] Cancel search: enginePage 394 of 477

WARNING {continu ed)
• Never let anyone place any part of their
body underneath the vehicle when support ed
by the jack.
• Never support your vehicl e on cinder
blocks, bricks or other obje cts . These may not
Changing a wheel
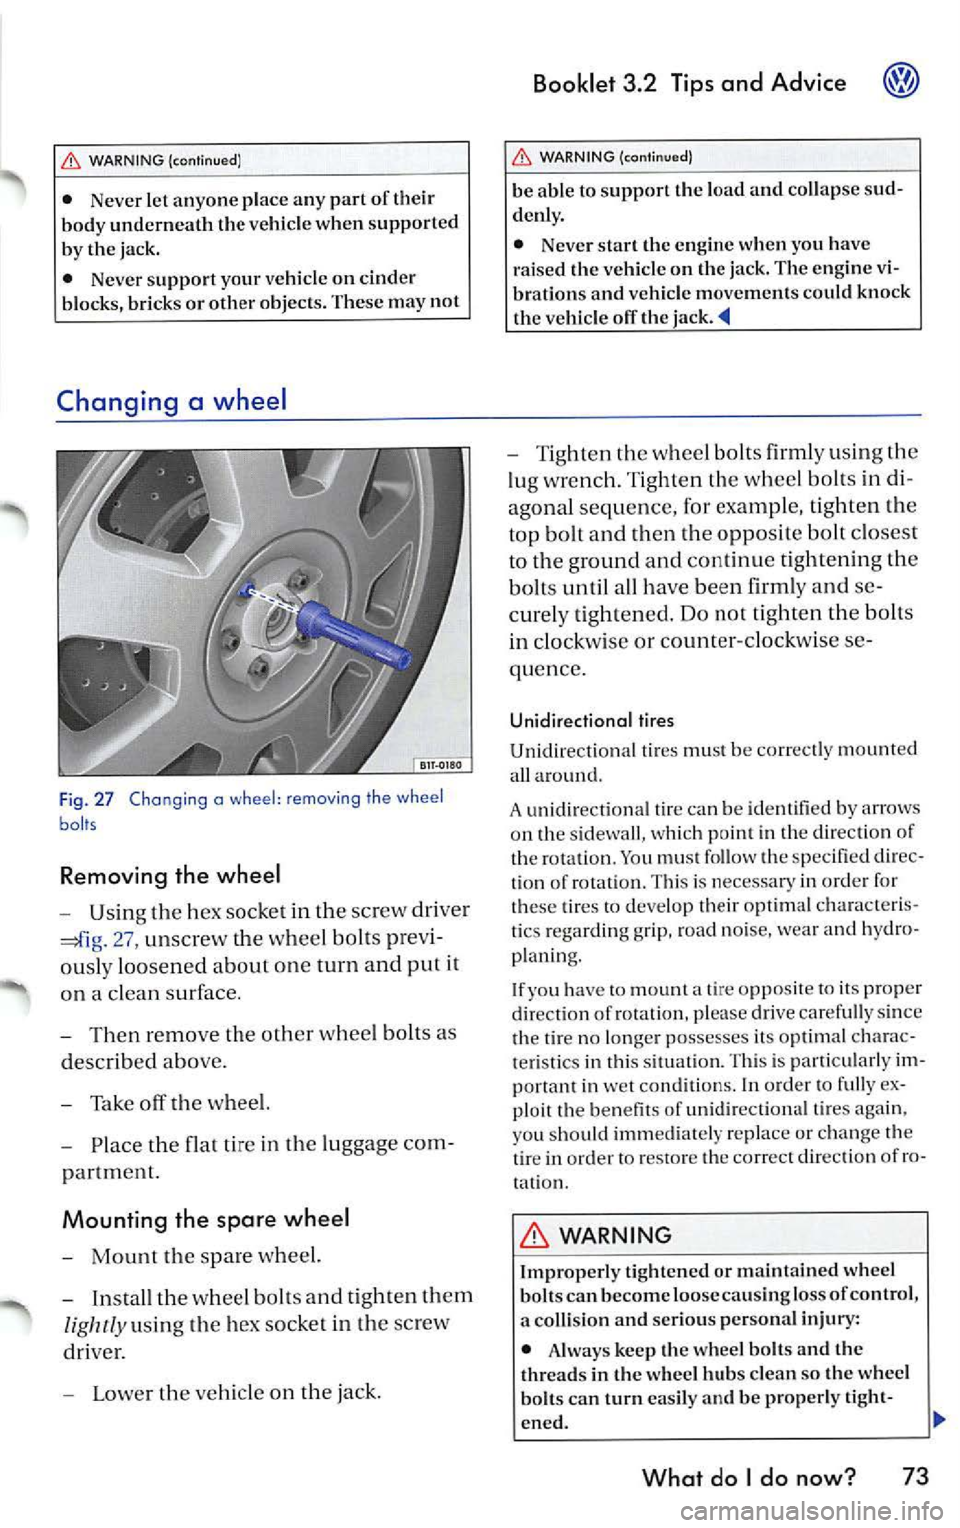
F ig . 27 Chang ing a wheel : removing the wheel
baits
Removing the wheel
-Usin g the h ex socket in th e sc rew dri ver
27, un screw t he w heel bo lts pre vi
o usly loo sen ed about on e turn and put it
o n a cl ean su rface .
- Then re mo ve the oth er whee l bolt s as
d esc ribed abo ve.
- Tak e off th e w he el.
- Place the flat ti re in the lu gg ag e co m-
p artmen t.
Mounting the spare wheel
-Mount the sp a re wh eel.
- Insta ll th e w hee l bolt s and tight en th em
lig htly u sin g th e hex so cke t in th e sc rew
dri ver.
- L ower th e ve hicle on the jack .
Booklet 3.2 Tips and Advice
WARNING {cont inu ed )
be able to support the load and collap se sud
denl y.
• Nev er start the engine when you have
raised the vehicl e on the jack. The engine vi
bration s and v ehicle movements could knock
the v ehicl e off the
- T ig ht en the wheel bolts firml y using the
lu g w re n ch. Ti gh te n th e whee l b olts in di
a gonal s equ ence , for e xampl e, tig h te n th e
top bolt and then th e oppo sit e bolt clo se st
to th e ground and continu e tight enin g the
bolt s until all have bee n firml y and se
c ur ely tight en ed. Do not tight en th e bolts
in clock wise or c ounter-cl oc kw ise se
quen ce.
Unidirectional tires
Unidir ectional tir es mu st be co rrec tly m ount ed
a ll arou nd.
A un idir ection al tir e ca n b e id en tified b y arrows
o n th e s idewa ll, w hi ch p oin t in the di rec tion of
t h e ro tation . Yo u mu st fo llow the speci fied dir ec
ti on of ro ta ti on. Thi s is necessary in orde r for
the se tires to deve lop t heir optim al cha racte ris
ti cs regar ding grip, road noise, wea r and hydro
p la ni ng .
I f y ou have
to moun t a tire opp osite to i ts pro per
dir ection of rot atio n. p lease drive caref ull y sin ce
th e tir e no lo nge r poss esses its o ptimal chara c
t e ri stic s in thi s s itu atio n. Thi s is parti cul arl y im
po rta nt in we t con ditions. In orde r to f ully ex
pl oi t th e benefi ts of unidir ectio nal tire s ag ain ,
yo u sh ou ld imm edi ate ly re place or change the
tir e in or der to resto re th e co rrect d irec tion of ro
t a ti on .
WARNING
Improp erl y tight en ed or maintain ed wheel
b olt s can b ecome loose cau sin g lo ss of control ,
a colli sio n and seriou s per son al inju ry:
• Alw ay s keep th e wheel bolt s and th e
thread s in the wh eel hub s clean so the whee l
bolt s can turn easily and be p roperl y tight-
en ed .
What do I do now? 73
Page 398 of 477

WARNING (continued )
hide. The doors can be lock ed using the re
mote control key or the powe r lock button.
Th is co uld res ult in peop le bein g trapped in
th e ve hicl e.
•
build -up in th e passenger com part
ment an d lu ggage compartmen t o f a parked
Fuses
Changing a fu se
Fig. 32 Dosh panel, le fl: cover of fuse box A
Fuse bo x A locat ed in th e side of the
da sh pan el on th e driver' s side
In se rt a suit abl e obj ect (e .g. a sc rew
dr iver) into th e
32 and car efull y
pry the cove r oil
Fu se box B in the engine compartment
Open the en gin e hood .
Press the release tabs 33 (arrow s)
to re lease the fuse box cove r.
R e mo ve the cover .
To re mount the cover, place it ove r th e
fu se box
press the sid e tab s in the op
po sit e direct ion until they latch sec ure ly.
Bookl et 3.2 Tip s and Advice
WARNING (continu ed)
vehicle can re sult in tem peratur es in the ve
hicle that arc much higher than the out sid e
tem peratu res, p arti cularl y in su mmer. Tem
p era tures ca n quickl y reac h levels that can
cause unco nscio usne ss and death, particu
l ar ly to sma ll childre n. _.
Fig . 33 In the engine compa rtment: caver of fuse
box B
The indiv idu al el ec trica l ci rcu its are prot ecte d
b y fu se s. We reco mm end y ou sev eral spar e
fu ses at all tim es. T hese are availab le from a u
th ori ze d Vo lk sw agen dea le rs.
A ut omob ile te chnol ogy chan ges co ntinuously.
Your a uthori ze d Volkswage n deal er h as the mo st
curr ent t echn ica l in format io n for your Vo lk
sw agen.
I f yo u ar e
sur e w hich fu se to use or to ch an ge ,
co ntact your authori zed Vol kswage n Se rv ice
viso r.
Co lar cod ing o f fu ses
C olor
rating
li ght
5
brow n t 7.5
reel I 10
What do I do now? 77
Page 400 of 477

Booklet 3.2 Tip s and Adv ice
Fuse tables
Fi g. 34 Fuses in the fuse box A in the dash panel
Fi g. 35 F use box Bin the engine comportment: Left vehicles w ith a 54 fuse box , right vehic les with a 30 fuse
box
What do I do now ? 79
Page 401 of 477

Booklet 3.2 Tips and Advice
Fuses in the fuse box A in the dash panel
Electrical consumer
Fuse number (amp
ratin g in bra cke ts )
ABS /ESP/E DL 2
(5)
Tran sm iss ion (2.5 1 14 (5)
and 1.91 engine)
Front pow er wi nd ows 23 (30)
powe r 32 (30)
Fan 22 (40)
wi ndow de- 25 (25)
fogger
S tee rin g. DSG • 6 (5)
Int erior light s
15 (7,5 )
Fuel pump 27 (15)
A irbag 3 (5)
roof
33 (25 )
Se at hea ting
4 (5), 37 (30). 46 (5 )
8
48
V aca nt
20
Auxiliary hea tin g'
16 (10), 25 (25) 47 (10)
Pow er outl et 26 (20)
Cc n
lock ing for 12 (IO}
fr ont doo rs
H eat ed was her je ts 46 (5)
Lumb ar support ad- 34 (15)
ju stment for front
sea ts
C igare tte light er
24 (25)
Fuses in the fuse box Bin the engine compart
ment: vehicles with a
54 fuse box
Electrical consumer
Fuse numb er (amp
rating in bra cke ts)
Fl (30). F2 (30)
L eft turn signa l F47 (40 )
turn s ignal (40 )
I-lorn F5 (15)
D SG' FI3 (15 )
light s
F47 (40), (40)
80 What do I do now?
F19
v\l ind shi eld wip ers (3 0)
Lef t headlight F47
(40)
headlight F48 (40 )
So und system
(30)
L ef t sid e lig ht F47 (40 )
sid e light F48 (40 )
release
Ce ntral lock ing for (2 0) rea r door s
Fuses in the fuse box B in the engine compart
ment: vehicles with
a 30 fuse box
Electrical co nsum er
Fuse number (amp
rat ing in bra ckets )
A BS F4 (30),
(30)
W ind shi eld wip ers Fl (25 )FJ9 (25)
F8 (15 )
H orn FI7 (15 )
DSG' F5
(15)
Turn sig nal ri ght
F25 (40 )
Turn signal left F26 (40 )
Aux iliary heat ing •
Fil (20)
T e le phon e•
F9 (5)
Fu el pump (di esel)
(5)
Fan F24 (IO )
F og lig ht s F25 (40 )F26 (40)
h ea dli ght
F26 (40 )
headlight F25 (40 )
WARNING
Using the wrong fuse and attempting to repair
a fu se or u singsomethingin stead of a fuse can
cause a fire and serious per sonal inju ry.
• Always read and hee d the information and
a ll WARN INGS.
Tips
T he tabl es show the fu se loca tion s for the mo st
important consumers. The right -hand column s
Page 402 of 477

contain the in se rt loca tio n, the figur es in
bra cket s indi ca te th e a mp ere rating for th e fuse.
O ne c on sum er mi ght re quir e seve ral fu ses (also
in separat e fu se boxes) .
• Seve ral con su m ers cou ld
over on e sin gle
fu se .
Changing a light bulb
Changing light bulbs
Booklet 3.2 Tips and Advice
• T he fuse b ox in the dash pan el h as spa ce fo r
r ep lace ment fuses .
• There a re o th er fu se s in th e vehicle. Th ese
s h ould be chan ged by a qua lified d ealer ship .
Light bulbs should be changed by a qualified t echnician only.
Light bulb s should b e chan ged onl y by qu alifie d
t ec hni cian s. In man y cases c han ging a light bulb
in vo lves re m ov ing oth er
of th e vehicl e to
ge t to the burnt- out ligh t bulb, pa rticularl y tho se
i n th e front of the v ehicl e th at can on ly be
r eac hed th rough th e eng in e co mp artm ent.
We reco mm end that light bulb s o nly be c ha nge d
b y an auth ori ze d Vo lksw agen deale r or qua lified
w ork sh op.
Before ch an ging a light bulb , you mu st s wi tc h off
th e light (light switch in Op osition ). and th e turn
s igna l lev er must b e in the neutra l p os iti on.
A lw ays rep la ce burnt- out light bulb s with id en
ti cal light bul bs w ith same spe cificatio ns. Th e
spe cifica tio ns are printed on th e light bul b, ei
th er on th e g lass bu lb or on th e m etal base. /\!
wa ys mak e sure th at th e c olo r of th e new bulb s is
th e sa me as th e re p lac ed ones.
It is ad visa ble to always carry a box o f rep lace
m ent light bulb s in yo ur ve hicl e at all tim es. The
box s hould co nt ain at l eas t th ose light bulb s th at
ar e import ant fo r traffi c
See your V olk
sw age n deale r f or rec omm end ed light bulb s.
WARNING
Slop ! Before working in th e e ngi ne comp art
ment, alway s read a nd heed all WARNINGS
34. The engine compartmen t of any
motor vehicl e is a potentially dangerous area
and c an cau se ser ious personal injury.
WARN ING (continu ed )
• Gas discharge lam ps (Xeno n) get pow er
from a high voltage so urce that can cause se
ri ous personal injury and even death
ways have a qualified tec hni cian replace
burnt-out ligh t bulbs, especia lly gas discharg e
l amps (Xenon) a nd 1-17 light bulbs.
WARNING
Neve r remove the hea dlight unless yo u know
exact ly ho w to carry out the job and have the
co rrec t tool and light bulb s.
• If you a re un cer ta in about what t o do , h ave
th e work performed by a n auth ori zed Volk
swage n dealer or a qualified worksho p. Se
rious per sonal injury may result from improp
e rl y perfor med work.
• Do not tou ch glass bul b w ith b are hand s. Fin
ge rprint s can cloud the out er surfa ce of th e bulb
w hen hea ted, thu s aff ec tin g th e refl ectio n, and
th us re duci ng th e powe r of illumin ati on.
•
b ulb can on ly be repl aced by a bulb of the
s am e ty pe. T he m odel i dent ifi cat io n is e ith er on
t h e bulb base o r on t he bul b itse lf.
What do I do now? 81
Page 406 of 477

Booklet 3.2 Tips and Advice
4.
1.
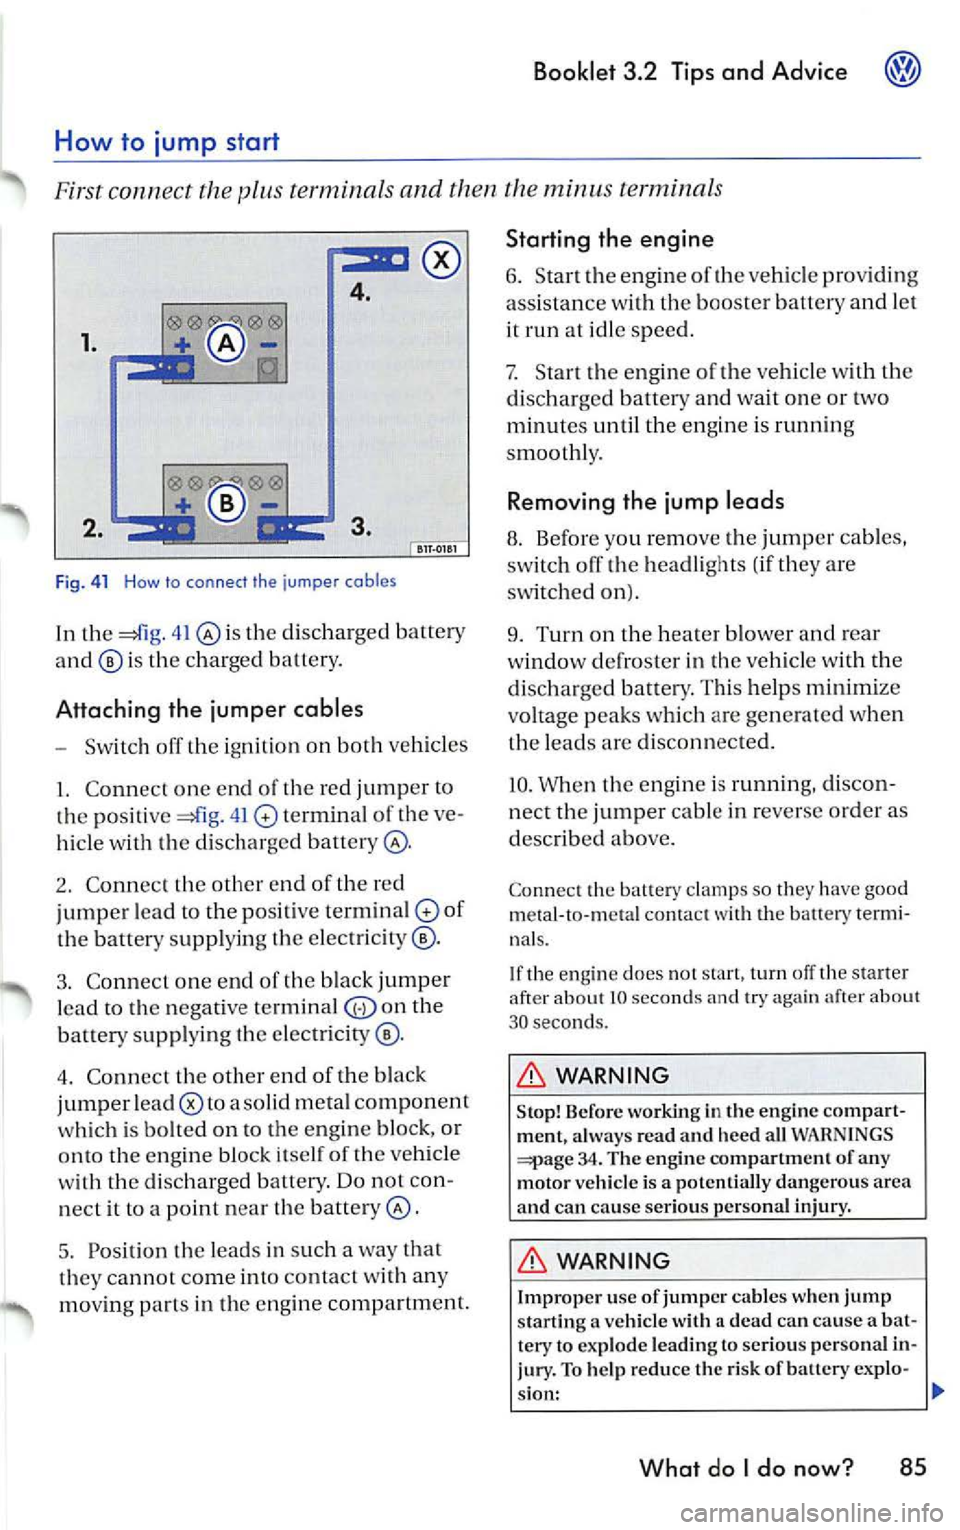
Fi g. 41 How to connect the jumper cables
In th e 41 th e di sc har ged batter y
is the c har ged battery.
Attaching the jumper cables
- Sw itch off th e igniti on on both vehicl es
I. Co nne ct one end of the red jump er to
po siti ve 41 termin al of the ve
hi cle w ith the disch arge d batter y@ .
2. Co nnect th e other end of the re d
jumper lea d
to the p ositive terminal of
th e batter y supp ly in g th e elec trici ty ® ·
3 . Co nne ct o n e end of the black jumper
l ea d to the neg ative terminal
the
batte ry sup plying th e elec tricity ®·
4 . Conn ect the othe r end of the black
jumper lead
a so lid m etal co mpon ent
w hich is bol te d on to the engin e block, or
onto the e ngin e bl ock itse lf of the ve hicle
wi th the d isc harg ed battery. Do nor con
n ect it to a po int n ear
batter y@ .
5. Position
leads in su ch a way that
they cannot come into conta ct w ith any
mo vin g part s in th e e ngine compa rtment.
Starting the engine
6 . Start en gine of vehicle providin g
ass ista nce with the booster batte ry and let
it run at id le speed .
7. Start the eng ine ofr he ve hicl e w ith the
di scharg ed batter y and wait o ne or two
m inut es unt il th e en gin e is runn ing
s mooth ly.
Removing the jump leads
8. Before yo u remov e th e jum per ca bles,
swi tch off the headli ghts ( if th ey are
on).
9. Turn on the hea te r blower and rea r
w ind ow defro ster in the ve hicle wi th th e
d isc ha rged battery . Thi s help s m inim iz e
v oltag e peaks w hich are ge ner ated when
t h e le ad s are disco nnect ed.
10 . W hen th e engin e is ru nnin g, d isco n
nect the jumper cable in reve rse order a s
desc ribed above.
Con nect th e battery clamps so the y ha ve good
metal- to- meta l co ntact w ith the battery termi
na ls.
If th e eng ine does not start , turn off th e s tarter
afte r about 10 seco nds and try aga in afce r ab out
30 seco nds.
WARNING
S to p! B efore wo rking in the engine comp art
ment, al ways read and he ed all WAR NIN GS
34 . The engin e compartment of any
motor v ehicl e is a pote ntially dan gero us area
and ca n ca use se rious per sonal inju ry.
WARNING
Improp er u se of jum per ca bles w hen jump
s tarting a ve hicl e with a dead can ca use a bat
tery to exp lode leading to seriou s perso nal i n
jury. To help reduce the risk of batt ery exp lo-
s ion:
What do I do now? 85
Page 410 of 477

then be towe d w ith all w hee ls rai sed. The ve hicle
s h ould be m ove d with a car
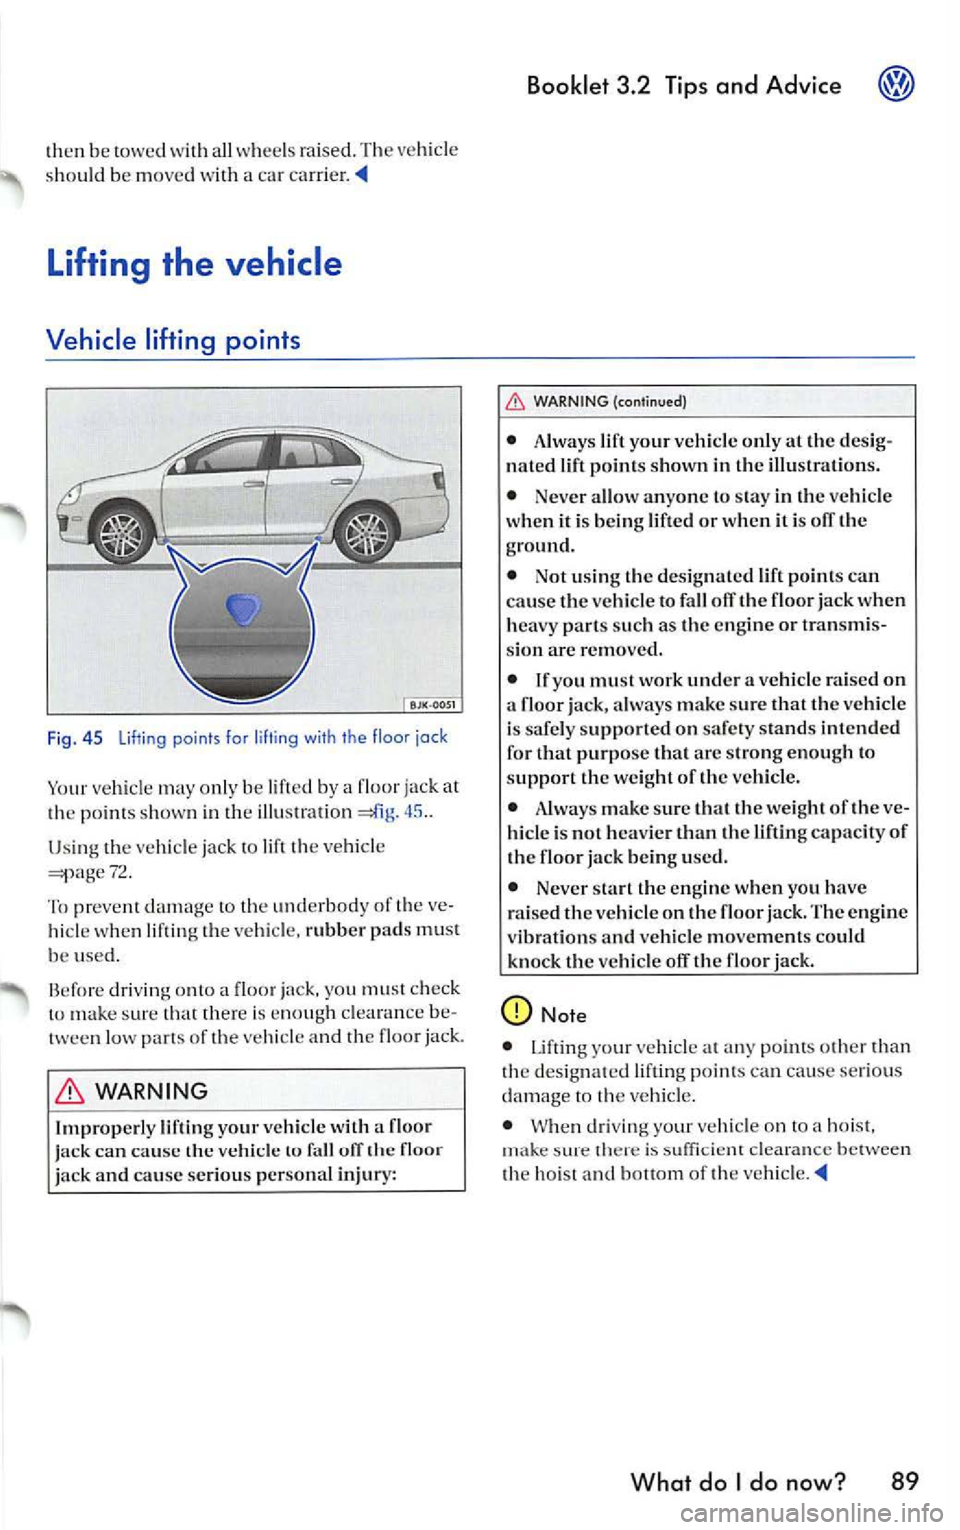
45 ..
Usin g th e ve hicle jack lift the vehi cle 72 .
To p reve nt damage to the un derbo dy of the ve
hicl e when lifting th e vehicl e, rubber pads must
be used.
B efo re driv ing o nto a flo or jack. yo u mu st chec k
make s ure that there is enou gh clea rance be
tw een low of the vehicle and the floor jack.
WARNING
Improp erl y your vehicl e with a floor
ja ck can cause the fl oor
j ac k and cause seriou s perso nal inju ry:
Booklet 3.2 Tips and Advice
WARNING (continued)
• Always lift your vehicle on ly at th e des ig
nated lift point s shown in the illu strations.
• Neve r allo w anyone to sta y in the ve hicle
when it is bein g lif ted or when it is
the
ground.
• Not u sin g the des ig nated lift point s can
ca use the vehicle to fall
the floor j ack when
hea vy part s such as the en gine or tran smi s
s ion are rem oved.
• If yo u must work under a veh icle rai sed on
a floor j ack, alway s mak e sure that the vehicle
i s sa fely supp orted on safety stands int end ed
for that purpose that arc strong e nough to
s upport th e we ight of the ve hicle.
•
mak e sure th at th e weight of th e ve
hicl e is not h eav ier than th e liftin g capac ity of
th e floor jack bein g used.
• Never start the engine when you have
rai sed th e vehicle on the floor jack. The engin e
v ibration s and vehicle move ment s co uld
knock the vehicle
the floor jac k.
Note
• Lifting yo ur vehicle at any point s oth er than
th e de signated lifting po int s c an cause se rious
damage
th e veh icle.
• When drivi ng yo ur vehicle on
10 hoist, m ake there is suffici ent cl earanc e betwee n
th e ho is t a nd bot1om of the
What do I do now? 89
Page 412 of 477

Booklet 3.2 Tips and Advice
your vehicle ou tside th e con
tin ent al limits of the Unit ed States o r Ca nada,
th ere is the p ossibilit y th at:
• Unleaded fuel s for veh icles w ith cata lyt ic
co nvert er may not be availabl e; •
may
have a co nsid erab ly low er octa ne
rating . Improp er fuel may cause engine damage;
• Service may be inad equ ate due to lack of
prop er service facilit ies, tools or test ing equip
n1en t;
• parts may not be readil y avail
abl e.
Volkswagen Servic e Repair Manual s
Volkswagen Official Factory serv ice and repair manual s are published as soon as
possible after model introduction.
Service and Hcpair manuals arc ava ilable from:
Hoben Bentley. Inc.
l-800- 423-4595
8 :30 AM to 5:00 PM Mo nday through
Thur sday.
Fro m 8:30 AM to 5 :3 0 PM EST. Fr iday
www .bentl eypub lish ers.com To
order serv ice manuals and other Volkswagen
Service literat ur e contact:
Vo lksw agen T echni cal Lit era tur e Ordering
Ce nter
l -800 -544-802 l
8:00 AM to 8:00 PM EST. Mo nda y th ro ugh
Fr iday .
www.vw.ddslt d.co m
What do I do now? 91