2009 VOLKSWAGEN GOLF oil level
[x] Cancel search: oil levelPage 114 of 516
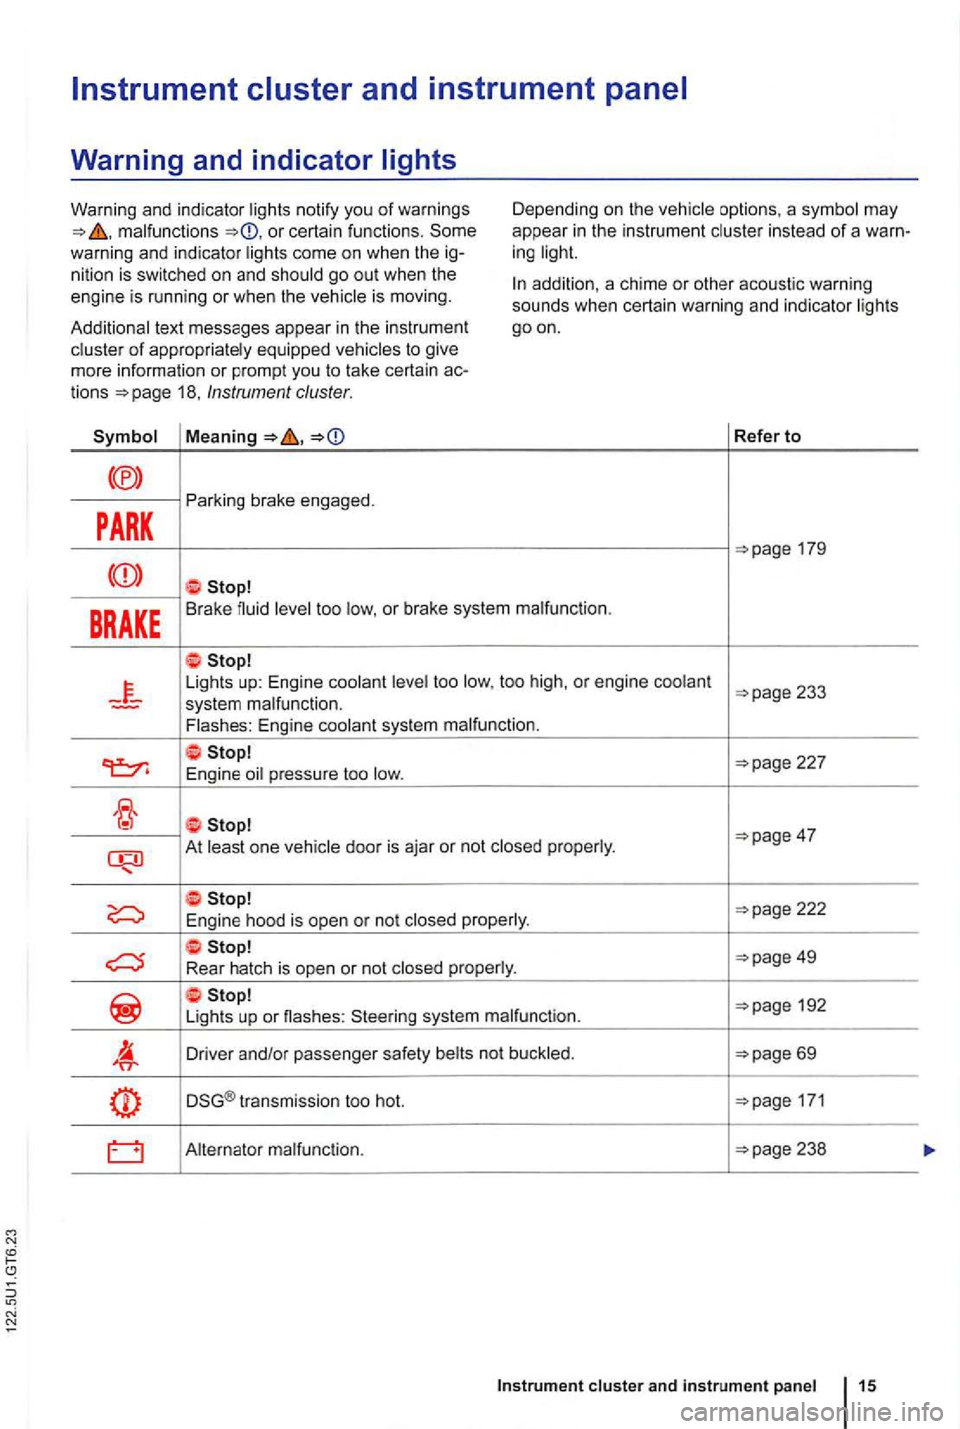
malfunctions or certain functions . Some
warning and indicator ligh ts come on when the ig
nition is swi tched on and shou ld go out when the
engine is running or when the vehicle is moving. D
epending on the vehicle options, a symbol may
appea r
in the instrum en t cluster in stead of a warn
ing light.
Additional text messages appear in th e instrumen t
cluster
of appropriately equipped vehicles to give
mo re information or prompt you to take certain actions 18, Instrument cluster.
addition, a chime or other acoustic warning
sounds when certain warning and indicator lights
goon.
Refer to
PARK
Parking brake engaged.
BRAKE Brake fluid level too low, o r brake system malfunction .
Lights up: Engine coolant level too low, too high , or engine coolant
227
E ngine oil pressure too low.
At least one vehicle door is aja r or not closed properly .
192
Li gh ts up or nashes : Steering system malfunction.
Driver and/or passenger safety belts not buckled .
DSG® transmission too hot. 171
Alternator malfunction.
cluster and instrument panel 15
Page 286 of 516
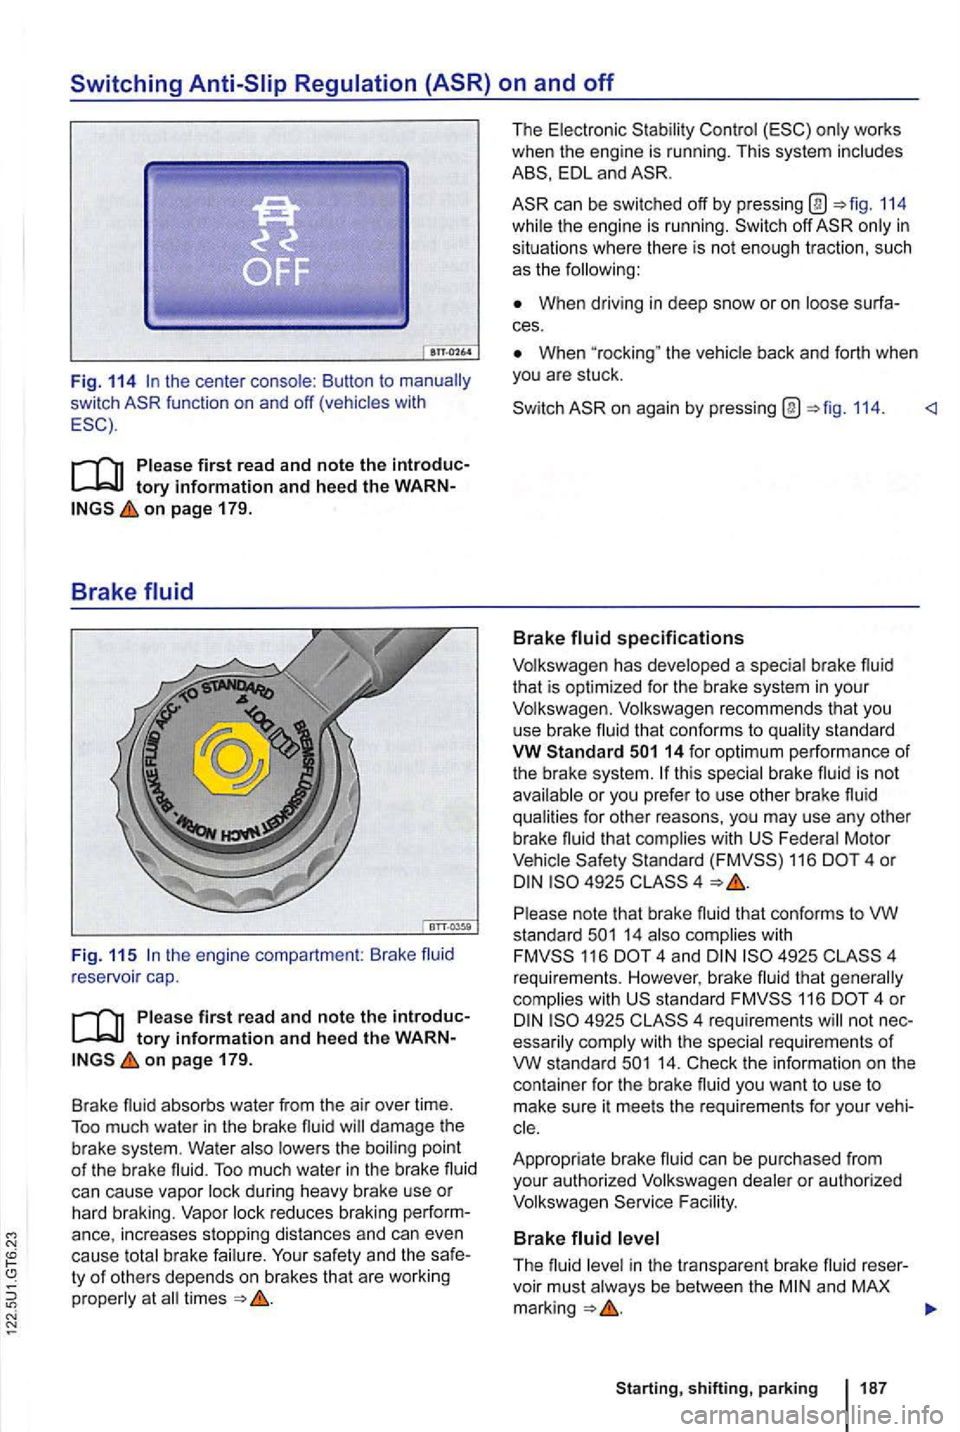
Switching
Fig. 114
on page 179.
Brake fluid
Fig. 11 5
on pag e 179.
Brake fluid
absorbs water from the air over time.
To o much water in the brake fluid will damage the brake system. Water also lowers th e boiling point of the brake fluid. Too much water in the brake flu id can cause vapor lock during heavy brake use or hard braking. Vapor lock reduces braking
ty of others depends on brakes that are worki ng
properly at all times
The Electronic
EDL and
can be switched off by pressi ng @ 114
wh ile the engine is running. off
When driving in deep s now o r on loose
When the vehicle back and forth when you are stuck.
on again by pressing @ 114.
Volkswagen has developed a special brake fluid
that is optimized for the brake system in your Volkswagen. Volkswagen recommends that you
use brake fluid that conforms to qua lity standa rd VW Standard
F ederal Motor Vehicle 116 4 o r
14 also complie s wi th 116 4 and 4925 4
requ irements . However. brake fluid that generally complies with s ta ndard 116 4 o r 4925 essarily comply with the special requirements of VW s ta ndard
cle.
Appropriate bra ke fluid
can be purchased from
you r authorized Volkswagen dealer or authorized
Volkswagen
The f lu id level in the transparent brake fluid voir must always be between the and MAX marking
Page 321 of 516
Care,
this sect ion
know how to carry out the
have the correc t technical information and the
proper too ls and supplies, and
are fami liar with the necessary safety precau
t ions
you are uncertain in any
Fa cility. from improperly per
formed work.
More
Exterior views
Windshie ld wipe r and was he r 129
S tart ing and stoppi ng t he engi ne
Brake fluid 179
Vehicle battery
E ngine oil 227
Engin e coolant 233
Parts, accesso ries, repairs and modifications 283
Unintend ed vehicle movement during maintenanc e work can ca use serious personal injuries.
Care , cleaning, maintenance
Never work under the vehicle unless you have safely secured the vehicle from moving. you mus t work under the vehicle with the
wheels on the g round , alway s make sure that the vehicle is on level ground, that
Th e engine compartment of any motor vehicle is a potent ially dangerous area and can cause serious personal injury.
Always use extreme caution when doing any work
Never p erform any work in the engine compartment unless you know exactly how to carry out the job and have the correct tec hnical information and the correct tools .
you are uncertain about what to do, have the work performed by an authorized
Volk swagen dealer, an authorized Volksw a
ge n Service Facility, or another qualified workshop. Serio us persona l injury may result from improperly performed work.
Page 326 of 516
Engine oil
find information about:
Wa rning a
nd indicator . . . . . . . . . . . . . . . 227
Engin e oil specifications . . . . . . . . . . . . . . . . . . 228
Engin e oil capac ity . . . . . . . . . . . . . . . . . . . . . . 229
Checking th e engine oil level and adding oil . 229
Eng ine oil consumpt ion . . . . . . 23 0
Changing engine oil . . . . . . . . . . . . . . .
231
More information:
P reparations for work ing in the engine compart
m en t 222
Parts, accessories, repairs and modi fications 283
handling of engine oil can cause vere burns and other serious injuries.
Store engine oil only in the closed original container. This also applies to used oil until disposal.
tainers that might mislead someone into drinking from them.
other operating fluids, engine oil can leaking and
sp illed operating fluids and dispose of them erly in accordance with
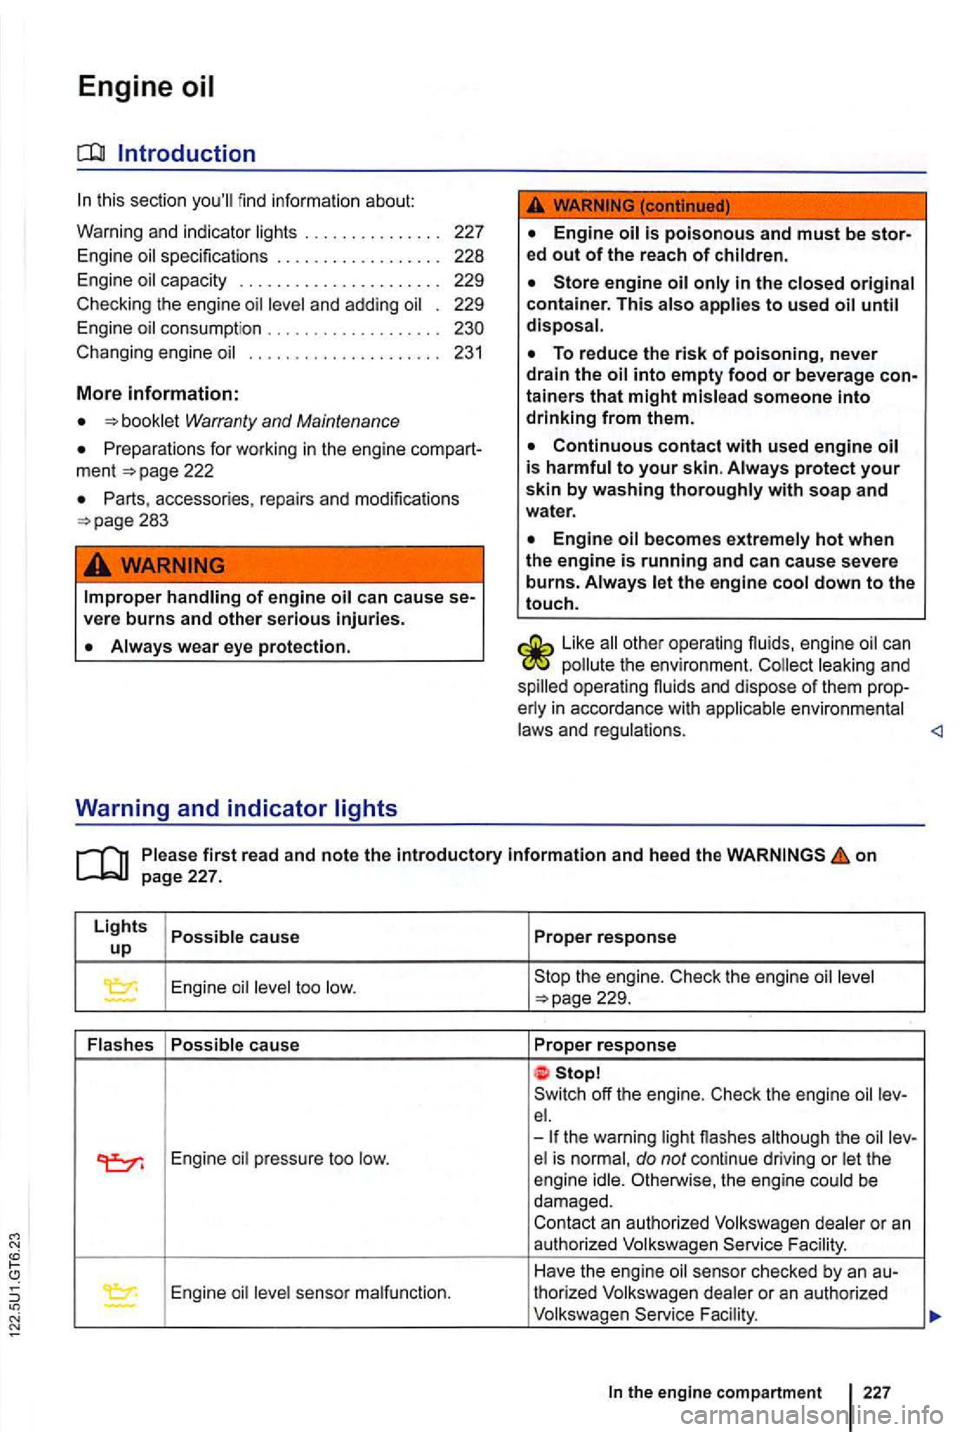
Please first read and note the introductory information and heed the on page 227.
Lights Possible cause Proper response up
Engine oil
leve l too low. the engine. Check the engine oil level
-
off the engine. Check the engin e lev-
el. -the warn ing light flashes although the oil lev-Engin e oil p ressure to o low . el is norm al, do not co ntinue driving or let the
engi ne idle. the engine could be damaged.
Contact an auth orize d Volkswagen dealer or an
authorized Volkswagen Facility.
Have the engine oil sensor checked by an au-
Engine oil leve l se nsor malfun ction. thorized Volksw agen dealer or an authorized --Volkswage n Faci lity.
the engine compartment 227
Page 328 of 516
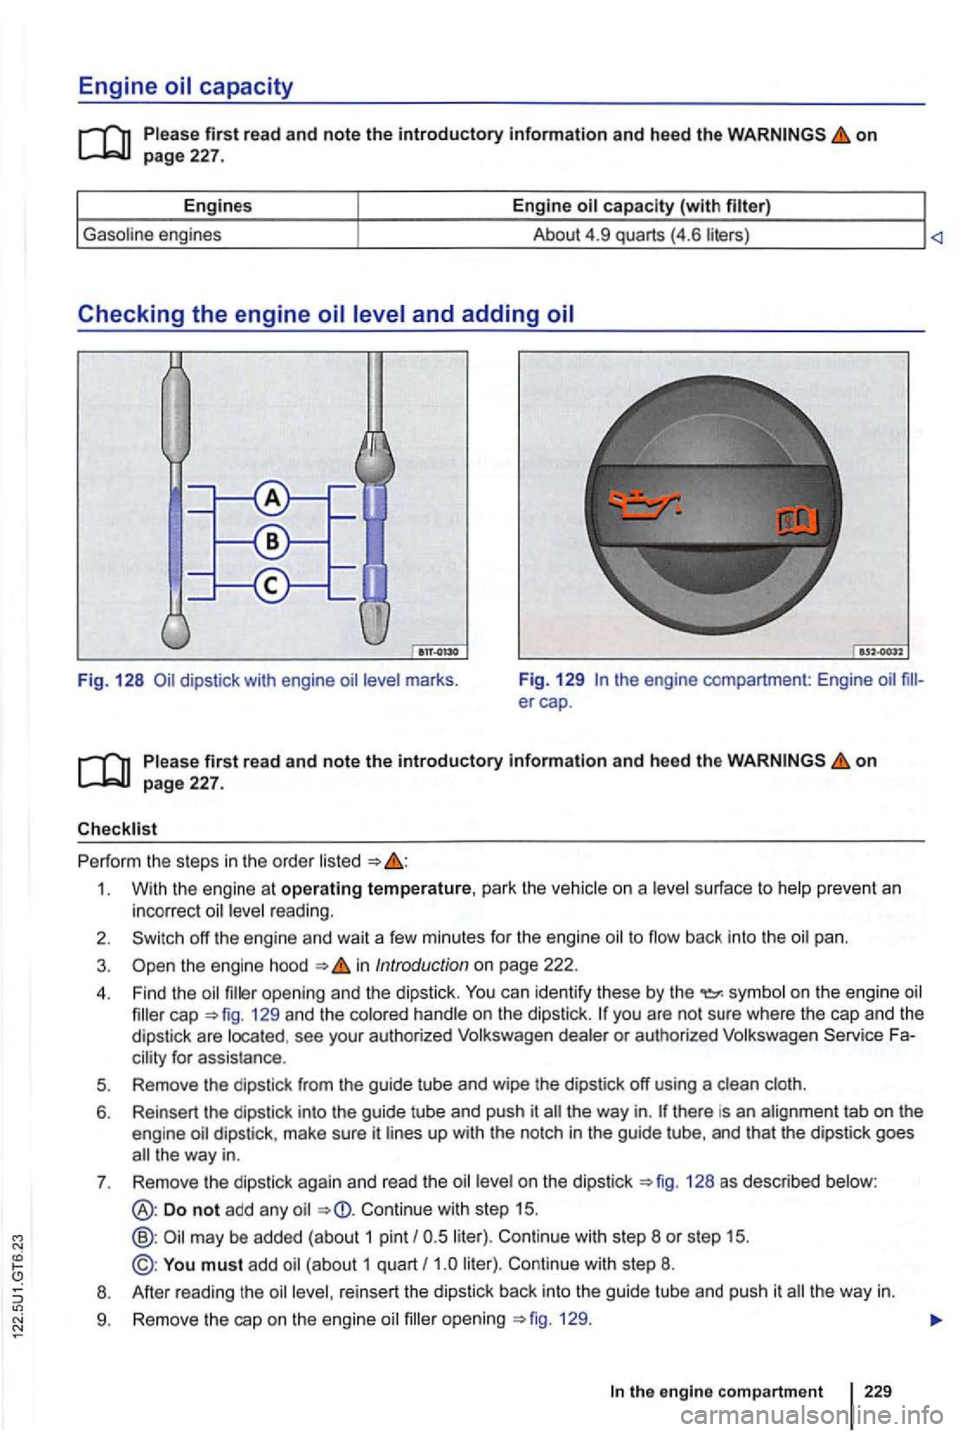
Engine
on page 227.
Engin es Engine
Checking the engine
Fig. 128 marks . Fig
. 129 the engine compartment: Engine
first rea d and note the introductory information and heed the on page 227.
Perf orm the steps in the order
1. With the engine at operating temperature, park the ve hic le on a surface to prevent an
incorrect r eadi ng.
2. off the engine and wait a few minutes for the engine to flow back int o the pan .
3. the engi ne hood in Introduc tion on page 222.
4. Find the opening and the dipstic k. can identify these by the on the engi ne cap =>fig . 129 and the co lo red hand le on the dipstick . dealer or aut horized Fa
the way in. dipstick, make sure it lin es up with the notch in the guide tube, and that the dipstick goes the way in.
7 . Remove the dipstick again and
read the on the dipstick 128 as described below:
Do not add any Continue with step 15.
@ : may be added (about 1 pint liter). Continue with step 8 or step 15.
©: You must add Continue with step 8.
8 . After reading the oil level , reinsert the dipstick back into the guide tube
and push it the way in.
9. Remove the cap on the engine oil opening =>fig. 129 .
the engine compartment 229
Page 395 of 516
As long as the indicator lights are on, expect engine malfunctions , increased
fuel consumption and loss of engine efficiency . <1
tory information and heed the on page 295.
T he
catalytic converter provides exhaust gas lrealmenll o help reduce pollutants in the exhaust
gas . To help ensure long service life of the exhaust
system and gasoline engine catalytic converter :
use unleaded fuel.
Neve r comple te ly empty the fuel la nk .
Do not exceed the corre ct oil level 227 .
Do not low the vehicle to start it, but use a
j u mp-start instead 327.
Care, cleaning, maintenance
you expe rience misfire s, loss of power or th e
Facili ty. Otherwise , gasoli n e
could reach the exhaust system and gel into the
atmosphere . The catalyt ic converter could also be
damaged
by overhea ting! <1
Page 506 of 516
at
AdBiue® Fluid: Check and add if necessary
(Pas sat TDI engine only)
Air e lement and sn ow scree n: Replace el
e m ent an d scre en and housing (if
Body : Visual in spectio n for corrosion
B rakes : Inspect brake system and shock ab
sorber for leaks and damage, check thickness of brake pads , b rake disc conditio n front and rear and
c h eck brake fluid leve l subject to abrasion (front and rear)
Coolan t level and frost protection: Check
CV joints: Check for leaks and damage
Diesel Particulate Filte r: Perform after the first or (DPF) replacem ent: Check ash
loading according to manufa ctur er wo rk procedure;
Repl ace
if necessary. DPF replace ment
is not necessary, perform ch eck every
miles thereafte r until rep lacement beco mes neces
sary.
Door checks and mounting pins: Lubricate
Dust and
Engine : C hange oil and replace oil
Engine and engine compartm ent components:
Check (from above) f or leaks and damage
Engin e a nd eng ine compa rtment co mponents:
C heck (from below) fo r leaks and damage, check
tran smi ssio n, final drive , and drive sha ft bo ots
Exha ust syste m: C heck for leaks, damage, and
secure fittings
Fuel filter: Replace
Interior lighting and glove box lights, cigarette
lighter/power horn, and
Lighting: F ront and rea r lights, luggage com
partmen t
Ribbed Belt: Ch eck condit io n
Service interval display: Reset
Service sticker: Enter the date of the next serv
ice on the service sticker and apply to the driver's
side door pillar
Spark plugs : Replace (All engines except
S unroof and Panoramic sunroof : Check, clean,
and lubrica te (if
s unroof and check front and
r ear wate r drains a nd clea n if necessary (if cable)
ne rod ends : Check for excessive play and
l oose ness, check boots
Check and replace if necessary miles, check
every mil es after. If not repl aced at mil es, chec k every
Check tread depth, condition , tire age ,
wear pattern and pressu re o f tires (including spare)
Rotate front to rea r
(non Automa tic) : Change
fluid and
Underbody : Inspect unde r sea l, u nderbody
t rims, pipe placing, and plug for damage
Winds hield washer, headligh t clea ning system,
and wipe r blades : C heck fo r da mage and function,
Check fluid level and add
if necessary