Page 110 of 672
110
1-6. Theft deterrent system
Alarm (if equipped)
The system sounds the alarm and flashes lights when forcible entry
is detected.
■ Triggering of the alarm
The alarm is triggered in the following situations.
●A locked door is unlocked or opened in any way other than
using the wireless remote control door lock function or key.
The doors will lock again automatically.
● The hood is opened while t he vehicle is locked.
● Vehicles with the glass breakage sensor (if equipped): The
side windows are tapped or broken.
● The battery is reconnected.
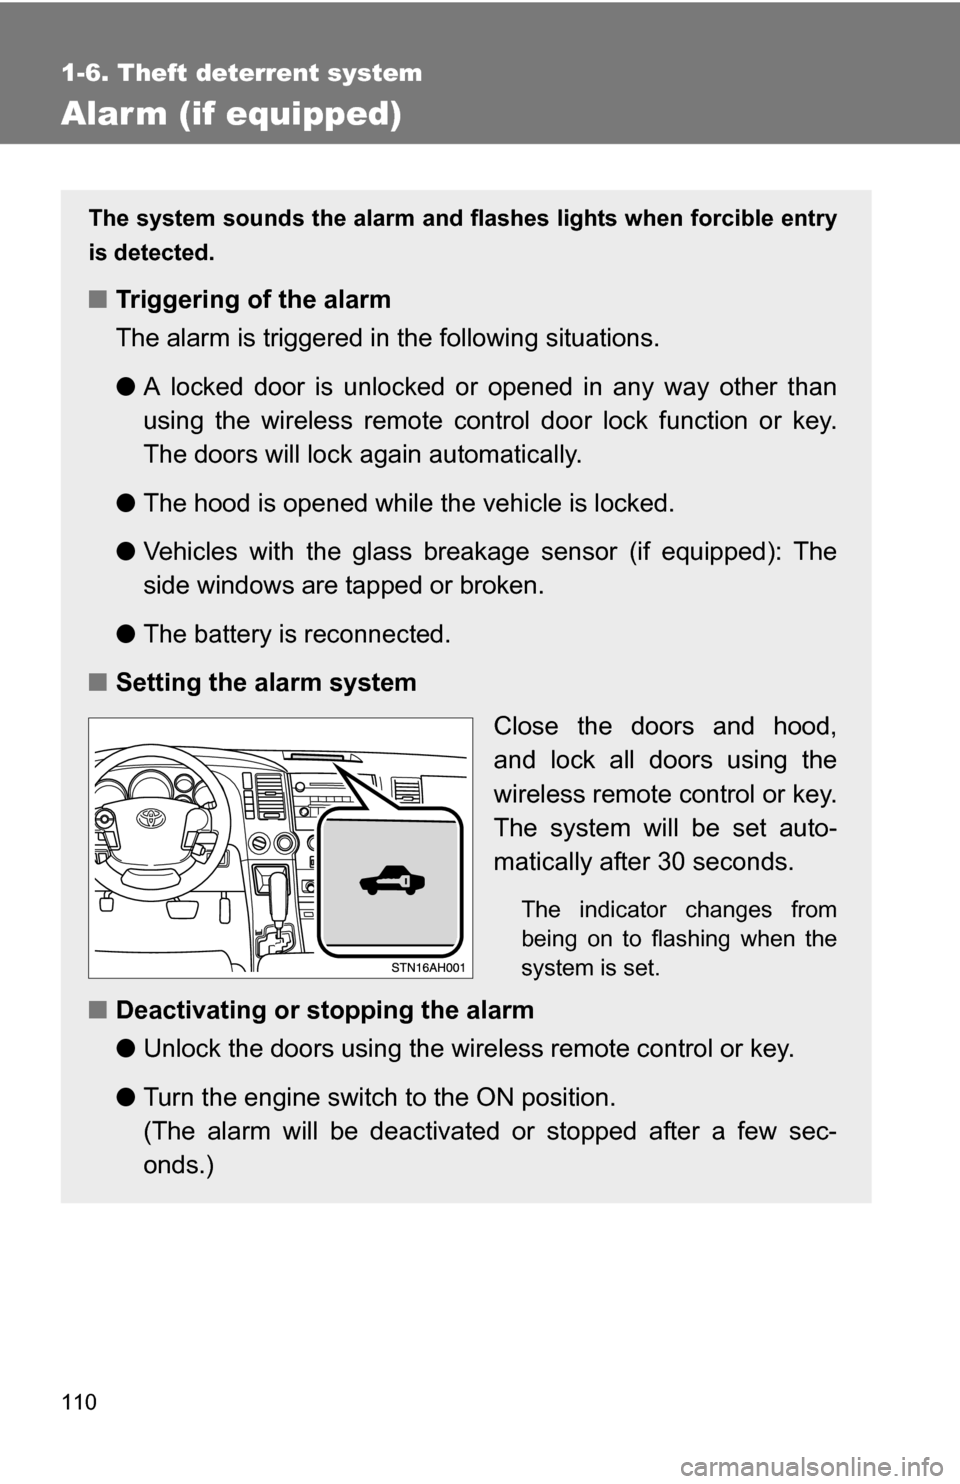
■ Setting the alarm system
Close the doors and hood,
and lock all doors using the
wireless remote control or key.
The system will be set auto-
matically after 30 seconds.
The indicator changes from
being on to flashing when the
system is set.
■Deactivating or stopping the alarm
●Unlock the doors using the wire less remote control or key.
● Turn the engine switch to the ON position.
(The alarm will be deactivated or stopped after a few sec-
onds.)
Page 111 of 672
111
1-6. Theft deterrent system
1
Before driving
■
Items to check before locking the vehicle
To prevent unexpected triggering of the alarm and vehicle theft, make sure
of the following.
●Nobody is in the vehicle.
● The windows and moon roof are closed before the alarm is set.
● No valuables or other personal items are left in the vehicle.
■ Triggering of the alarm
The alarm may be triggered in the following situations.
(Stopping the alarm deactivates the alarm system.)
●A person inside the vehicle opens a door or hood.
● The battery is recharged or replaced when the vehicle is locked.
■ Panic mode
P. 4 4
■ When the battery is disconnected
Be sure to cancel the alarm system.
If the battery is discharged before canceling the alarm, the system may be
triggered when the battery is reconnected.
Page 142 of 672
142 1-7. Safety information
CAUTION
■Child restraint precautions
●Regular Cab models: A forward-facing child restraint system which
belongs to a passenger risk group should never be installed on the right
passenger seat with the passenger airbag off switch in the AUTO position,
because the force of the deploying airbag could cause death or serious
injury to the child in forward seating position. ( P. 128)
● Regular Cab models (Bench type seat): Do not install a child restraint sys-
tem on the center seat if it interferes with driving operations such as
changing the shift lever position. In this case, install the child restraint sys-
tem on the right passenger seat.
● Do not use the seat belt extender when installing a child restraint system
on the front or rear passenger seat. If installing a child restraint system
with the seat belt extender connected to the seat belt, the seat belt will not
securely hold the child restraint system, which could cause death or seri-
ous injury to the child or other passengers in the event of collision.
● Do not allow the child to lean his/her head or any part of his/her body
against the door or the area of the sea t, front and rear pillars or roof side
rail from which the side airbags or curtain shield airbags deploy even if the
child is seated in the child restraint system. It is dangerous if the side air-
bags and curtain shield airbags inflate, and the force of the rapid inflation
could cause death or serious injury to the child.
● Make sure you have complied with all installation instructions provided by
the child restraint manufacturer and that the system is properly secured. If
it is not secured properly, it may cause death or serious injury to the child
in the event of a sudden stop or accident.
■ Child restraint lock function belt precaution
Do not allow children to play with the child restraint lock function belt. If the
belt becomes twisted around a child’s neck, it will not be possible to pull the
belt out leading to choking or other serious injuries that could result in death.
If this occurs and the buckle cannot be unfastened, scissors should be used
to cut the belt.
Page 168 of 672
168
2-1. Driving procedures
Driving the vehicle
The following procedures should be observed to ensure safe driv-
ing.
■ Starting the engine ( P. 177)
■ Driving
With the brake pedal depressed, shift the shift lever to D. ( P. 180)
Release the parking brake. ( P. 186)
Gradually release the brake pedal and gently depress the
accelerator pedal to accelerate the vehicle.
■ Stopping
With the shift lever in D, depress the brake pedal.
If necessary, set the parking brake.
When the vehicle is stopped for an extended period of time, shift
the shift lever to P or N. ( P. 180)
■Parking the vehicle
With the shift lever in D, depress the brake pedal.
Set the parking brake. ( P. 186)
Shift the shift lever to P. ( P. 180)
When parking on a hill, if necessary, block the wheels.
Turn the engine switch off to stop the engine.
Lock the door, making sure that you have the key on your
person.
Page 178 of 672
178 2-1. Driving procedures
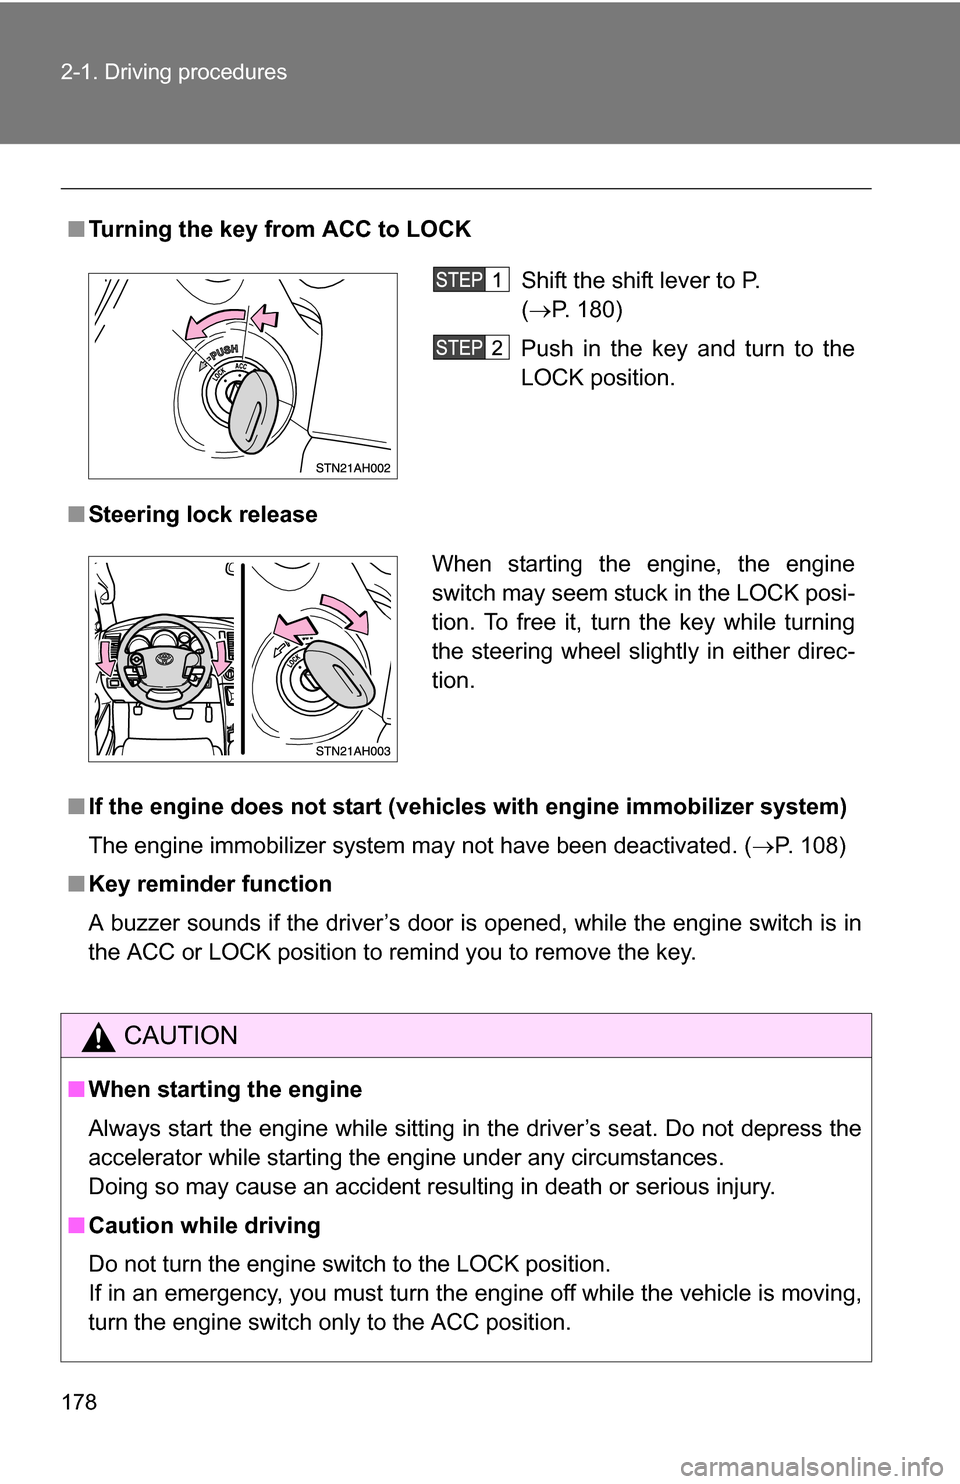
■Turning the key from ACC to LOCK
■ Steering lock release
■ If the engine does not start (vehic les with engine immobilizer system)
The engine immobilizer system may not have been deactivated. ( P. 108)
■ Key reminder function
A buzzer sounds if the driver’s door is opened, while the engine switch is in
the ACC or LOCK position to remind you to remove the key.
CAUTION
■When starting the engine
Always start the engine while sitting in the driver’s seat. Do not depress the
accelerator while starting the engine under any circumstances.
Doing so may cause an accident resulting in death or serious injury.
■ Caution while driving
Do not turn the engine switch to the LOCK position.
If in an emergency, you must turn the engine off while the vehicle is moving,
turn the engine switch only to the ACC position.
Shift the shift lever to P.
(P. 180)
Push in the key and turn to the
LOCK position.
When starting the engine, the engine
switch may seem stuck in the LOCK posi-
tion. To free it, turn the key while turning
the steering wheel slightly in either direc-
tion.
Page 200 of 672
200 2-2. Instrument cluster
Average Speed
Feature customizationThe vehicle can be customized while the vehicle is stopped.
Press the SETUP US/M button to select the item you want to
customize unit.
UNITS
KEYLESS ENTRY FEEDBACK
KEYLESS ENTRY RELOCK TIMER
KEYLESS ENTRY ALL DOORS UNLOCK
DOOR AUTO LOCKING
DOOR AUTO UNLOCKING
HEADLAMPS AUTO OFF TIMER
COURTESY LAMPS OFF TIMER
DEFAULT SETTING
Displays the average vehicle speed since the
engine was started or the function was reset.
The function can be reset by pushing the SELECT
RESET button for more than 2 seconds.
Page 201 of 672
201
2-2. Instrument cluster
2
When driving
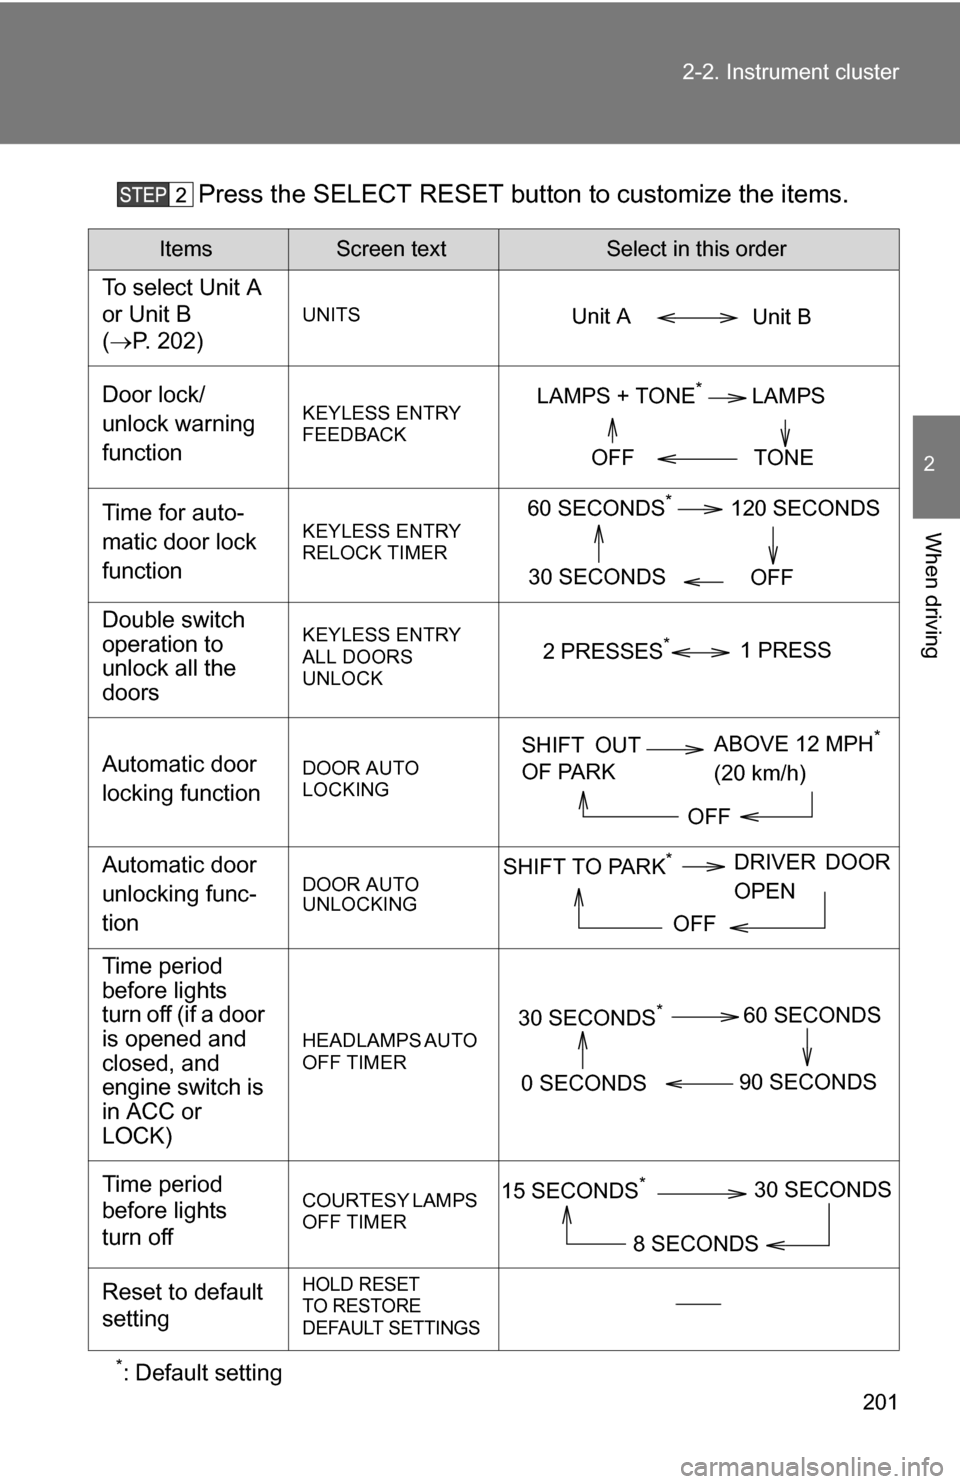
Press the SELECT RESET butt
on to customize the items.
*: Default setting
ItemsScreen textSelect in this order
To select Unit A
or Unit B
(P. 202)
UNITS
Door lock/
unlock warning
functionKEYLESS ENTRY
FEEDBACK
Time for auto-
matic door lock
functionKEYLESS ENTRY
RELOCK TIMER
Double switch
operation to
unlock all the
doorsKEYLESS ENTRY
ALL DOORS
UNLOCK
Automatic door
locking functionDOOR AUTO
LOCKING
Automatic door
unlocking func-
tionDOOR AUTO
UNLOCKING
Time period
before lights
turn off (if a door
is opened and
closed, and
engine switch is
in ACC or
LOCK)
HEADLAMPS AUTO
OFF TIMER
Time period
before lights
turn offCOURTESY LAMPS
OFF TIMER
Reset to default
settingHOLD RESET
TO RESTORE
DEFAULT SETTINGS
Unit B
Unit A
LAMPS + TONE*LAMPS
TONE
OFF
60 SECONDS*120 SECONDS
30 SECONDS OFF
2 PRESSES*1 PRESS
SHIFT OUT
OF PARKABOVE 12 MPH*
(20 km/h)
OFF
SHIFT TO PARK*DRIVER DOOR
OPEN
OFF
30 SECONDS*60 SECONDS
90 SECONDS
0 SECONDS
15 SECONDS*30 SECONDS
8 SECONDS
Page 208 of 672
208 2-3. Operating the lights and wipers
■Daytime running light system (if equipped)
To make your vehicle more visible to other drivers, the front turn signal lights
turn on automatically whenever the engine is started and the parking brake
is released. Daytime running lights are not designed for use at night.
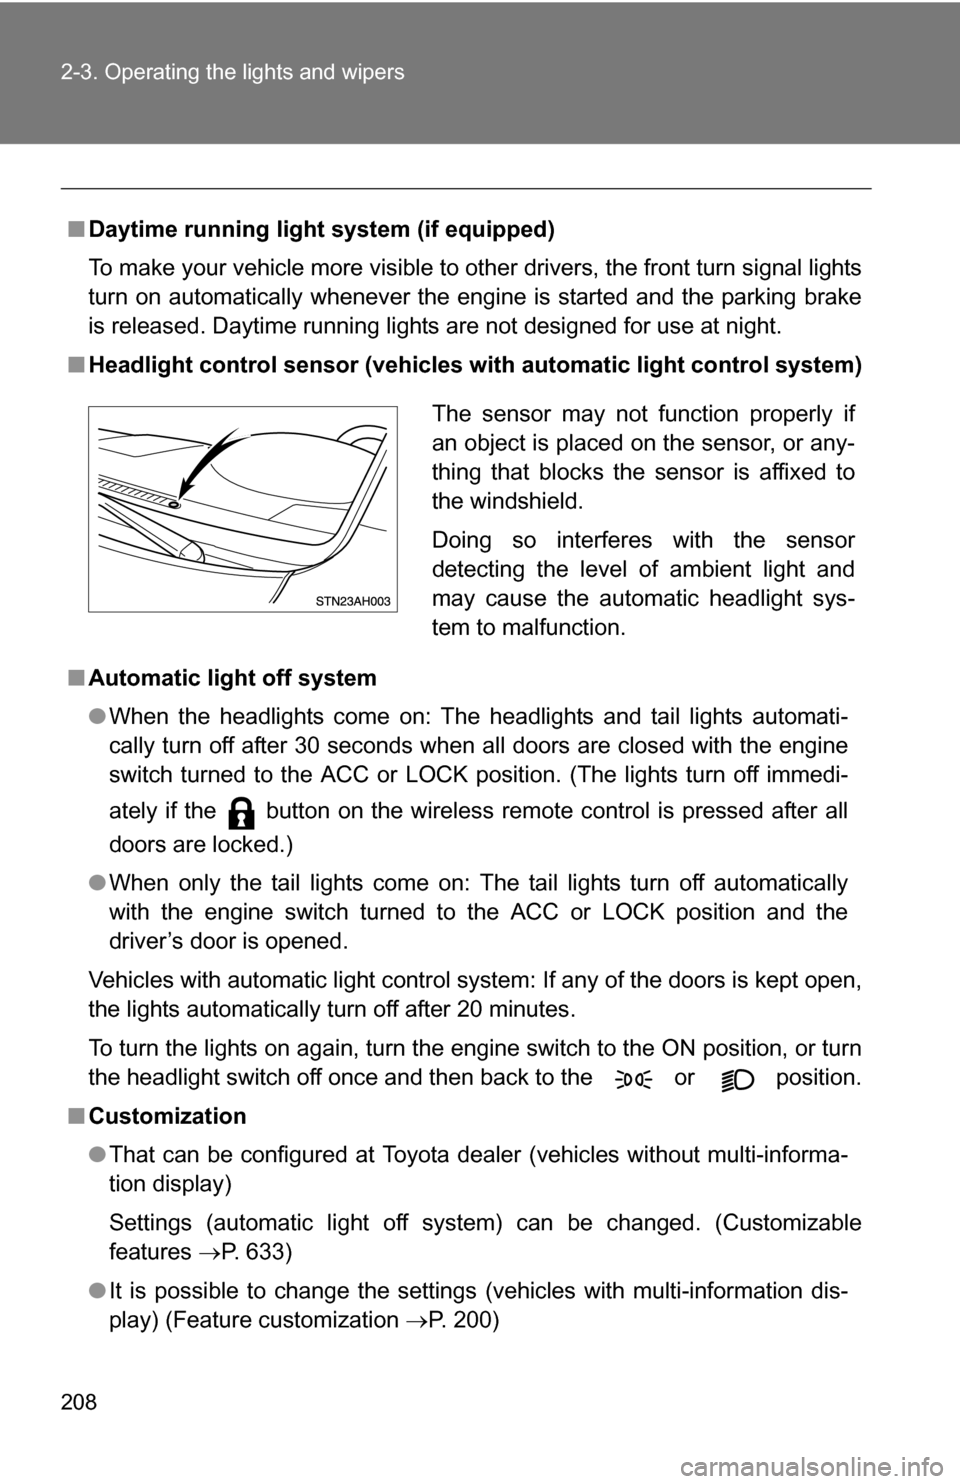
■ Headlight control sensor (vehicles wi th automatic light control system)
■ Automatic light off system
●When the headlights come on: The headlights and tail lights automati-
cally turn off after 30 seconds when all doors are closed with the engine
switch turned to the ACC or LOCK position. (The lights turn off immedi-
ately if the button on the wireless remote control is pressed after all
doors are locked.)
● When only the tail lights come on: The tail lights turn off automatically
with the engine switch turned to the ACC or LOCK position and the
driver’s door is opened.
Vehicles with automatic light control system: If any of the doors is kept open,
the lights automatically turn off after 20 minutes.
To turn the lights on again, turn the engine switch to the ON position, or turn
the headlight switch off once and then back to the or position.
■ Customization
●That can be configured at Toyota dealer (vehicles without multi-informa-
tion display)
Settings (automatic light off system) can be changed. (Customizable
features P. 633)
● It is possible to change the settings (vehicles with multi-information dis-
play) (Feature customization P. 200)
The sensor may not function properly if
an object is placed on the sensor, or any-
thing that blocks the sensor is affixed to
the windshield.
Doing so interferes with the sensor
detecting the level of ambient light and
may cause the automatic headlight sys-
tem to malfunction.