Page 136 of 672
136 1-7. Safety information
CAUTION
■Front passenger occupant cl assification system precautions
● Do not apply a heavy load to the front passenger seat or equipment (e.g.
seatback pocket).
● Do not apply pressure to the right front passenger seat by resting hands or
legs on the seatback.
● Double Cab and CrewMax models: Do not put weight on the front passen-
ger seat by putting your hands or feet on the front passenger seat seat-
back from the rear passenger seat.
● Double Cab and CrewMax models: Do not let a rear passenger lift the
front passenger seat with their feet or press on the seatback with their
legs.
● Do not put objects under the front passenger seat.
● Do not recline the front passenger seatback so far that it touches a rear
seat or a back wall. This may cause the AIR BAG OFF indicator light to be
illuminated, which indicates that the passenger’s airbags will not deploy in
the event of a severe accident. If the seatback touches the rear seat or
back wall, return the seatback to a position where it does not touch the
rear seat or back wall. Keep the front passenger seatback as upright as
possible when the vehicle is moving. Reclining the seatback excessively
may lessen the effectiveness of the seat belt system.
● If an adult sits in the right front passenger seat, the AIR BAG ON indicator
light is illuminated. If the AIR BAG OFF indicator is illuminated, ask the
passenger to sit up straight, well back in the seat, feet on the floor, and
with the seat belt worn correctly. If the AIR BAG OFF indicator still remains
illuminated, either ask the passenger to move to the rear seat, or if that is
not possible, move the right front passenger seat fully rearward.
● When it is unavoidable to install the forward-facing child restraint system
on the front passenger seat, install the child restraint system on the front
passenger seat in the proper order. (P. 144)
● Do not modify or remove the front seats.
● Do not kick the front passenger seat or subject it to severe impact. Other-
wise, the SRS warning light may come on to indicate a malfunction of the
detection system. In this case, contact your Toyota dealer immediately.
Page 167 of 672
When driving2
167
2-1. Driving procedures ........ 168Driving the vehicle............ 168
Engine (ignition) switch .... 177
Automatic transmission................... 180
Turn signal lever .............. 185
Parking brake ................... 186
Horn ................................. 187
2-2. Instrument cluster.......... 188 Gauges and meters ......... 188
Indicators and warning lights .............................. 194
Multi-information display............................ 198
Accessory meter .............. 204
2-3. Operating the lights and wipers ........................... 207
Headlight switch ............... 207
Fog light switch ................ 210
Windshield wipers and washer ........................... 211 2-4. Using other driving
systems ......................... 214
Cruise control ................... 214
Intuitive parking assist...... 217
Four-wheel drive system ........................... 223
AUTO LSD system........... 227
Driving assist systems ..... 230
2-5. Driving information ........ 236 Off-road precautions ........ 236
Cargo and luggage .......... 241
Vehicle load limits ............ 244
Winter driving tips ............ 246
Trailer towing ................... 250
Dinghy towing .................. 272
Page 194 of 672
194
2-2. Instrument cluster
Indicators and warning lights
The indicator and warning lights on the instrument cluster and cen-
ter panel inform the driver of the status of the vehicle’s various sys-
tems.
■ Instrument cluster
Vehicles with multi- information display
Vehicles without multi-in formation display (type A)
Page 197 of 672
197
2-2. Instrument cluster
2
When driving
CAUTION
■
If a safety system warning light does not come on
Should a safety system light such as ABS and the SRS airbag warning light
not come on when you start the engine, this could mean that these systems
are not available to help protect you in an accident, which could result in
death or serious injury. Have the vehicle inspected by your Toyota dealer
immediately if this occurs.
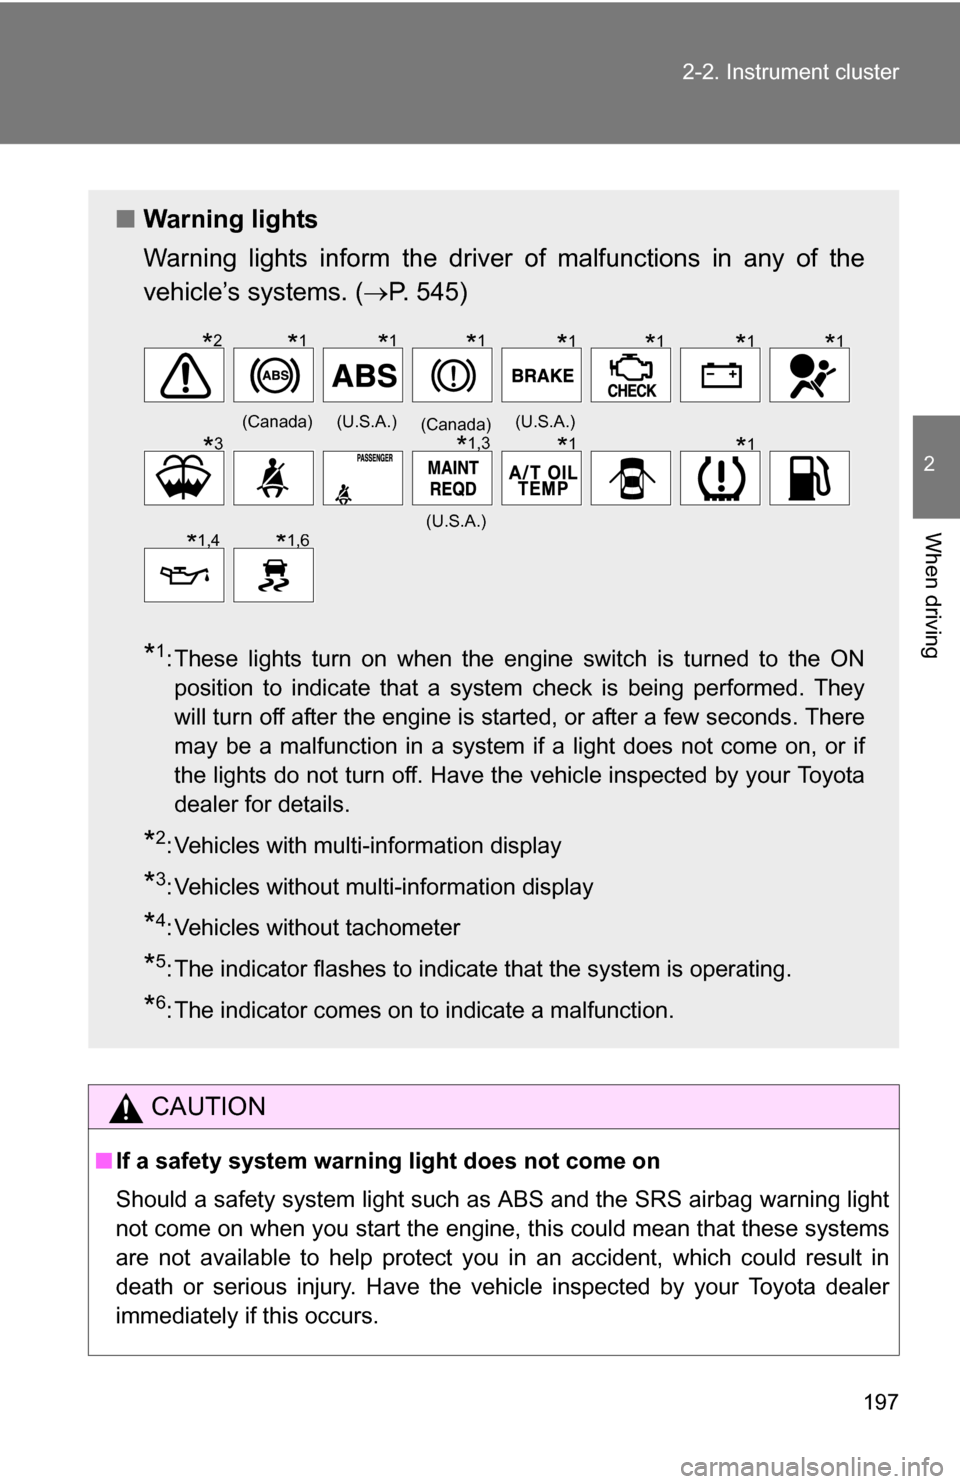
■ Warning lights
Warning lights inform the driver of malfunctions in any of the
vehicle’s systems. ( P. 545)
*1: These lights turn on when the engine switch is turned to the ON
position to indicate that a system check is being performed. They
will turn off after the engine is started, or after a few seconds. There
may be a malfunction in a system if a light does not come on, or if
the lights do not turn off. Have the vehicle inspected by your Toyota
dealer for details.
*2: Vehicles with multi-information display
*3: Vehicles without multi-information display
*4: Vehicles without tachometer
*5: The indicator flashes to indicate that the system is operating.
*6: The indicator comes on to indicate a malfunction.
(Canada)(U.S.A.)(Canada)(U.S.A.)
(U.S.A.)
*2*1*1*1*1*1*1*1
*3*1,3*1*1
*1,4*1,6
Page 201 of 672
201
2-2. Instrument cluster
2
When driving
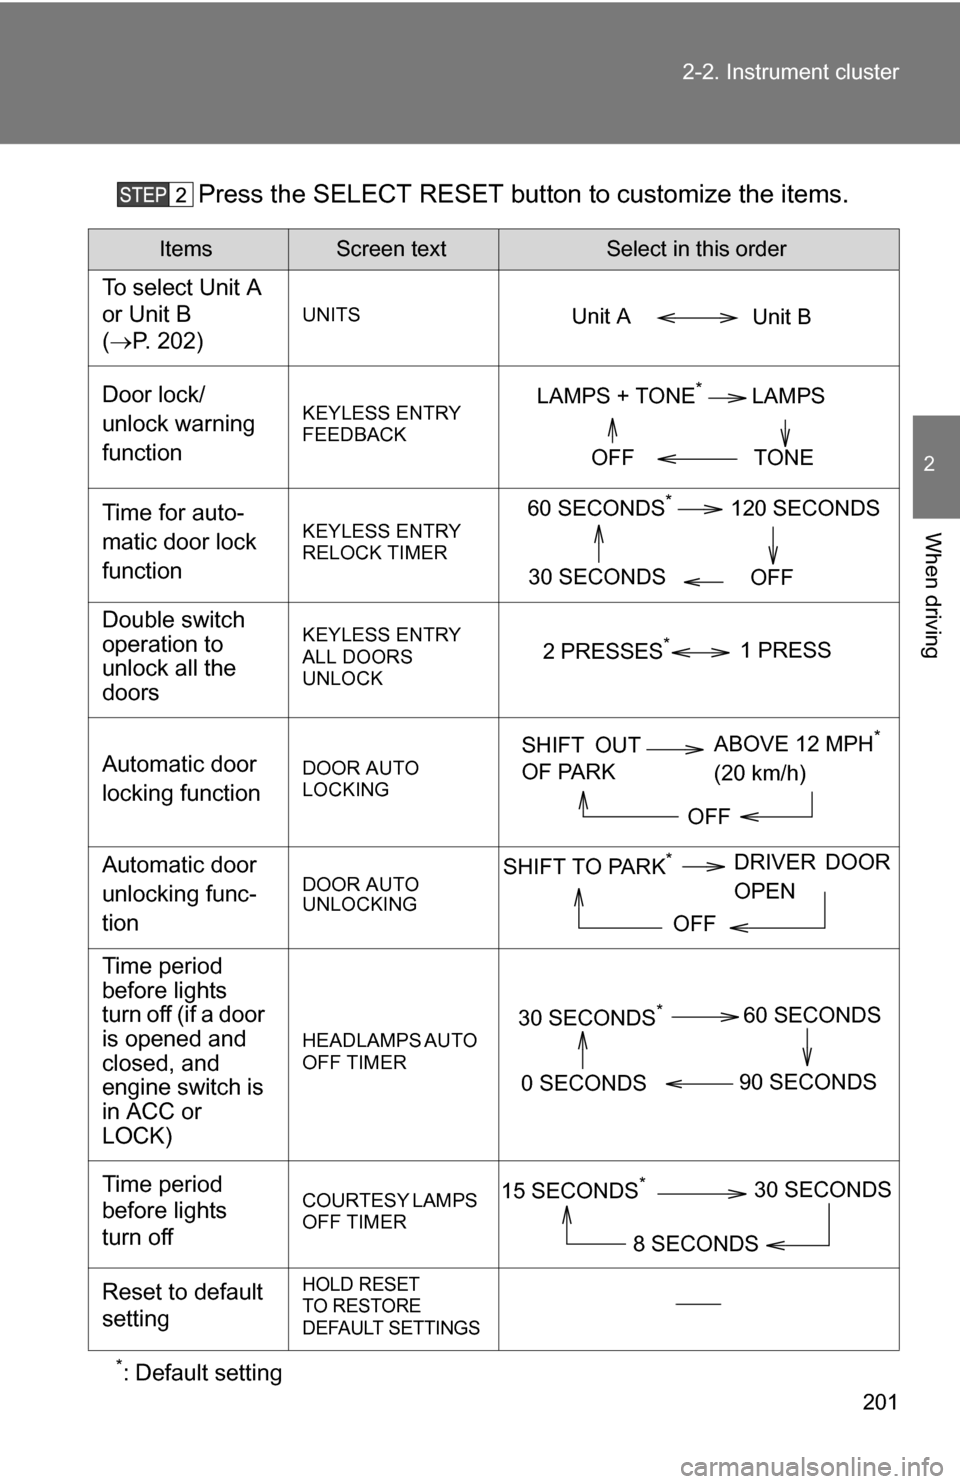
Press the SELECT RESET butt
on to customize the items.
*: Default setting
ItemsScreen textSelect in this order
To select Unit A
or Unit B
(P. 202)
UNITS
Door lock/
unlock warning
functionKEYLESS ENTRY
FEEDBACK
Time for auto-
matic door lock
functionKEYLESS ENTRY
RELOCK TIMER
Double switch
operation to
unlock all the
doorsKEYLESS ENTRY
ALL DOORS
UNLOCK
Automatic door
locking functionDOOR AUTO
LOCKING
Automatic door
unlocking func-
tionDOOR AUTO
UNLOCKING
Time period
before lights
turn off (if a door
is opened and
closed, and
engine switch is
in ACC or
LOCK)
HEADLAMPS AUTO
OFF TIMER
Time period
before lights
turn offCOURTESY LAMPS
OFF TIMER
Reset to default
settingHOLD RESET
TO RESTORE
DEFAULT SETTINGS
Unit B
Unit A
LAMPS + TONE*LAMPS
TONE
OFF
60 SECONDS*120 SECONDS
30 SECONDS OFF
2 PRESSES*1 PRESS
SHIFT OUT
OF PARKABOVE 12 MPH*
(20 km/h)
OFF
SHIFT TO PARK*DRIVER DOOR
OPEN
OFF
30 SECONDS*60 SECONDS
90 SECONDS
0 SECONDS
15 SECONDS*30 SECONDS
8 SECONDS
Page 492 of 672
492 4-3. Do-it-yourself maintenance
Washer fluidAdd washer fluid in the following situations.
● Any washer does not work.
● The low washer fluid warning light comes on. (if equipped)
● The warning message appears on the multi-information display. (if
equipped)
Open the lid.
Add washer fluid.
CAUTION
■When refilling the washer fluid
Do not refill the washer fluid when the engine is hot or running, as the
washer fluid contains alcohol and may catch fire if spilled on the engine etc.
Page 496 of 672
496 4-3. Do-it-yourself maintenance
Push and hold the tire pressure
warning reset switch about 3
seconds. After releasing the
switch, check that the tire pres-
sure warning light blinks slowly
three times.
Wait for several minutes with the engine switch on, and then
turn the engine switch to the ACC or LOCK position.
Registering ID codes
The tire pressure warning valve and transmitter is equipped with a
unique ID code. When replacing a tire pressure warning valve and
transmitter, it is necessary to regi ster the ID code of tire pressure
warning valve and transmitter. Have the ID code registered by your
Toyota dealer.
■When to replace your vehicle’s tires
Tires should be replaced if:
●You have tire damage such as cuts, splits, cracks deep enough to
expose the fabric or bulges indicating internal damage
●A tire goes flat repeatedly or c annot be properly repaired due to the
size or location of a cut or other damage
If you are not sure, consult with your Toyota dealer.
Page 497 of 672
497
4-3. Do-it-yourself maintenance
4
Maintenance and care
■Replacing tires and wheels
If the ID code of the tire pressure warning valve and transmitter is not
registered, the tire pre
ssure warning system will not work properly. After
driving for about 20 minutes, the ti re pressure warning light comes on
after blinking for 1 minute to indicate a system malfunction.
■Tire life
Any tire over 6 years old must be checked by a qualified technician even
if they have seldom or never been used or damage is not obvious.
■If the tread wears down below 0.16 in. (4 mm) on snow tires
The effectiveness of snow tires is lost.
■Maximum load of tire
Check that the maximum load of the re placed tire is greater than 1/2 of
the Gross Axle Weight Ratings (GAWR) of either the front axle or the
rear axle, whichever is greater.
As for the maximum load of the tire, see the load limit at maximum cold
tire inflation pressure mentioned on the sidewall of the tire, and as for the
Gross Axle Weight Ratings (GAWR) , see the Certification Label.
( P. 501, 622).
■Tire types
1 Summer tires
Summer tires are high-speed performance tires best suited to highway
driving under dry conditions. Since summer tires do not have the same
traction performance as snow tire s, summer tires are inadequate for
driving on snow-covered or icy roads. For driving on snow-covered
roads or icy roads, the use of snow tires is recommended. When
installing snow tires, be sure to replace all four tires.
2 All season tires All season tires are designed to provide better traction in snow and to
be adequate for driving in most winter conditions, as well as for use
year round. All season tires, however, do not have adequate traction
performance compared with snow tires in heavy or loose snow. Also,
all season tires fall short in acceleration and handling performance
compared with summer tires in highway driving.