Page 17 of 274
BASIC FUNCTIONS
37
Details of POIs in some buildings may be
displayed.
For detailed POI information, touch the
building name. You can see details of the
selected POIs.The orientation of the map can be changed
from north−
up to heading −up by touching
the orientation symbol at the top left of the
screen.
Touch or .
� North�up screen
�Heading�up screen
North�up symbol
Regardless of the direction of vehicle trav-
el, North is always up.
Heading�up symbol
The direction of vehicle travel is always up.
A red arrow indicates North.
— Orientation of the map
Page 20 of 274

DESTINATION SEARCH
40
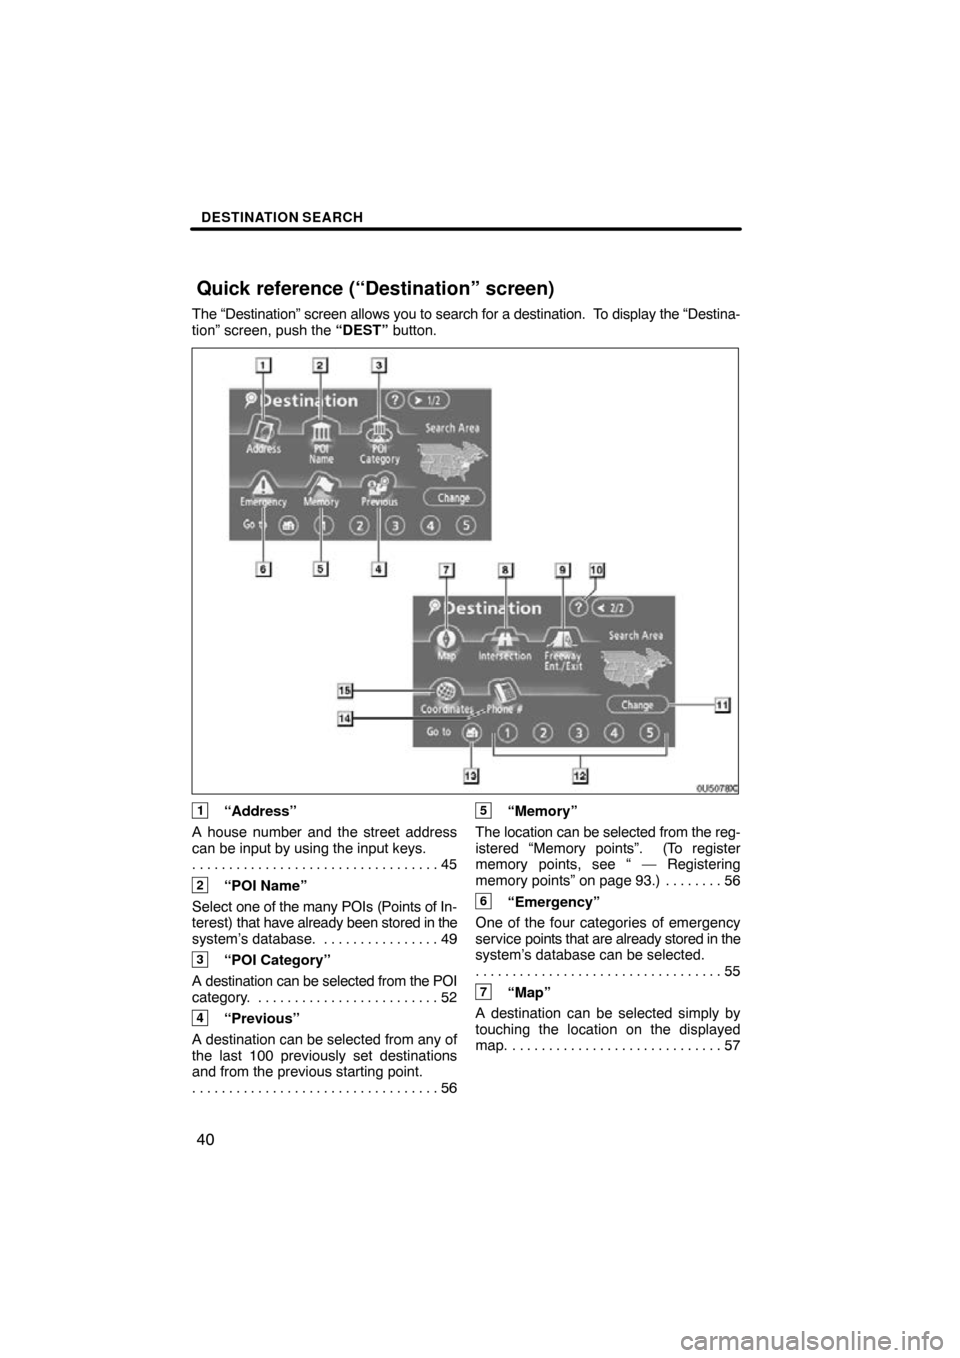
The “Destination” screen allows you to search for a destination. To display the “Destina-
tion” screen, push the “DEST” button.
1“Address”
A house number and the street address
can be input by using the input keys. 45
. . . . . . . . . . . . . . . . . . . . . . . . . . . . . . . . . .
2“POI Name”
Select one of the many POIs (Points of In-
terest) that have already been stored in the
system’s database. 49 . . . . . . . . . . . . . . . .
3“POI Category”
A destination can be selected from the POI
category. 52 . . . . . . . . . . . . . . . . . . . . . . . . .
4“Previous”
A destination can be selected from any of
the last 100 previously set destinations
and from the previous starting point. 56
. . . . . . . . . . . . . . . . . . . . . . . . . . . . . . . . . .
5“Memory”
The location can be selected from the reg-
istered “Memory points”. (To register
memory points, see “ — Registering
memory points” on page 93.) 56 . . . . . . . .
6“Emergency”
One of the four categories of emergency
service points that are already stored in the
system’s database can be selected. 55
. . . . . . . . . . . . . . . . . . . . . . . . . . . . . . . . . .
7“Map”
A destination can be selected simply by
touching the location on the displayed
map. 57 . . . . . . . . . . . . . . . . . . . . . . . . . . . . .
Quick reference (“Destination” screen)
Page 22 of 274

DESTINATION SEARCH
42
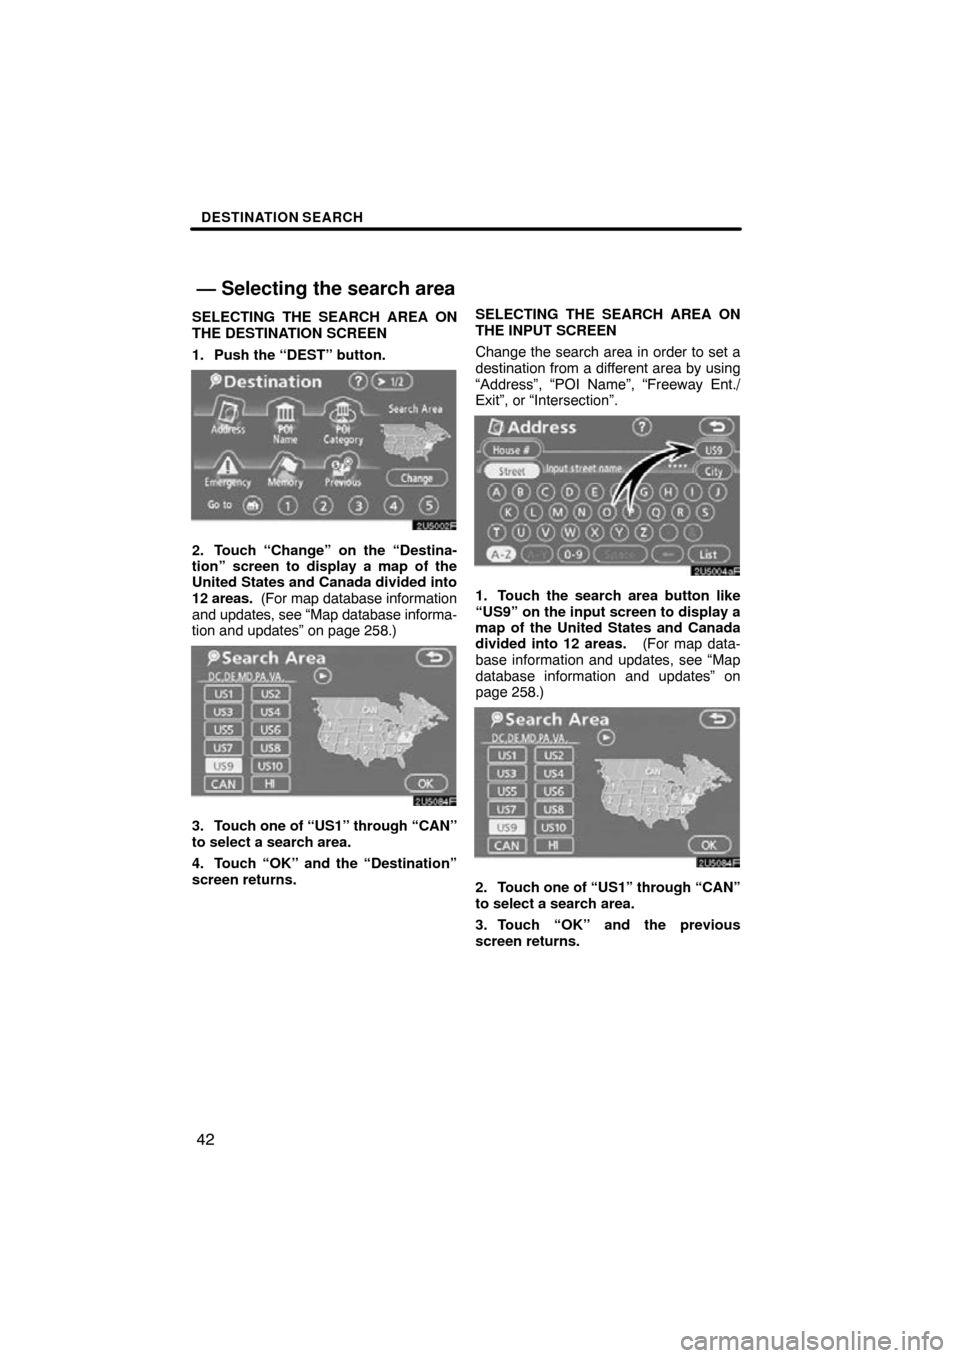
SELECTING THE SEARCH AREA ON
THE DESTINATION SCREEN
1. Push the “DEST” button.
2. Touch “Change” on the “Destina-
tion” screen to display a map of the
United States and Canada divided into
12 areas. (For map database information
and updates, see “Map database informa-
tion and updates” on page 258.)
3. Touch one of “US1” through “CAN”
to select a search area.
4. Touch “OK” and the “Destination”
screen returns. SELECTING THE SEARCH AREA ON
THE INPUT SCREEN
Change the search area in order to set a
destination from a different area by using
“Address”, “POI Name”, “Freeway Ent./
Exit”, or “Intersection”.
1. Touch the search area button like
“US9” on the input screen to display a
map of the United States and Canada
divided into 12 areas.
(For map data-
base information and updates, see “Map
database information and updates” on
page 258.)
2. Touch one of “US1” through “CAN”
to select a search area.
3. Touch “OK” and the previous
screen returns.
— Selecting the search area
Page 24 of 274

DESTINATION SEARCH
44
1. Push the “DEST” button.
2. Touch the home touch�screen but-
ton on the “Destination” screen.
The screen changes and displays the map
location for home and the route prefer-
ence. (See “Starting route guidance” on
page 60.)
To use this function, it is necessary to set
“Home” for the memory point. (To register
“Home”, see page 100.)
INFORMATION
Guidance starts from the current ve-
hicle position to your home if “Enter”
is touched even while driving.
1. Push the “DEST” button.
2. Touch any of the quick access
touch�screen buttons on the “Destina-
tion” screen.
The screen changes and displays the map
location of the quick access point and the
route preference. (See “Starting route
guidance” on page 60.)
To use this function, it is necessary to set
“Quick access” for each memory point. (To
register “Quick Access”, see page 96.)
INFORMATION
Guidance starts from the current ve-
hicle position to the quick access
point if “Enter” is touched even while
driving.
— Destination search by
H
ome
— Destination search by
Quick access
Page 25 of 274
DESTINATION SEARCH
45
There are 2 ways to input a destination by
address.
1. Push the “DEST” button.
2. Touch “Address” on the “Destina-
tion” screen.(a) Inputting a house number and a
street name
1. Touch numerals directly on the
screen to input a house number.
After inputting a house number, touch
“OK” to display the screen for inputting a
street name.
It is possible to input a street name first.
Touch “Street” to display the screen for in-
putting a street name.
2. Input the street name.
— Destination search by
“Address”
Page 26 of 274
DESTINATION SEARCH
46
3. When the desired street name is
found, touch the corresponding touch�
screen button.
The screen changes and displays the map
location of the selected destination and the
route preference. (See “Starting route
guidance” on page 60.)
If the same address exists in more than
one city, the current screen changes to the
city list screen.
4. Select or enter the desired city.
“Input Name”: To narrow down the listed
items by inputting the city name.
If inputting a street name first, the screen
changes. The house number can then be
input.
If the above screen appears, an address
range on the screen can be selected.
If the same address exists in more than
one city, the current screen changes to the
city list screen.
Page 27 of 274
DESTINATION SEARCH
47
(b) Selecting a city to search
Touch “City”.
To search by city, the following three meth-
ods are possible.
1. Input the city name
2. Select from the nearest 5 cities
3. Select from the last 5 cities
INFORMATION
�To change the search area, touch
“Search Area”.
�To cancel the city setting, touch
“Any City”.
INPUTTING THE CITY NAME
1. Touch “Input City Name”.
2. Input a city name.
3. Touch the touch�screen button of
the desired city name from the dis-
played list.
“Map”: To display the selected destination
and the route preference. (See “Starting
route guidance” on page 60.)
The current screen changes to the screen
for inputting a house number or a street
name. (See “(a) Inputting a house number
and a street name” on page 45.)
Page 28 of 274
DESTINATION SEARCH
48
SELECTING FROM THE NEAREST 5
CITIES
1. Touch “Nearest 5 Cities”.
2. Touch the touch�screen button of
the desired city name from the dis-
played list.
The current screen changes to the screen
for inputting a house number or a street
name. (See “(a) Inputting a house number
and a street name” on page 45.)SELECTING FROM THE LAST 5 CITIES
Touch the touch�screen button of the
desired city name.
If the navigation has not be used, no cities
will be displayed on the screen.
The current screen changes to the screen
for inputting a house number or a street
name. (See “(a) Inputting a house number
and a street name” on page 45.)