Page 333 of 447
9-8In case of emergency
Turn the jackscrew by hand until the jack
head engages firmly into the jack-up point.
9. Insert the jack handle into the jack-
screw, and turn the handle until the tire
clears the ground. Do not raise the vehicle
higher than necessary. 10. Remove the wheel nuts and the flattire.11. Before putting the spare tire on, clean
the mounting surface of the wheel and hub
with a cloth.
12. Put on the spare tire. Replace thewheel nuts. Tighten them by hand.
WARNING
Do not use oil or grease on the
wheel studs or nuts when the spare
tire is installed. This could cause the
nuts to become loose and lead to anaccident.
13. Turn the jack handle counterclockwise
to lower the vehicle.
14. Use the wheel nut wrench to securely
tighten the wheel nuts to the specified
torque, following the tightening order in the illustration.
The torque for tightening the nuts is 74 to
89 lbf·ft (100 to 120 N·m, 10 to 12 kgf·m).
This torque is equivalent to applying
Page 339 of 447

9-14In case of emergency
&Towing and tie-down hooks
The towing hooks should be used only in
an emergency (e.g., to free a stuck vehicle
from mud, sand or snow).
CAUTION
. Use only the specified towing
hooks and tie-down hooks. Never
use suspension parts or other
parts of the body for towing or
tie-down purposes.
. Never use the tie-down hook
closest to the muffler under the
vehicle for towing purposes.
. To prevent deformation to the
bumper and the towing hook, do
not apply excessive lateral load
to the towing hooks.
Front towing hook (OUTBACK models):
1. Take out the towing hook, screwdriver
and wheel nut wrench from the on board
tool bucket.
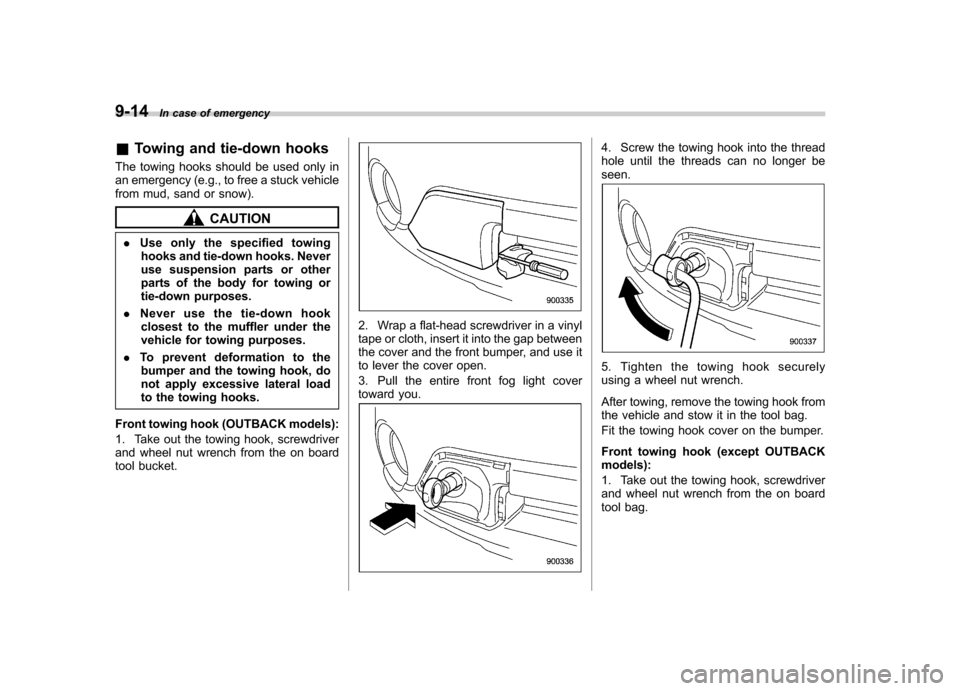
2. Wrap a flat-head screwdriver in a vinyl
tape or cloth, insert it into the gap between
the cover and the front bumper, and use it
to lever the cover open.
3. Pull the entire front fog light cover
toward you.
4. Screw the towing hook into the thread
hole until the threads can no longer beseen.
5. Tighten the towing hook securely
using a wheel nut wrench.
After towing, remove the towing hook from
the vehicle and stow it in the tool bag.
Fit the towing hook cover on the bumper.
Front towing hook (except OUTBACK models):
1. Take out the towing hook, screwdriver
and wheel nut wrench from the on board
tool bag.
Page 340 of 447
2. Wrap a flat-head screwdriver with cloth
or vinyl. Then, insert the screwdriver into
the gap between the front fog light cover
and the bumper, and pry out the cover.
3. Pull the entire front fog light cover
toward you.
4. Likewise, insert the screwdriver still
wrapped with cloth or vinyl into the cutout
between the towing hook cover and the
bumper. Pry out the cover.
5. Screw the towing hook into the thread
hole until the threads can no longer beseen.
6. Tighten the towing hook securely
using a wheel nut wrench.
After towing, remove the towing hook from
the vehicle and stow it in the tool bag.
Fit the fog light cover and towing hook
cover on the bumper.
WARNING
. Do not use the towing hook
except when towing your vehicle.
. Be sure to remove the towing
hook after towing. Leaving the
towing hook mounted on the
vehicle could interfere with prop-
er operation of the SRS airbag
system in a frontal collision. In case of emergency
9-15
– CONTINUED –
Page 342 of 447

vehicles.
2. Pull up the parking brake lever firmly.
3. Secure the vehicle onto the carrier
properly with safety chains. Each safety
chain should be equally tightened and
care must be taken not to pull the chains
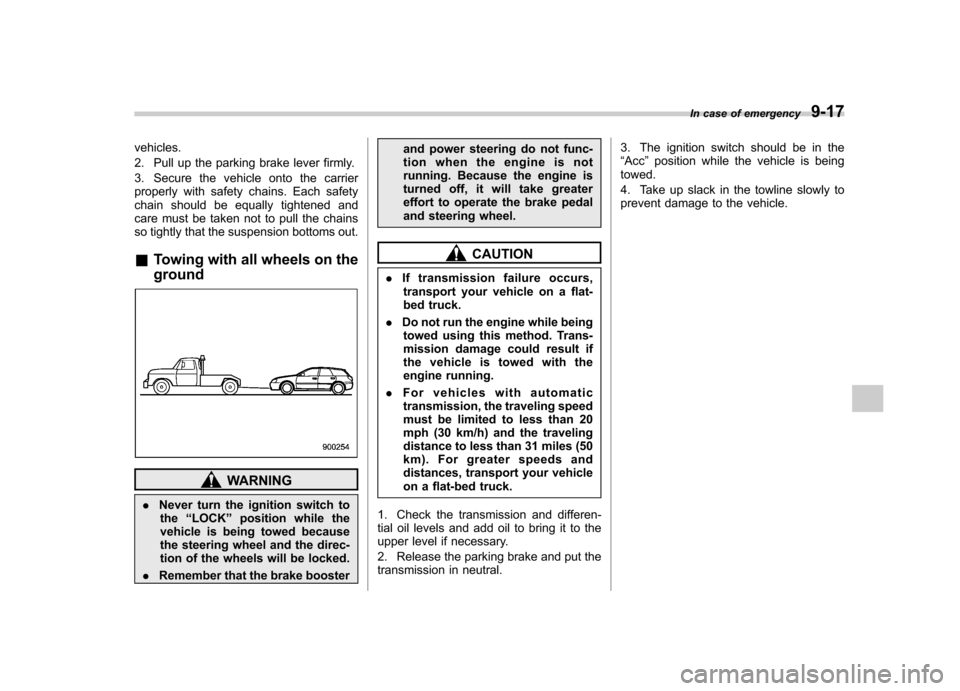
so tightly that the suspension bottoms out. &Towing with all wheels on the ground
WARNING
. Never turn the ignition switch to
the “LOCK ”position while the
vehicle is being towed because
the steering wheel and the direc-
tion of the wheels will be locked.
. Remember that the brake booster and power steering do not func-
tion when the engine is not
running. Because the engine is
turned off, it will take greater
effort to operate the brake pedal
and steering wheel.
CAUTION
. If transmission failure occurs,
transport your vehicle on a flat-
bed truck.
. Do not run the engine while being
towed using this method. Trans-
mission damage could result if
the vehicle is towed with the
engine running.
. For vehicles with automatic
transmission, the traveling speed
must be limited to less than 20
mph (30 km/h) and the traveling
distance to less than 31 miles (50
km). For greater speeds and
distances, transport your vehicle
on a flat-bed truck.
1. Check the transmission and differen-
tial oil levels and add oil to bring it to the
upper level if necessary.
2. Release the parking brake and put the
transmission in neutral. 3. The ignition switch should be in the“
Acc ”position while the vehicle is being
towed.
4. Take up slack in the towline slowly to
prevent damage to the vehicle. In case of emergency
9-17
Page 355 of 447

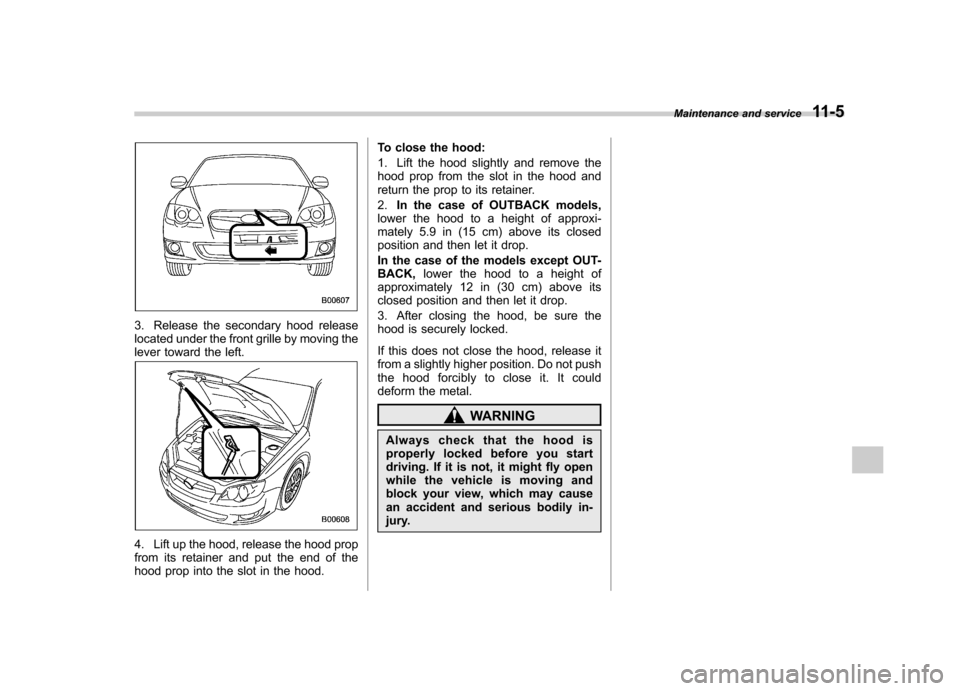
3. Release the secondary hood release
located under the front grille by moving the
lever toward the left.
4. Lift up the hood, release the hood prop
from its retainer and put the end of the
hood prop into the slot in the hood.To close the hood:
1. Lift the hood slightly and remove the
hood prop from the slot in the hood and
return the prop to its retainer. 2.
In the case of OUTBACK models,
lower the hood to a height of approxi-
mately 5.9 in (15 cm) above its closed
position and then let it drop.
In the case of the models except OUT- BACK, lower the hood to a height of
approximately 12 in (30 cm) above its
closed position and then let it drop.
3. After closing the hood, be sure the
hood is securely locked.
If this does not close the hood, release it
from a slightly higher position. Do not push
the hood forcibly to close it. It could
deform the metal.
WARNING
Always check that the hood is
properly locked before you start
driving. If it is not, it might fly open
while the vehicle is moving and
block your view, which may cause
an accident and serious bodily in-
jury. Maintenance and service
11-5
Page 361 of 447
3.0 L models
4. Drain out the engine oil by removing
the drain plug while the engine is still
warm. The used oil should be drained into
an appropriate container and disposed of
properly.
WARNING
Be careful not to burn yourself with
hot engine oil.
5. Wipe the seating surface and around
the drain plug with a clean cloth and
tighten it securely with a new sealing
washer after the oil has completely
drained out.
2.5 L models
3.0 L models
6. Open the access cover by removing
the clips and turning the access cover
counterclockwise. The oil filter will beexposed.
2.5 L models
3.0 L models
7. Remove the oil filter with an oil filter wrench.
8. Before installing a new oil filter, apply a
thin coat of engine oil to the seal. Maintenance and service
11-11
– CONTINUED –
Page 366 of 447

11-16Maintenance and service
2. Place a proper container under the
drain plug and loosen the drain plug.
3. Loosen the radiator cap to drain the
coolant from the radiator. Then drain the
coolant from the reserve tank. Tighten the
drain plug securely.
NOTE (turbo model only)
The cap (without tabs) on top of the
radiator does not need to be removed.
To add coolant, remove the cap (with
tabs) on the coolant tank on top of theengine.
4. Install the under cover.
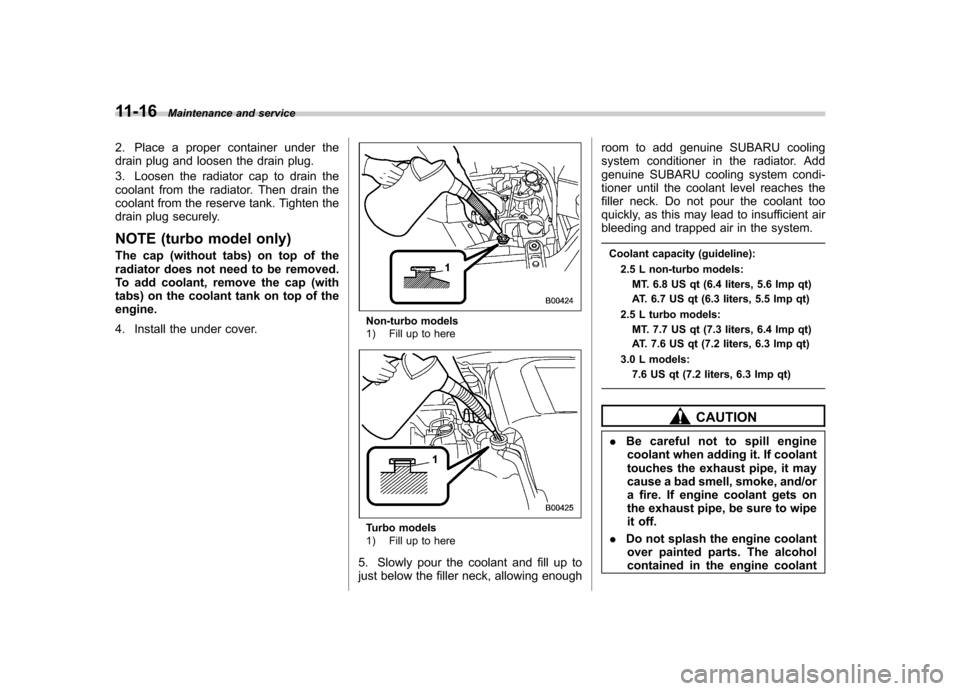
Non-turbo models
1) Fill up to here
Turbo models
1) Fill up to here
5. Slowly pour the coolant and fill up to
just below the filler neck, allowing enough room to add genuine SUBARU cooling
system conditioner in the radiator. Add
genuine SUBARU cooling system condi-
tioner until the coolant level reaches the
filler neck. Do not pour the coolant too
quickly, as this may lead to insufficient air
bleeding and trapped air in the system.
Coolant capacity (guideline): 2.5 L non-turbo models:MT. 6.8 US qt (6.4 liters, 5.6 Imp qt)
AT. 6.7 US qt (6.3 liters, 5.5 Imp qt)
2.5 L turbo models: MT. 7.7 US qt (7.3 liters, 6.4 Imp qt)
AT. 7.6 US qt (7.2 liters, 6.3 Imp qt)
3.0 L models: 7.6 US qt (7.2 liters, 6.3 Imp qt)
CAUTION
. Be careful not to spill engine
coolant when adding it. If coolant
touches the exhaust pipe, it may
cause a bad smell, smoke, and/or
a fire. If engine coolant gets on
the exhaust pipe, be sure to wipe
it off.
. Do not splash the engine coolant
over painted parts. The alcohol
contained in the engine coolant
Page 395 of 447
&Rear window wiper blade rubber
1. Pull out the end of the blade rubber
assembly to unlock it from the plasticsupport.
2. Pull the blade rubber assembly out of
the plastic support.
1) Metal spines
3. If the new blade rubber is not provided
with two metal spines, remove the metal
spines from the old blade rubber and
install them in the new blade rubber.
4. Align the claws of the plastic support
with the grooves in the blade rubber
assembly, then slide the blade rubber
assembly into place.
Securely retain both ends of the rubber
with the stoppers on the plastic support Maintenance and service
11-45
– CONTINUED –