2009 SUBARU LEGACY weight
[x] Cancel search: weightPage 324 of 447

8-28Driving tips
! Before starting out on a trip
. Check that the vehicle and vehicle-to-
hitch mounting are in good condition. If
any problems are apparent, do not tow the
trailer. . Check that the vehicle sits horizontally
with the trailer attached. If the vehicle is
tipped sharply up at the front and down at
the rear, check the total trailer weight,
GVW, GAWs and tongue load again, then
confirm that the load and its distribution
are acceptable. . Check that the tire pressures are
correct.. Check that the vehicle and trailer are
connected properly. Confirm that
–the trailer tongue is connected
properly to the hitch ball. – the trailer lights connector is con-
nected properly and trailer ’s brake
lights illuminate when the vehicle ’s
brake pedal is pressed, and that the trailer ’s turn signal lights flash when
the vehicle ’s turn signal lever is oper-
ated. – the safety chains are connected
properly.– all cargo in the trailer is secured
safety in position.– the side mirrors provide a good
rearward field of view without a sig- nificant blind spot.
. Sufficient time should be taken to learn
the “feel ”of the vehicle/trailer combination
before starting out on a trip. In an area free
of traffic, practice turning, stopping and
backing up. ! Driving with a trailer
. You should allow for considerably more
stopping distance when towing a trailer.
Avoid sudden braking because it may
result in skidding or jackknifing and loss ofcontrol. . Avoid abrupt starts and sudden accel-
erations. If your vehicle has a manual
transmission, always start out in first gear
and release the clutch at moderate enginerevolution. . Avoid uneven steering, sharp turns and
rapid lane changes.. Slow down before turning. Make a
longer than normal turning radius because
the trailer wheels will be closer than the
vehicle wheels to the inside of the turn. In
a tight turn, the trailer could hit yourvehicle. . Crosswinds will adversely affect the
handling of your vehicle and trailer, caus-
ing sway. Crosswinds can be due to
weather conditions or the passing of large
trucks or buses. If swaying occurs, firmly
grip the steering wheel and slow down immediately but gradually. .
When passing other vehicles, consid-
erable distance is required because of the
added weight and length caused by
attaching the trailer to your vehicle.
1) Left turn
2) Right turn
. Backing up with a trailer is difficult and
takes practice. When backing up with a
trailer, never accelerate or steer rapidly.
When turning back, grip the bottom of the
steering wheel with one hand and turn it to
the left for a left turn, and turn it to the right
for a right turn. . If the ABS warning light illuminates
while the vehicle is in motion, stop towing
the trailer and have repairs performed
immediately by the nearest SUBARU
dealer.
Page 390 of 447

11-40Maintenance and service
WARNING
. All four tires must be the same in
terms of manufacturer, brand
(tread pattern), construction, de-
gree of wear, speed symbol, load
index and size. Mixing tires of
different types, sizes or degrees
of wear can result in damage to
the vehicle ’s power train. Use of
different types or sizes of tires
can also dangerously reduce
controllability and braking per-
formance and can lead to anaccident.
. Use only radial tires. Do not use
radial tires together with belted
bias tires and/or bias-ply tires.
Doing so can dangerously re-
duce controllability, resulting in
an accident. &
Wheel replacement
When replacing wheels due, for example,
to damage, make sure the replacement
wheels match the specifications of the
wheels that are fitted as standard equip-
ment. Replacement wheels are available
from SUBARU dealers.
WARNING
Use only those wheels that are
specified for your vehicle. Wheels
not meeting specifications could
interfere with brake caliper opera-
tion and may cause the tires to rub
against the wheel well housing dur-
ing turns. The resulting loss of
vehicle control could lead to anaccident. Aluminum wheels
Aluminum wheels can be scratched and
damaged easily. Handle them carefully to
maintain their appearance, performance,
and safety. .
When any of the wheels is removed
and replaced for tire rotation or to change
a flat, always check the tightness of the
wheel nuts after driving approximately 600
miles (1,000 km). If any nut is loose,
tighten it to the specified torque. . Never apply oil to the threaded parts,
wheel nuts, or tapered surface of the wheel. . Never let the wheel rub against sharp
protrusions or curbs.. Be sure to fit tire chains on uniformly
and completely around the tire, otherwise
the chains may scratch the wheel. . When wheel nuts, balance weights, or
the center cap is replaced, be sure to
replace them with genuine SUBARU parts
designed for aluminum wheels.
Page 424 of 447

13-4Consumer information and Reporting safety defects
!Maximum load rating
The load rating at the maximum
permissible weight load for this tire.
For example, “MAX. LOAD 730 kg
(1609 LBS) @ 300 kpa (44 PSI)
MAX. PRESS. ”
WARNING
Maximum load rating applies
only to the tire, not to the
vehicle. Putting a load rated
tire on any vehicle does not
mean the vehicle can be
loaded up to the tire ’s rated
load.
! Construction type
Applicable construction of this tire.
For example, “TUBELESS STEEL
BELTED RADIAL ”
! Construction
The generic name of each cord
material used in the plies (both
sidewall and tread area) of this tire.
For example, “PLIES: TREAD 2 STEEL + 2 POLYESTER + 1
NYLON SIDEWALL 2 POLYE- STER
”
! Uniform Tire Quality Grading (UTQG)
For details, refer to “Uniform tire
quality grading standards ”in this
chapter.
Page 426 of 447

13-6Consumer information and Reporting safety defects
! Vehicle placard
The vehicle placard is affixed to the driver ’s side B-pillar.
Example:
The vehicle placard shows original
tire size, recommended cold tire
inflation pressure on each tire at
maximum loaded vehicle weight,
seating capacity and loading infor-mation. ! Adverse safety consequences
of under-inflation
Driving at high speeds with exces-
sively low tire pressures can cause
the tires to flex severely and to
rapidly become hot. A sharp in-
crease in temperature could cause
tread separation, and failure of the
tire(s). Possible resulting loss of
vehicle control could lead to anaccident. ! Measuring and adjusting air
pressure to achieve proper in-
flation
Check and, if necessary, adjust the
pressure of each tire (including the
spare) at least once a month and
before any long journey. Check the
tire pressures when the tires are
cold. Use a pressure gauge to
adjust the tire pressures to the specific values. Driving even a
short distance warms up the tires
and increases the tire pressures.
Also, the tire pressures are affected
by the outside temperature. It is
best to check tire pressure out-
doors before driving the vehicle.
When a tire becomes warm, the air
inside it expands, causing the tire
pressure to increase. Be careful not
to mistakenly release air from a
warm tire to reduce its pressure. &
Glossary of tire terminology
. Cold tire pressure
The pressure in a tire that has been
driven less than 1 mile or has been
standing for three hours or more.. Maximum inflation pressure
The maximum cold inflation pres-
sure to which a tire may be inflated. . Recommended inflation pres-
sure
The cold inflation pressure recom-
mended by a vehicle manufacturer.. Intended outboard sidewall
(1) The sidewall that contains a
Page 427 of 447

whitewall, bears white lettering
or bears manufacturer, brand,
and/or model name molding that
is higher or deeper than the
same molding on the other side-
wall of the tire, or (2)The outward facing sidewall
of an asymmetrical tire that has
a particular side that must al-
ways face outward when mount-
ing on a vehicle.
. Accessory weight
The combined weight (in excess of
those standard items which may be
replaced) of floor mats, leather
seats and cross bars to the extent
that these items are available as
factory-installed equipment
(whether installed or not). . Curb weight
The weight of a motor vehicle with
standard equipment including the
maximum capacity of fuel, oil, and
coolant and air conditioning. . Maximum loaded vehicle weight
The sum of curb weight, accessory
weight, vehicle capacity weight and production options weight.
. Normal occupant weight
150 lbs (68 kg) times the number of
occupants (3 occupants). . Occupant distribution
Distribution of occupants in a vehi-
cle, 2 in front, 1 in rear seat.. Production options weight
The combined weight of those
installed regular production options
weighing over 5.1 lbs (2.3 kg) in
excess of those standards items
which they replace, not previously
considered in curb weight or acces-
sory weight. . Vehicle capacity weight
The total weight of cargo, luggage
and occupants that can be added to
the vehicle. . Vehicle maximum load on a tire
Load on an individual tire that is
determined by distributing to each
axle its share of the maximum
loaded vehicle weight and dividing
by two. . Vehicle normal load on a tire
Load on an individual tire that is determined by distributing to each
axle its share of the curb weight,
accessory weight, and normal oc-
cupant weight and dividing by two. &
Tire care –maintenance and
safety practices
. Check on a daily basis that the
tires are free from serious damage,
nails, and stones. At the same time,
check the tires for abnormal wear.. Inspect the tire tread regularly
and replace the tires before their
tread wear indicators become visi-
ble. When a tire ’s tread wear
indicator becomes visible, the tire
is worn beyond the acceptable limit
and must be replaced immediately.
With a tire in this condition, driving
at even low speeds in wet weather
can cause the vehicle to hydro-
plane. Possible resulting loss of
vehicle control can lead to anaccident. . To maximize the life of each tire
and ensure that the tires wear
uniformly, it is best to rotate the
Consumer information and Reporting safety defects
13-7
– CONTINUED –
Page 428 of 447

13-8Consumer information and Reporting safety defects
tires every 7,500 miles (12,000 km).
Rotating the tires involves switch-
ing the front and rear tires on the
right-hand side of the vehicle and
similarly switching the front and
rear tires on the left-hand side of
the vehicle. (Each tire must be kept
on its original side of the vehicle.)
Replace any damaged or unevenly
worn tire at the time of rotation.
After tire rotation, adjust the tire
pressures and make sure the wheel
nuts are correctly tightened. A
tightening torque specification and
a tightening sequence specification
for the wheel nuts can be found“ Flat tires
”section in chapter 9.
& Vehicle load limit –how to
determine
The load capacity of your vehicle is
determined by weight, not by avail-
able cargo space. The load limit of
your vehicle is shown on the
vehicle placard attached to the
driver ’s side B-pillar. Locate the
statement “The combined weight of occupants and cargo should
never exceed XXX kg or XXX lbs
”
on your vehicle ’s placard.
Thevehicleplacardalsoshows
seating capacity of your vehicle.
The total load capacity includes the
total weight of driver and all pas-
sengers and their belongings, any
cargo, any optional equipment such
as a trailer hitch, roof rack or bike
carrier, etc., and the tongue load of
a trailer. Therefore cargo capacity
can be calculated by the followingmethod.
Cargo capacity = Load limit �(total
weight of occupants + total weight
of optional equipment + tongue
load of a trailer (if applicable))
For towing capacity information and
weight limits, refer to the “Trailer
towing ”section in chapter 8.
! Calculating total and load ca-
pacities varying seating con-
figurations
Calculate the available load capa-
city as shown in the following examples:
Example 1A
Vehicle capacity weight of the
vehicle is 800 lbs (363 kg), which
is indicated on the vehicle placard
with the statement
“The combined
weight of occupants and cargo
should never exceed 363 kg or
800 lbs ”.
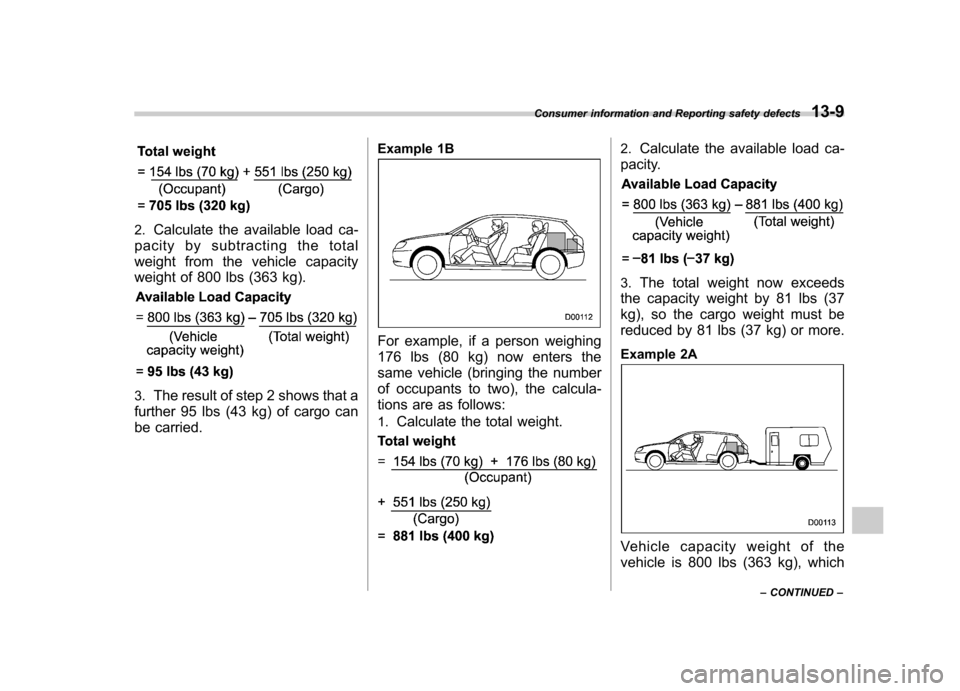
For example, if the vehicle has one
occupant weighing 154 lbs (70 kg)
plus cargo weighing 551 lbs (250kg). 1. Calculate the total weight.
Page 429 of 447

2.Calculate the available load ca-
pacity by subtracting the total
weight from the vehicle capacity
weight of 800 lbs (363 kg).
3. The result of step 2 shows that a
further 95 lbs (43 kg) of cargo can
be carried. Example 1B
For example, if a person weighing
176 lbs (80 kg) now enters the
same vehicle (bringing the number
of occupants to two), the calcula-
tions are as follows: 1.
Calculate the total weight.
2.Calculate the available load ca-
pacity.
3. The total weight now exceeds
the capacity weight by 81 lbs (37
kg), so the cargo weight must be
reduced by 81 lbs (37 kg) or more.
Example 2A
Vehicle capacity weight of the
vehicle is 800 lbs (363 kg), which
Consumer information and Reporting safety defects
13-9
– CONTINUED –
Page 430 of 447

13-10Consumer information and Reporting safety defects
is indicated on the vehicle placard
with the statement “The combined
weight of occupants and cargo
should never exceed 363 kg or
800 lbs ”.
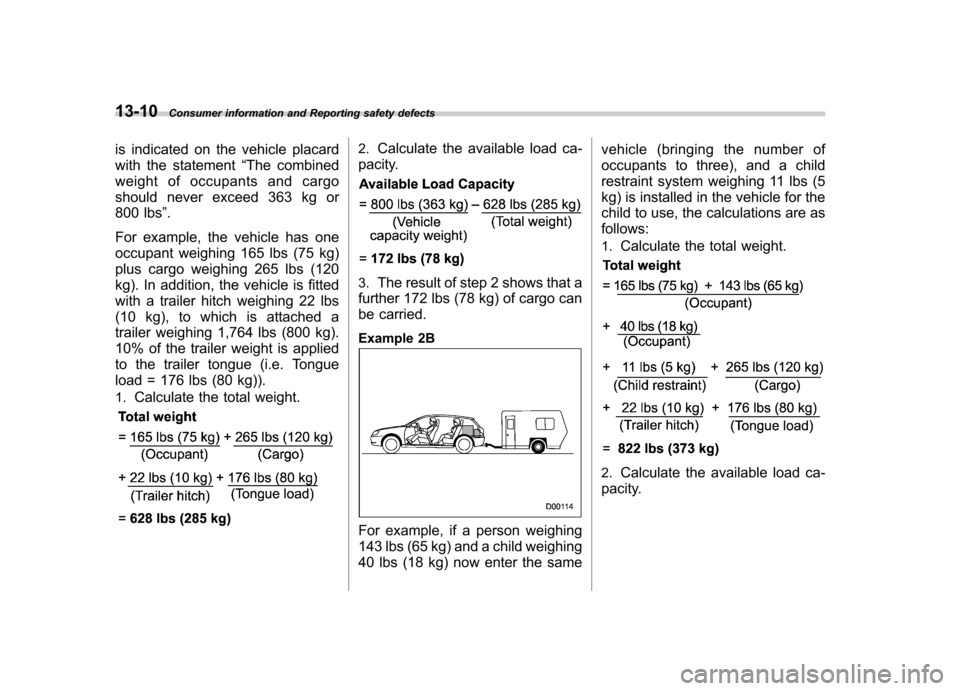
For example, the vehicle has one
occupant weighing 165 lbs (75 kg)
plus cargo weighing 265 lbs (120
kg). In addition, the vehicle is fitted
with a trailer hitch weighing 22 lbs
(10 kg), to which is attached a
trailer weighing 1,764 lbs (800 kg).
10% of the trailer weight is applied
to the trailer tongue (i.e. Tongue
load = 176 lbs (80 kg)). 1. Calculate the total weight.
2.Calculate the available load ca-
pacity.
3. The result of step 2 shows that a
further 172 lbs (78 kg) of cargo can
be carried.
Example 2B
For example, if a person weighing
143 lbs (65 kg) and a child weighing
40 lbs (18 kg) now enter the same vehicle (bringing the number of
occupants to three), and a child
restraint system weighing 11 lbs (5
kg) is installed in the vehicle for the
child to use, the calculations are asfollows: 1.
Calculate the total weight.
2.Calculate the available load ca-
pacity.