2009 SUBARU LEGACY Ground
[x] Cancel search: GroundPage 329 of 447

9-4In case of emergency
3. Put a spare fuse inside the FWD
socket located in the fuse panel and
confirm that the “
”warning light on
the combination meter illuminates. The
All-Wheel-Drive capability of the vehicle
has now been deactivated.
NOTE
After reinstalling the conventional tire,
remove the spare fuse from the FWD
socket in order to reactivate All-Wheel
Drive. Make sure to restore the re-
moved spare fuse in the spare fuse
holder located in the engine compart-ment. Flat tires
If you have a flat tire while driving, never
brake suddenly; keep driving straight
ahead while gradually reducing speed.
Then slowly pull off the road to a safeplace. &
Changing a flat tire
WARNING
. Do not jack up the vehicle on an
incline or a loose road surface.
The jack can come out of the
jacking point or sink into the
ground and this can result in a
severe accident.
. Use only the jack provided with
your vehicle. The jack supplied
with the vehicle is designed only
for changing a tire. Never get
under the vehicle while support-
ing the vehicle with this jack. .
Always turn off the engine before
raising the flat tire off the ground
using the jack. Never swing or
push the vehicle supported with
the jack. The jack can come out
of the jacking point due to a jolt
and this can result in a severeaccident.
1. Park on a hard, level surface, when-
ever possible, then stop the engine.
2. Set the parking brake securely and
shift a manual transmission vehicle in
reverse or an automatic transmission
vehicle in the “P ”(Park) position.
3. Turn on the hazard warning flasher
and have everyone get out of the vehicle.
4. Put wheel blocks at the front and rear
of the tire diagonally opposite the flat tire.
Page 333 of 447

9-8In case of emergency
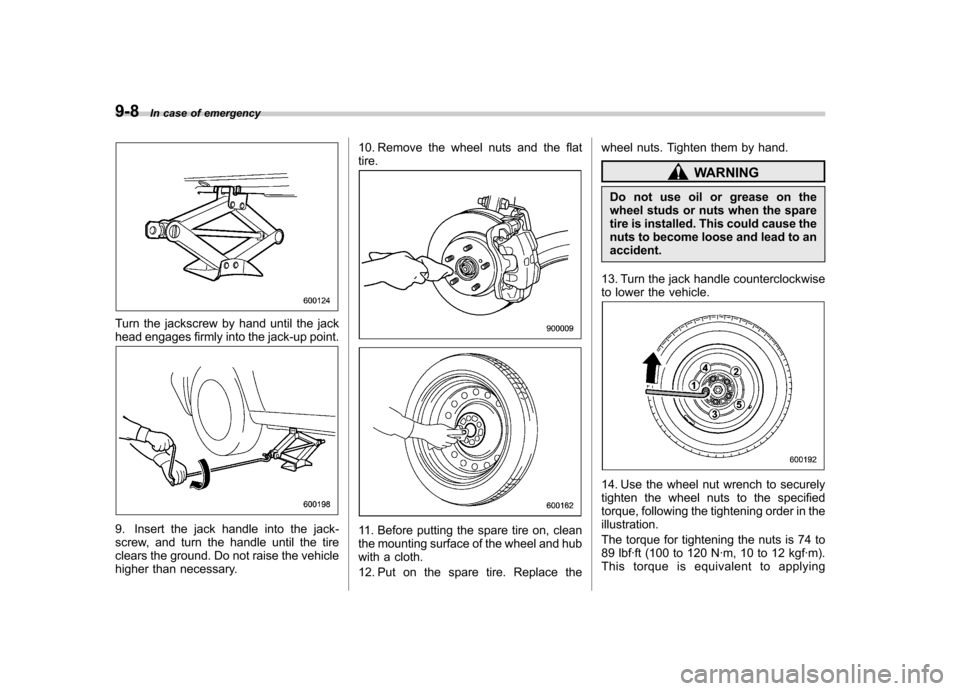
Turn the jackscrew by hand until the jack
head engages firmly into the jack-up point.
9. Insert the jack handle into the jack-
screw, and turn the handle until the tire
clears the ground. Do not raise the vehicle
higher than necessary. 10. Remove the wheel nuts and the flattire.11. Before putting the spare tire on, clean
the mounting surface of the wheel and hub
with a cloth.
12. Put on the spare tire. Replace thewheel nuts. Tighten them by hand.
WARNING
Do not use oil or grease on the
wheel studs or nuts when the spare
tire is installed. This could cause the
nuts to become loose and lead to anaccident.
13. Turn the jack handle counterclockwise
to lower the vehicle.
14. Use the wheel nut wrench to securely
tighten the wheel nuts to the specified
torque, following the tightening order in the illustration.
The torque for tightening the nuts is 74 to
89 lbf·ft (100 to 120 N·m, 10 to 12 kgf·m).
This torque is equivalent to applying
Page 336 of 447

eye protectors, and remove metal
objects such as rings, bands or
other metal jewelry.
. Be sure the jumper cables and
clamps on them do not have
loose or missing insulation.
. Do not jump start unless cables
in suitable condition are avail-able.
. A running engine can be danger-
ous. Keep your fingers, hands,
clothing, hair and tools away
from the cooling fan, belts and
any other moving engine parts.
Removing rings, watches and
ties is advisable.
. Jump starting is dangerous if it is
done incorrectly. If you are un-
sure about the proper procedure
for jump starting, consult a com-
petent mechanic.
When your vehicle does not start due to a
run down (discharged) battery, the vehicle
may be jump started by connecting your
battery to another battery (called the
booster battery) with jumper cables. &
How to jump start
1. Make sure the booster battery is 12
volts and the negative terminal isgrounded.
2. If the booster battery is in another
vehicle, do not let the two vehicles touch.
3. Turn off all unnecessary lights and accessories.
4. Connect the jumper cables exactly in
the sequence illustrated. In case of emergency
9-11
– CONTINUED –
Page 338 of 447

Engine overheating
WARNING
Never attempt to remove the radia-
tor cap until the engine has been
shut off and has fully cooled down.
When the engine is hot, the coolant
is under pressure. Removing the
cap while the engine is still hot
could release a spray of boiling hot
coolant, which could burn you very
seriously.
If the engine overheats, pull off the road
safely and stop the vehicle in a safe place. & If steam is coming from the
engine compartment
Turn off the engine and get everyone
away from the vehicle until it cools down. & If no steam is coming from
the engine compartment
1. Keep the engine running at idling speed.
2. Open the hood to ventilate the engine compartment.
Confirm that the cooling fan is turning. If
the fan is not turning, immediately turn off the engine and contact your authorized
dealer for repair.
3. After the engine coolant temperature
has dropped, turn off the engine.
If the temperature gauge stays at the
overheated zone, turn off the engine.
4. After the engine has fully cooled down,
check the coolant level in the reservetank.
If the coolant level is below the
“MIN ”
mark, add coolant up to the “MAX ”mark.
5. If there is no coolant in the reserve
tank, add coolant to the reserve tank.
Then remove the radiator cap and fill the
radiator with coolant.
If you remove the radiator cap from a hot
radiator, first wrap a thick cloth around the
radiator cap, then turn the cap counter-
clockwise slowly without pressing down
until it stops. Release the pressure from
the radiator. After the pressure has been
fully released, remove the cap by pressing
down and turning it. TowingWARNING
Never tow AWD vehicles (both AT
and MT) with the front wheels raised
off the ground while the rear wheels
are on the ground, or with the rear
wheels raised off the ground while
the front wheels are on the ground.
This will cause the vehicle to spin
away due to the operation or dete-
rioration of the center differential.
If towing is necessary, it is best done by
your SUBARU dealer or a commercial
towing service. Observe the following
procedures for safety. In case of emergency
9-13
– CONTINUED –
Page 342 of 447

vehicles.
2. Pull up the parking brake lever firmly.
3. Secure the vehicle onto the carrier
properly with safety chains. Each safety
chain should be equally tightened and
care must be taken not to pull the chains
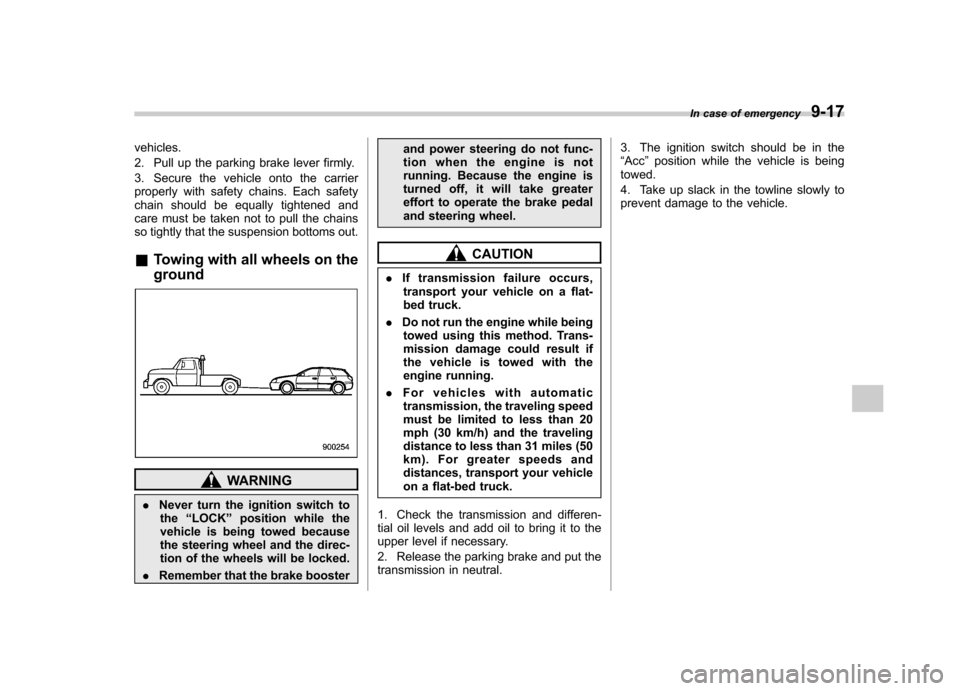
so tightly that the suspension bottoms out. &Towing with all wheels on the ground
WARNING
. Never turn the ignition switch to
the “LOCK ”position while the
vehicle is being towed because
the steering wheel and the direc-
tion of the wheels will be locked.
. Remember that the brake booster and power steering do not func-
tion when the engine is not
running. Because the engine is
turned off, it will take greater
effort to operate the brake pedal
and steering wheel.
CAUTION
. If transmission failure occurs,
transport your vehicle on a flat-
bed truck.
. Do not run the engine while being
towed using this method. Trans-
mission damage could result if
the vehicle is towed with the
engine running.
. For vehicles with automatic
transmission, the traveling speed
must be limited to less than 20
mph (30 km/h) and the traveling
distance to less than 31 miles (50
km). For greater speeds and
distances, transport your vehicle
on a flat-bed truck.
1. Check the transmission and differen-
tial oil levels and add oil to bring it to the
upper level if necessary.
2. Release the parking brake and put the
transmission in neutral. 3. The ignition switch should be in the“
Acc ”position while the vehicle is being
towed.
4. Take up slack in the towline slowly to
prevent damage to the vehicle. In case of emergency
9-17
Page 389 of 447

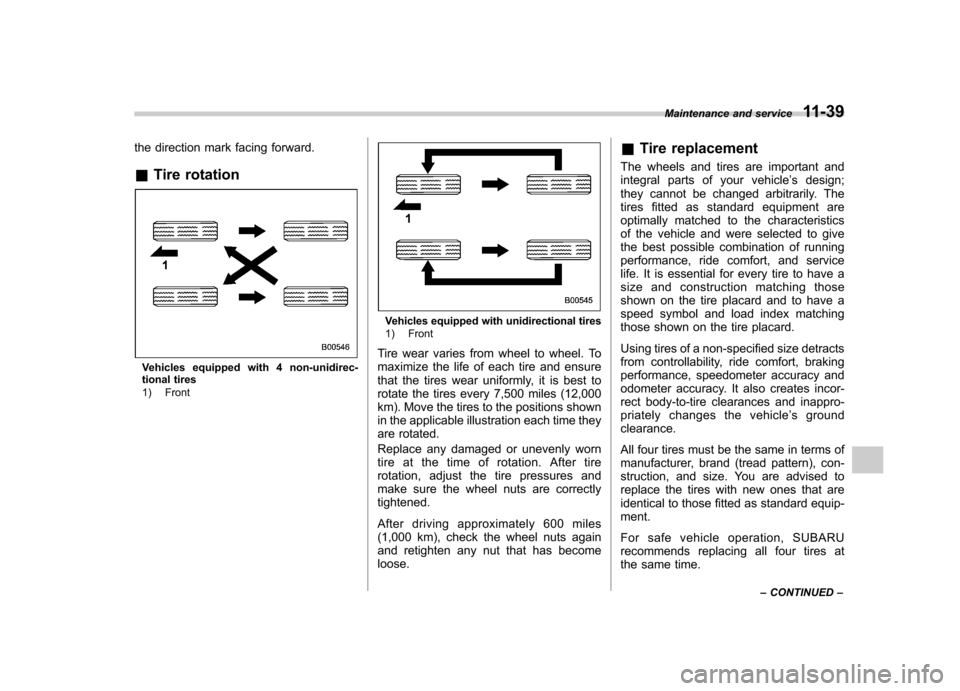
the direction mark facing forward. &Tire rotation
Vehicles equipped with 4 non-unidirec-
tional tires
1) Front
Vehicles equipped with unidirectional tires
1) Front
Tire wear varies from wheel to wheel. To
maximize the life of each tire and ensure
that the tires wear uniformly, it is best to
rotate the tires every 7,500 miles (12,000
km). Move the tires to the positions shown
in the applicable illustration each time they
are rotated.
Replace any damaged or unevenly worn
tire at the time of rotation. After tire
rotation, adjust the tire pressures and
make sure the wheel nuts are correctlytightened.
After driving approximately 600 miles
(1,000 km), check the wheel nuts again
and retighten any nut that has become loose. &
Tire replacement
The wheels and tires are important and
integral parts of your vehicle ’s design;
they cannot be changed arbitrarily. The
tires fitted as standard equipment are
optimally matched to the characteristics
of the vehicle and were selected to give
the best possible combination of running
performance, ride comfort, and service
life. It is essential for every tire to have a
size and construction matching those
shown on the tire placard and to have a
speed symbol and load index matching
those shown on the tire placard.
Using tires of a non-specified size detracts
from controllability, ride comfort, braking
performance, speedometer accuracy and
odometer accuracy. It also creates incor-
rect body-to-tire clearances and inappro-
priately changes the vehicle ’s ground
clearance.
All four tires must be the same in terms of
manufacturer, brand (tread pattern), con-
struction, and size. You are advised to
replace the tires with new ones that are
identical to those fitted as standard equip-ment.
For safe vehicle operation, SUBARU
recommends replacing all four tires at
the same time. Maintenance and service
11-39
– CONTINUED –
Page 411 of 447

12-2Specifications
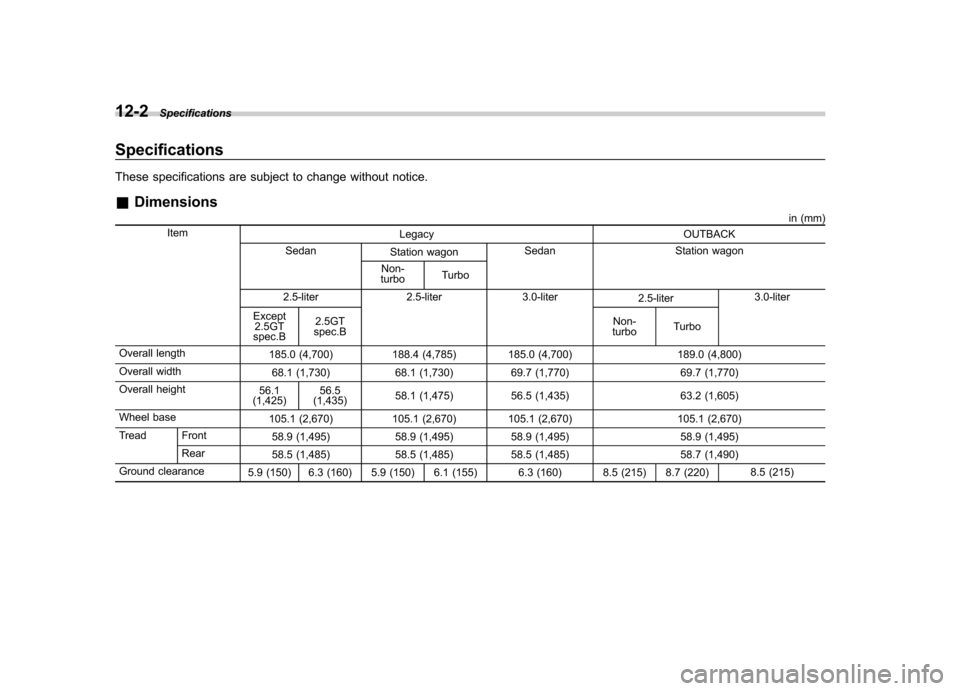
Specifications
These specifications are subject to change without notice. &Dimensions
in (mm)
Item Legacy OUTBACK
Sedan Station wagon Sedan Station wagon
Non-
turbo Turbo
2.5-liter 2.5-liter 3.0-liter 2.5-liter3.0-liter
Except 2.5GT
spec.B 2.5GT
spec.B Non-
turbo Turbo
Overall length 185.0 (4,700) 188.4 (4,785) 185.0 (4,700) 189.0 (4,800)
Overall width 68.1 (1,730) 68.1 (1,730) 69.7 (1,770) 69.7 (1,770)
Overall height 56.1
(1,425) 56.5
(1,435) 58.1 (1,475) 56.5 (1,435) 63.2 (1,605)
Wheel base 105.1 (2,670) 105.1 (2,670) 105.1 (2,670) 105.1 (2,670)
Tread Front 58.9 (1,495) 58.9 (1,495) 58.9 (1,495) 58.9 (1,495)
Rear 58.5 (1,485) 58.5 (1,485) 58.5 (1,485) 58.7 (1,490)
Ground clearance 5.9 (150) 6.3 (160) 5.9 (150) 6.1 (155) 6.3 (160) 8.5 (215) 8.7 (220) 8.5 (215)
Page 443 of 447

Speedometer....................................................... 3-6, 3-24
SPORT mode indicator light ........................................ 3-38
SRS
Curtain airbag ........................................................ 1-56
Frontal airbag ........................................................ 1-45
Side airbag ........................................................... 1-56
SRS airbag (Supplemental Restraint System airbag) ... 4, 1-40
SRS airbag system Monitors. ............................................................... 1-63
Servicing ............................................................... 1-65
Warning light ......................................................... 3-30
Starting the engine ....................................................... 7-9
State emission testing (U.S. only) .................................. 7-7
Steering wheel Power ................................................................... 7-34
Tilt/telescopic ......................................................... 3-59
Stopping the engine ................................................... 7-11
Storage compartment ................................................... 6-5
Stowage boxes .......................................................... 6-17
Sun shade ........................................................ 2-30, 2-31
Sun visors ................................................................... 6-4
Supplemental Restraint System airbag (SRS) ... ............. 1-40
Synthetic leather upholstery ........................................ 10-5
T
Tachometer ......................................................... 3-6, 3-26
Temperature gauge ...................................... 3-7, 3-12, 3-27
Temperature warning light AT OIL TEMP ........................................................ 3-33
Temporary spare tire .................................................... 9-2
Tether (child restraint system) .............................. 1-35, 1-38 Tie-down hooks
.......................................................... 9-14
Tire
Chains .................................................................. 8-13
Inspection ............................................................ 11-35
Pressures and wear .............................................. 11-36
Replacement. ....................................................... 11-39
Rotation .............................................................. 11-39
Types .................................................................. 11-33
Tire pressure monitoring system (TPMS) ......................................... 3-33, 7-43, 9-9, 11-34
Tires ......................................................................... 12-5
Tires and wheels ...................................................... 11-33
Top tether anchorages ........................................ 1-35, 1-38
Towing ...................................................................... 9-13
All wheels on the ground ......................................... 9-17
Flat-bed truck ......................................................... 9-16
Tie-down hooks ...................................................... 9-14
Weight .................................................................. 8-22
Traction Control system OFF indicator light .................................................. 3-37
Trailer Connecting ............................................................ 8-20
Hitch ..................................................................... 8-19
Hitches .................................................................. 8-25
Towing .................................................................. 8-21
Towing tips ............................................................ 8-27
Trip meter .................................................................. 3-25
Trunk lid .................................................................... 2-24
Release handle ...................................................... 2-25
Trunk light ............................................................... 11-59 Index
14-9