2009 SUBARU LEGACY seat adjustment
[x] Cancel search: seat adjustmentPage 27 of 447

Front seats........................................................... 1-2
Manual seat ........................................................ 1-3
Power seat (if equipped) ...................................... 1-4
Memory function (driver ’s seat —if equipped) ..... 1-5
Head restraint adjustment .................................... 1-7
Active head restraint ........................................... 1-7
Lumbar support (if equipped) .............................. 1-8
Seat heater (if equipped) .................................... 1-8
Rear seats ............................................................ 1-9
Folding down the rear seatback ........................... 1-9
Head restraint adjustment ................................... 1-10
Armrest (if equipped) ......................................... 1-12
Loading long objects (Sedan) ............................. 1-12
Seatbelts ............................................................. 1-13
Seatbelt safety tips ............................................. 1-13
Emergency Locking Retractor (ELR) ................... 1-15
Automatic/Emergency Locking Retractor (A/ELR) ............................................................ 1-15
Seatbelt warning light and chime ........................ 1-15
Fastening the seatbelt ........................................ 1-17
Seatbelt maintenance ......................................... 1-23 Front seatbelt pretensioners
............................. 1-24
System monitors ............................................... 1-25
System servicing ............................................... 1-26
Precautions against vehicle modification ............ 1-27
Child restraint systems ..................................... 1-27
Where to place a child restraint system .............. 1-29
Choosing a child restraint system ...................... 1-30
Installing child restraint systems with A/ELR seatbelt ........................................................... 1-30
Installing a booster seat ..................................... 1-34
Installation of child restraint systems by use of lower and tether anchorages (LATCH) .............. 1-35
Top tether anchorages ....................................... 1-38
*SRS airbag (Supplemental Restraint System airbag) ................................................ 1-40
Vehicle with SRS airbags and lap/shoulder restraints for driver, front passenger, and
window-side rear passengers . .......................... 1-40
SUBARU advanced frontal airbag system ........... 1-45
SRS side airbag and SRS curtain airbag ............. 1-56
SRS airbag system monitors .............................. 1-63
SRS airbag system servicing ... .......................... 1-65
Precautions against vehicle modification ............ 1-66
Seat, seatbelt and SRS airbags1
Page 29 of 447

According to accident statistics,
children are safer when properly
restrained in the rear seating posi-
tions than in the front seating posi-
tions. For instructions and precau-
tions concerning child restraint sys-
tems, refer to the“Child restraint
systems ”section in this chapter.
& Manual seat
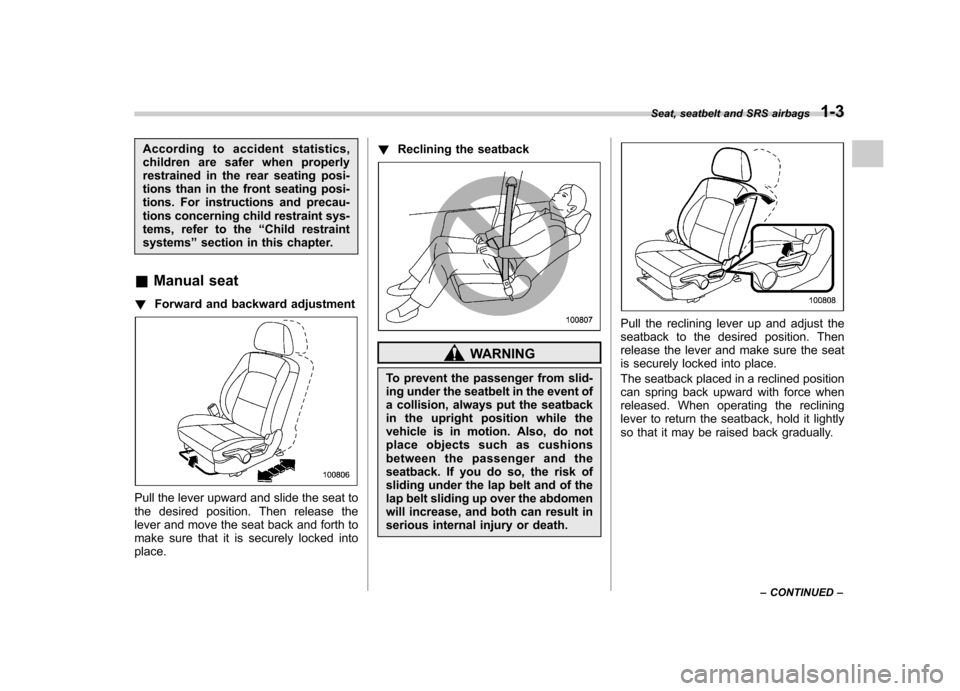
! Forward and backward adjustment
Pull the lever upward and slide the seat to
the desired position. Then release the
lever and move the seat back and forth to
make sure that it is securely locked intoplace. !
Reclining the seatback
WARNING
To prevent the passenger from slid-
ing under the seatbelt in the event of
a collision, always put the seatback
in the upright position while the
vehicle is in motion. Also, do not
place objects such as cushions
between the passenger and the
seatback. If you do so, the risk of
sliding under the lap belt and of the
lap belt sliding up over the abdomen
will increase, and both can result in
serious internal injury or death.
Pull the reclining lever up and adjust the
seatback to the desired position. Then
release the lever and make sure the seat
is securely locked into place.
The seatback placed in a reclined position
can spring back upward with force when
released. When operating the reclining
lever to return the seatback, hold it lightly
so that it may be raised back gradually. Seat, seatbelt and SRS airbags
1-3
– CONTINUED –
Page 30 of 447

1-4Seat, seatbelt and SRS airbags
!Seat height adjustment (driver ’s
seat)
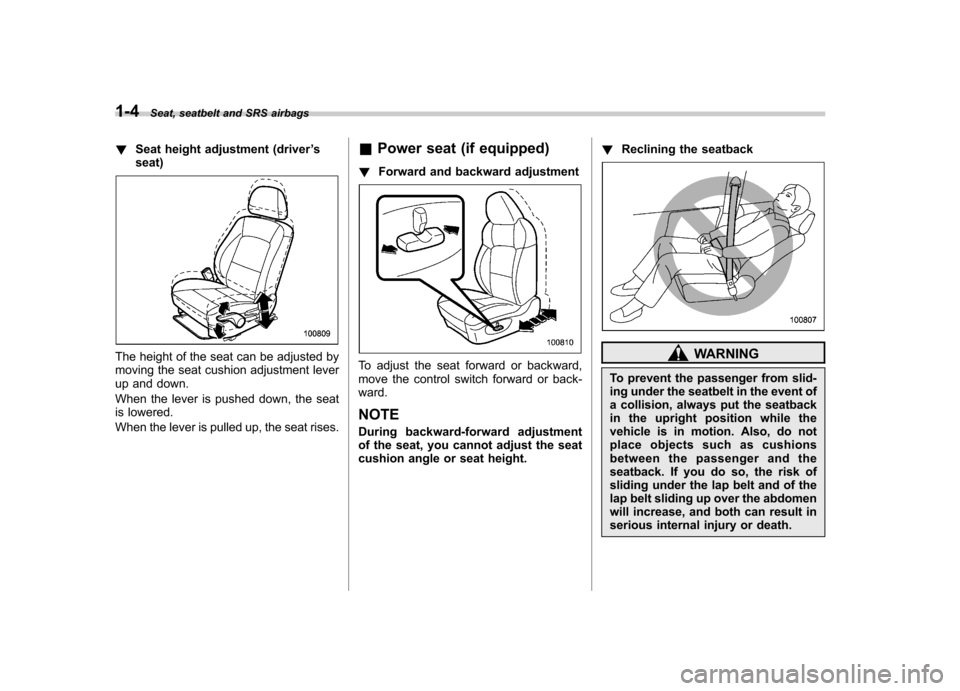
The height of the seat can be adjusted by
moving the seat cushion adjustment lever
up and down.
When the lever is pushed down, the seat
is lowered.
When the lever is pulled up, the seat rises. &
Power seat (if equipped)
! Forward and backward adjustmentTo adjust the seat forward or backward,
move the control switch forward or back-ward. NOTE
During backward-forward adjustment
of the seat, you cannot adjust the seat
cushion angle or seat height. !
Reclining the seatbackWARNING
To prevent the passenger from slid-
ing under the seatbelt in the event of
a collision, always put the seatback
in the upright position while the
vehicle is in motion. Also, do not
place objects such as cushions
between the passenger and the
seatback. If you do so, the risk of
sliding under the lap belt and of the
lap belt sliding up over the abdomen
will increase, and both can result in
serious internal injury or death.
Page 31 of 447

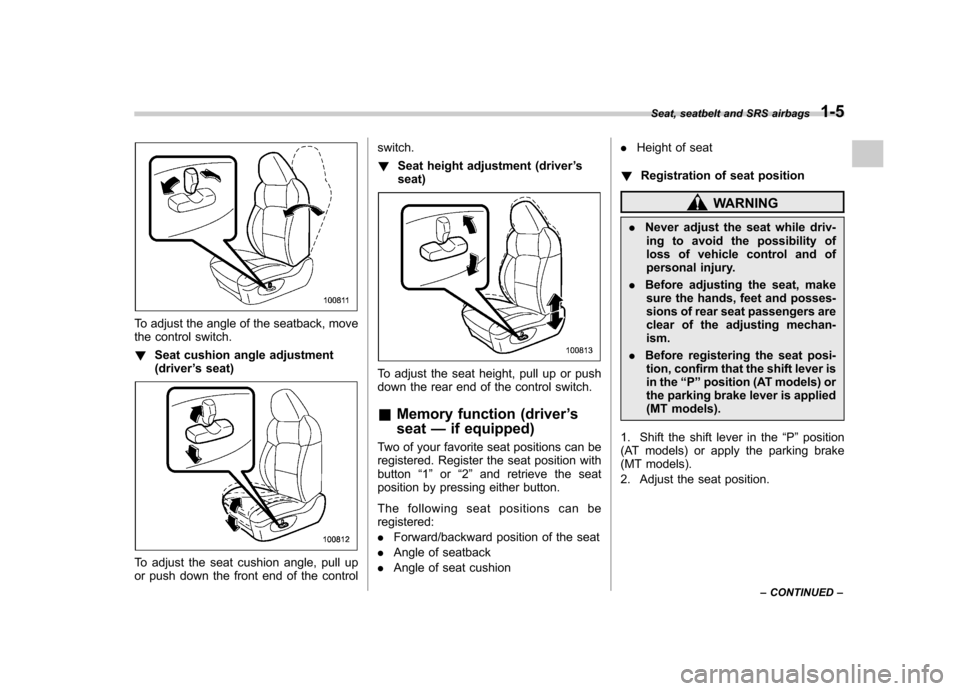
To adjust the angle of the seatback, move
the control switch. !Seat cushion angle adjustment (driver ’s seat)
To adjust the seat cushion angle, pull up
or push down the front end of the control switch. !
Seat height adjustment (driver ’s
seat)
To adjust the seat height, pull up or push
down the rear end of the control switch. & Memory function (driver ’s
seat —if equipped)
Two of your favorite seat positions can be
registered. Register the seat position withbutton “1 ” or “2 ” and retrieve the seat
position by pressing either button.
The following seat positions can be registered: . Forward/backward position of the seat
. Angle of seatback
. Angle of seat cushion .
Height of seat
! Registration of seat position
WARNING
. Never adjust the seat while driv-
ing to avoid the possibility of
loss of vehicle control and of
personal injury.
. Before adjusting the seat, make
sure the hands, feet and posses-
sions of rear seat passengers are
clear of the adjusting mechan-ism.
. Before registering the seat posi-
tion, confirm that the shift lever is
in the “P ” position (AT models) or
the parking brake lever is applied
(MT models).
1. Shift the shift lever in the “P ” position
(AT models) or apply the parking brake
(MT models).
2. Adjust the seat position. Seat, seatbelt and SRS airbags
1-5
– CONTINUED –
Page 33 of 447

injury or death.
. To retrieve the seat position,
make sure the hands, feet or
luggage of rear seat passengers
are clear of the seat adjustingmechanism.
NOTE . If a new position is registered for the
same button, the previous seat posi-
tion is deleted.. If the battery is disconnected, the
registered seat position is not deleted. & Head restraint adjustment
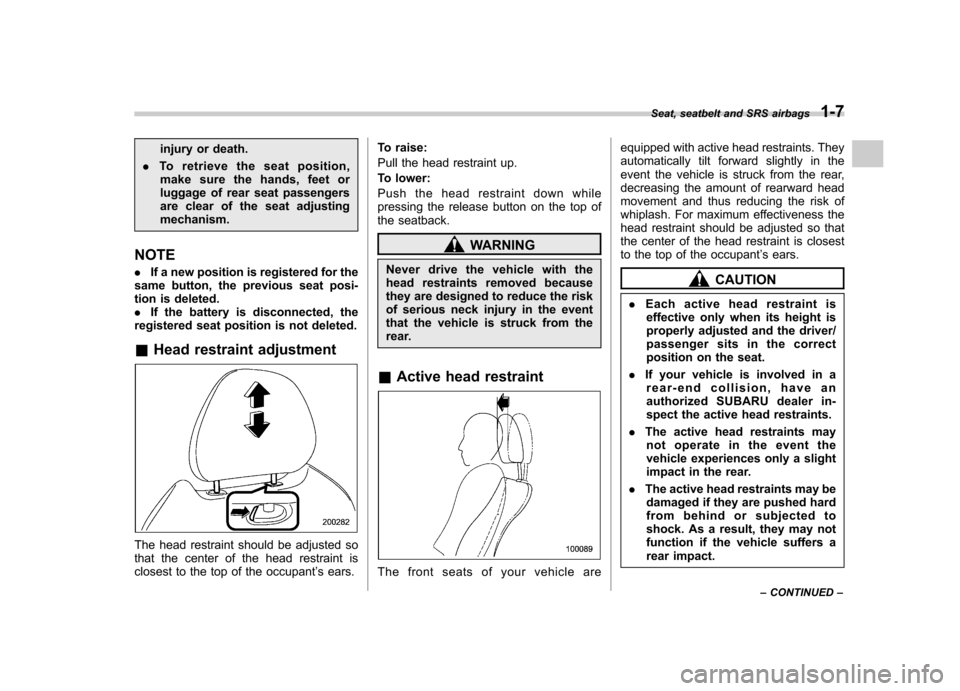
The head restraint should be adjusted so
that the center of the head restraint is
closest to the top of the occupant ’s ears. To raise:
Pull the head restraint up.
To lower:
Push the head restraint down while
pressing the release button on the top of
the seatback.
WARNING
Never drive the vehicle with the
head restraints removed because
they are designed to reduce the risk
of serious neck injury in the event
that the vehicle is struck from the
rear.
& Active head restraint
The front seats of your vehicle are equipped with active head restraints. They
automatically tilt forward slightly in the
event the vehicle is struck from the rear,
decreasing the amount of rearward head
movement and thus reducing the risk of
whiplash. For maximum effectiveness the
head restraint should be adjusted so that
the center of the head restraint is closest
to the top of the occupant
’s ears.
CAUTION
. Each active head restraint is
effective only when its height is
properly adjusted and the driver/
passenger sits in the correct
position on the seat.
. If your vehicle is involved in a
rear-end collision, have an
authorized SUBARU dealer in-
spect the active head restraints.
. The active head restraints may
not operate in the event the
vehicle experiences only a slight
impact in the rear.
. The active head restraints may be
damaged if they are pushed hard
from behind or subjected to
shock. As a result, they may not
function if the vehicle suffers a
rear impact. Seat, seatbelt and SRS airbags
1-7
– CONTINUED –
Page 34 of 447

1-8Seat, seatbelt and SRS airbags
&Lumbar support (if equipped)
Pull the lever forward or backward.
Pulling the lever forward will increase the
amount of support for your lower back. Seat heater (if equipped)The seat heater is equipped in the front seats.
The seat heater operates when the igni-
tion switch is either in the
“Acc ”or “ON ”
position.
Each seat heater has four levels of
adjustment. To use the heater in the
right-hand seat, turn the “R ” adjustment
dial forward until the “
”mark reaches the
desired position. To activate the heater in
the left-hand seat, turn the “L ” adjustment
dial forward until the “
”mark reaches the
desired position. Each heater warms the
seat most quickly with the “
”mark on the
adjustment dial in the furthest-forward
position. An indicator light next to the adjustment dial for each seat heater
illuminates when that seat heater isactivated.
When the vehicle
’s interior is warmed
enough or before you leave the vehicle,
be sure to turn the switch off.
CAUTION
. There is a possibility that people
with delicate skin may suffer
slight burns even at low tempera-
tures if they use the seat heater
for a long period of time. When
using the heater, always be sure
to warn the persons concerned.
. Do not put anything on the seat
which insulates against heat,
such as a blanket, cushion, or
similar items. This may cause the
seat heater to overheat.
NOTE
Use of the seat heater for a long period
of time while the engine is not running
can cause battery discharge.
Page 36 of 447

1-10Seat, seatbelt and SRS airbags
!Sedan models
1) Lock
2) Unlock
3) Release button
Insert the key into the key cylinder on the
seatback, unlock the seatback by turning the key counterclockwise, and then fold
the seatback down while pushing the
release button.
To return the seatback to its original
position, raise the seatback until it locks
into place and make sure that it is securelylocked. !
Wagon models
Unlock the seatback by pushing the
release button and then fold the seatbackdown.
To return the seatback to its original
position, raise the seatback until it locks
into place and make sure that it is securelylocked. &
Head restraint adjustment
WARNING
Never drive the vehicle with the
head restraints removed because
they are designed to reduce the risk
of serious neck injury in the event
that the vehicle is struck from the
rear.
! Rear windows side seating position
CAUTION
The head restraint is not intended to
be used at the lowest position.
Before sitting on the seat, raise the
head restraint to the click position.
Page 254 of 447

7-8Starting and operating
not damage an AWD SUBARU vehicle.
Under no circumstances should the rear
wheels be jacked off the ground, nor
should the driveshaft be disconnected for
state emission testing.
The EPA has issued regulations for
inspecting the On-Board Diagnostic
(OBD) system as part of the state emis-
sions inspection. The OBD system is
designed to detect engine and transmis-
sion problems that might cause vehicle
emissions to exceed allowable limits.
These inspections apply to all 1996 model
year and newer passenger cars and light
trucks. Over 30 states plus the District of
Columbia have implemented the OBD
system inspection. .The inspection of the OBD system
consists of a visual operational check of the “CHECK ENGINE ”warning light/mal-
function indicator lamp (MIL) and an
examination of the OBD system with an
electronic scan tool while the engine isrunning. . Avehicle
passes the OBD system
inspection if proper the “CHECK ENGINE ”
warning light/MIL illumination is observed,
there is nostored diagnostic trouble
codes, and the OBD system readiness
monitors are complete. . A vehicle
fails the OBD inspection if the
“ CHECK ENGINE ”warning light/MIL is not properly operating or there is one or
more diagnostic trouble codes stored invehicle
’s computer with the “CHECK
ENGINE ”warning light/MIL illuminated.
. A state emission inspection may reject
(not pass or fail) a vehicle if the number of
OBD system readiness monitors “Not
Ready ”is greater than one. Under this
condition, the vehicle operator should be
instructed to drive his/her vehicle for a few
days to set the monitors and return for an
emission re-inspection. . Owners of rejected or failing vehicles
should contact their SUBARU Dealer for service. Preparing to drive
You should perform the following checks
and adjustments every day before you
start driving.
1. Check that all windows, mirrors, and
lights are clean and unobstructed.
2. Check the appearance and condition
of the tires. Also check tires for properinflation.
3. Look under the vehicle for any sign of leaks.
4. Check that the hood, trunk (Sedan)
and rear gate (Station wagon) are fullyclosed.
5. Check the adjustment of the seat.
6. Check the adjustment of the inside
and outside mirrors.
7. Fasten your seatbelt. Check that your
passengers have fastened their seatbelts.
8. Check the operation of the warning
and indicator lights when the ignition
switch is turned to the
“ON ”position.
9. Check the gauges, indicator and warn-
ing lights after starting the engine.