2009 SUBARU FORESTER stop start
[x] Cancel search: stop startPage 222 of 384
on the old batteries before removing them
to ensure that the new batteries are
inserted properly (battery“+ ” should be
pointed away from the transmitter circuit
board on both batteries).
3. Carefully snap the case halves back
together, then test the remote control.
NOTE
This device complies with Part 15 of
the FCC Rules and with RSS-210 of
Industry Canada. Operation is subject
to the following two conditions: (1) This
device may not cause harmful inter-
ference, and (2) this device must
accept any interference received, in-
cluding interference that may cause
undesired operation.
Changes or modifications not ex-
pressly approved by the party respon-
sible for compliance could void theuser ’s authority to operate the equip-
ment. Manual transmission
The manual transmission is a fully syn-
chromeshed, 5-forward-speed and 1-re-
verse-speed transmission.
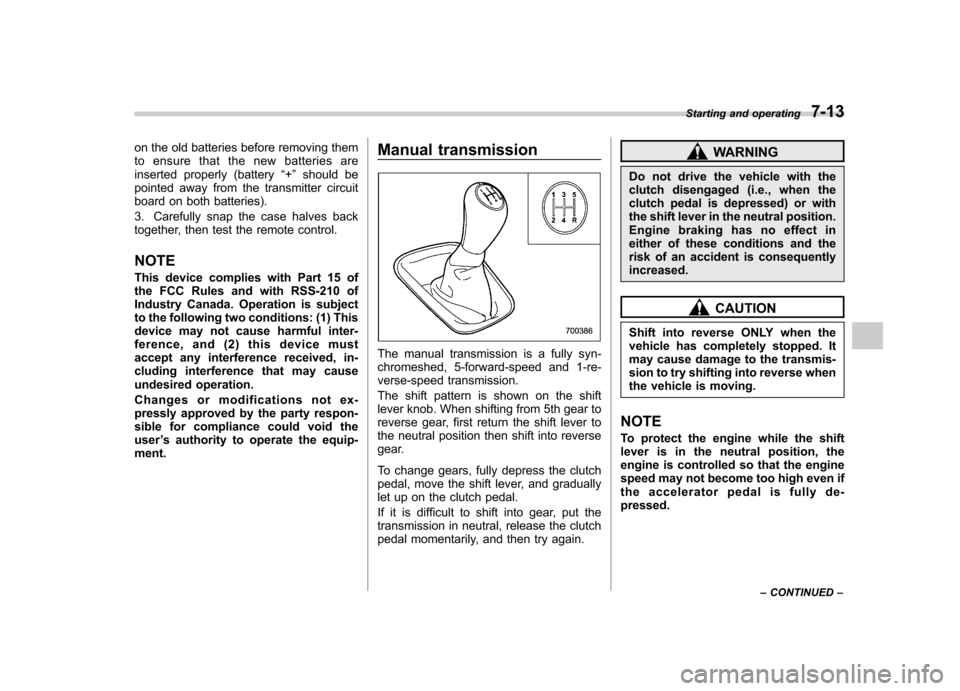
The shift pattern is shown on the shift
lever knob. When shifting from 5th gear to
reverse gear, first return the shift lever to
the neutral position then shift into reverse
gear.
To change gears, fully depress the clutch
pedal, move the shift lever, and gradually
let up on the clutch pedal.
If it is difficult to shift into gear, put the
transmission in neutral, release the clutch
pedal momentarily, and then try again.
WARNING
Do not drive the vehicle with the
clutch disengaged (i.e., when the
clutch pedal is depressed) or with
the shift lever in the neutral position.
Engine braking has no effect in
either of these conditions and the
risk of an accident is consequentlyincreased.
CAUTION
Shift into reverse ONLY when the
vehicle has completely stopped. It
may cause damage to the transmis-
sion to try shifting into reverse when
the vehicle is moving.
NOTE
To protect the engine while the shift
lever is in the neutral position, the
engine is controlled so that the engine
speed may not become too high even if
the accelerator pedal is fully de-pressed. Starting and operating
7-13
– CONTINUED –
Page 224 of 384

Automatic transmission
The automatic transmission is electroni-
cally controlled and provides 4 forward
speeds and 1 reverse speed. Also, it has a
manual mode and a SPORT mode.
WARNING
Do not shift from the “P ” or “N ”
position into the “D ” or “R ” position
while depressing the accelerator
pedal. This may cause the vehicle
to jump forward or backward.
CAUTION
. Shift into the “P ” or “R ” position
only after the vehicle is comple-
tely stopped. Shifting while the
vehicle is moving may cause
damage to the transmission.
. Do not race the engine for more
than 5 seconds in any position
except the “N ” or “P ” position
when the brake is set or when
chocks are used in the wheels.
This may cause the automatic
transmission fluid to overheat.
. Avoid shifting from one of the
forward driving positions into the “
R ” position or vice versa until
the vehicle has completely
stopped. Such shifting may
cause damage to the transmis-sion.
. When parking the vehicle, first
securely apply the parking brake
and then place the selector lever
in the “P ” position. Avoid parking
for a long time with the selector
lever in any other position as
doing so could result in a dead
battery.
NOTE . When the engine coolant tempera-
ture is still low, your vehicle ’s auto-
matic transmission will up-shift at high-
er engine speeds than when the cool-
ant temperature is sufficiently high in
order to shorten the warm-up time and
improve driveability. The gearshift tim-
ing will automatically shift to the nor-
mal timing after the engine has warmedup.. Immediately after ATF (automatic
transmission fluid) is replaced, you
may feel that the automatic transmis-
sion operation is somewhat unusual.
This results from invalidation of data
which the on-board computer has collected and stored in memory to
allow the transmission to shift at the
most appropriate times for the current
condition of your vehicle. Optimized
shifting will be restored as the vehicle
continues to be driven for a while.
NOTE (non-turbo models only)
To protect the engine while the
“P ” or
“ N ” position is selected, the engine is
controlled so that the engine speed
may not become too high even if the
accelerator pedal is fully depressed.
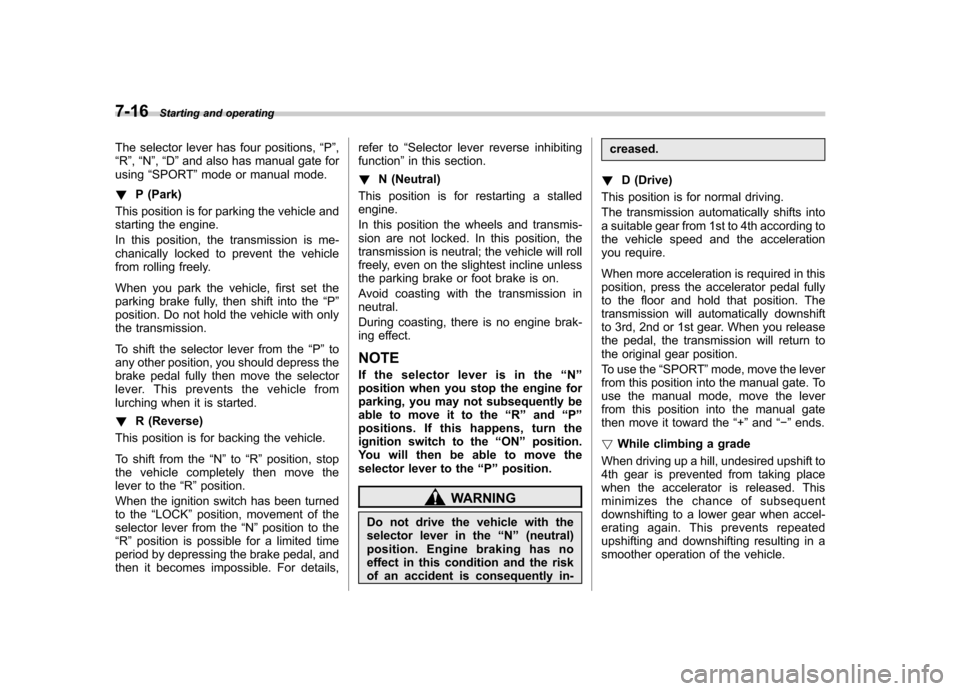
& Selector lever
: Shift possible with brake pedal de-
pressed
: Shift possible with brake pedal notdepressed Starting and operating
7-15
– CONTINUED –
Page 225 of 384
7-16Starting and operating
The selector lever has four positions, “P ”,
“ R ”, “N ”, “D ”and also has manual gate for
using “SPORT ”mode or manual mode.
! P (Park)
This position is for parking the vehicle and
starting the engine.
In this position, the transmission is me-
chanically locked to prevent the vehicle
from rolling freely.
When you park the vehicle, first set the
parking brake fully, then shift into the “P ”
position. Do not hold the vehicle with only
the transmission.
To shift the selector lever from the “P ” to
any other position, you should depress the
brake pedal fully then move the selector
lever. This prevents the vehicle from
lurching when it is started. ! R (Reverse)
This position is for backing the vehicle.
To shift from the “N ”to “R ”position, stop
the vehicle completely then move the
lever to the “R ”position.
When the ignition switch has been turned
to the “LOCK ”position, movement of the
selector lever from the “N ”position to the
“ R ” position is possible for a limited time
period by depressing the brake pedal, and
then it becomes impossible. For details, refer to
“Selector lever reverse inhibiting
function ”in this section.
! N (Neutral)
This position is for restarting a stalledengine.
In this position the wheels and transmis-
sion are not locked. In this position, the
transmission is neutral; the vehicle will roll
freely, even on the slightest incline unless
the parking brake or foot brake is on.
Avoid coasting with the transmission in neutral.
During coasting, there is no engine brak-
ing effect.
NOTE
If the selector lever is in the “N ”
position when you stop the engine for
parking, you may not subsequently be
able to move it to the “R ” and “P ”
positions. If this happens, turn the
ignition switch to the “ON ”position.
You will then be able to move the
selector lever to the “P ” position.
WARNING
Do not drive the vehicle with the
selector lever in the “N ” (neutral)
position. Engine braking has no
effect in this condition and the risk
of an accident is consequently in- creased.
! D (Drive)
This position is for normal driving.
The transmission automatically shifts into
a suitable gear from 1st to 4th according to
the vehicle speed and the acceleration
you require.
When more acceleration is required in this
position, press the accelerator pedal fully
to the floor and hold that position. The
transmission will automatically downshift
to 3rd, 2nd or 1st gear. When you release
the pedal, the transmission will return to
the original gear position.
To use the “SPORT ”mode, move the lever
from this position into the manual gate. To
use the manual mode, move the lever
from this position into the manual gate
then move it toward the “+ ” and “� ” ends.
! While climbing a grade
When driving up a hill, undesired upshift to
4th gear is prevented from taking place
when the accelerator is released. This
minimizes the chance of subsequent
downshifting to a lower gear when accel-
erating again. This prevents repeated
upshifting and downshifting resulting in a
smoother operation of the vehicle.
Page 227 of 384
7-18Starting and operating
& Selection of manual mode
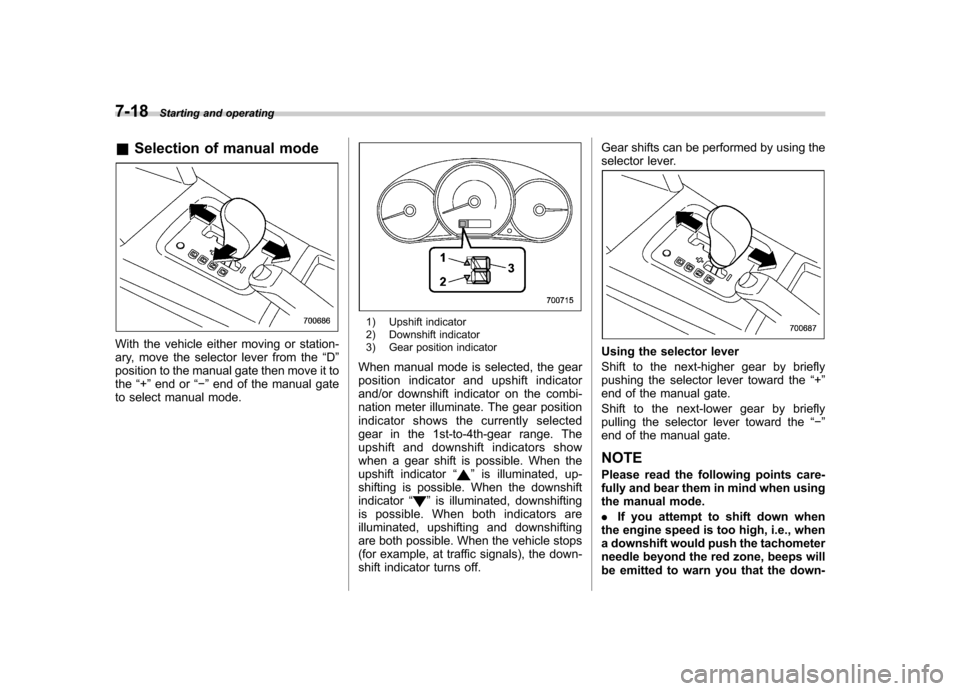
With the vehicle either moving or station-
ary, move the selector lever from the “D ”
position to the manual gate then move it tothe “+ ” end or “� ” end of the manual gate
to select manual mode.
1) Upshift indicator
2) Downshift indicator
3) Gear position indicator
When manual mode is selected, the gear
position indicator and upshift indicator
and/or downshift indicator on the combi-
nation meter illuminate. The gear position
indicator shows the currently selected
gear in the 1st-to-4th-gear range. The
upshift and downshift indicators show
when a gear shift is possible. When the
upshift indicator “
”is illuminated, up-
shifting is possible. When the downshift indicator “
”is illuminated, downshifting
is possible. When both indicators are
illuminated, upshifting and downshifting
are both possible. When the vehicle stops
(for example, at traffic signals), the down-
shift indicator turns off. Gear shifts can be performed by using the
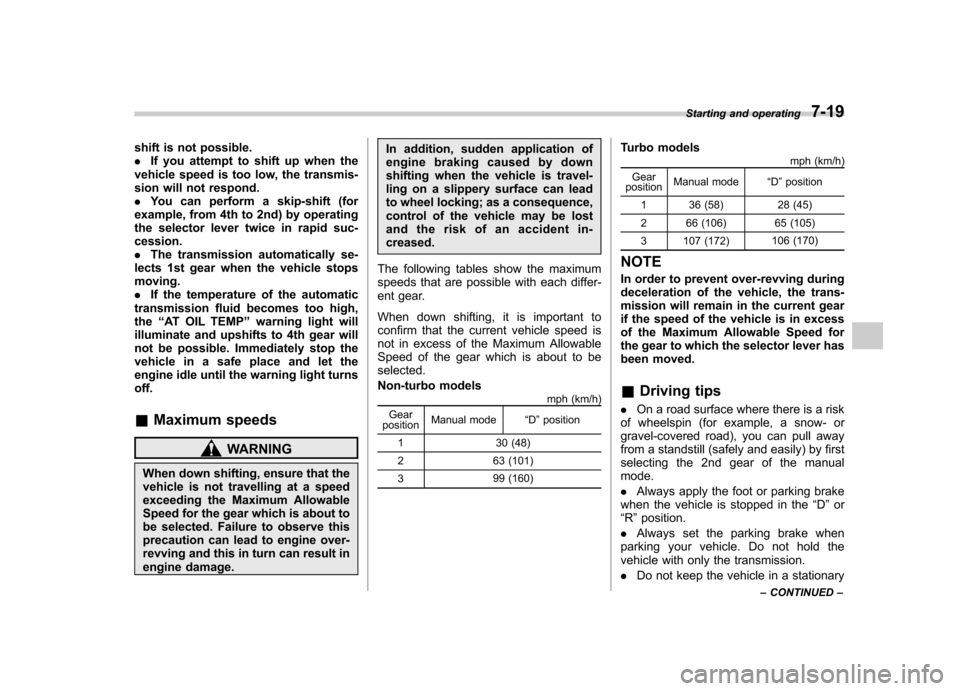
selector lever.
Using the selector lever
Shift to the next-higher gear by briefly
pushing the selector lever toward the
“+ ”
end of the manual gate.
Shift to the next-lower gear by briefly
pulling the selector lever toward the “� ”
end of the manual gate. NOTE
Please read the following points care-
fully and bear them in mind when using
the manual mode. . If you attempt to shift down when
the engine speed is too high, i.e., when
a downshift would push the tachometer
needle beyond the red zone, beeps will
be emitted to warn you that the down-
Page 228 of 384
shift is not possible. .If you attempt to shift up when the
vehicle speed is too low, the transmis-
sion will not respond.. You can perform a skip-shift (for
example, from 4th to 2nd) by operating
the selector lever twice in rapid suc-cession.. The transmission automatically se-
lects 1st gear when the vehicle stopsmoving.. If the temperature of the automatic
transmission fluid becomes too high,the “AT OIL TEMP ”warning light will
illuminate and upshifts to 4th gear will
not be possible. Immediately stop the
vehicle in a safe place and let the
engine idle until the warning light turnsoff.
& Maximum speeds
WARNING
When down shifting, ensure that the
vehicle is not travelling at a speed
exceeding the Maximum Allowable
Speed for the gear which is about to
be selected. Failure to observe this
precaution can lead to engine over-
revving and this in turn can result in
engine damage. In addition, sudden application of
engine braking caused by down
shifting when the vehicle is travel-
ling on a slippery surface can lead
to wheel locking; as a consequence,
control of the vehicle may be lost
and the risk of an accident in-creased.
The following tables show the maximum
speeds that are possible with each differ-
ent gear.
When down shifting, it is important to
confirm that the current vehicle speed is
not in excess of the Maximum Allowable
Speed of the gear which is about to beselected.
Non-turbo models mph (km/h)
Gear
position Manual mode
“D ”position
1 30 (48)
2 63 (101) 3 99 (160) Turbo models
mph (km/h)
Gear
position Manual mode
“D ”position
1 36 (58) 28 (45)
2 66 (106) 65 (105)
3 107 (172) 106 (170)
NOTE
In order to prevent over-revving during
deceleration of the vehicle, the trans-
mission will remain in the current gear
if the speed of the vehicle is in excess
of the Maximum Allowable Speed for
the gear to which the selector lever has
been moved. & Driving tips
. On a road surface where there is a risk
of wheelspin (for example, a snow- or
gravel-covered road), you can pull away
from a standstill (safely and easily) by first
selecting the 2nd gear of the manualmode. . Always apply the foot or parking brake
when the vehicle is stopped in the “D ”or
“ R ”position.
. Always set the parking brake when
parking your vehicle. Do not hold the
vehicle with only the transmission. . Do not keep the vehicle in a stationary Starting and operating
7-19
– CONTINUED –
Page 229 of 384
7-20Starting and operating
position on an uphill grade by using the “ D ”position. Use the brake instead.
. The engine may, on rare occasions,
knock when the vehicle rapidly acceler-
ates or rapidly pulls away from a standstill.
This phenomenon does not indicate aproblem.
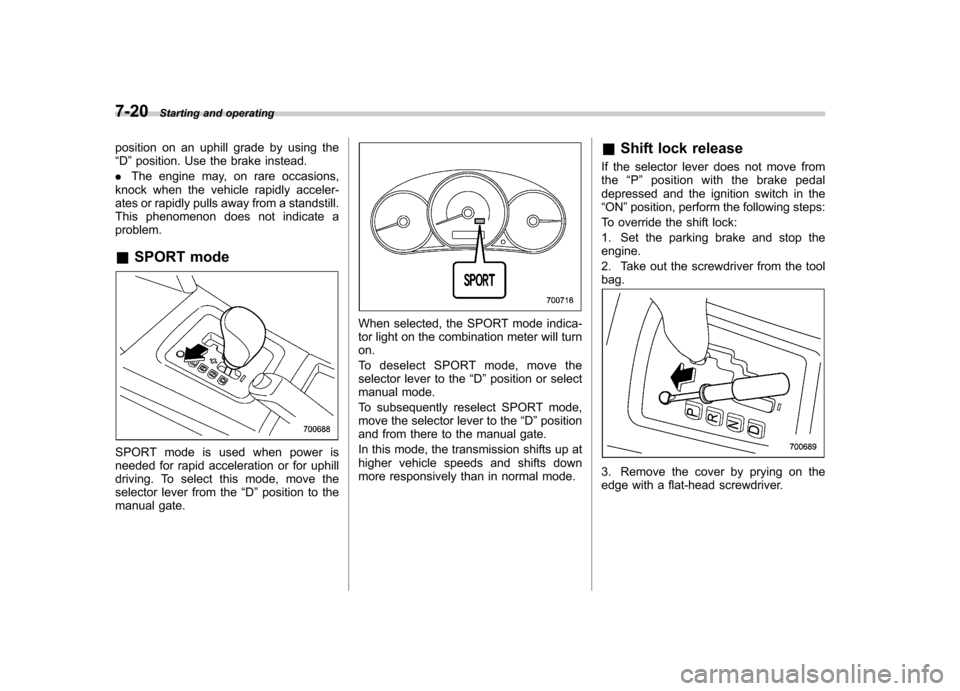
& SPORT mode
SPORT mode is used when power is
needed for rapid acceleration or for uphill
driving. To select this mode, move the
selector lever from the “D ”position to the
manual gate.
When selected, the SPORT mode indica-
tor light on the combination meter will turnon.
To deselect SPORT mode, move the
selector lever to the “D ”position or select
manual mode.
To subsequently reselect SPORT mode,
move the selector lever to the “D ”position
and from there to the manual gate.
In this mode, the transmission shifts up at
higher vehicle speeds and shifts down
more responsively than in normal mode. &
Shift lock release
If the selector lever does not move fromthe “P ” position with the brake pedal
depressed and the ignition switch in the“ ON ”position, perform the following steps:
To override the shift lock:
1. Set the parking brake and stop the engine.
2. Take out the screwdriver from the tool bag.
3. Remove the cover by prying on the
edge with a flat-head screwdriver.
Page 230 of 384
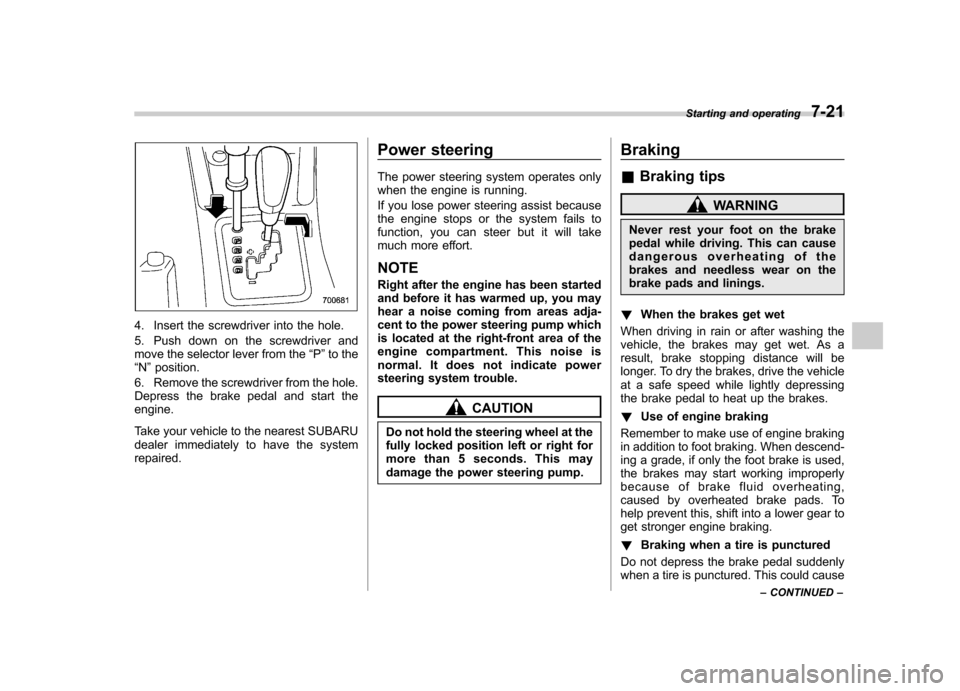
4. Insert the screwdriver into the hole.
5. Push down on the screwdriver and
move the selector lever from the“P ”to the
“ N ”position.
6. Remove the screwdriver from the hole.
Depress the brake pedal and start theengine.
Take your vehicle to the nearest SUBARU
dealer immediately to have the systemrepaired. Power steering
The power steering system operates only
when the engine is running.
If you lose power steering assist because
the engine stops or the system fails to
function, you can steer but it will take
much more effort. NOTE
Right after the engine has been started
and before it has warmed up, you may
hear a noise coming from areas adja-
cent to the power steering pump which
is located at the right-front area of the
engine compartment. This noise is
normal. It does not indicate power
steering system trouble.
CAUTION
Do not hold the steering wheel at the
fully locked position left or right for
more than 5 seconds. This may
damage the power steering pump. Braking &
Braking tips
WARNING
Never rest your foot on the brake
pedal while driving. This can cause
dangerous overheating of the
brakes and needless wear on the
brake pads and linings.
! When the brakes get wet
When driving in rain or after washing the
vehicle, the brakes may get wet. As a
result, brake stopping distance will be
longer. To dry the brakes, drive the vehicle
at a safe speed while lightly depressing
the brake pedal to heat up the brakes. ! Use of engine braking
Remember to make use of engine braking
in addition to foot braking. When descend-
ing a grade, if only the foot brake is used,
the brakes may start working improperly
because of brake fluid overheating,
caused by overheated brake pads. To
help prevent this, shift into a lower gear to
get stronger engine braking. ! Braking when a tire is punctured
Do not depress the brake pedal suddenly
when a tire is punctured. This could cause Starting and operating
7-21
– CONTINUED –
Page 231 of 384
7-22Starting and operating
a loss of control of the vehicle. Keep
driving straight ahead while gradually
reducing speed. Then slowly pull off the
road to a safe place. &Brake system
! Two separate circuits
Your vehicle has two separate circuit
brake systems. Each circuit works diag-
onally across the vehicle. If one circuit of
the brake system should fail, the other half
of the system still works. If one circuit fails,
the brake pedal will go down much closer
to the floor than usual and you will need to
press it down much harder. And a much
longer distance will be needed to stop thevehicle. ! Brake booster
The brake booster uses engine manifold
vacuum to assist braking force. Do not
turn off the engine while driving because
that will turn off the brake booster, result-
ing in poor braking power.
The brakes will continue to work even
when the brake booster completely stops
functioning. If this happens, however, you
will have to push the pedal much harder
than normal and the braking distance willincrease. !
Brake assist system
WARNING
Do not be overconfident about the
brake assist. It is not a system that
brings more braking ability to the
vehicle beyond its braking capabil-
ity. Always use the utmost care
when driving regarding vehicle
speed and safe distance.
CAUTION
When you need to brake suddenly,
continue depressing the brake pedal
strongly to bring the effect of the
brake assist.
Brake assist is a driver assistance system.
It assists the brake power when the driver
cannot depress the brake pedal strongly
and the brake power is insufficient.
Brake assist generates the brake power
according to the speed at which the driver
depresses the brake pedal. NOTE
When you depress the brake pedal
strongly or suddenly, the following
phenomena occur. However, even
though these occur, they do not indi- cate any malfunctions, and the brake
assist system is operating properly. .
You might feel that the brake pedal
is applied by lighter force and gener-
ates a greater braking force.. You might hear clicking (knocking)
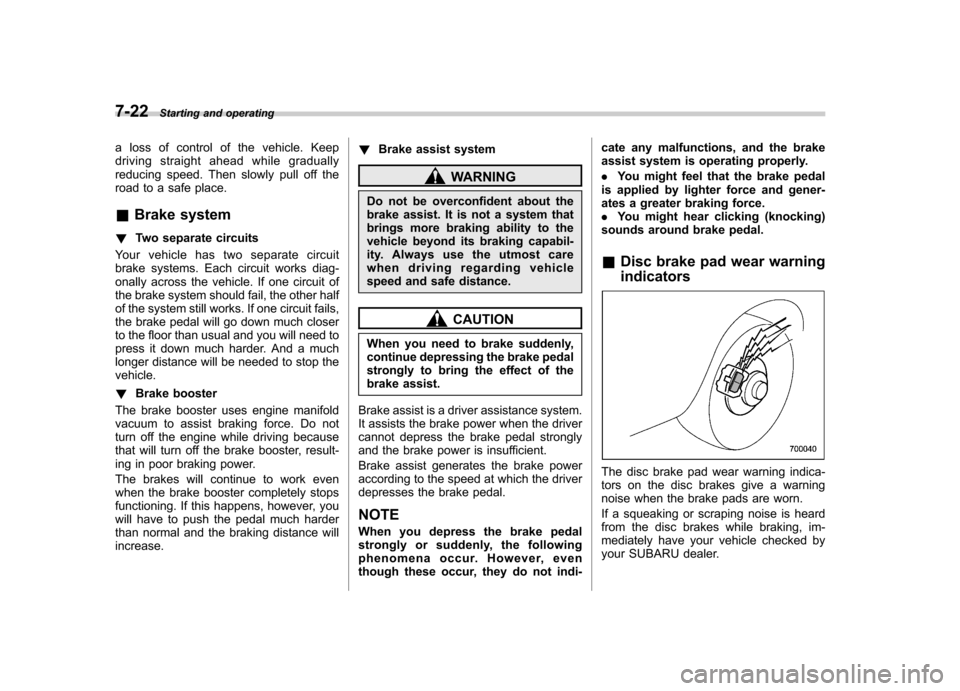
sounds around brake pedal. & Disc brake pad wear warning indicators
The disc brake pad wear warning indica-
tors on the disc brakes give a warning
noise when the brake pads are worn.
If a squeaking or scraping noise is heard
from the disc brakes while braking, im-
mediately have your vehicle checked by
your SUBARU dealer.