2009 SKODA YETI fold seats
[x] Cancel search: fold seatsPage 83 of 271

Seats and Stowage
82 Pack static separation net– Press the red button of the joint - so that it releases. – Put the separation net folded together in the bag and close it. – Attach the bag with the aid of the plastic carabines to the eyes on the left and right
luggage compartment trim panel.
Installing and removing the static separation net behind the rear seats with variable loading floor*
⇒page 82 is carried out analogously as
behind the rear seats without
variable loading floor. Use the lower fixing ey
es on the carrier rails in order to attach
the carabines. The opening
⇒page 81, fig. 80
in the static separation net is designed to feed
through the three-point seat belt
⇒page 144.
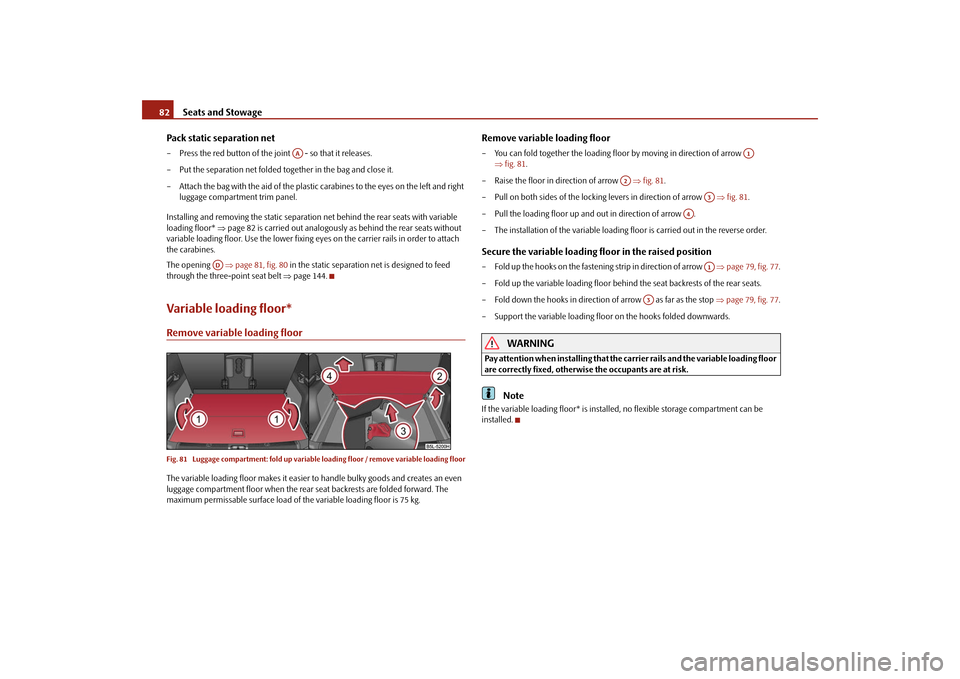
Variable loading floor*Remove variable loading floorFig. 81 Luggage compartment: fold up variable
loading floor / remove variable loading floor
The variable loading floor makes it easier to handle bulky goods and creates an even luggage compartment floor when the rear seat backrests are folded forward. The maximum permissable surface load of the variable loading floor is 75 kg.
Remove variable loading floor– You can fold together the loading floor
by moving in direction of arrow
⇒ fig. 81
.
– Raise the floor in direction of arrow
⇒fig. 81
.
– Pull on both sides of the locking levers in direction of arrow
⇒fig. 81
.
– Pull the loading floor up and out in direction of arrow . – The installation of the variable loading floor is carried out in the reverse order.Secure the variable loading floor in the raised position– Fold up the hooks on the fastening strip in direction of arrow
⇒page 79, fig. 77
.
– Fold up the variable loading floor behind
the seat backrests of the rear seats.
– Fold down the hooks in direction
of arrow as far as the stop
⇒page 79, fig. 77
.
– Support the variable loading floor on the hooks folded downwards.
WARNING
Pay attention when installing that the ca
rrier rails and the variable loading floor
are correctly fixed, otherwis
e the occupants are at risk.
Note
If the variable loading floor* is installed, no flexible storage compartment can be installed.
AA
AD
A1
A2
A3
A4
A1
A3
sgg.6.book Page 82 Thursday, September 24, 2009 2:32 PM
Page 84 of 271

Seats and Stowage
83
Using the system
Safety
Driving Tips
General Maintenance
Breakdown assistance
Technical Data
Remove carrier railsFig. 82 Luggage compartment: Slacken
check points / remove carrier rails
Install carrier rails– Slacken the check points on the carrier rails using the vehicle key or a flat screw-
driver
⇒fig. 82
.
– Grasp the carrier rail at the position
⇒fig. 82
and slacken it by pulling in the
direction of arrow.
– Grasp the carrier rail at the position ,
slacken it by pulling in the direction of
arrow and take it out.
– The carrier rail on the other side of
the luggage compartment can be removed in
the same way.
Install carrier rails– Position the carrier rails on the
sides of the luggage compartment.
– Press both check points on each carrier rail up to the stop. – Check the attachment of the carrier rails by pulling it.
WARNING
Pay attention when installing that the carrier rails are correctly fixed, otherwise the occupants are at risk.
Variable loading floo
r* with spare wheel*
Use variable loading floorFig. 83 Luggage compartment: Fold the side parts of the loading floor / example for using the variable loading floorThe variable loading floor makes it easier to handle bulky goods and creates an even luggage compartment floor when the rear seat backrests are folded forward. The maximum permissable surface load of the variable loading floor is 75 kg. You can fold down the side parts of the loading floor in direction arrow in order to enlarge the space foreseen for stowing items of luggage
⇒fig. 83
.
Note
If the variable loading floor with spare wheel*
is installed, no flexible storage compart-
ment can be installed.•
The variable loading floor with spare wheel*
can be secured in the raised position
in the same way as the variable loading floor without spare wheel*
⇒page 82, “Secure
the variable loading floor in the raised position”.
AB
AA
A1
AA
A2
sgg.6.book Page 83 Thursday, September 24, 2009 2:32 PM
Page 86 of 271

Seats and Stowage
85
Using the system
Safety
Driving Tips
General Maintenance
Breakdown assistance
Technical Data
•
Please note that the handling properties of your vehicle change when you
transport heavy or bulky items on the roof bar system as a result of the displacement of the centre of gravity an
d the increased wind attack area - risk
of accident! You must absolutely adapt your style of driving and the speed of the vehicle to the sp
ecific circumstances.
Cup holderCup holder in front centre consoleYou can place two cups or beverage cans into the recesses
⇒fig. 86
.
WARNING
•
Do not place any hot beverages into the
cup holder. If the vehicle moves, the
hot beverages may spill - risk of scalding!•
Do not use any cups or beakers which are
made of brittle material (e.g. glass,
porcelain). You might be injured by them in the event of an accident.
Caution
Do not open the beverages in the cup hold
er while driving. They may spill when
braking and while doing so damage the vehicle.
Cup holder in rear centre console*– Press on the panel in the area
⇒fig. 87
- the cup holder comes out.
– Pull the cup holder out as far as the stop.– Adjust the cup holder by
moving the locking plate .
WARNING
•
Do not place any hot beverages into the
cup holder. If the vehicle moves, the
hot beverages may spill - risk of scalding!•
Do not use any cups or beakers which are
made of brittle material (e.g. glass,
porcelain). You might be injured by
them in the event of an accident.
Caution
The cup holder in the rear part of the centre
console must be closed
(otherwise it could
get damaged) before folding forward the rear middle seat.
WARNING (continued)
Fig. 86 Front centre console: Cup holder
Fig. 87 Centre console at rear: Cup holder
AA
AB
sgg.6.book Page 85 Thursday, September 24, 2009 2:32 PM
Page 87 of 271

Seats and Stowage
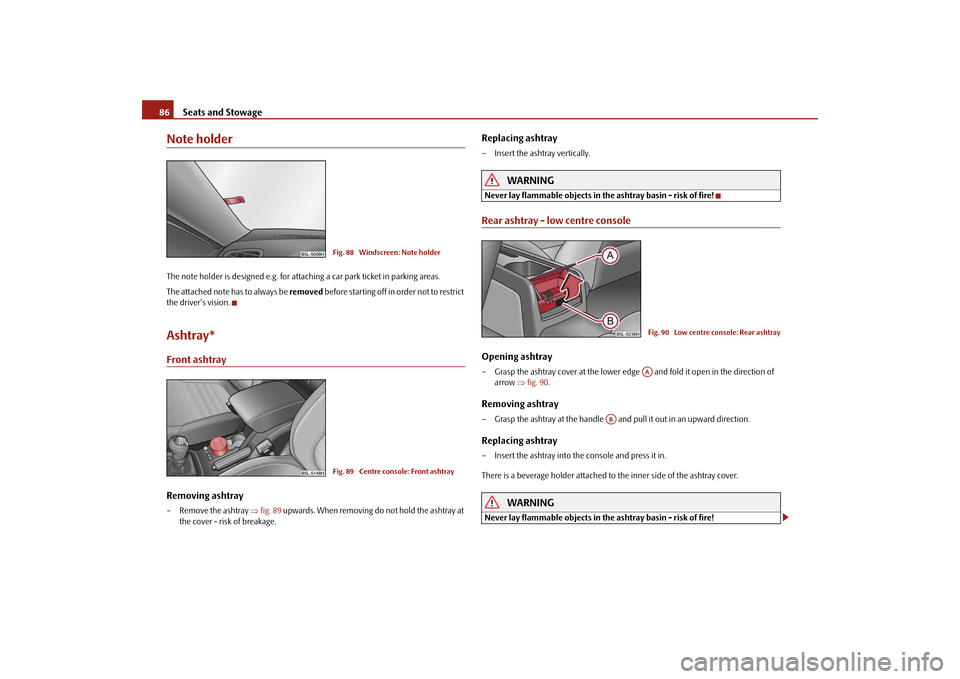
86Note holderThe note holder is designed e.g. for atta
ching a car park ticket in parking areas.
The attached note has to always be
removed
before starting off in order not to restrict
the driver's vision.Ashtray*Front ashtrayRemoving ashtray– Remove the ashtray
⇒fig. 89
upwards. When removing do not hold the ashtray at
the cover - risk of breakage.
Replacing ashtray– Insert the ashtray vertically.
WARNING
Never lay flammable objects in the ashtray basin - risk of fire!Rear ashtray - low centre consoleOpening ashtray– Grasp the ashtray cover at the lower edge and fold it open in the direction of
arrow
⇒fig. 90
.
Removing ashtray– Grasp the ashtray at the handle and
pull it out in an upward direction.
Replacing ashtray– Insert the ashtray into the console and press it in. There is a beverage holder attached to
the inner side of the ashtray cover.
WARNING
Never lay flammable objects in the ashtray basin - risk of fire!
Fig. 88 Windscreen: Note holderFig. 89 Centre console: Front ashtray
Fig. 90 Low centre console: Rear ashtrayAA
AB
sgg.6.book Page 86 Thursday, September 24, 2009 2:32 PM
Page 88 of 271

Seats and Stowage
87
Using the system
Safety
Driving Tips
General Maintenance
Breakdown assistance
Technical Data
Caution
The ashtray in the rear part of the centre
console must be closed
(otherwise it could
get damaged) before folding forward the rear middle seat.Rear ashtray - high centre console*Opening ashtray– Press on the top part of the cover of the ashtray in area
⇒fig. 91
.
Removing ashtray insert– Press the cover of the ashtray do
wn slightly as far as the stop.
– Grasp the ashtray insert at the cover and pull it out.Insert ashtray insert– Insert the ashtray insert into the mount and press it in.
WARNING
Never lay flammable objects in the ashtray basin - risk of fire!
Caution
The ashtray in the rear part of the centre
console must be closed
(otherwise it could
get damaged) before folding forward the rear middle seat.
Cigarette lighter*, power socketsCigarette lighter You can also use the socket on the cigarette lighter for other electrical appliances.Using the cigarette lighter– Press in the button of the cigarette lighter
⇒fig. 92
.
– Wait until the button jumps forward. – Remove the cigarette lighter immediately and use it. – Insert the cigarette lighter again into the socket.Using the socket– Remove the cigarette lighter or the cover of the power socket.– Connect the plug of the electrical appliance to the socket. The 12 volt power socket can also be used
to supply power to additional electrical
accessories with a power uptake up to 120 watts.
WARNING
•
Take care when using the cigarette lighter! Not paying proper attention or
incorrect use the cigarette lighter in an uncontrolled manner may result in burns.
Fig. 91 High centre console: Rear ashtray
AA
AB
Fig. 92 Centre console: Cigarette lighter
sgg.6.book Page 87 Thursday, September 24, 2009 2:32 PM
Page 90 of 271

Seats and Stowage
89
Using the system
Safety
Driving Tips
General Maintenance
Breakdown assistance
Technical Data
Storage compartment on the front passenger sideOpening and closing the storage compartment on the front passenger side– Press the button
⇒fig. 94
- the lid folds down.
– Raise the lid and press it until the catch is heard to engage. In the storage compartment are pin holders.
WARNING
The storage compartment must always be closed when driving for safety reasons.
Cooling of storage compar
tment on front passenger
side*The compartment is fitted with an
isolatable entry for cooled air.
– You can switch on the cooling system by
pulling the lever in direction of arrow
⇒ fig. 95
.
– Switch off the cooling system by inserting the lever. Opening the air inlet when the air conditioning system is on causes fresh or interior air to flow into the storage compartment. We recommend that you switch off the cooling if it is operating in the heating mode or if you are not using the cooling system for the storage compartment.Storage compartment on the dash panel*
Fig. 94 Dash panel: Storage compart- ment on the front passenger side
Fig. 95 Storage compartment: Using cooling systemFig. 96 Dash panel: Storage compart-ment
sgg.6.book Page 89 Thursday, September 24, 2009 2:32 PM
Page 91 of 271

Seats and Stowage
90– Press on the button
⇒page 89, fig. 96
in direction of arrow, the cover then folds
upwards.
Certain model versions are equipped without lid for the storage compartment.
WARNING
•
The storage compartment is not a substi
tute for the ashtray and must also
not be used for such purposes - risk of fire!•
The storage compartment must always be closed when driving for safety
reasons.•
Do not put any highly inflammable obje
cts or objects which are sensitive to
heat (e.g. lighters, spra
ys, spectacles, carbonated
drinks) in the storage
compartment.Storage compartment in front centre consoleThe storage compartment without cover in the centre console is foreseen for storage of small objects.
WARNING
The storage compartment is not a substitu
te for the ashtray and must also not
be used for such purposes - risk of fire!
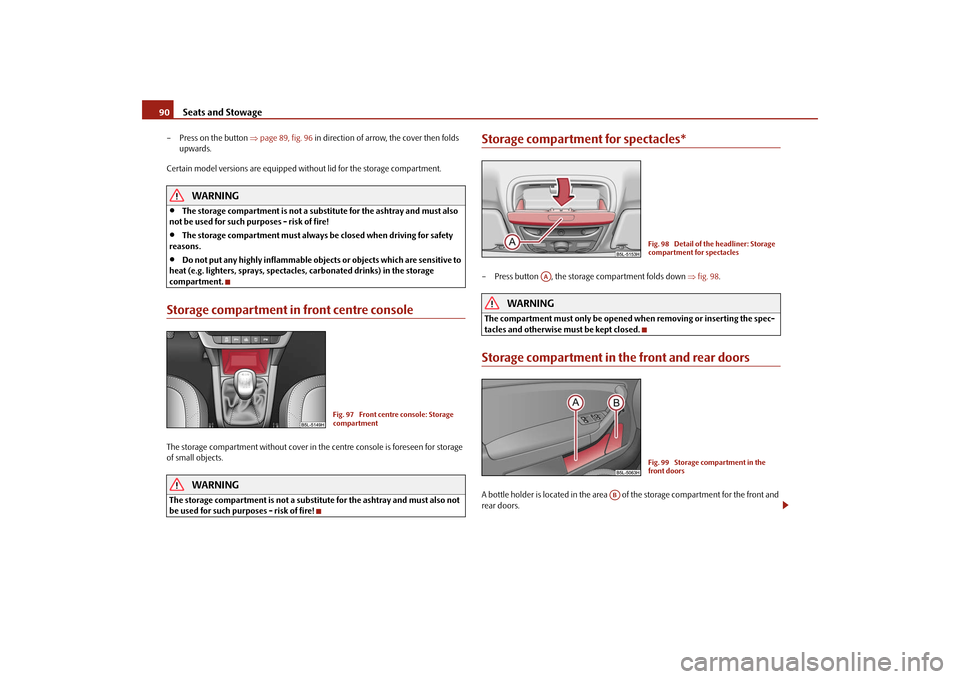
Storage compartment for spectacles*– Press button , the storage compartment folds down
⇒fig. 98
.
WARNING
The compartment must only be opened
when removing or inserting the spec-
tacles and otherwise mu
st be kept closed.
Storage compartment in the front and rear doorsA bottle holder is located in the area of the storage compartment for the front and rear doors.
Fig. 97 Front centre console: Storage compartment
Fig. 98 Detail of the headliner: Storage compartment for spectacles
AA
Fig. 99 Storage compartment in the front doors
AB
sgg.6.book Page 90 Thursday, September 24, 2009 2:32 PM
Page 92 of 271

Seats and Stowage
91
Using the system
Safety
Driving Tips
General Maintenance
Breakdown assistance
Technical Data
WARNING
Use the area
⇒page 90, fig. 99
of the storage compartment only for storing
objects which do not project so that the effectiveness of the side airbag is not impaired.Storage compartment below front passenger seat*The storage compartment is foreseen for storing small objects of up to 1.5 kg in weight. – Tilt the lock to open the flap and pull out the flap
⇒fig. 100
.
– Tilt the lock to close the
flap and press flap close.
Front seat armrest with storage compartment*Fig. 101 Armrest: Storage compartment / cooling of storage compartment
The armrest is adjustable for height and length.Opening storage compartment– Open the lid of the armrest in the direction of arrow
⇒fig. 101
.
Closing storage compartment– Open the lid up to the stop, then you can fold it downwards.Setting height– First of all fold the lid to the bottom and li
ft it in the direction of arrow into one of
the 4 fixed positions.
Adjusting in forward/back direction– Push the lid into the desired position.Opening air inlet– Pull the lock in upward direction
⇒fig. 101
.
Closing air inlet– Push the lock as far as the stop downwards. On vehicles fitted with air conditioning, the storage compartment is equipped with a lockable inlet for thermally treated (warmed-up) air. At open air supply, air flows into the storage with a temperature which is as high as the one out of the air outlet nozzles, depending on temperature setting. The air inlet in the storage compar
tment is connected to position
through adjust-
ment of the control dial for air distribution. This position causes the maximum amount of air to flow into the storage compartmen
t (depending on the rotary regulator posi-
tion for the fan). You can use the storage compartment, for
example, to temper drinks cans, etc.
If you do not use the air inlet in the storage compartment, the end cover should always be kept closed.
AA
Fig. 100 Front passenger seat: Storage compartment
A1
AAAA
sgg.6.book Page 91 Thursday, September 24, 2009 2:32 PM