2009 SKODA ROOMSTER electric
[x] Cancel search: electricPage 192 of 263
Inspecting and replenishing191
Using the system
Safety
Driving Tips
General Maintenance
Breakdown assistance
Praktik
Technical Data
For the sake of the environment
Do not re-use coolant if it is necessary to drain the coolant in the system. It should
be collected and disposed of in compliance with environmental protection
regulations.Radiator fan
The radiator fan may switch on suddenly.The radiator fan is driven by an electric motor and controlled by a thermostat
according to the coolant temperature.
The radiator fan may continue running for up to 10 minutes after the engine has
been switched off - even if the ignition is also off. It may also switch on suddenly
after a certain time, if•
the coolant temperature has risen because of an accumulation of heat or
•
the warm engine compartment is heated up additionally by strong sunlight.
WARNING
You must therefore be aware when working in the engine compartment that
the fan may switch on suddenly - risk of injury!
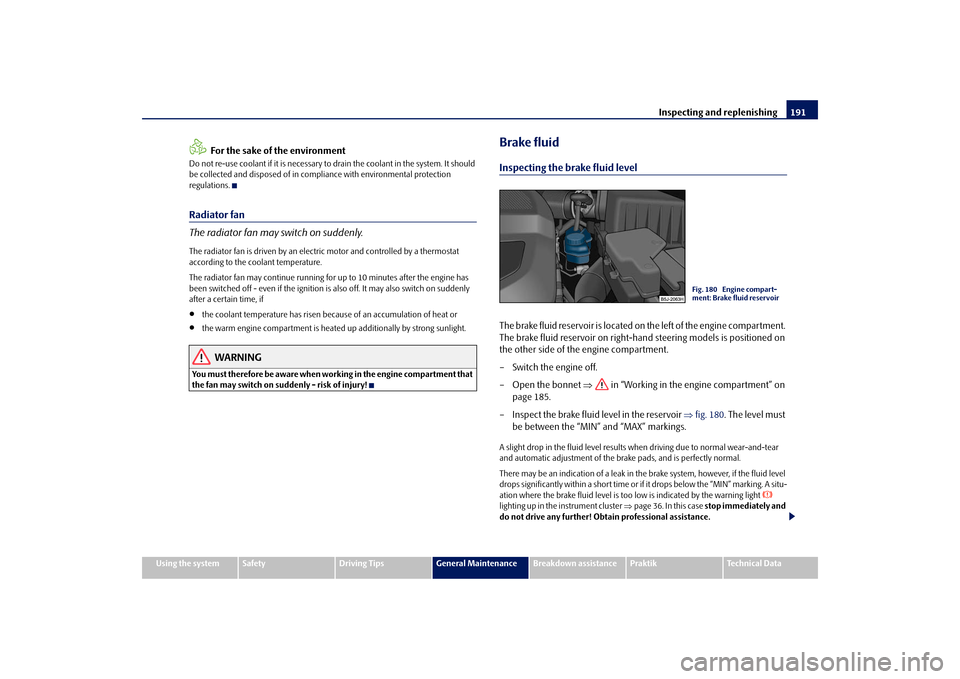
Brake fluidInspecting the brake fluid levelThe brake fluid reservoir is located on the left of the engine compartment.
The brake fluid reservoir on right-hand steering models is positioned on
the other side of the engine compartment.
– Switch the engine off.
– Open the bonnet ⇒ in “Working in the engine compartment” on
page 185.
– Inspect the brake fluid level in the reservoir ⇒fig. 180. The level must
be between the “MIN” and “MAX” markings.A slight drop in the fluid level results when driving due to normal wear-and-tear
and automatic adjustment of the brake pads, and is perfectly normal.
There may be an indication of a leak in the brake system, however, if the fluid level
drops significantly within a short time or if it drops below the “MIN” marking. A situ-
ation where the brake fluid level is too low is indicated by the warning light
lighting up in the instrument cluster ⇒page 36. In this case stop immediately and
do not drive any further! Obtain professional assistance.
Fig. 180 Engine compart-
ment: Brake fluid reservoir
s29g.4.book Page 191 Wednesday, June 17, 2009 9:54 AM
Page 194 of 263

Inspecting and replenishing193
Using the system
Safety
Driving Tips
General Maintenance
Breakdown assistance
Praktik
Technical Data
– Unlock the interlock on the positive terminal side of the battery
⇒page 192, fig. 181.
– Pull up the cover in direction of arrow ⇒page 192, fig. 181 (automatic
gearbox) or ⇒page 192, fig. 182 (manual gearbox).
– The installation of the battery cover on the positive terminal side takes
place in the reverse order.Removal and installation of the battery is not recommended since it can, under
certain circumstances, lead to major damage to the battery and fuse boxes. Contact
a specialist garage.
There is a risk of injuries, scalding, accidents and burns when carrying out any work
on the battery and on the electrical system. For this reason, it is essential to comply
with the warning instructions ⇒ stated below and with the general applicable
rules of safety.
WARNING
•
The battery acid is strongly corrosive and must, therefore, be handled
with the greatest of care. Always wear protective gloves, eye and skin
protection when handling batteries. Corrosive fumes in the air irritate the
air passages and lead to conjunctivitis and inflammation of the air passages
in the lungs. Battery acid corrodes dental enamel and creates deep wounds
after contact with the skin which take a long time to heal. Repeated contact
with diluted acids causes skin diseases (inflammations, ulcers, slin cracks).
Acids coming into contact with water are diluted accompanied by significant
development of heat.
•
Do not tilt the battery otherwise battery electrolyte may flow out of the
battery vent openings. Protect the eyes with safety glasses or a shield! There
is the danger of suffering blindness! If any battery electrolyte gets into your
eye, rinse out your eye immediately with clear water for several minutes.
Contact a doctor without delay.
•
Splashes of acid on your skin or clothes should be neutralised as soon as
possible using soap suds and then rinsed with plenty of water. Contact a
doctor immediately if you swallow battery electrolyte.
•
Keep batteries out of the reach of children.
•
Hydrogen is released when you charge a battery and a highly explosive
gas mixture is produced. An explosion can be caused through sparkling over
during unclamping or loosening of the cable plug while the ignition is on.
•
Bridging of the poles will create a short circuit (e.g. through metal
objects, cables). Possible consequences of a short circuit: Melting of lead
struts, explosion and burning of the battery, jets of acid spurting out.
•
It is prohibited to work with a naked flame and light, to smoke or to carry
out any activities which produce sparks. Avoid creating sparks when
working with cables and electrical devices. Strong sparking represents a risk
of injury.
•
Before carrying out any work on the electrical system, switch off the
engine, the ignition as well as all electrical components and disconnect the
negative cable (-) on the battery. If you wish to replace a bulb it is sufficient
to switch off the appropriate light.
•
Never charge a frozen or thawed battery - risk of explosion and caustic
burns! Replace a frozen battery.
•
Never use a battery which is damaged - risk of explosion! Immediately
replace a damaged battery.Caution
•
You must only disconnect the battery if the ignition is switched off, otherwise
the electrical system (electronic components) of the vehicle may be damaged.
When disconnecting the battery from the electrical system of the vehicle, first
disconnect the negative terminal (-) of the battery. Then disconnect the positive
terminal (+).
•
When reconnecting the battery, first connect the positive terminal (+) and only
then the negative terminal (-) of the battery. You must on no account connect the
cables wrongly - risk of a cable fire.
•
Ensure that battery acid does not come into contact with the vehicle body
otherwise damage could occur to the paintwork.WARNING (continued)
s29g.4.book Page 193 Wednesday, June 17, 2009 9:54 AM
Page 195 of 263
Inspecting and replenishing 194•
Do not place the battery in direct daylight in order to protect the battery
housing from the effects of ultra-violet light.For the sake of the environment
A removed battery is a special type of waste which is harmful to the environment -
contact your specialist garage regarding disposing of the battery.
Note
•
Please also refer to the guidelines ⇒page 196, “Disconnecting and recon-
necting the battery”, also after connecting the battery.
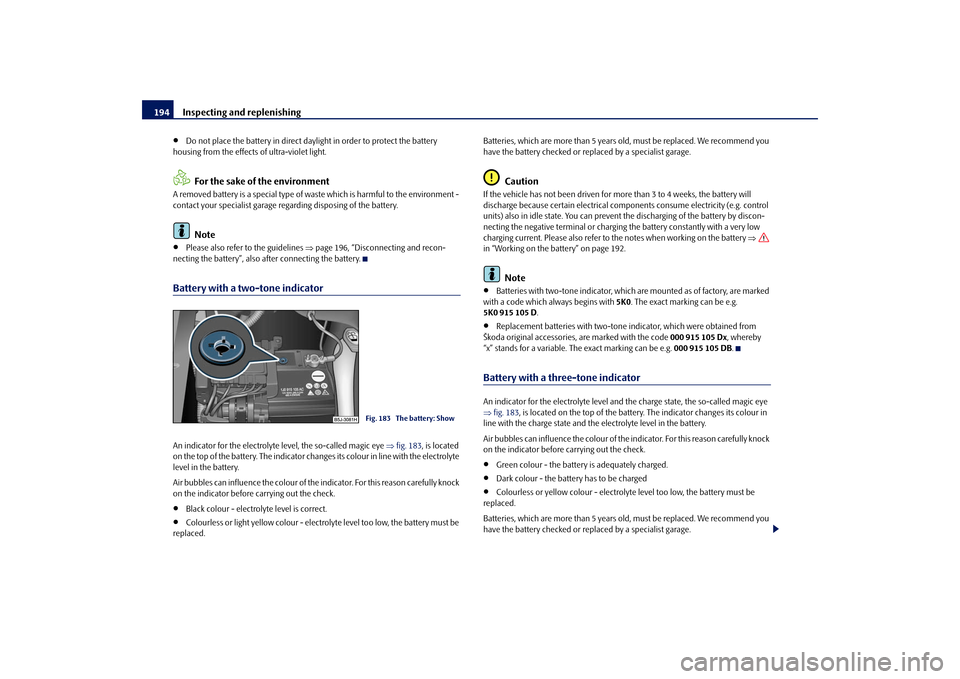
Battery with a two-tone indicatorAn indicator for the electrolyte level, the so-called magic eye ⇒fig. 183, is located
on the top of the battery. The indicator changes its colour in line with the electrolyte
level in the battery.
Air bubbles can influence the colour of the indicator. For this reason carefully knock
on the indicator before carrying out the check.•
Black colour - electrolyte level is correct.
•
Colourless or light yellow colour - electrolyte level too low, the battery must be
replaced.Batteries, which are more than 5 years old, must be replaced. We recommend you
have the battery checked or replaced by a specialist garage.
Caution
If the vehicle has not been driven for more than 3 to 4 weeks, the battery will
discharge because certain electrical components consume electricity (e.g. control
units) also in idle state. You can prevent the discharging of the battery by discon-
necting the negative terminal or charging the battery constantly with a very low
charging current. Please also refer to the notes when working on the battery ⇒
in “Working on the battery” on page 192.
Note
•
Batteries with two-tone indicator, which are mounted as of factory, are marked
with a code which always begins with 5K0. The exact marking can be e.g.
5K0 915 105 D.
•
Replacement batteries with two-tone indicator, which were obtained from
Škoda original accessories, are marked with the code 000 915 105 Dx, whereby
“x” stands for a variable. The exact marking can be e.g. 000 915 105 DB.
Battery with a three-tone indicatorAn indicator for the electrolyte level and the charge state, the so-called magic eye
⇒fig. 183, is located on the top of the battery. The indicator changes its colour in
line with the charge state and the electrolyte level in the battery.
Air bubbles can influence the colour of the indicator. For this reason carefully knock
on the indicator before carrying out the check.•
Green colour - the battery is adequately charged.
•
Dark colour - the battery has to be charged
•
Colourless or yellow colour - electrolyte level too low, the battery must be
replaced.
Batteries, which are more than 5 years old, must be replaced. We recommend you
have the battery checked or replaced by a specialist garage.
Fig. 183 The battery: Show
s29g.4.book Page 194 Wednesday, June 17, 2009 9:54 AM
Page 196 of 263

Inspecting and replenishing195
Using the system
Safety
Driving Tips
General Maintenance
Breakdown assistance
Praktik
Technical Data
Caution
If the vehicle has not been driven for more than 3 to 4 weeks, the battery will
discharge because certain electrical components consume electricity (e.g. control
units) also in idle state. You can prevent the discharging of the battery by discon-
necting the negative terminal or charging the battery constantly with a very low
charging current. Please also refer to the notes when working on the battery ⇒
in “Working on the battery” on page 192.
Note
•
Batteries with three-tone indicator, which are mounted as of factory, are
marked with a code which always begins with 1J0, 7N0 or 3B0. The exact marking
can be e.g. 1J0 915 105 AC.
•
Replacement batteries with three-tone indicator, which were obtained from
Škoda original accessories, are marked with the code 000 915 105 Ax, whereby
“x” stands for a variable. The exact marking can be e.g. 000 915 105 AB.
Inspecting the electrolyte levelThe battery is practically maintenance-free under normal operating conditions.
We do, however, recommend that you have the electrolyte level inspected from
time to time by a specialist garage when outside temperatures are high or when
driving on long trips. You should also have the electrolyte level ⇒page 195
checked each time the battery is charged.
The electrolyte level of the battery will also be checked as part of the Inspection
Service.Operation in winterThe battery has to provide greater amounts of electricity during the winter. It also
has only part of the initial power output at low temperatures that it has at normal
temperatures.
A discharged battery may already freeze at temperatures just below 0°C.We therefore recommend that you have the battery checked by a specialist garage
before the start of the winter, and recharged if necessary.
Charging the battery
A properly charged battery is essential for reliably starting the
engine.– Read the warning notes ⇒ in “Working on the battery” on
page 192 and ⇒.
– Switch the ignition and all electrical components off.
– Only for “quick-charging”: Disconnect both battery cables (first of all
“negative”, then “positive”).
– Carefully attach the terminal clamps of the charger to the battery
terminals (red = “positive”, black = “negative”).
– You can now plug the mains cable of the charger into the power socket
and switch on the charger.
– When charging is completed: switch the charger off and unplug the
mains cable from the power socket.
– Only then should you disconnect the terminal clamps of the charger.
– Reconnect the cables to the battery (first of all “positive”, then “nega-
tive”).It is not normally necessary to disconnect the cables of the battery if you recharge
the battery using low amperages (as for example from a mini-charger). Please also
refer to the instructions from the charger manufacturer.
A charging current of 0.1 of the total battery capacity (or lower) is that which should
be used until full charging is achieved.
It is, however, necessary to disconnect both cables before charging the battery with
high amperages, so-called “quick-charging”.
s29g.4.book Page 195 Wednesday, June 17, 2009 9:54 AM
Page 197 of 263
Inspecting and replenishing 196“Quick-charging” a battery is dangerous ⇒ in “Working on the battery” on
page 192. It requires a special charger and appropriate knowledge. We therefore
recommend that you have your battery quick-charged only by your specialist
garage.
A discharged battery may already freeze at temperatures just below 0°C ⇒. We
recommend that you no longer use a battery which has thawed out because the
casing of the battery may be cracked through the formation of ice and this would
allow battery electrolyte to flow out.
The vent plugs of the battery should not be opened for charging.
WARNING
Never charge a frozen or thawed battery - risk of explosion and caustic
burns! Replace a frozen battery.Disconnecting and reconnecting the batteryOn disconnecting and reconnecting the battery the following functions are initially
deactivated or are no longer able to operate fault-free.
We recommend having the vehicle checked by a specialist garage to ensure full
functionality of all electrical systems.
Replacing the batteryYou should only replace a battery with a new battery of the same capacity, voltage
(12 V), amperage and of the same size. Specialist garages have a range of suitable
batteries available.
We re c o m m e nd t h a t y o u o n l y ha v e a n o l d b a t te r y d i s p o s e d o f b y a s p e c i a l i s t g a ra g e
since it does require special disposal.
For the sake of the environment
Batteries contain poisonous substances such as sulphuric acid and lead. They must
be disposed of in accordance with local environmental protection regulations and
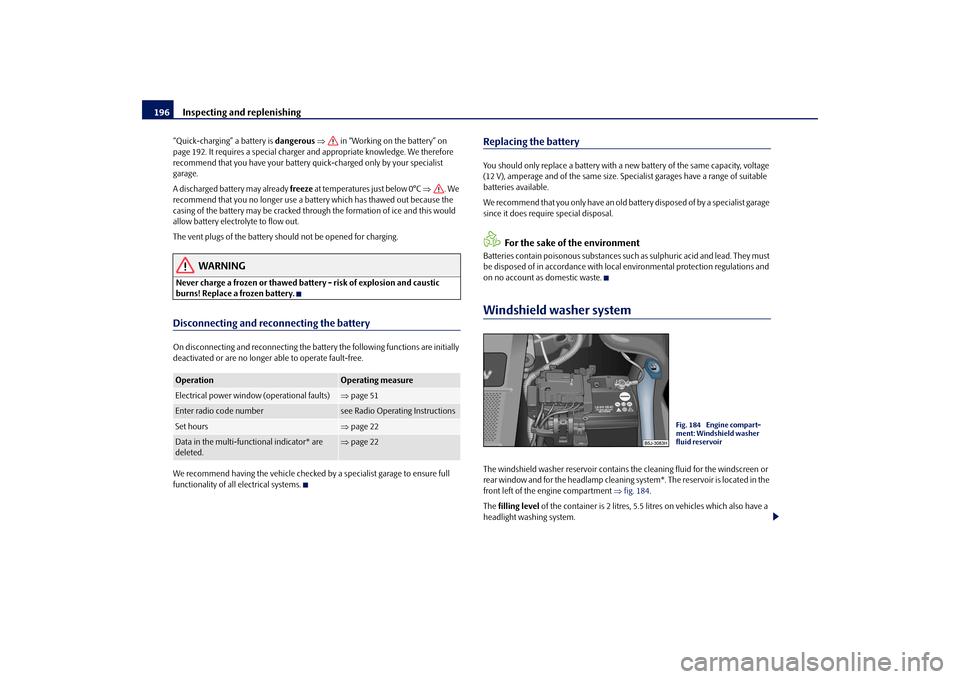
on no account as domestic waste.Windshield washer systemThe windshield washer reservoir contains the cleaning fluid for the windscreen or
rear window and for the headlamp cleaning system*. The reservoir is located in the
front left of the engine compartment ⇒fig. 184.
The filling level of the container is 2 litres, 5.5 litres on vehicles which also have a
headlight washing system.
Operation
Operating measure
Electrical power window (operational faults)
⇒page 51
Enter radio code number
see Radio Operating Instructions
Set hours
⇒page 22
Data in the multi-functional indicator* are
deleted.
⇒page 22
Fig. 184 Engine compart-
ment: Windshield washer
fluid reservoir
s29g.4.book Page 196 Wednesday, June 17, 2009 9:54 AM
Page 205 of 263
Accessories, changes and replacement of parts 204Accessories, changes and replacement of partsAccessories and replacement partsŠkoda vehicles have been built according to the latest discoveries in safety engi-
neering. Thus one should not change the condition in which the vehicle was deliv-
ered from the manufacturer without some thought.
The following guidelines should be observed when a vehicle is to be retrofitted with
accessories, have technical changes made to it or a par t has to be replaced at some
time in the future.•
Advise should always be obtained from a specialist garage before buying any
accessories and before making any technical changes ⇒.
•
This is particularly the case when accessories are bought in a foreign country.
•
Škoda Genuine Accessories which have been released for use and Skoda orig-
inal parts can be bought from specialist garages that professionally undertake the
assembly of parts which were not purchased there.
•
Škoda Genuine Accessories which have been released for use and Skoda orig-
inal parts can be bought from specialist garages that professionally undertake the
assembly of parts which were not purchased there.
•
Radios, aerials and other electrical accessories should only be installed by a
specialist garage.
•
The guidelines issued by Škoda Auto must be observed when making technical
changes.
•
This is to ensure that no technical damage occurs to the vehicle, that travelling
and operating safety are maintained and that the chnages are permissible. The
specialist garages also undertake this work professionally or refer it to another
specialist garage in special cases.
Any damage which is done caused by technical changes made without
consulting a Skoda dealer is excluded from the guarantee.
WARNING
•
We advise you, in your own interest, to only use Škoda Genuine Accesso-
ries and Škoda original parts which have been expressly approved for use on
your Škoda. Reliability, safety and suitabiliity have been established for
these Škoda original parts.
•
We cannot guarantee suitability of installation into your vehicle of other
products despite keeping a constant eye on market developments (also not
in the case where there is an attestation or permission can be produced).
Technical changesInterference on the electronic components and their software can lead to opera-
tional faults. This interference can also impair not directly affected systems because
of the networking of the electronic components. This means that the operating
safety of your vehicle can be considerably jeopardized, a greater wear of vehicle
parts can occur and finally the vehicle registration documents expire.
We trust that you will understand that Škoda Auto cannot be liable for damage
resulting from unprofessional work.
We therefore recommend that you have all work carried out with Škoda original
parts at specialist garages.
WARNING
Work or modifications on your vehicle, which have been carried out unpro-
fessionally, can cause operational faults - risk of accident!
s29g.4.book Page 204 Wednesday, June 17, 2009 9:54 AM
Page 215 of 263
Breakdown assistance 214•
We recommend purchasing jump-start cables from Škoda Service Partners as a
Škoda original accessory or from retailers who sell branded batteries.
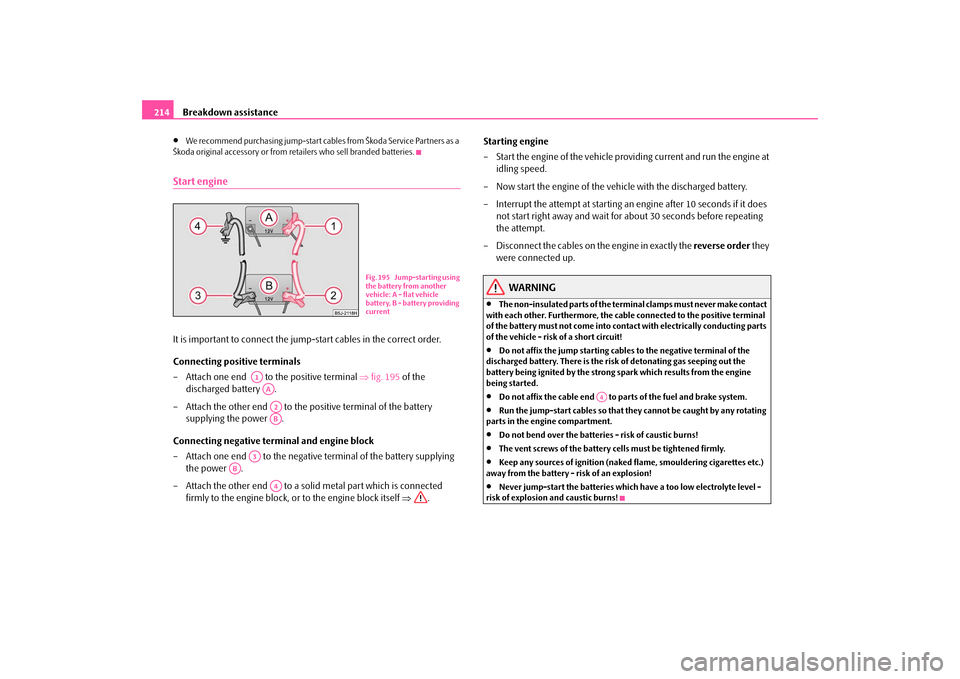
Start engineIt is important to connect the jump-start cables in the correct order.
Connecting positive terminals
– Attach one end to the positive terminal ⇒fig. 195 of the
discharged battery .
– Attach the other end to the positive terminal of the battery
supplying the power .
Connecting negative terminal and engine block
– Attach one end to the negative terminal of the battery supplying
the power .
– Attach the other end to a solid metal part which is connected
firmly to the engine block, or to the engine block itself ⇒.Starting engine
– Start the engine of the vehicle providing current and run the engine at
idling speed.
– Now start the engine of the vehicle with the discharged battery.
– Interrupt the attempt at starting an engine after 10 seconds if it does
not start right away and wait for about 30 seconds before repeating
the attempt.
– Disconnect the cables on the engine in exactly the reverse order they
were connected up.
WARNING
•
The non-insulated parts of the terminal clamps must never make contact
with each other. Furthermore, the cable connected to the positive terminal
of the battery must not come into contact with electrically conducting parts
of the vehicle - risk of a short circuit!
•
Do not affix the jump starting cables to the negative terminal of the
discharged battery. There is the risk of detonating gas seeping out the
battery being ignited by the strong spark which results from the engine
being started.
•
Do not affix the cable end to parts of the fuel and brake system.
•
Run the jump-start cables so that they cannot be caught by any rotating
parts in the engine compartment.
•
Do not bend over the batteries - risk of caustic burns!
•
The vent screws of the battery cells must be tightened firmly.
•
Keep any sources of ignition (naked flame, smouldering cigarettes etc.)
away from the battery - risk of an explosion!
•
Never jump-start the batteries which have a too low electrolyte level -
risk of explosion and caustic burns!
Fig. 195 Jump-starting using
the battery from another
vehicle: A - flat vehicle
battery, B - battery providing
current
A1AAA2AB
A3
AB
A4
A4
s29g.4.book Page 214 Wednesday, June 17, 2009 9:54 AM
Page 219 of 263

Fuses and light bulbs 218Fuses and light bulbsElectric fusesReplacing fuses in the dash panel
Defect fuses must be replaced.Individual electrical circuits are protected by fuses. The fuses are located
on the left side of the dash panel behind the safety cover.
– Switch the ignition off and also the electrical component affected.
– Carefully swivel the cover in the direction of arrow and pull it out
⇒fig. 199.
– Find out which fuse belongs to the component which is not operating
⇒page 219, “Fuse assignment in the dash panel”.
– Take the plastic clip out of its fixture in the fuse cover, insert it onto the
respective fuse and pull out this fuse.
– Defect fuses can be detected by their melted metal strips. Replace the
defect fuse by a new fuse of the same ampere number.– Insert the fuse cover into the dash panel in such a way that the guide
lugs are guided into the openings of the dash panel and then lock
them by pressing.
We recommend that you always have the small box of replacement fuses in your
vehicle. You can obtain replacement fuses from Škoda original accessories or from
a specialist garage
10).
Colour coding of fuses
Caution
•
Never attempt to “repair” fuses and also do not replace them with a fuse of a
higher amperage - risk of fire! This may also cause damage at another part of the
electrical system.
•
Have the electrical system checked as quickly as possible by a specialist garage
if a newly inserted fuse blows again after a short time.
Fig. 199 Bottom side of the
dash panel: fuse cover
10)The small box with replacement fuses is part of the basic equipping of the vehicle in some
countries.
Colour
Maximum amperage
light brown
5
brown
7,5
red
10
blue
15
yellow
20
white
25
green
30
s29g.4.book Page 218 Wednesday, June 17, 2009 9:54 AM