2009 Seat Altea XL High level
[x] Cancel search: High levelPage 11 of 297

Safe driving
10Proper sitting position for occupantsProper sitting position for driver
The proper sitting position for the driver is important for a
safe and relaxed driving.
For your own safety and to reduce the risk of injur y in the event of an
accident, we recommend the following adjustments for the driver:
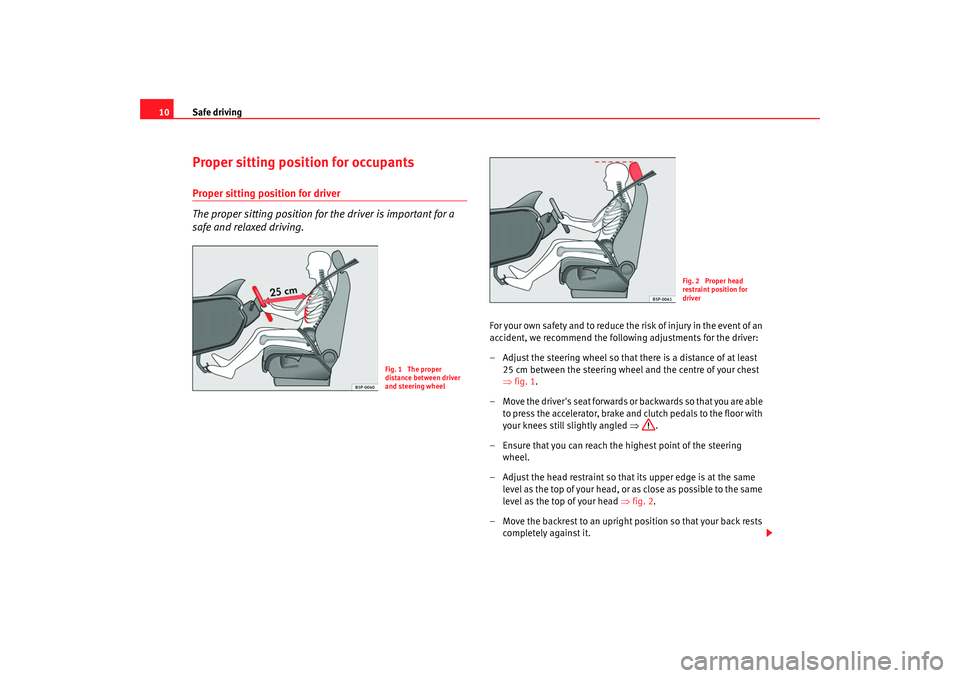
– Adjust the steering wheel so that there is a distance of at least
25 cm between the steering wheel and the centre of your chest
⇒fig. 1.
– Move the driver's seat forwards or backwards so that you are able to press the accelerator, brake and clutch pedals to the floor with
your knees still slightly angled ⇒.
– Ensure that you can reach the highest point of the steering wheel.
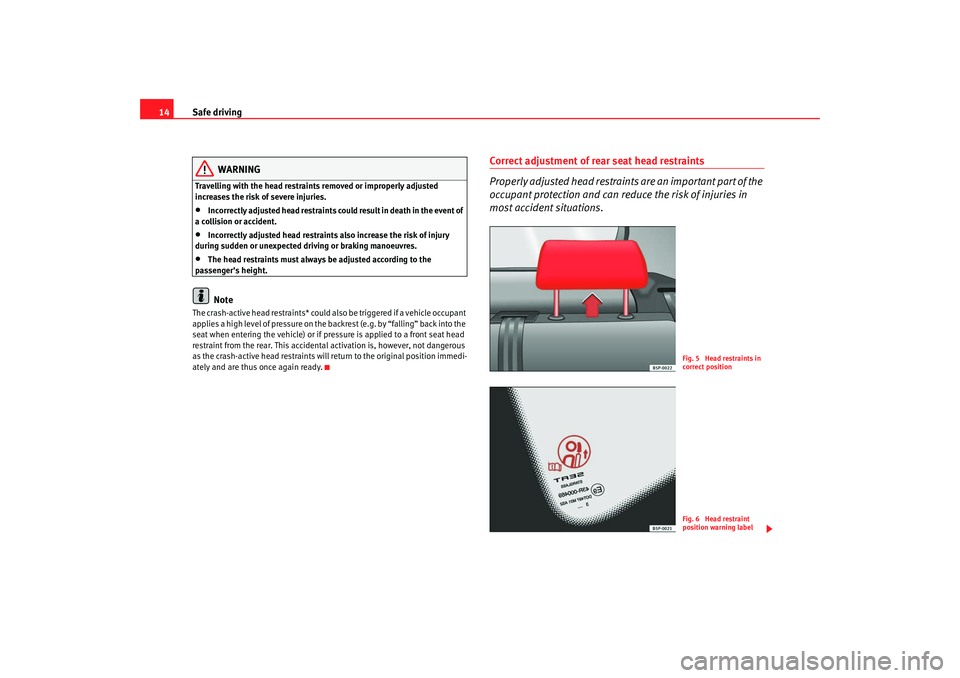
– Adjust the head restraint so that its upper edge is at the same level as the top of your head, or as close as possible to the same
level as the top of your head ⇒fig. 2.
– Move the backrest to an upright position so that your back rests completely against it.
Fig. 1 The proper
distance between driver
and steering wheel
Fig. 2 Proper head
restraint position for
driver
AlteaXL_EN.book Seite 10 M ontag, 2. Februar 2009 12:26 12
Page 15 of 297

Safe driving
14
WARNING
Travelling with the head restraints removed or improperly adjusted
increases the risk of severe injuries.•
Incorrectly adjusted head restraints could result in death in the event of
a collision or accident.
•
Incorrectly adjusted head restraints also increase the risk of injury
during sudden or unexpected driving or braking manoeuvres.
•
The head restraints must always be adjusted according to the
passenger's height.Note
The crash-active head restraints* could also be triggered if a vehicle occupant
applies a high level of pressure on the backrest (e.g. by “falling” back into the
seat when entering the vehicle) or if pressure is applied to a front seat head
restraint from the rear. This accidental activation is, however, not dangerous
as the crash-active head restraints will return to the original position immedi-
ately and are thus once again ready.
Correct adjustment of rear seat head restraints
Properly adjusted head restraints are an important part of the
occupant protection and can redu ce the risk of injuries in
most accident situations.
Fig. 5 Head restraints in
correct positionFig. 6 Head restraint
position warning label
AlteaXL_EN.book Seite 14 M ontag, 2. Februar 2009 12:26 12
Page 58 of 297

Cockpit57
Safety First
Operating instructions
Practical tips
Te c h n i c a l D a t a
display
4).
Stop the car and switch off the engine. Check the coolant level
⇒ page 220 ⇒.
Even if the coolant level is correct do not continue driving. You should obtain
technical assistance.WARNING
When working in the engine compartment, always observe the safety warn-
ings ⇒page 213.
Caution
Accessories in front of the air inlet reduce the cooling effect of the coolant. At
high outside temperatures and high engine loads, there is a risk of the
engine overheating.Rev counter
The rev. counter displays the engine speed in revolutions per
minute.The start of the red zone ⇒page 55, fig. 33 indicates the maximum
engine speed operating at service temperature. However, it is advisable to
change up a into a higher gear, move the selector lever to D or lift your foot
off the accelerator before the needle reaches the red zone.
Caution
The rev counter needle must never enter the red zone on the scale. Risk of
engine damage.
For the sake of the environment
Changing up into higher gears early will help you to save fuel and minimise
engine noise.SpeedometerThe speedometer is equipped with a digital odometer and a trip counter, in
addition to a service intervals display.
During the running-in period, the instructions shown on ⇒page 190 should
be followed.Setting the digital clock*
The digital clock is located in the instrument panel display.– Turn the setting knob ⇒page 55, fig. 33 clockwise until the
first “click” to set the hour. The hour will flash. To change the
hour, press the button.
– Turn the setting knob clockwise to the second “click” to set the
minutes. The minutes will flash. To change the minutes, press the
button.
4)Depending on the model version
A4
A5
AlteaXL_EN.book Seite 57 M ontag, 2. Februar 2009 12:26 12
Page 76 of 297

Cockpit75
Safety First
Operating instructions
Practical tips
Te c h n i c a l D a t a
•
The engine compartment is a dangerous area! Before you open the
bonnet to work on the engine or in the engine compartment, you must
switch the engine off and allo w it to cool to reduce the risk of scalding or
other kind of injuries. Read and observe the relevant warnings
⇒ page 213.Note
•
The appropriate warning lamp for a fault will light up in vehicles without
warning or information texts in the display.
•
In vehicles with warning or information texts on the screen, the appro-
priate warning lamp for a fault will ligh t up and a warning or information text
will also appear on the screen.
Fuel level / reserve
This symbol lights up to indicate that the fuel tank under the
reserve level.It lights up when only 7 litres of fuel remain in the tank. Also, an audible
warning is given. This serves as a reminder to fill up with fuel at the earliest
opportunity ⇒page 210.
The instrument panel displ ays the following message
8): PLEASE REFUEL! .
Coolant Level* / temperature
The warning lamp lights up if the coolant temperature is too
high or if the coolant level is too low.There is a fault if:•
The warning symbol does not go out again after a few seconds.
•
The warning lamp lights up or flashes while the vehicle is moving, while
three acoustic warning signals ⇒ are emitted.
This means that either the coolant level is too low or the coolant temperature
is too high.
Coolant temperature too high
The instrument panel disp lays the following message
9): CHECK COOLANT
INSTRUCTIONS MANUAL ⇒ page 220.
First look at the coolant temperature gauge. The coolant temperature is too
high if the needle is over the warning area on the dial. Stop the vehicle,
switch the engine off and wait for it to cool down. Check the coolant level.
If the coolant level is correct, the over heating may be caused by a malfunction
of the radiator fan. Check the radiator fan fuse and have it replaced if neces-
sary ⇒page 249.
If the warning lamp lights up again after driving on for a short distance, stop
the vehicle and switch the engine off . Contact an Authorised Service Centre
or a qualified workshop.
Coolant level too low
The instrument panel disp lays the following message10): STOP CHECK
COOLANT INSTRUCTIONS MANUAL .
8)Depending on the version of the model.WARNING (continued)
9)Depending on the version of the model.10)Depending on the version of the model.
AlteaXL_EN.book Seite 75 Montag, 2. Februar 2009 12:26 12
Page 78 of 297

Cockpit77
Safety First
Operating instructions
Practical tips
Te c h n i c a l D a t a
Main beam headlights
This warning lamp lights up when the main beams are on.The warning lamp
is switched on once main beams are on or once the
headlight flasher is operating.
Further information ⇒page 116.
Soot accumulation in the diesel engine particulate filter
If the indicator lights
you may help the filter clear itself by driving in the
appropriate manner.
To do this, drive about 15 minutes in 4th or 5th gear (automatic gearbox: S
gear range) at a speed of 60 km/h, with the engine running at approximately
2000 rpm. In this way, the pollen buil d up in the filter is burned. When
cleaning is successful, the indicator turns off.
If the indicator
is not deactivated, bring the vehicle to a specialised work-
shop to repair the fault.
WARNING
•
Always drive according to the road weather conditions, the terrain and
traffic. Driving recommendations should never lead to illegal manoeuvres
in surrounding traffic.
•
The diesel engine particulate filter may reach extremely high tempera-
tures; it should not enter into contact with flammable materials under-
neath the vehicle. Failure to comply could result in fire.
Anti-lock brake system (ABS)
A warning lamp system monitors the ABS.
The warning lamp
should light up for a few seconds when the ignition is
switched on. It goes out again after th e system has run through an automatic
test sequence.
There is a fault in the ABS if:
•
The warning lamp
does not light up when the ignition is switched on.
•
The warning lamp does not go out again after a few seconds.
•
The warning lamp lights up when the vehicle is moving.
The vehicle can still be braked in the normal way (except that the ABS control
function will not function). Please take the vehicle to a qualified workshop as
soon as possible. For further information on the ABS see the ⇒page 183.
If a fault occurs in the ABS, the ESP* warning lamp will also light up.
Brake system fault
If the ABS warning lamp
lights up together with the brake warning lamp
, this indicates not only a fault in the ABS function, but also a possible fault
in the brake system ⇒.
WARNING
•
Before opening the bonnet, read and observe the warnings on
⇒ page 213, “Working in the engine compartment”.
•
If the brake warning lamp
should light up together with the ABS
warning lamp
, stop the vehicle immediately and check the brake fluid
level in the reservoir ⇒page 226, “Brake fluid”. If the fluid level has
dropped below the “MIN” mark you must not drive on. Risk of accident.
Obtain technical assistance.
•
If the brake fluid level is correct, the fault in the brake system may have
been caused by a failure of the ABS system. This could cause the rear
AlteaXL_EN.book Seite 77 M ontag, 2. Februar 2009 12:26 12
Page 123 of 297

Lights and visibility
122icing in the zone. The function is switched on by pressing the rear heating
window key
.
WARNING
•
Worn and dirty wiper blades obstruct visibility and reduce safety levels.
•
In cold conditions, you should not use the wash / wipe system unless
you have warmed the windscreen with the heating and ventilation system.
The washer fluid could otherwise freeze on the windscreen and obscure
your view of the road.
•
Always note the corresponding warnings on ⇒page 223, “Changing
windscreen wiper blades”.Caution
In icy conditions, always check that the wiper blades are not frozen to the
glass before using the wipers for the first time. If you switch on the wipers
when the wiper blades are frozen to the windscreen, you could damage both
the wiper blades and the wiper motor.
Note
•
The windscreen wipers will only work when the ignition is switched on.
•
In certain versions of vehicles with alarms, the windscreen wiper will only
work when the ignition is on and the bonnet closed.
•
When in use, the wipers do not go as far as the rest position. When the
lever is moved to position 0, they are totally hidden.
•
The next speed down will automatically be selected if speed ⇒ page 121,
fig. 85 or is selected when the vehicle stops. The set speed will be
resumed when the vehicle starts again
•
The windscreen will be wiped again after approximately five seconds once
the “automatic wipe/wash system” has been operated, provided the vehicle
is in transit (drip function). If you activate the wipers less than three secionds
after the drip function, a new wash sequence will begin without the last wipe. For the “drip” function to work again, you have to turn the ignition off and
then on again.
•
When the “intermittent wipe function” is on, the intervals are directly
proportional to the speed. This way, the higher the vehicle speed the shorter
the intervals.
•
The wiper will try to wipe away any obstacles that are on the windscreen.
The wiper will stop moving if the obstacle blocks its path. Remove the
obstacle and switch the wiper back on again.
•
Before removing any objects that may be trapped in the side areas of the
windscreen, always move the wiper arms to the service position (horizontal).
•
The heat output of the heated jets is controlled automatically when the
ignition is switched on, depending upon the outside temperature.
A2
A3
AlteaXL_EN.book Seite 122 M ontag, 2. Februar 2009 12:26 12
Page 162 of 297

Heating, Ventilation and Air conditioning 161
Safety First
Operating instructions
Practical tips
Te c h n i c a l D a t a
When the button is off (LED off),
the heating, ventilation and air condi-
tioning system is off.
When the button is off, the heating, ventilation and air conditioning
system is switched off to save fuel. The temperature continues to self-regu-
late. The set temperature can then only be reached if it is higher than the
ambient temperature.
Driver and passenger temperature control
The button controls the synchronisation of the 2 Climatronic climate
zones.
When the button is on (LED lit), the climate zone of the Climatronic is
personalised, for example: Driver side temperature 22°C and passenger side
temperature 23°C.
When the button is off (LED off), the climate zone of the Climatronic is
synchronised, for example: Driver side temperature 22°C and passenger side
temperature 22°C.
If the button is off and the passenger side temperature is changed, the
function is automatically activated.
Air recirculation mode
Air recirculation mode prevents fumes or unpleasant smells
from coming from the outside.– Press the button ⇒ page 160, fig. 134 to switch air recir-
culation mode on or off. It is switched on if the following symbol
appears in the display
.
Air recirculation mode prevents strong odours in the ambient air from
entering the vehicle interior, for example when passing through a tunnel or in
a traffic jam. With low temperatures outside, the air recirculation increases the effective-
ness of the heating system by heating the air inside the passenger compart-
ment rather than the air from outside.
With high ambient temperatures, the air recirculation increases the effective-
ness of the air conditioning system by cooling the air inside the passenger
compartment rather than the ambient air.
If the windscreen air output is on and the air recirculation mode is pressed,
this remains active. When the recirculation mode is on, if the air distribution
towards the windscreen mode is selecte
d, the recirculation mode is deacti-
vated. For safety reasons, the air recirculation mode should not be
connected.
WARNING
In air recirculation mode, no cold air from the outside enters the vehicle
interior. If the air conditioning syst em is switched off, the windows can
quickly mist over. Therefore, never leave the air recirculation mode
switched on for a long time (risk of accident).General notesThe impurity filter
The impurity filter (a combined particle filter and active carbon filter) serves
as a barrier against impurities in the ambient air, including dust and pollen.
For the air conditioning system to work with maximum efficiency, the pollen
filter must be replaced at the intervals specified in the Service Schedule.
If the filter loses efficiency prematurely due to use in areas reaching very high
pollution levels, the pollen filter must be changed more frequently than
stated in the Service Schedule.
ACAC
DUAL
DUALDUAL
DUAL
A2
AlteaXL_EN.book Seite 161 M ontag, 2. Februar 2009 12:26 12
Page 189 of 297

Intelligent technology
188speed suitable for the road conditions. Failure to do so could result in an
accident.Brakes
What factors can have a negative effect on the brakes?New brake pads
New brake pads do not provide optimal performance during the first 400 km
they must be “run in”. However, the reduced braking capacity may be
compensated by pressing on the brake pedal a little harder. Avoid over-
loading the brakes during run-in.
Wear
The rate of wear on the brake pads depends a great deal on how you drive and
the conditions in which the vehicle is operated. Negative factors are, for
instance, city traffic, frequent short tr ips or hard driving with abrupt starts
and stops.
Wet roads; road salt
When the velocity is over 80 km/h windscreen wipers are on, the brake
system moves the pads towards the brake discs for a few seconds. This
occurs - without warning to the driver - at regular intervals and requires a
more rapid response from the brakes when driving on wet roads.
In certain conditions, such as in heavy rain, or after washing the car or driving
through water, the full braking effect ca n be delayed by moisture (or in winter
by ice) on the discs and brake pads. The brakes should be “dried” by pressing
the pedal to restore full braking effect.
The effectiveness of the brakes can also be temporarily reduced if the car is
driven for some distance without using the brakes when there is a lot of salt on the road in winter. In this case, the layer of salt on the brake discs and pads
has to wear off before braking.
Corrosion
There may be a tendency for dirt to build up on the brake pads and corrosion
to form on the discs if the car is used infrequently, or if you only drive low
mileages without using the brakes very much.
If the brakes are not used frequently, or
if rust has formed on the disks, it is
advisable to clean off the pads and disks by braking firmly a few times from a
moderately high speed ⇒ .
Faults in the brake system
If the brake pedal travel should ever increase suddenly, this may mean that
one of the two brake circuits has failed. Drive immediately to the nearest qual-
ified workshop and have the fault rectified. On the way to the dealer, be
prepared to use more pressure on the brake pedal, and allow for longer stop-
ping distances.
Low brake fluid level
Malfunctions can occur in the brake system if the brake fluid level is too low.
The brake fluid level is monitored electronically.
Brake servo
The brake servo amplifies the pressure you apply to the brake pedal. The
brake servo works only when the engine is running.
WARNING
•
When applying the brakes to clean off deposits on the pads and discs,
select a clear, dry road. Be sure not to inconvenience or endanger other
road users. Risk of accident.
•
Ensure the vehicle does not move wh ile in neutral, when the motor is
stopped. Failure to do so could result in an accident.
WARNING (continued)
AlteaXL_EN.book Seite 188 M ontag, 2. Februar 2009 12:26 12