2009 Seat Altea XL instrument panel
[x] Cancel search: instrument panelPage 176 of 297

Driving175
Safety First
Operating instructions
Practical tips
Te c h n i c a l D a t a
Applying the handbrake
– Pull the handbrake lever up firmly ⇒ page 174, fig. 147.
Releasing the handbrake
– Pull the lever up slightly and press the release knob in the direc- tion of the arrow ⇒ page 174, fig. 147 and guide the handbrake
lever down fully ⇒.Always apply the handbrake firmly . This prevents you driving with the hand-
brake applied ⇒.
The handbrake warning lamp
lights up when the handbrake is applied
and the ignition switched on. The warning turns off when the handbrake is
released.
If you drive faster than 6 km/h with the handbrake on, the following
message* will appear on the instrument panel display: HANDBRAKE ON. Also,
an audible warning is given.
WARNING
•
Never use the handbrake to stop the vehicle when it is in motion. The
braking distance is considerably longer, because braking is only applied to
the rear wheels. Risk of accident!
•
If it is only partially released, this will cause rear brakes overheating,
which can impair the function of the brake system and could lead to an acci-
dent. This also causes premature wear on the rear brake pads.Caution
Always apply the handbrake before you leave the vehicle. The first gear
should also be selected.
Parking
The handbrake should always be firmly applied when the
vehicle is parked.Always note the following points when parking the vehicle:
– Use the foot brake to stop the vehicle.
–Apply the handbrake.
– The first gear should also be selected.
– Switch the engine off and remove the key from the ignition lock. Turn the steering wheel slightly to engage the steering lock.
– Always take you car keys with you when you leave the vehicle ⇒ .Additional notes on parking the vehicle on gradients:
Turn the steering wheel so that the vehicle rolls against the kerb if it started
to roll.•
If the vehicle is parked facing downhill , turn the front wheels so that they
point towards the kerb.
•
If the vehicle is parked facing uphill, turn the front wheels so that they
point away from the kerb .
•
Secure the vehicle as normal by applying the handbrake firmly and
engaging first gear.
WARNING
•
Take measures to reduce the risk of injury when you leave your vehicle
unattended.
AlteaXL_EN.book Seite 175 M ontag, 2. Februar 2009 12:26 12
Page 181 of 297
Driving
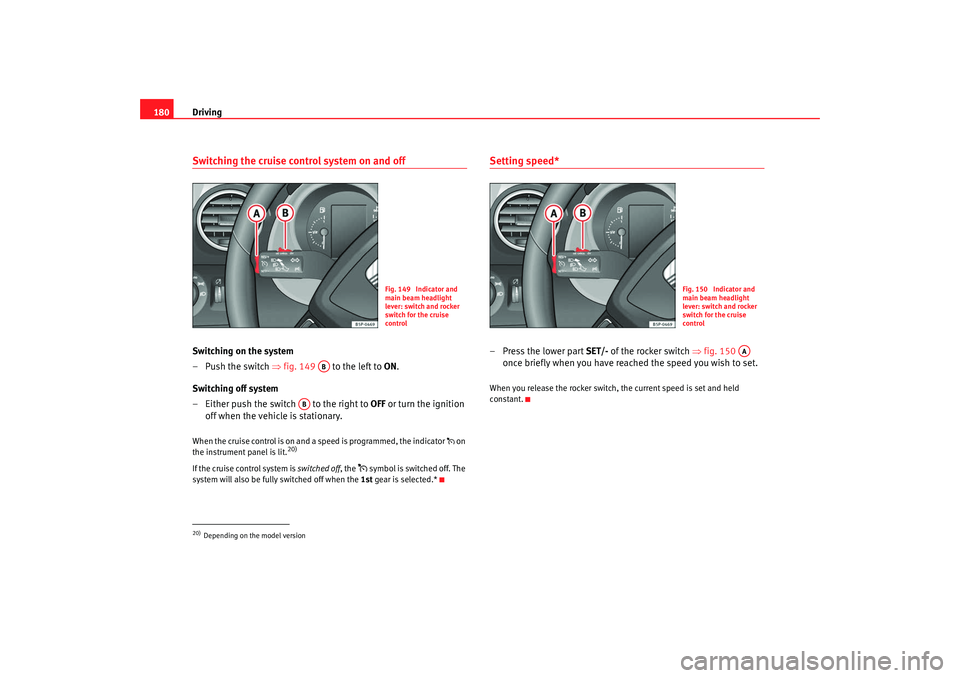
180Switching the cruise control system on and offSwitching on the system
–Push the switch ⇒fig. 149 to the left to ON.
Switching off system
– Either push the switch to the right to OFF or turn the ignition
off when the vehicle is stationary.When the cruise control is on and a speed is programmed, the indicator on
the instrument panel is lit.
20)
If the cruise control system is switched off, the
symbol is switched off. The
system will also be fully switched off when the 1st gear is selected.*
Setting speed*–Press the lower part SET/- of the rocker switch ⇒fig. 150
once briefly when you have reached the speed you wish to set.When you release the rocker switch, the current speed is set and held
constant.
20)Depending on the model version
Fig. 149 Indicator and
main beam headlight
lever: switch and rocker
switch for the cruise
control
AB
AB
Fig. 150 Indicator and
main beam headlight
lever: switch and rocker
switch for the cruise
control
AA
AlteaXL_EN.book Seite 180 M ontag, 2. Februar 2009 12:26 12
Page 234 of 297

Wheels and tyres233
Safety First
Operating instructions
Practical tips
Te c h n i c a l D a t a
Wear indicators
The original tyres on your vehicle have 1.6 mm high “tread wear indicators”
⇒
page 232, fig. 168 , running across the tread. Depending on the make,
there will be six to eight of them evenly spaced around the tyre. Markings on
the tyre sidewall (for instance the letters “TWI” or other symbols) indicate the
positions of the tread wear indicators. The minimum tread depth required by
law is 1.6 mm (measured in the tread grooves next to the tread wear indica-
tors). Worn tyres must be replaced. Different figures may apply in export
countries ⇒.
Tyre pressure
Incorrect tyre pressure causes premature wear and could cause tyre blow-out.
For this reason, the tyre pressure should be checked at least once per month
⇒ page 230.
Driving style
Fast cornering, heavy acceleration and hard braking all increase tyre wear.
Changing wheels around
If the front tyres are worn considerably more than the rear ones it is advisable
to change them around as shown ⇒page 232, fig. 169 . All the tyres will then
last for about the same time.
Wheel balance
The wheels on new vehicles are balanced. However, various factors encoun-
tered in normal driving can cause them to become unbalanced, which results
in steering vibration.
Unbalanced wheels should be rebalanced, as they otherwise cause excessive
wear on steering, suspension and tyres. A wheel must also be rebalanced
when a new tyre is fitted.
Incorrect wheel alignment
Incorrect wheel alignment causes excessive tyre wear, impairing the safety of
the vehicle. If tyres show excessive wear, you should have the wheel align-
ment checked by an Authorised Service Centre.
WARNING
There is a serious danger of accidents if a tyre bursts during driving!•
The tyres must be replaced at the latest when the tread is worn down to
the tread wear indicators. Failure to do so could result in an accident. Worn
tyres do not grip well at high speeds on wet roads. There is also a greater
risk of “aquaplaning”
•
At continuously high speeds, a tyre with insufficient pressure flexes
more. This causes it to overheat. This can cause tread separation and tyre
blow-out. Risk of accident. Always observe the recommended tyre pres-
sures.
•
If tyres show excessive wear, you should have the running gear checked
by an Authorised Service Centre.
•
Keep chemicals such as oil, fuel and brake fluid away from tyres.
•
Damaged wheels and tyres must be replaced immediately!For the sake of the environment
Under-inflated tyres will increase fuel consumption.Anti-puncture tyres
Anti-puncture tyres allow you to continue driving even with a
punctured tyre, in the majority of cases.Vehicles equipped with anti-puncture
22)
tyres from the factory indi-
cate the loss of tyre pressure on the instrument panel.
22)Depending upon version and country.
AlteaXL_EN.book Seite 233 M ontag, 2. Februar 2009 12:26 12
Page 235 of 297

Wheels and tyres
234
Driving with anti-puncture tyres (emergency gear)
– Leave the ESP/TCS (electronic stabilisation programme) switched on, or switch on ⇒page 185.
– Continue driving carefully and slowly (80 km/h maximum).
– Avoid sudden manoeuvres and sharp turns.
– Avoid driving over obstacles (for example kerbs) or potholes.
– Look out for the ESP/TCS intervening often, smoke coming from the tyres or the smell of rubber, the vehicle vibrating or a clat-
tering noise. If any of these occur, stop the vehicle.The anti-puncture tyres have a tag on the side of the tyre, with the description:
“DSST”, “Eufonia”, “RFT”, “ROF”, “RSC”, “SSR” or “ZP”.
The sides of this type of tyre are reinforced. When the tyres lose air they are
supported on the sides (emergency driving).
The loss of pressure in the tyre is shown on the instrument panel. You can
then drive a maximum of 80 km and if the circumstances are favourable (for
example, low load), even more.
The damaged tyre should be changed as soon as possible. The rim should be
checked in a specialist workshop to detect possible damage and replace it if
necessary. We recommend you contact Technical Service. If more than one
tyre is being used under emergency co nditions, this reduces the distance
which can be travelled.
Starting driving in emergency conditions
When the loss in tyre pressure is displayed on the instrument panel, this
implies that at least one tyre is being driven in emergency conditions ⇒.
End of emergency operation
Do not drive on if:
•
smoke is coming from one of the tyres,
•
there is a smell of rubber,
•
the vehicle vibrates,
•
there is a rattling noise.
When is it no longer possible to co ntinue driving even using anti-puncture
tyres?
•
If one of the tyres has been severely damaged in an accident, etc. If a tyre
has been badly damaged there is a risk that parts of the tread can be thrown
off and cause damage to the fuel lines, brake pipes or fuel filler.
•
It is also advisable to stop driving if severe vibrations occur, or if the wheel
starts overheating and gives off smoke.
WARNING
When driving in emergency conditions, the driving quality of the vehicle is
considerably impaired.•
The maximum permitted speed of 80 km/h is subject to road and
weather conditions. Please observe legal requirements when doing so.
•
Avoid sharp turns and rapid manoeuvres, and brake earlier than usual.
•
Avoid driving over obstacles (for example kerbs) or potholes.
•
If one or more tyres is being driven in emergency conditions, the driving
quality of the vehicle is impaired and there is a risk of accident.Note
•
The anti-puncture tyres do not “deflate” on losing pressure because they
are supported on the reinforced sides. Th erefore defects in the tyre can not be
detected with a visual inspection.
•
Snow chains must not be used on front tyres used in emergency
conditions.
AlteaXL_EN.book Seite 234 M ontag, 2. Februar 2009 12:26 12
Page 252 of 297

If and when251
Safety First
Operating instructions
Practical tips
Te c h n i c a l D a t a
Fuses on left side of dash panelFusesNumber
Consumer
Amps
1
Va can t
2
Va can t
3
Va can t
4
Va can t
5
Va can t
6
Va can t
7
Va can t
8
Va can t
9
Airbag
5
10
RSE input (roof screen)
10
11
Va can t
11
Vacant
12
Left xenon headlight
10
13
Instrument panel (oil le vel)/Switchboard wiring
(BCM)/Heater / ABS, ESP/ Park Pilot/ Gate-
way/Flow meter
5
14
Gearbox/Servosteering/Brake light sensor/
Trailer/ ABS, ESP/ Haldex/ Light switch
10
15
Heated windscreen / Instrument lighting / Diag-
nosis switchboard/Engine management/Addi-
tional heating/AFS headlamps/Park Pilot
10
16
Right xenon headlight
10
17
Engine management
10
18
Vacant
19
Vacant
20
Park Pilot (Parking assistant) / Gear lever/ ESP
switchboard
10
21
Vacant
22
Volumetric alarm sensor/ Alarm horn
5
23
Diagnosis / Rain sensor / Light switch
10
24
Vacant
25
Switchboard coupling automatic gearbox
20
26
Vacu um pum p
20
27
RSE input (roof screen)
10
28
Rear wiper motor / Switchboard wiring
20
29
Vacant
30
Cigarette lighter / socket
20
31
Vacant
32
Vacant
33
Heater
40
34
Vacant
35
Vacant
36
Engine management
10
37
Engine management
10
38
Engine management
10
39
Trailer control unit (coupling)
15
Number
Consumer
Amps
AlteaXL_EN.book Seite 251 M ontag, 2. Februar 2009 12:26 12
Page 253 of 297

If and when
252Some of the electrical items listed in the table are only fitted on certain
models or are optional extras. Please note that the above list, while correct at the time of printing, is subject
to alterations. If discrepancies should
occur, please refer to the sticker on the
inside of the fuse cover for the correct information for your model.
Fuses layout, engine compartment, left partFuses
40
Trailer control unit (indicators, brakes and left
side)
20
41
Trailer control unit (fog light, reversing light and
right side)
20
42
BCM wiring switchboard
20
43
Trailer pre-installation
40
44
Rear window heater
25
45
Electric windows (front)
30
46
Rear electric windows
30
47
Engine (Fuel control unit, petrol relay)
15
48
Convenience controls
20
49
Heating controls
40
50
Heated seats
30
51
Sunroof
20
52
Headlight washer system
20
53
Vacant
20
54
Taxi (taximeter power supply)
5
55
Vacant
20
56
Taxi (taximeter power supply)
15
57
Vacant
58
Central locking control unit
30
Number
Consumer
Amps
Number
Consumer
Amps
1
Windscreen wipers
20
2
DQ200 gearbox
30
3
Cable control unit
5
4
ABS
20
5
AQ gearbox
15
6
Instrument panel/Steering column
5
7
Ignition key
40
8
Radio
15
9
Telephone/TomTom Navigator
5
10
Engine management
5
Engine management
10
11
Va ca n t
12
Electronic control unit
5
13
Petrol injection module supply
15
Diesel injection module supply
30
14
Coil
20
AlteaXL_EN.book Seite 252 M ontag, 2. Februar 2009 12:26 12
Page 292 of 297

Index291
Heating . . . . . . . . . . . . . . . . . . . . . . . . . . . . . . . . 151
High pressure cleaners . . . . . . . . . . . . . . . . . . . 201
Horn . . . . . . . . . . . . . . . . . . . . . . . . . . . . . . . . . . . 53IIdentification number . . . . . . . . . . . . . . . . . . . . 270
Ignition key . . . . . . . . . . . . . . . . . . . . . . . . . . . . 165
Ignition lock . . . . . . . . . . . . . . . . . . . . . . . . . . . . 165
Indicators
indication lamp . . . . . . . . . . . . . . . . . . . . . . . 76
Information texts in the display . . . . . . . . . . . . . 62
Instrument and switch lighting . . . . . . . . . . . . . 113
Instrument lighting . . . . . . . . . . . . . . . . . . . . . . . 53
Instrument panel . . . . . . . . . . . . . . . . . . . . . . . . . 53
Instrument panel menu Configuration menu . . . . . . . . . . . . . . . . . . . . 70
Example of menu use . . . . . . . . . . . . . . . . . . 64
Lights and visibility menu . . . . . . . . . . . . . . . 72
Instrument panel menus Main menu . . . . . . . . . . . . . . . . . . . . . . . . . . . 64
Vehicle status menu . . . . . . . . . . . . . . . . . . . 69
Instruments . . . . . . . . . . . . . . . . . . . . . . . . . . . . . 55
Interior lights . . . . . . . . . . . . . . . . . . . . . . . . . . . 117
Intermittent wipe, windscreen . . . . . . . . . . . . . 121
ISOFIX system . . . . . . . . . . . . . . . . . . . . . . . . . . . 50JJack position points Skirting with cover . . . . . . . . . . . . . . . . . . . . 245 Jump leads . . . . . . . . . . . . . . . . . . . . . . . . . . . . . 262
Jump-starting . . . . . . . . . . . . . . . . . . . . . . . . . . . 262
KKey tab . . . . . . . . . . . . . . . . . . . . . . . . . . . . . . . . . 97
Keys . . . . . . . . . . . . . . . . . . . . . . . . . . . . . . . . . . . 97LLeather cleaning . . . . . . . . . . . . . . . . . . . . . . . . 206
Lights . . . . . . . . . . . . . . . . . . . . . . . . . . . . . . . . . 109
Load compartment in the boot
See Luggage compartment . . . . . . . . . . . . . . 17
Locks . . . . . . . . . . . . . . . . . . . . . . . . . . . . . . . . . 203
Luggage compartment . . . . . . . . . . . . . . . . 17, 148 See also Luggage compartment . . . . . . . . . . 17
Luggage compartment cover . . . . . . . . . . . . . . 149
Luggage compartment retaining net . . . . . . . . 139MMain beam . . . . . . . . . . . . . . . . . . . . . . . . 109, 116
Main beam headlights Indicator lamp . . . . . . . . . . . . . . . . . . . . . . . . 77
Main headlight lamps . . . . . . . . . . . . . . . . . . . . 254
Maintenance airbags . . . . . . . . . . . . . . . . . . . . . . . . . . . . . . 31
Manual gearbox . . . . . . . . . . . . . . . . . . . . . . . . . 169
Manual mode 2C-Climatronic . . . . . . . . . . . . . . . . . . . . . . . 160 MEDIA-IN* connector . . . . . . . . . . . . . . . . . . . . . 147
MFD . . . . . . . . . . . . . . . . . . . . . . . . . . . . . . . . . . . . 60
Mileage display . . . . . . . . . . . . . . . . . . . . . . . . . . 59
Mirrors
Exterior mirrors, electrical . . . . . . . . . . . . . . 126
Interior mirror . . . . . . . . . . . . . . . . . . . . . . . . 125
Make-up mirrors . . . . . . . . . . . . . . . . . . . . . 120
Mobile telephone . . . . . . . . . . . . . . . . . . . . . . . 209
Multi-function display . . . . . . . . . . . . . . . . . . . . . 60
Multi-purpose* mobile stowage compartment 142
Closing . . . . . . . . . . . . . . . . . . . . . . . . . . . . . 142
Fitting . . . . . . . . . . . . . . . . . . . . . . . . . . . . . . 141
Opening . . . . . . . . . . . . . . . . . . . . . . . . . . . . 142
Removal . . . . . . . . . . . . . . . . . . . . . . . . . . . . 141
Uses . . . . . . . . . . . . . . . . . . . . . . . . . . . . . . . 142
NNumber of seats . . . . . . . . . . . . . . . . . . . . . . . . . 19OObservations . . . . . . . . . . . . . . . . . . . . . . . . . . . 194
Octane number . . . . . . . . . . . . . . . . . . . . . . . . . 211
Oil . . . . . . . . . . . . . . . . . . . . . . . . . . . . . . . . . . . . 216
Oil change . . . . . . . . . . . . . . . . . . . . . . . . . . . . . 219
Oil properties . . . . . . . . . . . . . . . . . . . . . . . . . . . 217
One-touch opening and closing Electric windows . . . . . . . . . . . . . . . . . . . . . 105
Opening and locking . . . . . . . . . . . . . . . . . . . . . 102
AlteaXL_EN.book Seite 291 M ontag, 2. Februar 2009 12:26 12
Page 293 of 297

Index
292Overview
Control lamps . . . . . . . . . . . . . . . . . . . . . . . . 73
Instrument panel . . . . . . . . . . . . . . . . . . . . . . 53
Instruments . . . . . . . . . . . . . . . . . . . . . . . . . . 55
Warning lamps . . . . . . . . . . . . . . . . . . . . . . . 73PPaintworkPolishing . . . . . . . . . . . . . . . . . . . . . . . . . . . 202
Parking . . . . . . . . . . . . . . . . . . . . . . . . . . . . . . . . 175
Parking lights . . . . . . . . . . . . . . . . . . . . . . . . . . 116
Parking system . . . . . . . . . . . . . . . . . . . . . . . . . 177
Parking system plus . . . . . . . . . . . . . . . . . . . . . 177
Parts . . . . . . . . . . . . . . . . . . . . . . . . . . . . . . . . . . 208
Parts replacement . . . . . . . . . . . . . . . . . . . . . . . 208
Pedals . . . . . . . . . . . . . . . . . . . . . . . . . . . . . . . . . 16
Petrol . . . . . . . . . . . . . . . . . . . . . . . . . . . . . . . . . 211 Driving abroad . . . . . . . . . . . . . . . . . . . . . . . 194
Petrol additives . . . . . . . . . . . . . . . . . . . . . . . . . 212
Petrol engines, starting . . . . . . . . . . . . . . . . . . 166
Physical principles of a frontal collision . . . . . . 20
Plastic key tab . . . . . . . . . . . . . . . . . . . . . . . . . . . 97
Plastic parts . . . . . . . . . . . . . . . . . . . . . . . . . . . . 202
Plastic parts cleaning . . . . . . . . . . . . . . . . . . . . 206
Pollen filter . . . . . . . . . . . . . . . . . . . . . . . . . . . . 161
Power steering . . . . . . . . . . . . . . . . . . . . . . . . . . 189
Products for vehicle maintenance . . . . . . . . . . 199
RRadio frequency remote control Changing the battery . . . . . . . . . . . . . . . . . . 99
Radio navigation Steering wheel controls audio + telephone version . . . . . . . . . . . . . . 87
audio version . . . . . . . . . . . . . . . . . . . . . . . . . 87
Radio wave remote control . . . . . . . . . . . . . . . . . 98
Rain sensor* . . . . . . . . . . . . . . . . . . . . . . . . . . . 123
Rear drink holder* Armrest* . . . . . . . . . . . . . . . . . . . . . . . . . . . . 140
Rear fog light Indication lamp . . . . . . . . . . . . . . . . . . . . . . 109
Warning lamp . . . . . . . . . . . . . . . . . . . . . . . . 76
Rear interior lights . . . . . . . . . . . . . . . . . . . . . . 119
Rear lights . . . . . . . . . . . . . . . . . . . . . . . . . . . . . 257
Rear reading lights . . . . . . . . . . . . . . . . . . . . . . 119
Rear seat bench . . . . . . . . . . . . . . . . . . . . . . . . . 133
Rear window heating Heating element wires . . . . . . . . . . . . . . . . 203
Rear window wiper . . . . . . . . . . . . . . . . . . . . . . 124
Rear-view mirror . . . . . . . . . . . . . . . . . . . . . . . . 125
Recommended gear display . . . . . . . . . . . . . . . . 59
Refuelling . . . . . . . . . . . . . . . . . . . . . . . . . . . . . . 210
Registration light . . . . . . . . . . . . . . . . . . . . . . . . 261
Remote control key Buttons . . . . . . . . . . . . . . . . . . . . . . . . . . . . . 98
Synchronising . . . . . . . . . . . . . . . . . . . . . . . . 99
Removing and fitting the wheel . . . . . . . . . . . . 245 Repairs
airbags . . . . . . . . . . . . . . . . . . . . . . . . . . . . . . 31
Replacement keys . . . . . . . . . . . . . . . . . . . . . . . . 97
Rev counter . . . . . . . . . . . . . . . . . . . . . . . . . . . . . 57
Reverse gear Manual gearbox . . . . . . . . . . . . . . . . . . . . . 169
Roll-back function Sliding/tilting roof . . . . . . . . . . . . . . . . . . . 108
Windows . . . . . . . . . . . . . . . . . . . . . . . . . . . 105
Roof aerial* . . . . . . . . . . . . . . . . . . . . . . . . . . . . 209
Roof carrier* . . . . . . . . . . . . . . . . . . . . . . . . . . . 150
Roof stowage compartment* . . . . . . . . . . . . . . 137
Rubber seals . . . . . . . . . . . . . . . . . . . . . . . . . . . 203
Running in Engine . . . . . . . . . . . . . . . . . . . . . . . . . . . . . 190
SSafe driving . . . . . . . . . . . . . . . . . . . . . . . . . . . . . . 7
Safety . . . . . . . . . . . . . . . . . . . . . . . . . . . . . . . . . . . 8
Safety equipment . . . . . . . . . . . . . . . . . . . . . . . . . 7
Safety instructionsCoolant temperature . . . . . . . . . . . . . . . . . . . 76
Safety notes Airbags . . . . . . . . . . . . . . . . . . . . . . . . . . . . . . 31
Belt tension devices . . . . . . . . . . . . . . . . . . . 27
Curtain airbags . . . . . . . . . . . . . . . . . . . . . . . 41
Disabling front passenger airbag . . . . . . . . 44
frontal airbags . . . . . . . . . . . . . . . . . . . . . . . . 36
side airbags . . . . . . . . . . . . . . . . . . . . . . . . . . 39
AlteaXL_EN.book Seite 292 M ontag, 2. Februar 2009 12:26 12