2009 Seat Altea XL ECU
[x] Cancel search: ECUPage 51 of 297

Child safety
50Securing child seat with the “ISOFIX” system
The child seat with “ISOFIX” system can be secured quickly,
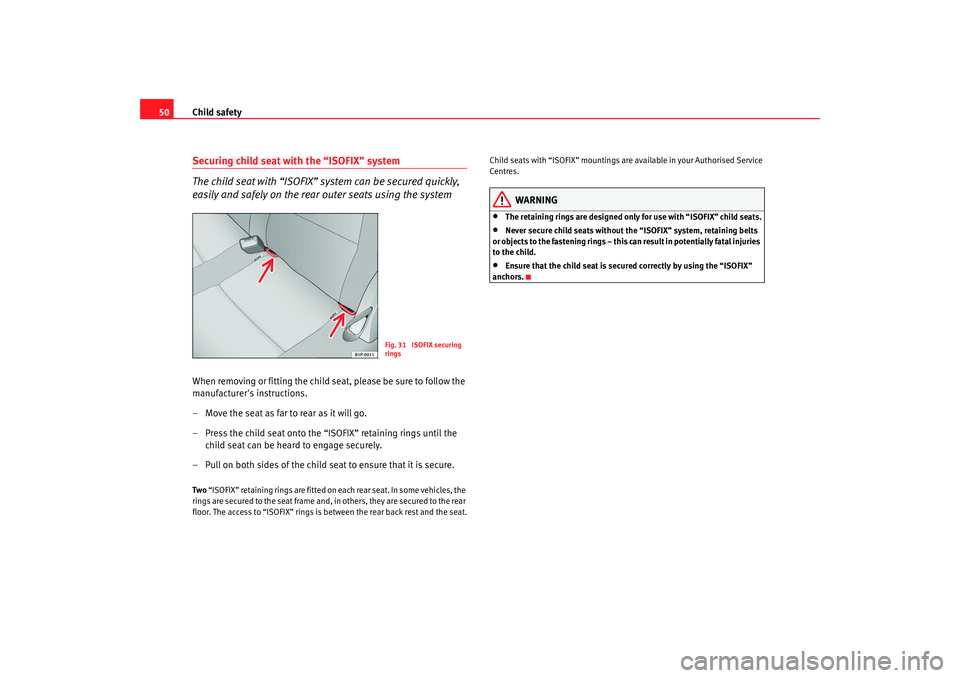
easily and safely on the rear outer seats using the systemWhen removing or fitting the child seat, please be sure to follow the
manufacturer's instructions.
– Move the seat as far to rear as it will go.
– Press the child seat onto the “ISOFIX” retaining rings until the
child seat can be heard to engage securely.
– Pull on both sides of the child se at to ensure that it is secure.Two “ISOFIX” retaining rings are fitted on each rear seat. In some vehicles, the
rings are secured to the seat frame and, in others, they are secured to the rear
floor. The access to “ISOFIX” rings is between the rear back rest and the seat. Child seats with “ISOFIX” mountings are available in your Authorised Service
Centres.
WARNING
•
The retaining rings are designed only for use with “ISOFIX” child seats.
•
Never secure child seats without the “ISOFIX” system, retaining belts
or objects to the fastening rings – this c an result in potentially fatal injuries
to the child.
•
Ensure that the child seat is secured correctly by using the “ISOFIX”
anchors.
Fig. 31 ISOFIX securing
rings
AlteaXL_EN.book Seite 50 M ontag, 2. Februar 2009 12:26 12
Page 93 of 297

Unlocking and locking
92
Note•
While the driver's door is open, the vehicle can not be locked with the
remote control. This avoids the user from forgetting his key inside the vehicle.
•
If the driver's door is unlocked with the key shaft, only the driver's door is
unlocked, the rest of the doors remain locked. When the ignition is switched
on, the door "safe" deadlock is deactivated (although the doors remain
locked) and the central locking button is activated. See ⇒page 100.
•
If the central locking or anti-theft alarm are faulty, the driver's door
warning lamp remains lit for approx. 30 seconds after locking the vehicle.
•
For anti-theft security, only the driver's door is fitted with a lock cylinder.
Safety system “Safe*”
The "safe" deadlock makes it more difficult to break into the
vehicle because the door release lever and the central locking
button are not active (depending upon country).Activating deadlock
– Press once the locking button on the remote control or
–Turn the key once i n t h e d r i v e r ' s d o o r l o ck t o l o ck . A wa r n i n g la m p
in the driver door flashes to indicate the "safe" deadlock is
working. The warning lamp flashes for approx. two seconds at
short intervals and then more slowly. Deactivating deadlock when the vehicle is locked
–Press
twice the locking button on the remote control within
two seconds. The vehicle is locked without activating the dead-
lock. The driver's door warning lamp flashes for approx. two
seconds and then goes out. After approx. 30 seconds it starts
flashing again.
The doors can be unlocked and opened from the inside if the "safe" deadlock
has not been activated. You will have to pull the door release lever once.
When the "safe" deadlock is off, the antitheft alarm* ⇒page 100 remains
active. The vehicle interior monitoring system* and the anti-tow system are
deactivated*.
WARNING
Nobody should remain in the vehicle if the anti-tow system deadlock mech-
anism has been activated. It is not possible to open the doors from the
inside. Locked doors could make it mo re difficult to assist vehicle occu-
pants in the event of an accident. People could become trapped inside in an
emergency.Selective unlocking system*
This system allows to unlock either just the driver's door or all
the vehicle.Using the remote control, press the unlock button on the remote once. The
“Safe” system for all the vehicle is deactivated, only the driver's door is
unlocked and both the alarm and the light indicator are also turned off.
AlteaXL_EN.book Seite 92 M ontag, 2. Februar 2009 12:26 12
Page 95 of 297

Unlocking and locking
94Central locking button
The central locking button allows you to lock and unlock the
vehicle from the inside.Locking the vehicle
– Press the button ⇒.
Unlocking the doors
– Press button .The central locking button is still operative when the ignition is switched off.
Except when the "safe" security system is activated.
Please note the following if you lock your vehicle with the central locking
button:•
Safety reasons make not be possible to open the doors or the tailgate
from the outside (for instance, when stopped at a traffic light).
•
The driver or front passenger door cannot be locked if any of the vehicle
doors (except the tailgate) are open. This avoids the user from forgetting his
key inside the vehicle.
•
Repeated operation of the central locking will deactivate the central
locking button for 30 seconds. Once this time has passed, the button may be
used once more.
•
There is a danger of leaving the key inside the vehicle if the vehicle is
locked by the central locking button whe n the driver's door is closed and any
of the rear doors open. On closing any of the rear doors, the vehicle locks and
the keys remain inside it.
•
All doors can be locked separately from inside the car. Do this by pulling
the door release lever once.
WARNING
•
If the vehicle is locked, children and disabled people may be trapped
inside it.
•
The central locking button is not operative in the following cases:
•
When the vehicle is locked from the outside (by the remote or the key).
•
While the ignition is not activated afte r unlocking the door lock cylinder
with the key.Note
•
Vehicle locked, amber button .
•
Vehicle unlocked, red button .
Unlocking and locking - Manual personalisation Activating selective unlocking
With the driver's door open, turn the key to unlock for approx. 3 s.
Fig. 58 Detail of the
centre console: central
locking system button
AlteaXL_EN.book Seite 94 M ontag, 2. Februar 2009 12:26 12
Page 101 of 297

Unlocking and locking
100Anti-theft alarm system*Description of anti-theft alarm system*
The anti-theft alarm triggers if unauthorised movements are
detected around the vehicle.The anti-theft alarm makes it more diffi cult to break into the vehicle or steal
it. Audible and visible alarms are triggered if the car is opened using the key,
or if unauthorised access to the vehicle is forced.
The anti-theft alarm system is automatically connected on locking the
vehicle. The system is then primed.
When does the system trigger an alarm?
The system triggers an alarm if the following unauthorised actions are carried
out when the car is locked:•
Mechanical opening of the vehicle with the vehicle key
•
Opening a door
•
Opening the bonnet
•
Opening the tailgate
•
Switching on the ignition
•
Movements in the vehicle
•
Undue manipulation of the alarm
•
Battery handling
The acoustic signals sound and the indicators flash for approx. 30 seconds.
This may be repeated up to 10 times depending on the country.
Opening the doors mechanically (emergency opening)
If the remote control function fails, you will have to use the key to unlock the
car. This is done as follows:
•
Unfold the key by pressing the button shown by the (arrow).
•
Use the lock on the driver door to un lock the vehicle. The anti-theft alarm
system remains active, but an alarm is not triggered immediately.
•
Switch on the ignition within 15 seconds. When the ignition is switched
on, the electronic immobiliser recognises a valid vehicle key and deactivates
the anti-theft alarm system. If you do not switch on the ignition within 15
seconds, the alarm is triggered.
How to switch the alarm off
When the vehicle is unlocked via the unlocking button of the remote control
or when the key is inserted in the ignition lock.Note
•
If, after the alarm goes off, access is gained to a second secured zone
(e.g. the tailgate is opened after a door has been opened), the warning signal
is triggered again.
•
Vehicle monitoring remains active even if the battery is disconnected or
not working for any reason.
•
The alarm is triggered immediately if one of the battery cables is discon-
nected while the alarm system is active.
Volumetric sensor*
Monitoring or control function incorporated in the anti-theft
alarm* which detects unauthorized vehicle entry by means of
ultrasound.The system consists of 3 sensors, 2 emitters and a receptor.
AlteaXL_EN.book Seite 100 M ontag, 2. Februar 2009 12:26 12
Page 102 of 297

Unlocking and locking101
Safety First
Operating instructions
Practical tips
Te c h n i c a l D a t a
Activation
– It is automatically turned on with the anti-theft alarm, when the
vehicle is locked mechanically with the key and when the button on the remote control is used.
Deactivation
– Press the button on the remote control twice. Only the volu- metric sensor is deactivated. The alarm system remains acti-
vated.
WARNING
•
The “safe” security system remains deactivated if the volumetric
sensor is deactivated.
•
For those vehicles in which a separate sunblind is fitted in the
passenger compartment, the alarm will not function correctly due to inter-
ference with the sensor.Note
•
If the alarm has been triggered by the volumetric sensor, this will be indi-
cated by a flashing of the indicator on the driver's door. This flashing will be
different to that for an activated alarm.
AlteaXL_EN.book Seite 101 M ontag, 2. Februar 2009 12:26 12
Page 131 of 297

Seats and stowage
130Removing or adjust ing head restraints
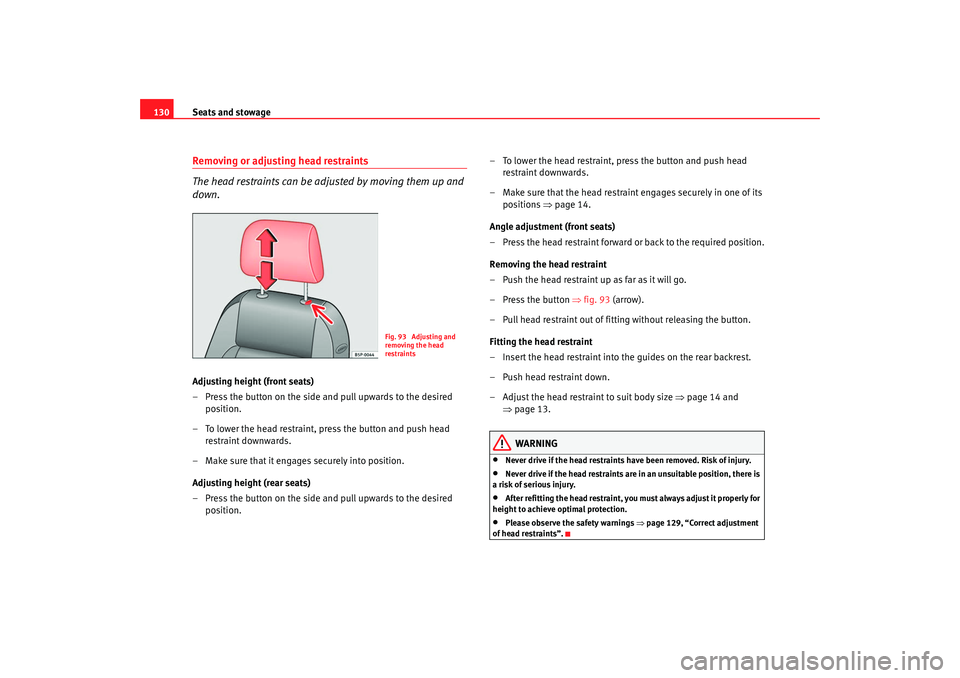
The head restraints can be adjusted by moving them up and
down.Adjusting height (front seats)
– Press the button on the side and pull upwards to the desired position.
– To lower the head restraint, press the button and push head restraint downwards.
– Make sure that it engages securely into position.
Adjusting height (rear seats)
– Press the button on the side and pull upwards to the desired position. – To lower the head restraint, press the button and push head
restraint downwards.
– Make sure that the head restrain t engages securely in one of its
positions ⇒page 14.
Angle adjustment (front seats)
– Press the head restraint forward or back to the required position.
Removing the head restraint
– Push the head restraint up as far as it will go.
– Press the button ⇒fig. 93 (arrow).
– Pull head restraint out of fitting without releasing the button.
Fitting the head restraint
– Insert the head restraint into the guides on the rear backrest.
– Push head restraint down.
– Adjust the head restraint to suit body size ⇒page 14 and
⇒ page 13.
WARNING
•
Never drive if the head restraints have been removed. Risk of injury.
•
Never drive if the head restraints are in an unsuitable position, there is
a risk of serious injury.
•
After refitting the head restraint, yo u must always adjust it properly for
height to achieve optimal protection.
•
Please observe the safety warnings ⇒page 129, “Correct adjustment
of head restraints”.
Fig. 93 Adjusting and
removing the head
restraints
AlteaXL_EN.book Seite 130 M ontag, 2. Februar 2009 12:26 12
Page 132 of 297

Seats and stowage131
Safety First
Operating instructions
Practical tips
Te c h n i c a l D a t a
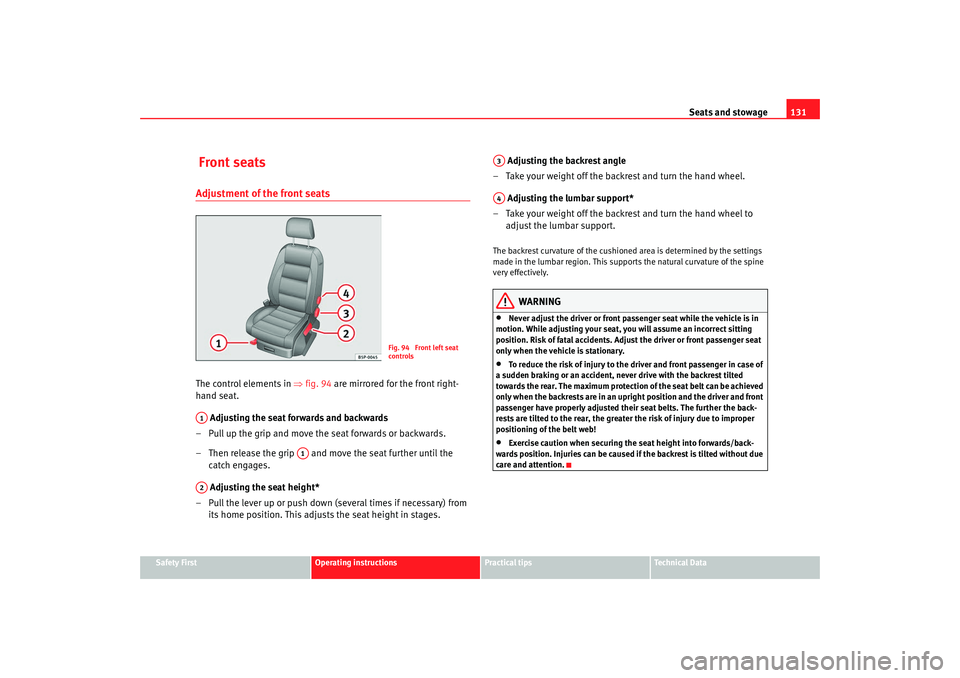
Front seatsAdjustment of the front seatsThe control elements in ⇒ fig. 94 are mirrored for the front right-
hand seat.
Adjusting the seat forwards and backwards
– Pull up the grip and move the seat forwards or backwards.
– Then release the grip and move the seat further until the catch engages.
Adjusting the seat height*
– Pull the lever up or push down (several times if necessary) from its home position. This adjusts the seat height in stages. Adjusting the backrest angle
– Take your weight off the backrest and turn the hand wheel.
Adjusting the lumbar support*
– Take your weight off the backrest and turn the hand wheel to adjust the lumbar support.
The backrest curvature of the cushioned area is determined by the settings
made in the lumbar region. This supports the natural curvature of the spine
very effectively.
WARNING
•
Never adjust the driver or front passenger seat while the vehicle is in
motion. While adjusting your seat, you will assume an incorrect sitting
position. Risk of fatal accidents. Adjust the driver or front passenger seat
only when the vehicle is stationary.
•
To reduce the risk of injury to the driver and front passenger in case of
a sudden braking or an accident, never drive with the backrest tilted
towards the rear. The maximum protection of the seat belt can be achieved
only when the backrests are in an upright position and the driver and front
passenger have properly adjusted their seat belts. The further the back-
rests are tilted to the rear, the greate r the risk of injury due to improper
positioning of the belt web!
•
Exercise caution when securing the seat height into forwards/back-
wards position. Injuries can be caused if the backrest is tilted without due
care and attention.
Fig. 94 Front left seat
controls
A1
A1
A2
A3A4
AlteaXL_EN.book Seite 131 M ontag, 2. Februar 2009 12:26 12
Page 135 of 297

Seats and stowage
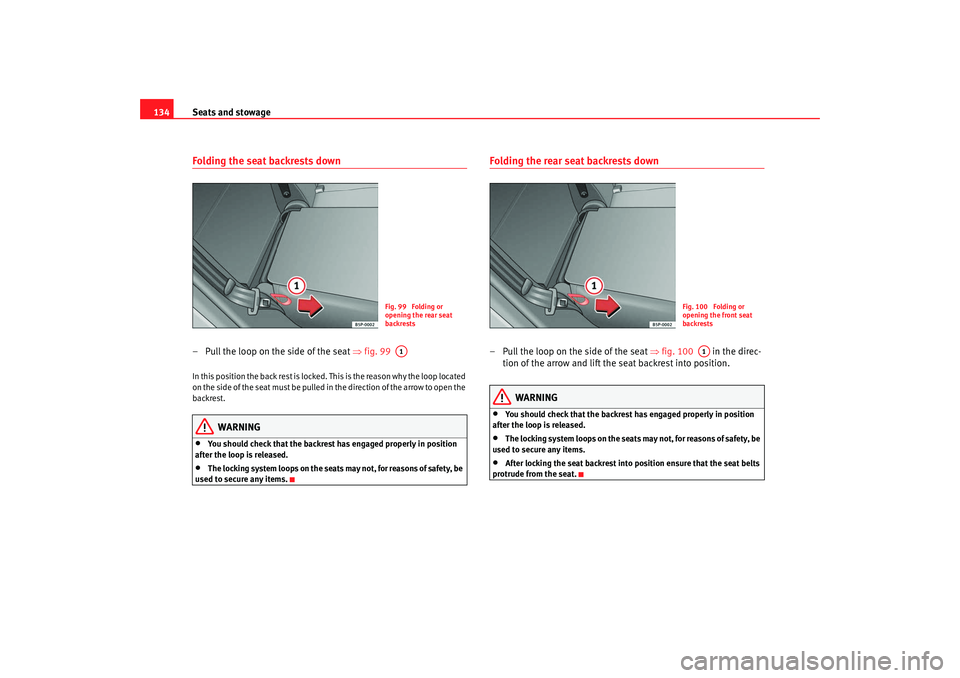
134Folding the seat backrests down – Pull the loop on the side of the seat ⇒fig. 99 In this position the back rest is locked. This is the reason why the loop located
on the side of the seat must be pulled in the direction of the arrow to open the
backrest.
WARNING
•
You should check that the backrest has engaged properly in position
after the loop is released.
•
The locking system loops on the seats may not, for reasons of safety, be
used to secure any items.
Folding the rear seat backrests down– Pull the loop on the side of the seat ⇒ fig. 100 in the direc-
tion of the arrow and lift the seat backrest into position.
WARNING
•
You should check that the backrest has engaged properly in position
after the loop is released.
•
The locking system loops on the seats may not, for reasons of safety, be
used to secure any items.
•
After locking the seat backrest into po sition ensure that the seat belts
protrude from the seat.
Fig. 99 Folding or
opening the rear seat
backrestsA1
Fig. 100 Folding or
opening the front seat
backrests
A1
AlteaXL_EN.book Seite 134 M ontag, 2. Februar 2009 12:26 12