2009 SATURN OUTLOOK buttons
[x] Cancel search: buttonsPage 115 of 432

you live, replace Step 3 under
“Programming Universal Home
Remote” with the following:
Continue to press and hold the
Universal Home Remote button
while you press and release every
two seconds (cycle) the hand-held
transmitter button until the frequency
signal has been successfully
accepted by the Universal Home
Remote. The Universal Home
Remote indicator light will �ash
slowly at �rst and then rapidly.
Proceed with Step 4 under
“Programming Universal Home
Remote” to complete.
Using Universal Home Remote
Press and hold the appropriate
Universal Home Remote button
for at least half of a second.
The indicator light will come on
while the signal is being transmitted.
Erasing Universal Home
Remote Buttons
The programmed buttons should be
erased when the vehicle is sold
or the lease ends.
To erase all programmed buttons on
the Universal Home Remote device:
1. Press and hold down the
two outside buttons until
the indicator light begins to �ash,
after 20 seconds.
2. Release both buttons.
Reprogramming a Single
Universal Home Remote
Button
To reprogram any of the three
Universal Home Remote buttons,
repeat the programming instructions
earlier in this section, beginning
with Step 2.
For help or information on the
Universal Home Remote System,
call the customer assistance phone
number underCustomer Assistance
Offices on page 7-5.
Features and Controls 2-49
ProCarManuals.com
Page 124 of 432

Cruise Control Light.............3-43
Highbeam On Light..............3-43
Tow/Haul Mode Light...........3-43
Fuel Gage..........................3-44
Driver Information
Center (DIC)
Driver Information
Center (DIC).....................3-44
DIC Operation and Displays
(With DIC Buttons).............3-45
DIC Operation and Displays
(Without DIC Buttons).........3-50
DIC Compass.....................3-54
DIC Warnings and
Messages.........................3-56
DIC Vehicle Customization
(With DIC Buttons).............3-65
Audio System(s)Audio System(s)..................3-74
Setting the Clock.................3-74
Radio(s).............................3-75
Using an MP3
(Radio with CD).................3-92
Using an MP3
(Radio with CD and
DVD Player)......................3-97
XM Radio Messages..........3-102
Navigation/Radio System.....3-103
Bluetooth
®........................3-103
Rear Seat Entertainment
(RSE) System..................3-114
Rear Seat Audio (RSA)......3-123
Theft-Deterrent Feature.......3-125
Audio Steering Wheel
Controls..........................3-125
Radio Reception................3-126
Multi-Band Antenna............3-127
3-2 Instrument Panel
ProCarManuals.com
Page 131 of 432

Rear Window
Wiper/Washer
The rear wiper and rear wash
button is located on the instrument
panel below the climate control
system.
Z(Rear Wiper):Press to turn the
rear wiper on and off. The wiper
speed cannot be changed.
Y(Wash):Press to spray washer
�uid on the rear window. The window
wiper will also come on. Release the
button when enough �uid has been
sprayed on the window. The rear
wiper will run a few more cycles
after it is released. If the rear wiper
function was already on, prior to
pressing the wash button, it stays
on until the wiper button is pressed
again.
The rear window washer uses the
same �uid that is in the windshield
washer reservoir. SeeWindshield
Washer Fluid on page 5-26.
Cruise Control
With cruise control, a speed of about
25 mph (40 km/h) or more can be
maintained without keeping your
foot on the accelerator. Cruise
control does not work at speeds
below about 25 mph (40 km/h).
When the brakes are applied, the
cruise control is disengaged.
{CAUTION
Cruise control can be dangerous
where you cannot drive safely at
a steady speed. So, do not use
the cruise control on winding
roads or in heavy traffic.
Cruise control can be dangerous
on slippery roads. On such roads,
fast changes in tire traction can
cause excessive wheel slip, and
you could lose control. Do not use
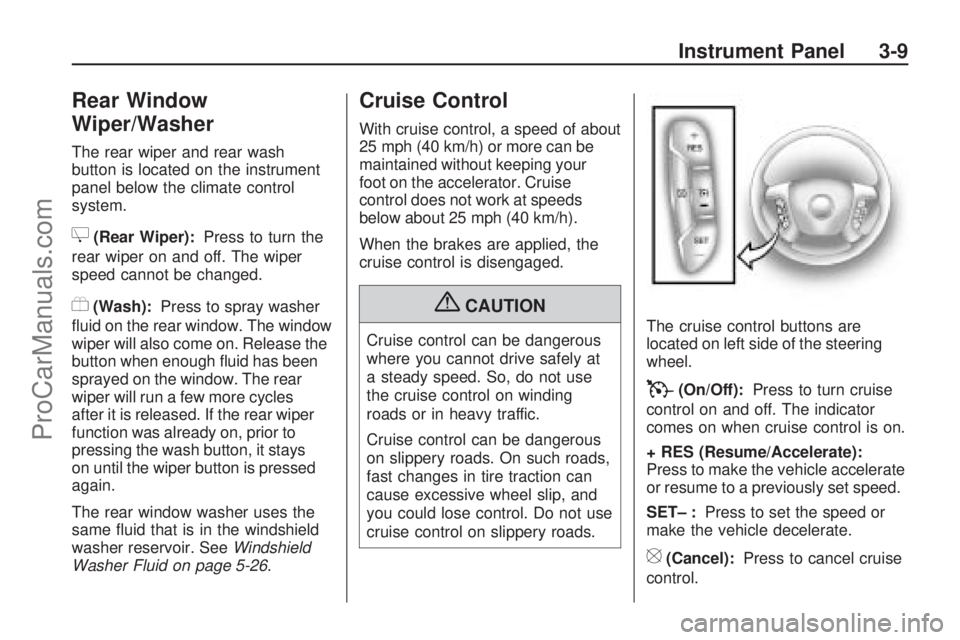
cruise control on slippery roads.The cruise control buttons are
located on left side of the steering
wheel.
T(On/Off):Press to turn cruise
control on and off. The indicator
comes on when cruise control is on.
+ RES (Resume/Accelerate):
Press to make the vehicle accelerate
or resume to a previously set speed.
SET– :Press to set the speed or
make the vehicle decelerate.
[(Cancel):Press to cancel cruise
control.
Instrument Panel 3-9
ProCarManuals.com
Page 134 of 432

2(Headlamps):Turns on
the headlamps together with
the following lamps listed below.
A warning chime sounds if the
driver door is opened when the
ignition switch is off and the
headlamps are on.
Parking Lamps
Taillamps
License Plate Lamps
Instrument Panel Lights
#(Fog Lamps) (If Equipped):
Turns on the fog lamps.
SeeFog Lamps on page 3-13.
Delayed Headlamps
Delayed headlamps provide a
period of exterior lighting as you
leave the area around your vehicle.
This feature is activated when the
headlamps are on due to the
automatic headlamps control feature,
and when the ignition is turned off.
The headlamps remain on until the
exterior lamps control is moved to
the parking lamps position or until
the pre-selected delayed headlamp
lighting period has ended.
If the ignition is turned off with the
headlamps switch in the parking
lamps or headlamps position, the
delayed headlamps cycle will not
occur.
To disable the delayed headlamps
feature or change the time of delay,
seeDIC Vehicle Customization (With
DIC Buttons) on page 3-65.
Daytime Running
Lamps (DRL)/Automatic
Headlamp System
Daytime Running Lamps (DRL) can
make it easier for others to see the
front of your vehicle during the day.
Fully functional daytime running
lamps are required on all vehicles
�rst sold in Canada.
The DRL system makes either the
low-beam headlamps come on at a
reduced brightness or the DRL lights,
for vehicles with High Intensity
Discharge (HID) headlamps when
the following conditions are met:
The ignition is in the ON/RUN
position.
The exterior lamps control is
in AUTO.
The engine is running.
3-12 Instrument Panel
ProCarManuals.com
Page 144 of 432

Dual Automatic Climate Control System
The heating, cooling, and ventilation in the vehicle can be controlled with this
system.
A. Fan Control
B. AUTO
C. Defrost
D. Recirculation
E. REAR (Rear Climate Control)
F. Air Delivery Mode Control
G. Driver Side Temperature ControlH. Display
I. Power (On/Off)
J. Rear Window Defogger
K. Air Conditioning
L. PASS (Passenger)
M. Passenger Side Temperature
Control Display Function
Each time the temperature, mode,
or fan control buttons are pressed,
the climate control display shows
that function along with the inside
temperature setting. The outside
temperature is displayed on the
instrument panel cluster.
O(On/Off):
Press to turn the
climate control system on or off.
While the system is off, outside air
still enters through the �oor outlets,
but the air delivery mode can be
adjusted.
The climate control system will
also turn on if either the fan control,
defrost, AUTO, or air conditioning
buttons are pressed.
3-22 Instrument Panel
ProCarManuals.com
Page 145 of 432

Automatic Operation
AUTO (Automatic):The system
automatically controls the inside
temperature, the air delivery,
and the fan speed.
To use automatic mode:
1. Press the AUTO button.
When AUTO is selected, the
current temperature(s) selected
and AUTO is shown on the
display. The current air delivery
mode and fan speed also appear
for approximately �ve seconds.
When AUTO is selected, the
air conditioning and air inlet
are automatically controlled.
The air conditioning runs when
the outside temperature is over
40°F (4°C). The system is
automatically set to outside
air, unless it is hot outside and
then the air inlet changes to
recirculation mode to help quickly
cool the vehicle. The recirculation
indicator light will come on.2. Set the temperature for the driver
and passenger.
To �nd a comfortable setting,
start with a 73°F (22°C)
temperature setting and allow
about 20 minutes for the system
to regulate. Use the driver’s side
or passenger side temperature
buttons to adjust the temperature
setting as necessary. The system
will remain at the selected setting.
Choosing the warmest or coolest
temperatures does not cause
the vehicle to heat or cool more
quickly.
To avoid blowing cold air in
cold weather, the system delays
turning on the fan until warm air is
available. Press the fan control to
override this delay and select the
fan speed.Temperature Control
The driver and passenger side
temperature buttons are used to
adjust the temperature of the
air coming through the system.
The temperature can be adjusted
even if the system is turned off since
outside air still enters the vehicle,
unless the recirculation mode
is selected. See “Recirculation”
later in this section.
Driver Side Temperature
Control:Press the + or−buttons
to increase or decrease the driver
side temperature. The driver side
temperature display will show the
temperature setting.
Passenger Side Temperature
Control:Press the + or−buttons
to increase or decrease the
passenger side temperature.
The passenger side display will
show the temperature setting.
Instrument Panel 3-23
ProCarManuals.com
Page 147 of 432

The air conditioning system runs
automatically in this setting, unless
the outside temperature is less than
40°F (4°C).
Do not drive the vehicle until all the
windows are clear.
While in defrost mode, if the PASS
button is pressed, the PASS button
indicator �ashes three times to show
that the passenger climate control
system cannot be activated. If the
passenger temperature buttons are
adjusted while in defrost mode, the
driver temperature indicator will
change. The passenger temperature
will not be displayed.Air Conditioning
#(Air Conditioning):Press
to turn the air conditioning (A/C)
on and off. An indicator light comes
on when A/C is on.
The A/C does not work when
the outside temperature is below
40°F (4°C). If
#is pressed the
indicator �ashes three times and
turns off to show that the A/C mode
is not available. If the A/C is on and
the outside temperature drops below
a temperature which is too cool for
air conditioning to be effective, the
A/C indicator turns off to show that
the A/C mode has been canceled.On hot days, open the windows
brie�y to let hot inside air escape.
This helps reduce the time it
takes for the interior of the vehicle
to cool down.
The air conditioning system
removes moisture from the air,
so a small amount of water might drip
under the vehicle while idling or after
turning off the engine. This is normal.
@(Recirculation):Press to
turn the recirculation mode on or off.
An indicator light comes on when
recirculation is on. When the engine
is turned off, the recirculation mode
automatically turns off and must be
re-selected when the engine is
turned on again.
Instrument Panel 3-25
ProCarManuals.com
Page 151 of 432

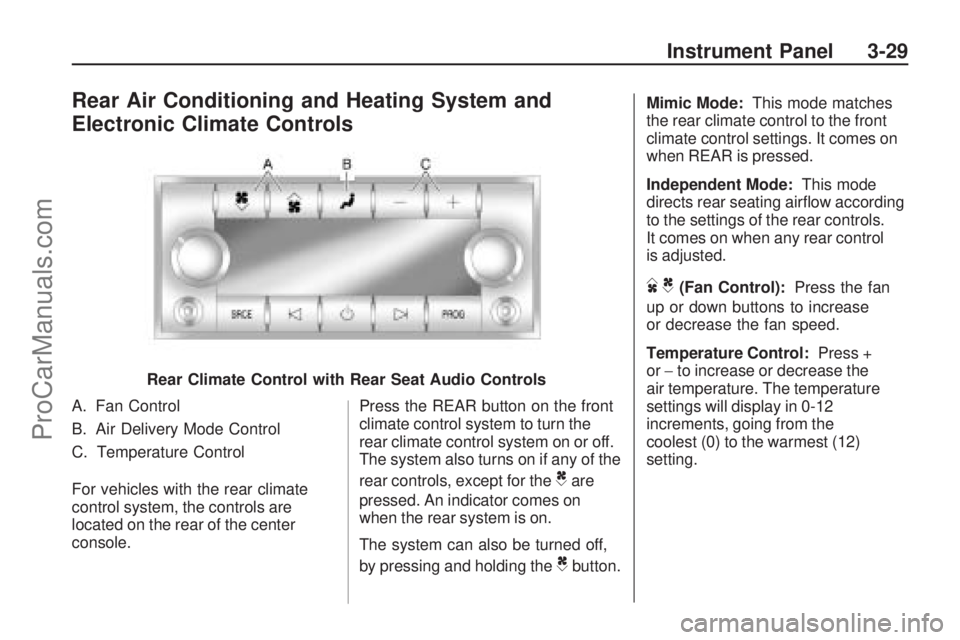
Rear Air Conditioning and Heating System and
Electronic Climate Controls
A. Fan Control
B. Air Delivery Mode Control
C. Temperature Control
For vehicles with the rear climate
control system, the controls are
located on the rear of the center
console.Press the REAR button on the front
climate control system to turn the
rear climate control system on or off.
The system also turns on if any of the
rear controls, except for the
Care
pressed. An indicator comes on
when the rear system is on.
The system can also be turned off,
by pressing and holding the
Cbutton. Mimic Mode:
This mode matches
the rear climate control to the front
climate control settings. It comes on
when REAR is pressed.
Independent Mode: This mode
directs rear seating air�ow according
to the settings of the rear controls.
It comes on when any rear control
is adjusted.
DC(Fan Control): Press the fan
up or down buttons to increase
or decrease the fan speed.
Temperature Control: Press +
or −to increase or decrease the
air temperature. The temperature
settings will display in 0-12
increments, going from the
coolest (0) to the warmest (12)
setting.
Rear Climate Control with Rear Seat Audio Controls
Instrument Panel 3-29
ProCarManuals.com