2009 PORSCHE PANAMERA tailgate
[x] Cancel search: tailgatePage 37 of 343

Opening and Locking
35
Malfunctions When Opening and
ClosingEmergency operation of tailgateIf the tailgate cannot be opened with the radio
remote control (e.g. if th e battery of the remote
control is dead), the emergency operation must
be performed:
1. Unlock and open the driver’s door with the car key.
2. Switch on the ignition within 10 seconds to prevent the alarm system from
triggering.
3. Press the central locking button on the front or rear center console.
The tailgate is now unlocked and can be
opened with the unlocking handle.
Only one door is unlockedOn the multi-function di splay in the instrument
panel, you can set different variants for locking
and unlocking the doors and tailgate. You can
open all doors irrespective of the setting made.
f Press button on the key twice within
2seconds.The vehicle cannot be unlockedThe remote control of the key may
– not function correctly due to radio waves (also
radio contact between remote control and
vehicle in the case of Porsche Entry & Drive),
– fail due to a fault,
– fail due to a flat key battery.
f Unlock the vehicle using the emergency key
in the door lock.
If the vehicle was unlocked using the
emergency key in the door lock, only the
driver’s door can be opened.
In order to prevent the alarm system from
being triggered, switch the ignition on
within 10 seconds of opening the door .
The vehicle cannot be lockedThis is recognizable by the fact that the
emergency flasher does not flash and there is no
locking noise.
The remote control of the key may
– not function correctly due to radio waves (also radio contact between remote control
and vehicle in the case of Porsche Entry &
Drive),
– fail due to a fault,
– fail due to a flat key battery.
f Lock the vehicle usin g the emergency key
in the door lock.
If the central locking system is defective,
operating the lock cylinder in the driver’s door will
lock all functioning lockin g elements of the central
locking system.
For information on lockin g the doors by means of
the emergency operation:
f Please see the chapter “NOT ALL VEHICLE
DOORS ARE LOCKED” on page 36.
f Have faults in the central locking system
repaired.
Please contact a qualified specialist workshop.
We recommend that you have an authorized
Porsche dealer to do this work as they have
trained workshop personnel and the necessary
parts and tools.
Page 147 of 343

Instrument Panel and Multi-Function Display
145
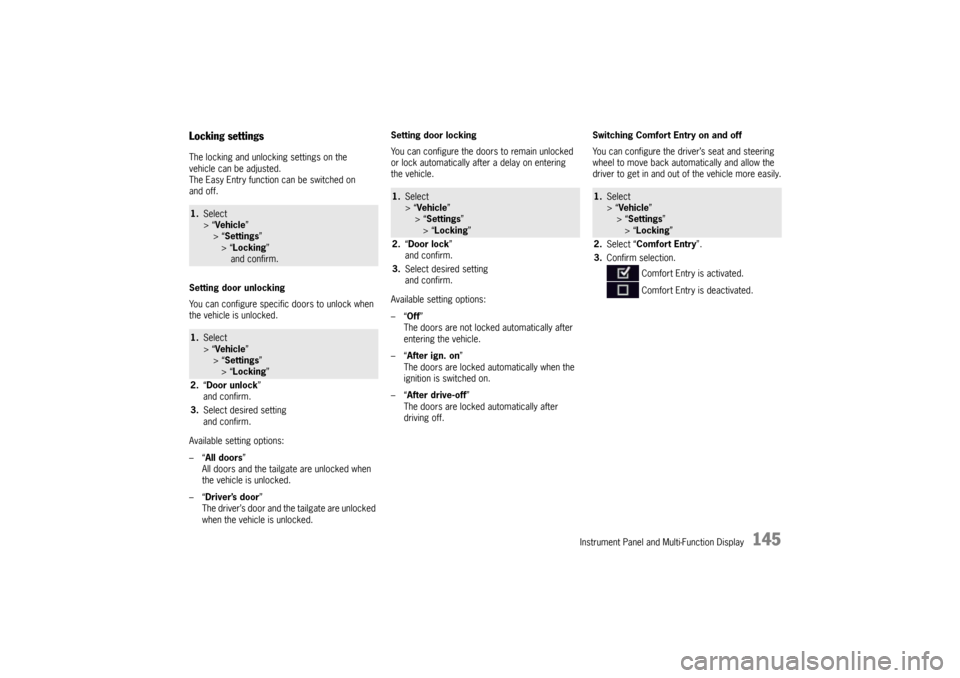
Locking settingsThe locking and unlocking settings on the
vehicle can be adjusted.
The Easy Entry function can be switched on
and off.
Setting door unlocking
You can configure specific doors to unlock when
the vehicle is unlocked.
Available setting options:
–“All doors”
All doors and the tailgate are unlocked when
the vehicle is unlocked.
–“ Driver’s door ”
The driver’s door and the tailgate are unlocked
when the vehicle is unlocked. Setting door locking
You can configure the doors to remain unlocked
or lock automatically after a delay on entering
the vehicle.
Available setting options:
–“
Off”
The doors are not locked automatically after
entering the vehicle.
–“ After ign. on ”
The doors are locked automatically when the
ignition is switched on.
–“ After drive-off ”
The doors are locked automatically after
driving off. Switching Comfort Entry on and off
You can configure the driver’s seat and steering
wheel to move back auto
matically and allow the
driver to get in and out of the vehicle more easily.1. Select
> “Vehicle ”
> “ Settings ”
> “Locking ”
and confirm.1. Select
> “Vehicle ”
> “ Settings ”
> “Locking ”
2. “Door unlock ”
and confirm.
3. Select desired setting
and confirm.
1.Select
> “Vehicle ”
> “Settings ”
> “ Locking ”
2. “Door lock ”
and confirm.
3. Select desired setting
and confirm.
1.Select
> “Vehicle ”
> “ Settings ”
> “Locking ”
2. Select “Comfort Entry ”.
3. Confirm selection.
Comfort Entry is activated.
Comfort Entry is deactivated.
Page 160 of 343

158
Instrument Panel and Multi-Function Display
Fault Porsche Entry & Drive Have the fault corrected at a qualified specialist workshop.*Multiple keys recognized
in vehicleInformation message:
Several vehicle keys in the vehicle, e.g. in the possession of
a passenger.Close doors to lock vehicle Close all doors
and the tailgate before locking the vehicle.Chassis system faultVehicle handling may be affected. Adapt your speed to the
changed conditions.
Have the fault corrected at a qualified specialist workshop.*Chassis system failure Stop immediately in a suitable place. Do not continue driving.
Have the fault corrected at a qualified specialist workshop.*Control on PASM level control is active.Control offPASM level control was switched off, e.g. before driving onto
a lifting platform or raising one wheel. not allowed Level adjustment is not permitted, e.g. at speeds above approx.
20 mph (30 km/h) or if the door/tailgate is open.not possible Level adjustment not available, e.g. when the engine is switched
off, if the vehicle is overloaded or the battery voltage is too low.Vehicle extremely low The vehicle ground clearance is insufficient to continue driving.
The system regulates the vehi cle level again automatically.
This can take several minutes. Have any persistent faults
checked/corrected at a qualif ied specialist workshop.*Vehicle extremely high The vehicle ground clearance is too high to continue driving.
The system regulates the vehicl e level again automatically.
Have any persistent faults ch ecked/corrected at a qualified
specialist workshop.*
Light in
instrument
panel
Warning message on multi-function
display Meaning/Action required
Page 163 of 343

Instrument Panel and Multi-Function Display
161
flashes
Fault Headlight controlHave the fault corrected at a qualified sp ecialist workshop.*Headlights adapted for
LHD/RHD Headlights have been changed for
countries with left/right-hand
trafficWiper defective Have the fault corrected at a qualified specialist workshop.*Tailgate Close the tailgate
Example:
Door open
Also:
Doors, engine compartment lidClose door/lid indicatedLaunch Control activated Lau
nch Control is activated.Distance! Please brake!Insufficient distance from vehicle in front.Fault ACC Adjust your speed and driving style.
Have the fault on the adaptive Cruise Control corrected at
a qualified specialist workshop.*Fault ACC sensor Adaptive cruise control: Sensor in the front of the vehicle may
be covered with dirt, snow, ice or affected by adverse weather
conditions.System fault One or more electrical systems may have failed.
Adjust your speed and driving style.
Have the fault corrected at a q ualified specialist workshop.*Fault
Instrument cluster/
ParkAssist sound Turn signal tones, acoustic
warning and distance signals
(e.g. for ParkAssist) are not available.
Please note this when parking. Have the fault corrected at
a qualified specialist workshop.*
Light in
instrument
panel
Warning message on multi-function
display Meaning/Action required
Page 211 of 343

Driving and Driving Safety
209
Porsche Active Suspension
Management (PASM) with Air
Suspension and Level ControlPASM with air suspension is an active shock
absorber adjustment and ride height balancing
system. The adjustable damper system selects
the appropriate damping level for each wheel
according to the driving situation and driving
conditions. The level control system automatically
balances load changes and maintains a constant
ride height. Driving safety , agility and comfort are
optimised.
Three different chassis setups can be selected at
the push of a button:
– “PASM Comfort”
– “PASM Sport”
– “PASM Sport Plus”
Comfort mode ensures comfortable chassis
tuning.
The “PASM Sport” chassis setup offers very
sporty shock absorber tuning.
“PASM Sport Plus” mode offers particularly sporty
shock absorber tuning (e.g. for driving on the race
circuit). The vehicle is also lowered by
approx. 1 in. (25 mm) compared with the normal
level and the spring rate is increased.
In addition to manual mode selection, PASM also
adjusts shock absorber tuning for either sporty
or comfort driving, depending on the driving
situation.
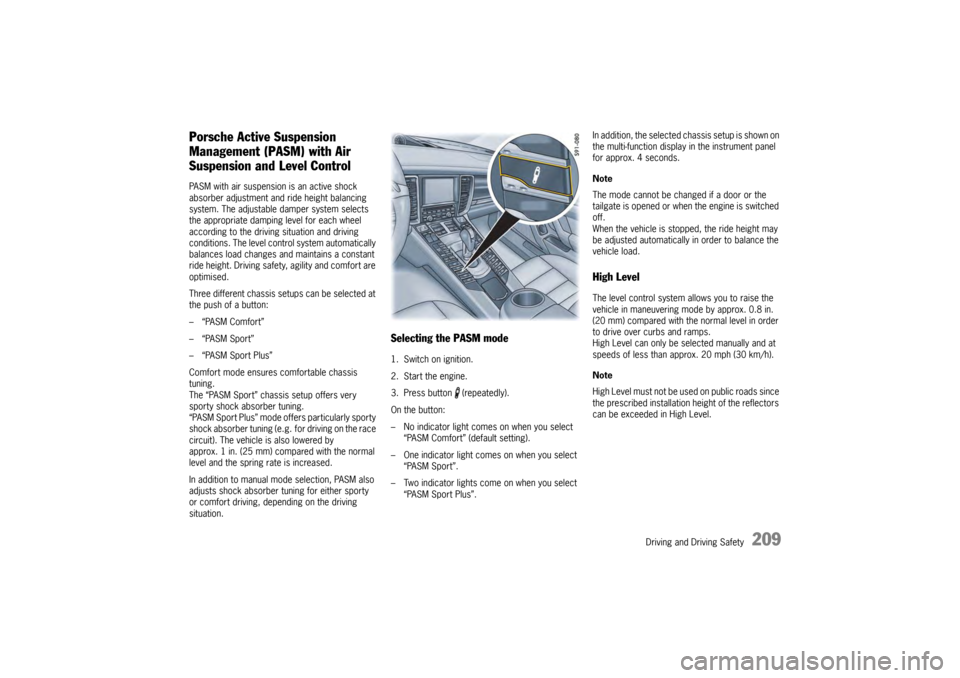
Selecting the PASM mode1. Switch on ignition.
2. Start the engine.
3. Press button (repeatedly).
On the button:
– No indicator light come s on when you select
“PASM Comfort” (default setting).
– One indicator light comes on when you select “PASM Sport”.
– Two indicator lights come on when you select
“PASM Sport Plus”. In addition, the selected chassis setup is shown on
the multi-function display in the instrument panel
for approx. 4 seconds.
Note
The mode cannot be changed if a door or the
tailgate is opened or when the engine is switched
off.
When the vehicle is stopped, the ride height may
be adjusted automatically
in order to balance the
vehicle load.
High LevelThe level control system al lows you to raise the
vehicle in maneuvering mode by approx. 0.8 in.
(20 mm) compared with the normal level in order
to drive over curbs and ramps.
High Level can only be selected manually and at
speeds of less than approx. 20 mph (30 km/h).
Note
High Level must not be us ed on public roads since
the prescribed installation height of the reflectors
can be exceeded in High Level.
Page 230 of 343

228
Storage, Luggage Compartment and Roof Transport System
Stowing Loads
Danger!
Danger of injury. An unsecured or incorrectly
positioned load can slip out of place or
endanger the vehicle occupants during
braking, direction changes or in accidents.
Never transport objects that are not secured.
f Always transport loads in the luggage
compartment, never in the passenger
compartment (e.g. on or in front of the seats).
f Support the load against the seat backrests
wherever possible. Always lock the backrests
into place.
f Only transport heavy objects with the rear seat
backrests upright and engaged.
f Place the load behind unoccupied seats
whenever possible.
f Stow heavy objects as far forward as possible
on the floor, with lightweight objects behind
them.
f Never load the vehicle higher than the top
edge of the seat backrest.
f Always protect the passenger compartment
with a luggage compartment cover. Do not
drive with objects on top of the luggage
compartment cover. f
If the rear seats are not occupied, the
backrests can be addition ally secured with the
seat belts. Simply cro ss the outer seat belts
and insert each into the opposite buckle.
f Make sure that the load cannot damage the
heating filaments and the TV antenna in the
rear window.
Tie-down belts
f Do not use elastic belt s or straps to tie
down a load.
f Do not route belts and straps over
sharp edges.
f Observe the directions for use and information
for the tie-down equipment.
f Use only belts with a tear strength of at least
1543 lbs (700 kg) and a maximum width of
1 in. (25 mm).
f Cross the belts over the load. Driving
f
Vehicle handling changes depending on the
vehicle load. Adapt your driving style to the
changed driving behavior.
f Do not exceed the maximum gross weight
and axle load.
This information can be found under “Technical
data” in this Owner’s Manual:
f Please see the chapter “WEIGHTS” on
page 328.
f Never drive with the tailgate open. Exhaust
gases can enter the passenger compartment.
f Adapt the tire pressure to the load.
After you change the tire pressure, you must
also update the setting for Tire Pressure
Monitoring.
For information on setting Tire Pressure
Monitoring on the multi-function display:
f Please see the chapter “OVERVIEW OF
WARNING MESSAGES” on page 152.
Information on tire pressures for partially and fully
loaded vehicles can be found under “Technical
data” in this Owner’s Manual:
f Please see the chapter “TIRE PRESSURE FOR
COLD TIRES (68 °F/20 °C)” on page 326.
Page 231 of 343

Storage, Luggage Compartment and Roof Transport System
229
Luggage Compartment Cover
Warning!
Risk of injury. In the event of braking,
direction changes or in an accident, objects
can slide into the passenger compartment
and endanger the occupants.
f Do not place objects on the retractable
luggage compartment cover or on the fixed luggage compartment cover.
Retractable luggage compartment coverLuggage can be protected against prying eyes
with the retractable luggage compartment cover.
fAlways pull out the retractable luggage
compartment cover when transporting objects
in the luggage compartment.
The retractable luggage compartment cover is
not designed to carry objects.
Pulling out retractable luggage
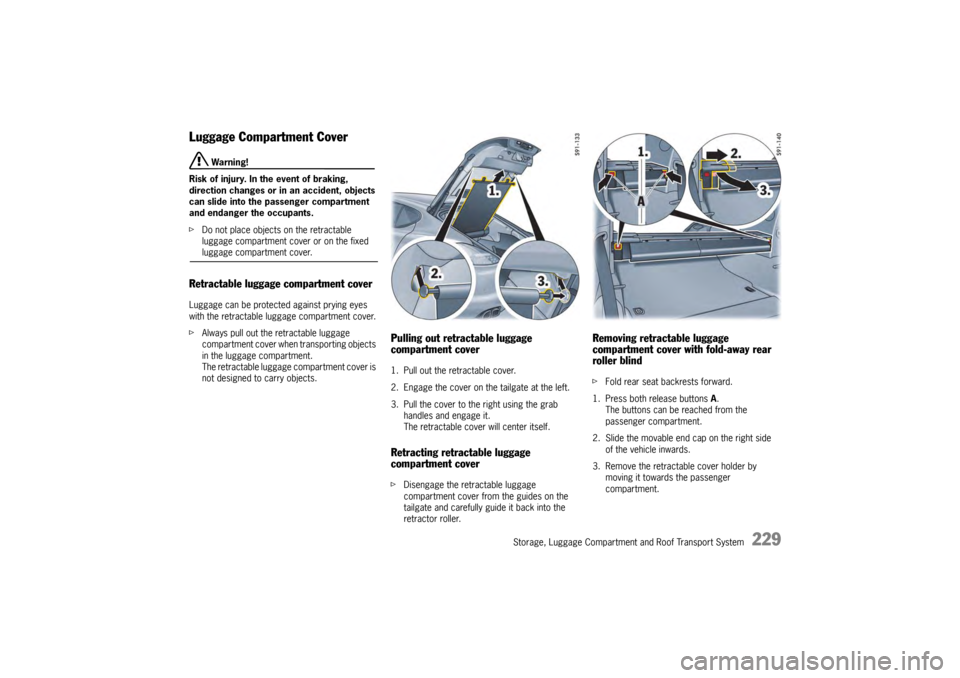
compartment cover1. Pull out the retractable cover.
2. Engage the cover on the tailgate at the left.
3. Pull the cover to the right using the grab
handles and engage it.
The retractable cove r will center itself.Retracting retractable luggage
compartment coverfDisengage the retractable luggage
compartment cover from the guides on the
tailgate and carefully guide it back into the
retractor roller.
Removing retractable luggage
compartment cover with fold-away rear
roller blindf Fold rear seat backrests forward.
1. Press both release buttons A.
The buttons can be reached from the
passenger compartment.
2. Slide the movable end cap on the right side of the vehicle inwards.
3. Remove the retractable cover holder by moving it towards the passenger
compartment.
Page 233 of 343

Storage, Luggage Compartment and Roof Transport System
231
Fixed Luggage Compartment
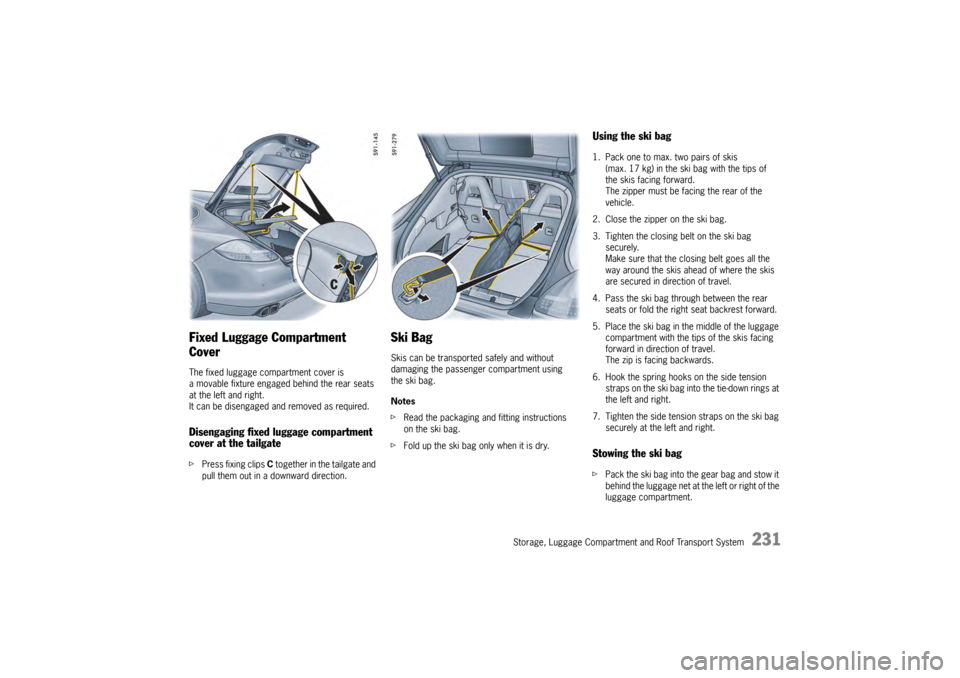
CoverThe fixed luggage compartment cover is
a movable fixture engaged behind the rear seats
at the left and right.
It can be disengaged and removed as required.Disengaging fixed luggage compartment
cover at the tailgatefPress fixing clips C together in the tailgate and
pull them out in a downward direction.
Ski BagSkis can be transported safely and without
damaging the passenger compartment using
the ski bag.
Notes
f Read the packaging and fitting instructions
on the ski bag.
f Fold up the ski bag only when it is dry.
Using the ski bag1. Pack one to max. two pairs of skis
(max. 17 kg) in the ski bag with the tips of
the skis facing forward.
The zipper must be facing the rear of the
vehicle.
2. Close the zipper on the ski bag.
3. Tighten the closing belt on the ski bag securely.
Make sure that the closing belt goes all the
way around the skis ahead of where the skis
are secured in direction of travel.
4. Pass the ski bag through between the rear seats or fold the right seat backrest forward.
5. Place the ski bag in the middle of the luggage compartment with the tips of the skis facing
forward in direction of travel.
The zip is facing backwards.
6. Hook the spring hooks on the side tension straps on the ski bag into the tie-down rings at
the left and right.
7. Tighten the side tension straps on the ski bag securely at the left and right.Stowing the ski bagfPack the ski bag into the gear bag and stow it
behind the luggage net at the left or right of the
luggage compartment.