2009 PORSCHE PANAMERA heating
[x] Cancel search: heatingPage 80 of 343

78
Air Conditioning
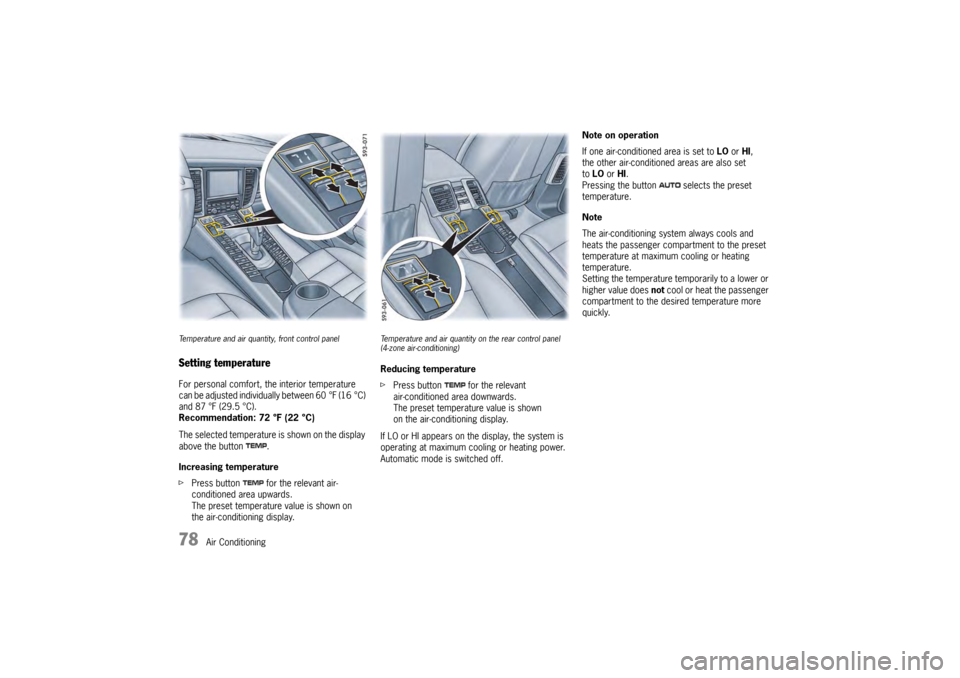
Temperature and air quantity, front control panelSetting temperatureFor personal comfort, the interior temperature
can be adjusted individually between 60 °F (16 °C)
and 87 °F (29.5 °C).
Recommendation: 72 °F (22 °C)
The selected temperature is shown on the display
above the button .
Increasing temperature
f Press button for the relevant air-
conditioned area upwards.
The preset temperature value is shown on
the air-conditioning display.
Temperature and air quantity on the rear control panel
(4-zone air-conditioning)Reducing temperature
fPress button for the relevant
air-conditioned area downwards.
The preset temperature value is shown
on the air-conditioning display.
If LO or HI appears on the display, the system is
operating at maximum coo ling or heating power.
Automatic mode is switched off. Note on operation
If one air-conditioned area is set to LO
or HI,
the other air-conditioned areas are also set
to LO or HI.
Pressing the button selects the preset
temperature.
Note
The air-conditioning system always cools and
heats the passenger compartment to the preset
temperature at maximum cooling or heating
temperature.
Setting the temperature temporarily to a lower or
higher value does not cool or heat the passenger
compartment to the desired temperature more
quickly.
Page 86 of 343

84
Air Conditioning
Extended ventilation panelFor information on the extended ventilation panel:
fPlease see the chapter “EXTENDED
VENTILATION PANEL” on page 81.
Automatic air-recirculation
For information on automatic air-recirculation
mode:
f Please see the chapter “AIR-RECIRCULATION
MODE” on page 74.
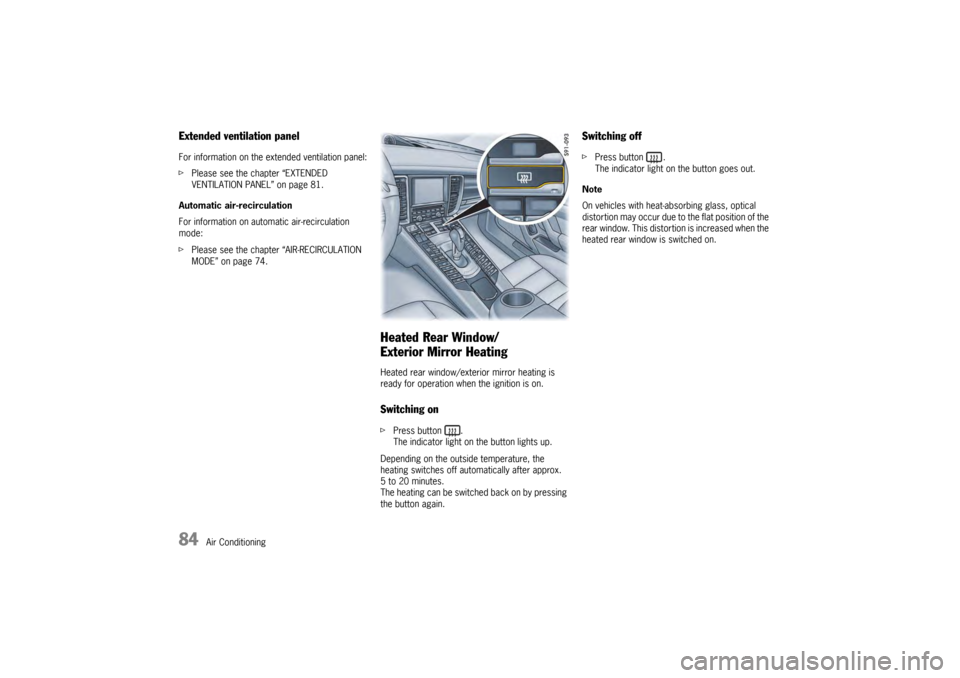
Heated Rear Window/
Exterior Mirror HeatingHeated rear window/exterior mirror heating is
ready for operation when the ignition is on.Switching onfPress button .
The indicator light on the button lights up.
Depending on the outside temperature, the
heating switches off automatically after approx.
5 to 20 minutes.
The heating can be switched back on by pressing
the button again.
Switching offf Press button .
The indicator light on the button goes out.
Note
On vehicles with heat-absorbing glass, optical
distortion may occur due to the flat position of the
rear window. This distortion is increased when the
heated rear window is switched on.
Page 159 of 343

Instrument Panel and Multi-Function Display
157
Fault Fuel indicatorHave the fault corrected at a qualified specialist workshop.*Check fuel tank cap Position tank cap correctly and screw on until it locks securely.Refill washer fluidFasten seat belt All vehicle occupants must fasten their seat belts.Air bag warning light failure Have the fault co rrected at a qualified specialist workshop.*Steering locked The steering wheel lock is faulty.
Have the fault corrected at a q ualified specialist workshop.*Relieve steering Relieve the steering lock by turning the steering wheel to the left
or right.Heated steering wheel on Steering wheel heating is switched onHeated steering wheel off Steering wheel heating is switched offCheck steering oil level For vehicles with PDCC:
Power steering fluid level too low.
Please visit a qualified specialist workshop.*Ignition key not removedIgnition lock fault Have the fault corrected at a qualified specialist workshop.*Key not recognized Make sure that you have the car key with you.Ignition lock faulty Have the fault corrected at a qua lified specialist workshop.*Replace ignition key battery Repla ce the battery in the car key.
Light in
instrument
panel
Warning message on multi-function
display Meaning/Action required
Page 171 of 343

Driving and Driving Safety
169
Auto Start Stop FunctionThe engine stops automatically when the vehicle is
stopped, e.g. at traffic lights or in a traffic jam.
The Auto Start Stop function thus helps to
save fuel.
The ignition stays on even when the engine
switches off automatically. All safety functions
are still available.Stopping the engineThe Auto Start Stop function stops the engine
as soon as the vehicle stops moving.
1. Use the footbrake to hold the vehicle in place.
2. Keep the footbrake pressed.or
Move PDK selector lever to position P.
Preconditions for stopping the engine
– Engine compartment lid closed.
– Driver detected: driver’s seat belt fastened and driver’s door closed.
– PDK selector lever in position D, N or P or
transmission range 1 or 2 selected manually.
– Engine, transmission and battery are at operating temperature.
– Vehicle was driven at a speed of more than approx. 1 mph (2 km/h) for at least
1.5 seconds since the engine last stopped
automatically.
Starting the engineThe Auto Start Stop func tion starts the engine:
f In PDK selector-lever position D, N or manually
selected transmission range 1 or 2:
Release the footbrake.
or
Press the accelerator.
or
f Move PDK selector lever to position R.
You can drive off normally.
Note
The engine will start automatically in certain
situations, e.g. if the vehicle starts rolling, if air
conditioning causes reduced comfort, or if the
brake booster vacuum is reduced.
Starting the engine manually after leaving
the vehicle
If the driver’s seat belt is unbuckled or the driver’s
door is opened after the engine was stopped
automatically, the engine will not start
automatically.
Furthermore, if the brake is released, the engine
has to be started manually.
The message “Please start engine manually”
will appear on the multi-function display in the
instrument panel.
f Please see the chapter “OVERVIEW OF
WARNING MESSAGES” on page 152.
Exceptions for the Auto Start Stop
functionThe Auto Start Stop function is not available in the
following situations, for example:
– When Sport mode is activated.
– When PSM is off.
– In Maneuvering mode.
– When AC MAX mode is activated.
– When the “Windshield defrost” function is active.
– While adjusting the chassis level.
– When the rear fog light is on.
The Auto Start Stop fu nction is available with
limited functionality in the following situations,
for example:
– If the air conditioning or passenger compartment heating is operated at a high
setting or if the defrost function is run for long
time periods.
– If the battery charging condition is low.
– On upward or downward slopes.
– During internal vehicle test procedures, e.g. automatic engine checks.
Note
If one of these situations arises after the engine
has stopped automatically, the engine can be
restarted automatically.
Page 175 of 343

Driving and Driving Safety
173
Brake system warning light
You can check the functionality of the brake
system warning light by switching the ignition to
the “On” position (position 1) and verifying that the
warning light illuminates.
The warning light in the instrument panel lights up.
A message will be displayed on the multi-function
display of the instrument panel if the brake fluid
level is too low, or (if the brake pedal travel has
increased) one of the two brake circuits has failed.
A greater braking pressure will be required,
stopping distances will be longer and the braking
behavior will change, particularly in curves.
With correctly adjusted brakes and a correctly
working brake system, the pedal travel to the
point of brake application should be 1-3/16 in. to
1-9/16 in. (30 to 40 mm). Whenever the brake
pedal travel exceeds this value, have the brake
system checked.
Brake pedal
Warning!
Risk of an accident, resulting in serious
personal injury or death.
Any obstruction of the brake pedal could
increase the stopping distance.
f Always check the movement of the brake pedal
before driving and make sure that it is not
obstructed by a floor mat or any other object.
f Secure the floor mat to prevent it from sliding
into positions that could interfere with the safe
operation of your vehicle.
Your Porsche dealer will be glad to offer you
floor mats of the correct size including a securing possibility.
Note
In case one of the two brake circuits fails,
increased pedal travel is required to bring your
vehicle to a full stop.
Warning!
To avoid overheating and premature wear of
the brakes:
f Before descending a steep grade, reduce
speed and shift the tran smission into a lower
gear to control speed.
f Do not “ride the brakes” by resting your foot on
the pedal when not intending to apply brake
pressure.
f Do not hold the pedal down too long or too
often. This could cause the brakes to overheat and not function properly.
Brake warning light USA
Brake warning light Canada
Page 227 of 343

Storage, Luggage Compartment and Roof Transport System
225
Emptying ashtrays in the doors1. Open the ashtray lid and carefully press it up.
The insert pops up slightly.
2. Remove the insert and empty it.
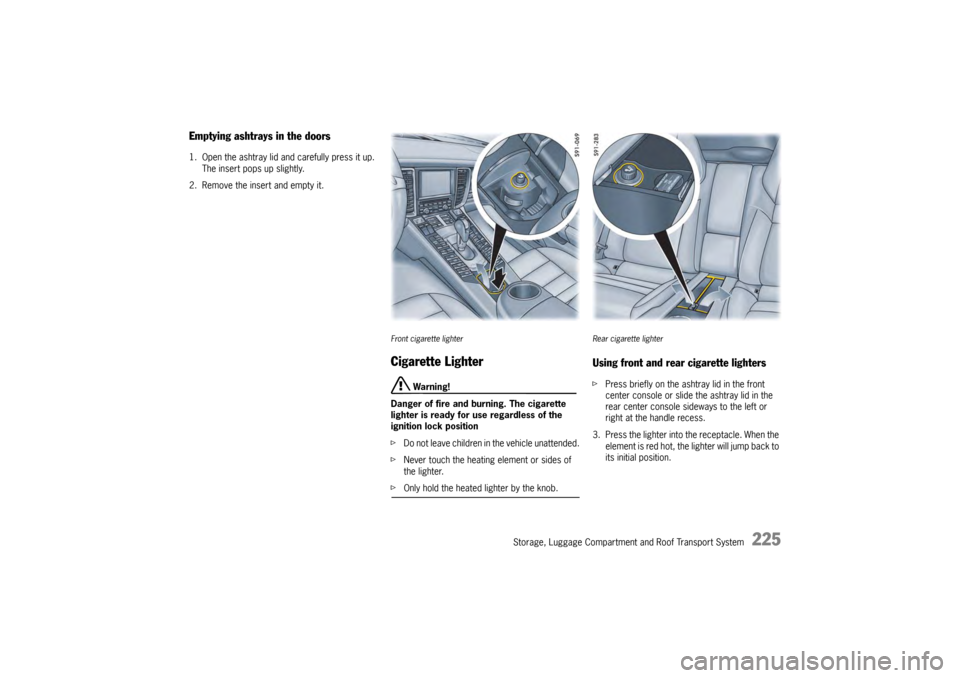
Front cigarette lighterCigarette Lighter
Warning!
Danger of fire and burning. The cigarette
lighter is ready for use regardless of the
ignition lock position
f Do not leave children in the vehicle unattended.
f Never touch the heating element or sides of
the lighter.
fOnly hold the heated lighter by the knob.
Rear cigarette lighterUsing front and rear cigarette lightersf Press briefly on the ashtray lid in the front
center console or slide the ashtray lid in the
rear center console sideways to the left or
right at the handle recess.
3. Press the lighter into the receptacle. When the element is red hot, the lighter will jump back to
its initial position.
Page 230 of 343

228
Storage, Luggage Compartment and Roof Transport System
Stowing Loads
Danger!
Danger of injury. An unsecured or incorrectly
positioned load can slip out of place or
endanger the vehicle occupants during
braking, direction changes or in accidents.
Never transport objects that are not secured.
f Always transport loads in the luggage
compartment, never in the passenger
compartment (e.g. on or in front of the seats).
f Support the load against the seat backrests
wherever possible. Always lock the backrests
into place.
f Only transport heavy objects with the rear seat
backrests upright and engaged.
f Place the load behind unoccupied seats
whenever possible.
f Stow heavy objects as far forward as possible
on the floor, with lightweight objects behind
them.
f Never load the vehicle higher than the top
edge of the seat backrest.
f Always protect the passenger compartment
with a luggage compartment cover. Do not
drive with objects on top of the luggage
compartment cover. f
If the rear seats are not occupied, the
backrests can be addition ally secured with the
seat belts. Simply cro ss the outer seat belts
and insert each into the opposite buckle.
f Make sure that the load cannot damage the
heating filaments and the TV antenna in the
rear window.
Tie-down belts
f Do not use elastic belt s or straps to tie
down a load.
f Do not route belts and straps over
sharp edges.
f Observe the directions for use and information
for the tie-down equipment.
f Use only belts with a tear strength of at least
1543 lbs (700 kg) and a maximum width of
1 in. (25 mm).
f Cross the belts over the load. Driving
f
Vehicle handling changes depending on the
vehicle load. Adapt your driving style to the
changed driving behavior.
f Do not exceed the maximum gross weight
and axle load.
This information can be found under “Technical
data” in this Owner’s Manual:
f Please see the chapter “WEIGHTS” on
page 328.
f Never drive with the tailgate open. Exhaust
gases can enter the passenger compartment.
f Adapt the tire pressure to the load.
After you change the tire pressure, you must
also update the setting for Tire Pressure
Monitoring.
For information on setting Tire Pressure
Monitoring on the multi-function display:
f Please see the chapter “OVERVIEW OF
WARNING MESSAGES” on page 152.
Information on tire pressures for partially and fully
loaded vehicles can be found under “Technical
data” in this Owner’s Manual:
f Please see the chapter “TIRE PRESSURE FOR
COLD TIRES (68 °F/20 °C)” on page 326.
Page 265 of 343

Maintenance and Car Care
263
How Emission Control WorksWhen an automobile engine is running, it uses
energy generated through the combustion of a
mixture of air and fuel. Depending on whether a
car is driven fast or slowly or whether the engine
is cold or hot, some of the fuel (hydrocarbons)
may not be burned completely, but may be
discharged into the engine crankcase or exhaust
system. Additonal hydrocarbons may enter the
atmosphere through evaporation of fuel from the
fuel tank. These hydrocarbons (HC), when
released into the air, co ntribute to undesirable
pollution.
In addition, carbon monoxide (CO) and oxides of
nitrogen (NOx) contribute to engine emissions.
They, too, are formed during the combustion
process and discharged into the exhaust system.
To reduce these pollutants, your Porsche is
equipped with a precisely calibrated fuel injection
system to assure a finely balanced air/fuel mixture
under all operating conditions.
Oxygen sensorThe oxygen sensor, installed in the exhaust pipe
continuously senses the oxygen content of the
exhaust and signals the information to an
electronic control unit. The control unit corrects
the air/fuel ratio, so the engine always receives an
accurately metered air/fuel mixture.Crankcase ventilationThrough crankcase ventilation, undesirable
emissions from the engine crankcase are not
permitted to reach the outside atmosphere. These
emissions are recirculated from the crankcase to
the air intake system. From here the emissions
mix with the intake air an d are later burned in the
engine.Catalytic convertersThe catalytic converters are efficient “clean-up”
devices built into the exhaust system of the
vehicle. The catalytic converters burn the
undesirable pollutants in the exhaust gas before it
is released into the atmosphere.
The exclusive use of unleaded fuel is
critically important for the life of the
catalytic converters. Therefore, only
unleaded fuel must be used. The catalytic converters will be damaged by:
– push or tow starting the vehicle
– misfiring of the engine
– turning off the ignition while the vehicle is
moving or
– driving until the fuel tank is completely empty
– by other unusual operating conditions.
f Do not continue to operate your vehicle under
these conditions, since raw fuel might reach
the catalytic converters. This could result in
overheating of the converters. Federal law
prohibits use of leaded fuel in this car.