2009 PORSCHE PANAMERA headlights
[x] Cancel search: headlightsPage 249 of 343

Alarm System and Theft Protection
247
Alarm System and Passenger
Compartment MonitoringThis device complies with:
Part 15 of the FCC Rules
RSS-210 of Industry Canada.
Operation of this device is subject to the following
two conditions:
– It may not cause harmful interference, and
– it must accept any interference received including interference that may cause
undesired operation.
Note
The manufacturer is not responsible for any radio
or TV interference caused by unauthorized
modifications to this equipment.
Such modification could void the user's authority
to operate the equipment.
Warning!
Any changes or modifications not expressly ap-
proved by Porsche could void the user’s authority
to operate this equipment.
The alarm system monitors the following alarm
contacts:
– Alarm contacts in doors, tailgate, engine compartment lid and headlights
– Interior surveillance: Movement in the interior when the vehicle is locked, e.g. attempted
theft after breaking a window.
– Inclination sensor: Tilting of the vehicle (e.g. attempt to tow away the vehicle).
If one of these alarm contacts is interrupted,
the alarm horn sounds for approx. 30 seconds
and the emergency flasher flashes on and off.
After 5 seconds of interruption, the alarm is
triggered again. This cycle is repeated ten times.Switching onf The alarm system is activated when the vehicle
is locked. Switching offfThe alarm system is deactivated when the
vehicle is unlocked. Note on operation
f
If you unlock the vehicle with the emergency
key in the door lock, you must switch the
ignition on (ignition lock position 1) within
10 seconds of opening the door in order to
prevent the alarm system from being
triggered.
The vehicle is locked ag ain automatically after
20 seconds if no doors are opened.
Switching off the alarm system if it is
triggeredf Unlock vehicle doors with the remote control
or
Switch on ignition.Switching off interior surveillance and
inclination sensorIf people or animals are remaining in the locked
vehicle or the vehicle is being transported on
a train or ship, for example, the interior
surveillance system and inclination sensor must
be switched off temporarily.
f Inform any persons remaining in the vehicle
that the alarm system will be triggered if the
door is opened.
USA: KR55WK50138
Canada: 7812D-5WK50138
Page 261 of 343

Maintenance and Car Care
259
Porsche dealer to do this work as they have
trained workshop personnel and the necessary
parts and tools. Warning!
Brake fluid is hazardous to your health, and
may be fatal if swallowed.
Brake fluid also attacks paintwork.
f Keep brake fluid out of children's reach.
f Immediately rinse off spilled brake fluid with
clean water.
f If brake fluid gets into your eye, immediately
rinse with clean water for a few minutes. Then
see a doctor immediately.
f Please note all the info rmation on the refill container of the brake fluid.
Changing brake fluidBrake fluid absorbs moisture from the air
over time. The absorbed water can impair
braking efficiency.
fIt is important therefore to have the brake fluid
changed in accordance with the change
intervals specified in the “Maintenance”
booklet.
The warning light on the instrument panel and the
warning message on the multi-function display
alert you to the fact that the brake fluid level is
too low and could indicate brake circuit failure
if the pedal travel is greater than normal.
Note on operation
If the warning light and warning message appear
when driving:
f Stop immediately in a suitable place.
f Do not continue driving.
Please contact a qualified specialist workshop.
We recommend that you have an authorized
Porsche dealer to do this work as they have
trained workshop personnel and the necessary
parts and tools.
Washer Fluid We recommend window cleaner concentrates
approved by Porsche for either summer or winter,
depending on the season. Your authorized
Porsche dealer will be pleased to advise you.
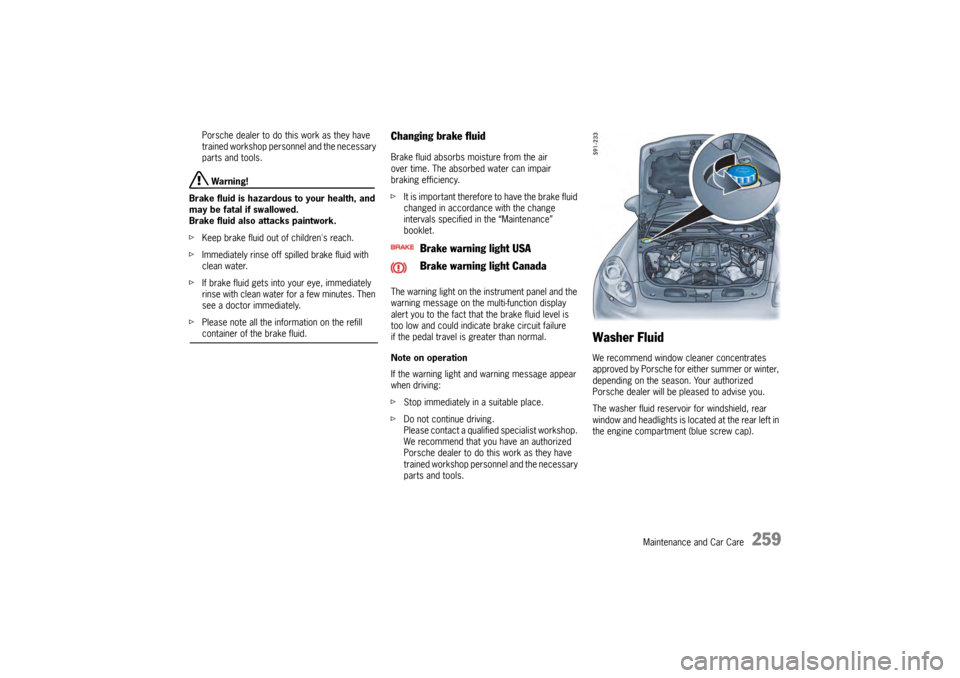
The washer fluid reservoir for windshield, rear
window and headlights is located at the rear left in
the engine compartment (blue screw cap).
Brake warning light USA
Brake warning light Canada
Page 276 of 343

274
Maintenance and Car Care
Cleaning headlights, lights, interior and
exterior plastic components, adhesive
foils, radar sensor for adaptive cruise
control and rearview cameraObserve the following points:
fUse only clean water and a little dishwashing
liquid or interior window cleaner to clean
headlights, lights, plastic components
and surfaces.
Use a soft sponge or a soft, lint-free cloth.
Note
An interior window cleane r can also be used to
clean plastic surfaces (always read the cleaning
instructions on the container!).
We recommend Porsche interior window cleaner.
f Gently wipe the surface without applying
too much pressure.
f Do not clean when dry.
f Never use other chemical cleaners
or solvents.
f Rinse cleaned surfaces with clear water.
Alloy wheelsMetal particles (e.g. brass or copper in brake
dust) must not remain too long on alloy wheels.
Contact corrosion can cause pitting.
Note
Cleaners with an oxide-removing effect or
wrong pH value, as are commonly used for
other metals, as well as mechanical tools and
products, will damage the oxide layer and are
therefore unsuitable.
fUse only cleaners for alloy wheels
(pH value 9.5). Products with the wrong
pH value can destroy the protective layer
on the wheels.
We recommend Porsche cleaner for light
alloy rims.
f If possible, wash the wheels every two weeks
with a sponge or washing brush. If the wheels
are exposed to road salt, grit or industrial dust,
weekly cleaning is necessary.
f Every three months, after cleaning, treat the
wheels with car wax or an acid-free grease
(e.g. Vaseline).
Rub the grease in well with a soft cloth.
f Please see the chapter “CLEANING IN CAR
WASHES” on page 271.
Danger!
Danger of accident resulting in serious
personal injury or death if cleaning agents
(e.g. wheel cleaning agents) come into
contact with the brake discs. The resulting
film on the brake discs can impair braking
performance.
f Make sure that no clea ning agent comes into
contact with the brake discs.
f If cleaning agent has come into contact with
the brake discs, clean the brake discs
thoroughly with a strong jet of water.
f Paying attention to any road users behind you, dry the brake discs by applying the brakes.
Stainless steel tailpipesStainless steel tailpipes can discolor due to
soiling, strong heat and combustion residues.
The original shine can be achieved again using
commercially available metal lustre paste or metal
polish.
Page 279 of 343

Minor Repairs
277
Minor Repairs
Exercise Extreme Caution when Working
on your Vehicle .......
................................... 278
Tires and Wheels..... ................................... 280
Wheel Bolts ................ .............................. 293
Flat Tire .................. ................................... 293
Electrical System .... ................................... 296
Battery ............................................ .......... 303
External Power Supply, Jump-Lead
Starting ........................................... .......... 306
Changing the Remote Co ntrol Battery .......... 307
Replacing Bulbs ...... ................................... 308
Headlights ....................................... .......... 308
Side Turn Signal Ligh t................................. 312
Licence Plate Lights ................................... 313
Side Marker Light .... ................................... 313
Changing Light-Emitting Diodes and
Long-Life Bulbs ......................................... 314
Headlight Adjustment .................................. 314
Towing ........................ .............................. 316
Fire Extinguisher .......................... .............. 321
Page 306 of 343

304
Minor Repairs
Battery carefEnsure that battery is securely mounted.
f Keep terminals and connections clean and
properly tightened. Corrosion can be
prevented by coating the terminals and
connections with petroleum jelly or silicone
spray.
f Ensure that vent caps ar e securely tightened to
prevent spillage.
Checking the electrolyte fluid level
(only on low-maintenance batteries)
Generally, the electrolyte level must be checked
more often in summer than in the winter, and more
often when driving long distances.
f When adding water, use only clean containers.
In no case may alcohol (e.g. window cleaner
residues) be permitted to enter the battery.
f Unscrew and open the filler vent caps of each
cell.
With the car on a level surface, the fluid level
should meet the indicator mark in each cell.
f If necessary, top up with distilled water. Do not
use acid. Only fill up to the mark, otherwise the
electrolyte will overflow when the battery is
being charged and cause damage.
Winter operationDuring the winter months, battery capacity tends
to decrease as temperatures drop. Additionally,
more power is consumed while starting, and the
headlights, heater, rear window defogger, etc.,
are used more frequently.
f Let your Porsche dealer test the battery's
capacity before winter sets in.Vehicle storageIf the car stands for long periods in the garage or
workshop, the doors and lids should be closed.
f Remove the ignition key and, if necessary,
disconnect the battery.
Notes on operation
f When the battery is disconnected, the alarm
system ceases to function.
If the vehicle was locked before the battery
was disconnected, the alarm will be triggered
when the battery is reconnected.
To deactivate the alarm system:
f Lock the vehicle and unlock it again.
Alarm system, central locking
f The status of the central locking and alarm
system is not changed by disconnecting the
battery. Maintenance notes
Even if you put your vehicle out of operation, the
battery still discharges.
The battery will discharge more quickly if your
vehicle is not driven on a daily basis over a
distance of several miles. The more often you
drive your vehicle, and
the longer the distance
driven on each trip, the more opportunity the
vehicle‘s charging system w ill have to recharge the
batteries.
f To preserve its efficiency, charge the battery
about every 6 weeks.
f Check the battery acid level and top off with
distilled water if necessary.
f Store a battery that has been removed in a
dark, cool place, but not subject to freezing.
Page 310 of 343

308
Minor Repairs
Changing the battery (CR 2032, 3V)
1. Remove the emergency key.
2. Lever off the cover on the back of the key
housing using a small screwdriver.
3. Change the battery (check polarity).
4. Re-fit cover and press together firmly.
5. Insert the emergency key.
Replacing Bulbs
Warning!
Risk of serious personal injury or death. The
headlights are under high voltage when
installed.
f Exercise extreme care when working close to
the headlights.
Risk of short circuit.
f Always switch off the relevant load when
changing bulbs.
Risk of damage. Bulbs of a high wattage can
damage the housing.
f Only use the bulbs specified in the bulb chart.
f Bulbs must be clean and free from grease.
f Never touch bulbs with your bare hands.
Use a cloth or soft paper when
replacing bulbs.
f Always carry spare bulbs with you.
In certain countries, it is mandatory to
carry spare bulbs.
Headlights
Caution!
Risk of damage to headlights due to abrasion
and excessive temperatures.
f Do not affix any coverings (e.g. “stone guards”
or films) on or around the headlights.
f Use soapy water only to clean light lenses and
plastic headlight lenses. In no case may
chemical cleaners or other volatile cleaning
fluids be used.
f To prevent scratches, do not rub with a dry or merely moist cloth, tissue or insect sponges.
Note
The headlights can mist up due to temperature
and humidity.
f To ensure optimum ventilation, do not cover
the gap between headlight and body.
Page 311 of 343

Minor Repairs
309
Removing headlights1. Switch off the ignition and remove the ignition
key, or pull out the control unit on vehicles with
Porsche Entry & Drive.
2. Open the engine compartment lid.
3. Take a socket wrench out of the tool kit.
4. Place the socket wrench on the release and turn in direction of arrow until you feel and hear
the headlight being released. 5. Pull headlight approx. 4 in. (10 cm) forward
out of the fender.
6. Press back the releas e tab of the connector A
and pull connector off.
7. Press the release lever on the underside of the rapid-action coupling on the breather hose B
up and pull it off.
8. Pull headlight out completely.
Installing headlights1. Move the headlight release mechanism to unlock position. Insert the headlight into the
guide rails, attach the connector A and
breather hose B and then slide the headlight
fully into the fender.
2. Press the headlight to the rear and simultaneously turn the socket wrench in
direction of arrow. You should feel and hear the
headlight locking mechanism engage.
3. Check that the headlight is seated securely.
4. Remove the socket wrench and place it in the tool kit.
5. Close engine compartment lid.
Page 312 of 343

310
Minor Repairs
Changing bulbs for static cornering light/
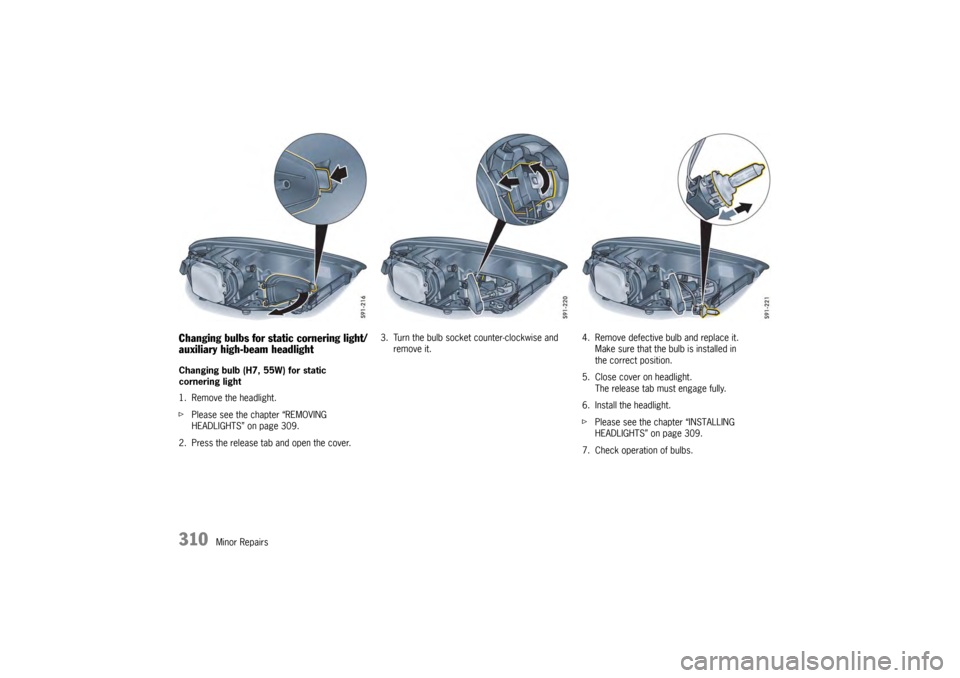
auxiliary high-beam headlight Changing bulb (H7, 55W) for static
cornering light
1. Remove the headlight.
fPlease see the chapter “REMOVING
HEADLIGHTS” on page 309.
2. Press the release tab and open the cover. 3. Turn the bulb socket counter-clockwise and
remove it. 4. Remove defective bulb and replace it.
Make sure that the bulb is installed in
the correct position.
5. Close cover on headlight. The release tab must engage fully.
6. Install the headlight.
f Please see the chapter “INSTALLING
HEADLIGHTS” on page 309.
7. Check operation of bulbs.