2009 PORSCHE CAYMAN ignition
[x] Cancel search: ignitionPage 135 of 284

Instruments, On-Board Computer, Warnings
133
Check Engine
(Emission Control)The emission control system detects malfunctions
early that could, for example, cause increased
pollutant emissions or consequential damage.
Faults are indicated by a continuously lit or
flashing instrument panel warning light.
The faults are recorded in the control unit's fault
memory.
The warning light in the instrument panel lights up
when the ignition is switched on as a bulb check
and goes out approx. 4 seconds after the engine
starts. If the warning light does not light up, have
the bulb replaced promptly.
The warning light in the instrument panel flashes to
indicate operating states (e.g. engine misfiring)
which might cause damage to certain parts of the
emission control system.
fIn this case, immediately reduce the engine
load by easing off the accelerator.
f In order to avoid consequential damage to the
engine or emission control system (e.g. cata-
lytic converter), have the fault diagnosed and
rectified immediately at the nearest authorized
Porsche dealer. If the warning light in the
instrument panel lights up
permanently without flashing before and remains
on while driving, it suggests:
– a potential engine control problem and the need for system service or
– an improperly fastened tank cap or
– the vehicle was refueled while the engine was running.
f Stop immediately at a suitable and secure
place and check tank cap for proper fastening.
If tank cap was fastened correctly, see your au-
thorized Porsche dealer for service as soon as
possible.
Caution!
If the check engine warning light in the in-
strument panel is flashing, serious catalytic
converter damage and power loss will soon
occur.
Prolonged driving with the check engine war-
ning light on could cause damage to the
emission control system. It also could affect
fuel economy and driveability.
f Have the fault remedied at the nearest authorized Porsche dealer immediately.
Warning Light
Page 136 of 284
134
Instruments, On-Board Computer, Warnings
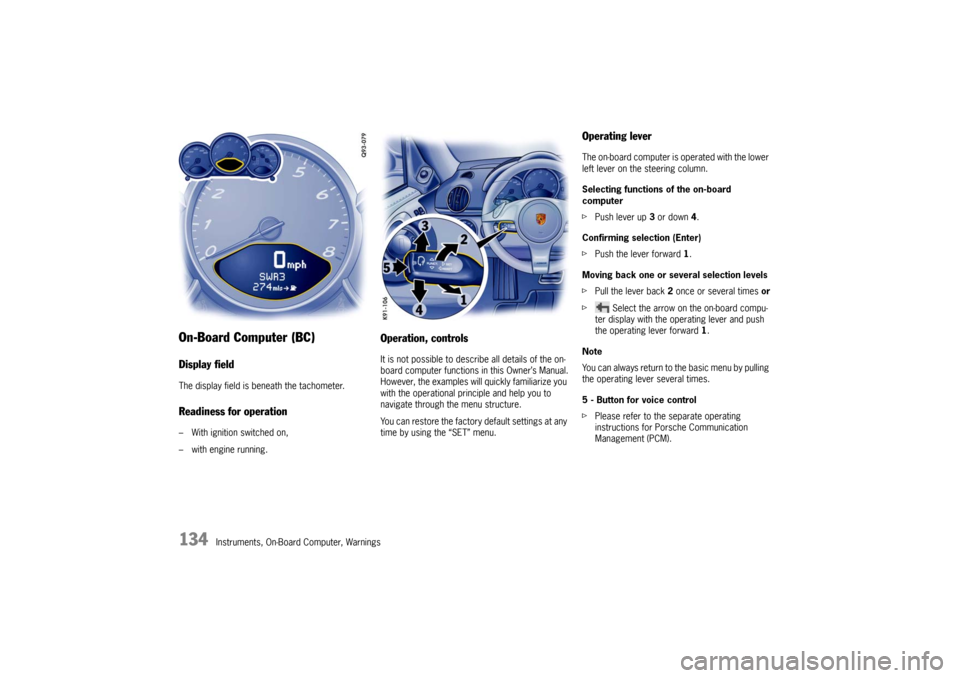
On-Board Computer (BC)Display fieldThe display field is beneath the tachometer.Readiness for operation– With ignition switched on,
– with engine running.
Operation, controlsIt is not possible to describe all details of the on-
board computer functions in this Owner’s Manual.
However, the examples will quickly familiarize you
with the operational principle and help you to
navigate through the menu structure.
You can restore the factory default settings at any
time by using the “SET” menu.
Operating leverThe on-board computer is operated with the lower
left lever on the steering column.
Selecting functions of the on-board
computer
f Push lever up 3 or down 4.
Confirming selection (Enter)
f Push the lever forward 1 .
Moving back one or several selection levels
f Pull the lever back 2 once or several times or
f Select the arrow on the on-board compu-
ter display with the operating lever and push
the operating lever forward 1.
Note
You can always return to the basic menu by pulling
the operating lever several times.
5 - Button for voice control
f Please refer to the separate operating
instructions for Porsche Communication
Management (PCM).
Page 142 of 284
140
Instruments, On-Board Computer, Warnings
INFO
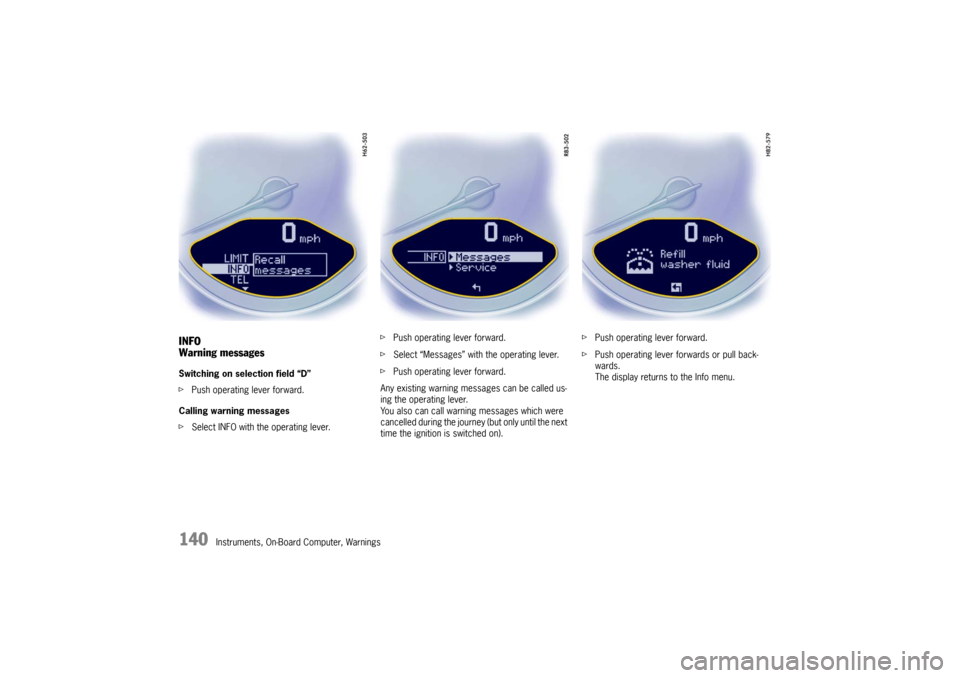
Warning messagesSwitching on selection field “D”
fPush operating lever forward.
Calling warning messages
f Select INFO with the operating lever. f
Push operating lever forward.
f Select “Messages” with the operating lever.
f Push operating lever forward.
Any existing warning messages can be called us-
ing the operating lever.
You also can call warning messages which were
cancelled during the journey (but only until the next
time the ignition is switched on). f
Push operating lever forward.
f Push operating lever forwards or pull back-
wards.
The display returns to the Info menu.
Page 146 of 284
144
Instruments, On-Board Computer, Warnings
CHRONO
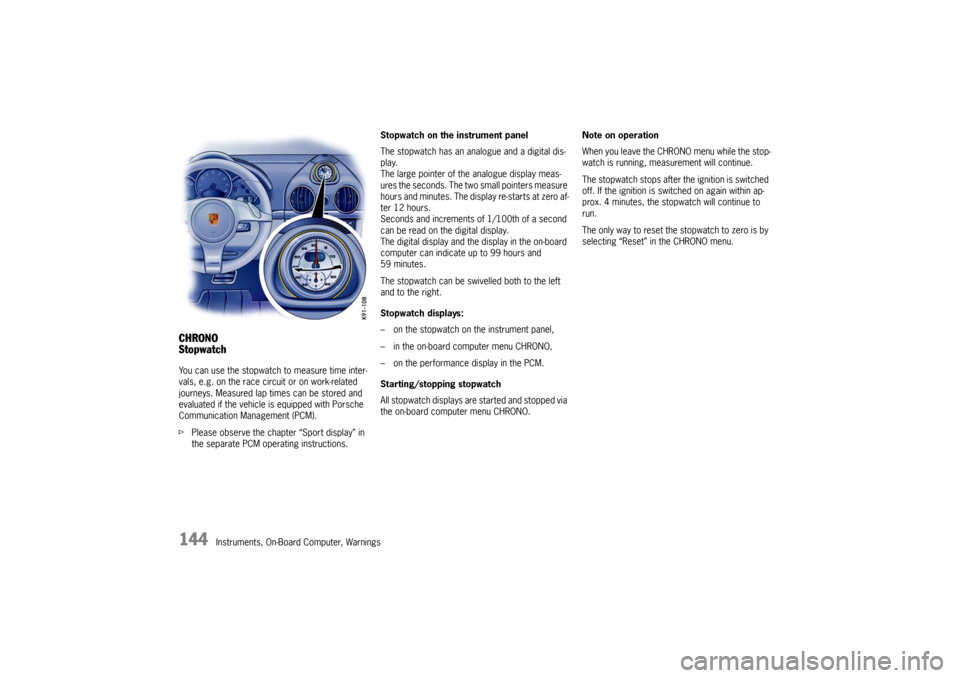
StopwatchYou can use the stopwatch to measure time inter-
vals, e.g. on the race circuit or on work-related
journeys. Measured lap times can be stored and
evaluated if the vehicle is equipped with Porsche
Communication Management (PCM).
fPlease observe the chapte r “Sport display” in
the separate PCM operating instructions. Stopwatch on the instrument panel
The stopwatch has an analogue and a digital dis-
play.
The large pointer of the analogue display meas-
ures the seconds. The two small pointers measure
hours and minutes. The display re-starts at zero af-
ter 12 hours.
Seconds and increments of
1/100th of a second
can be read on the digital display.
The digital display and the display in the on-board
computer can indicate up to 99 hours and
59 minutes.
The stopwatch can be swiv elled both to the left
and to the right.
Stopwatch displays:
– on the stopwatch on the instrument panel,
– in the on-board computer menu CHRONO,
– on the performance display in the PCM.
Starting/stopping stopwatch
All stopwatch displays are started and stopped via
the on-board computer menu CHRONO. Note on operation
When you leave the CHRONO menu while the stop-
watch is running, meas
urement will continue.
The stopwatch stops after the ignition is switched
off. If the ignition is sw itched on again within ap-
prox. 4 minutes, the stopwatch will continue to
run.
The only way to reset the stopwatch to zero is by
selecting “Reset” in the CHRONO menu.
Page 155 of 284
Instruments, On-Board Computer, Warnings
153
The tire pressure to be corrected (refill pressure)
is indicated on the displayed wheel.
Example: If “ –1.5 psi (–0.1 bar)” is displayed,
1.5 psi (0.1 bar) must be added to this tire.
Note
The tire pressure menu can only be called up when
the vehicle is stationary.
Calling up the “Info pressure” display
fPush operating lever forward in order to switch
on the selection field.
f Select “TPM” with the operating lever.
f Push operating lever forward.
The display changes to the tire pressure menu.
f Select “Info pressure” with the operating lever.
f Push operating lever forward.
Note
After the ignition is switch ed on, it can take up to
approx. 1 minute before all tire pressures are
displayed. Dashes (“-.-”) appear instead of the tire
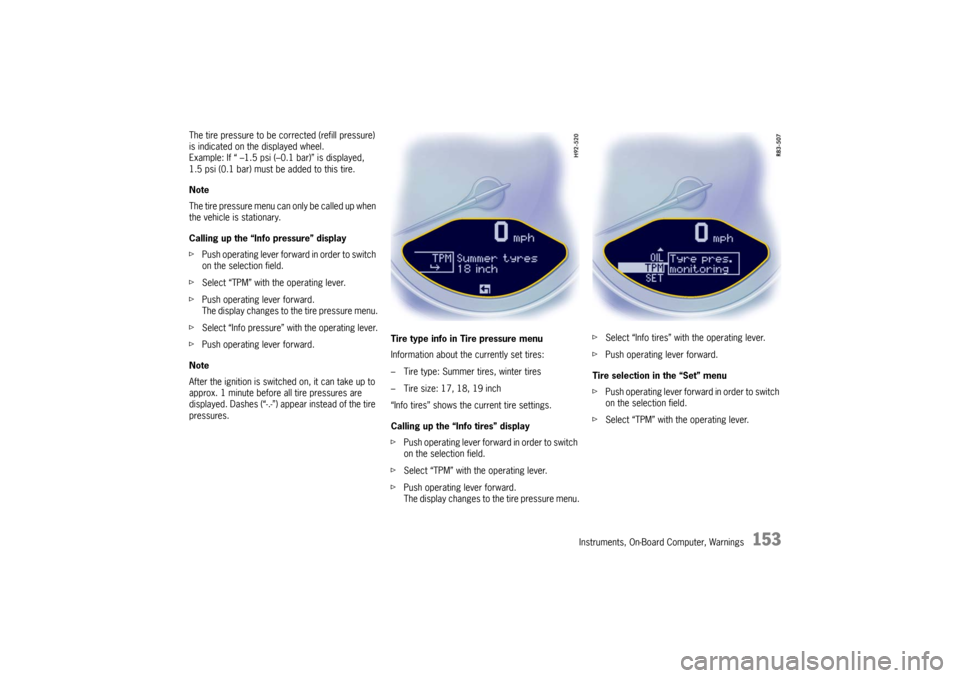
pressures. Tire type info in Tire pressure menu
Information about the currently set tires:
– Tire type: Summer tires, winter tires
– Tire size: 17, 18, 19 inch
“Info tires” shows the current tire settings.
Calling up the “Info tires” display
f
Push operating lever forward in order to switch
on the selection field.
f Select “TPM” with the operating lever.
f Push operating lever forward.
The display changes to the tire pressure menu. f
Select “Info tires” with the operating lever.
f Push operating lever forward.
Tire selection in the “Set” menu
f Push operating lever forward in order to switch
on the selection field.
f Select “TPM” with the operating lever.
Page 159 of 284
Instruments, On-Board Computer, Warnings
157
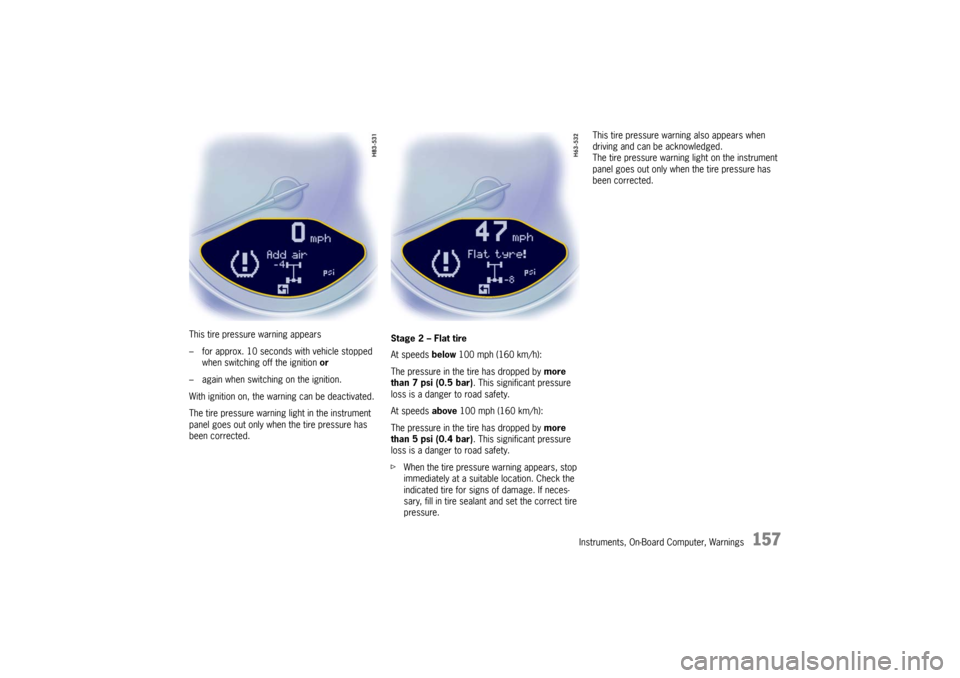
This tire pressure warning appears
– for approx. 10 seconds with vehicle stopped when switching off the ignition or
– again when switching on the ignition.
With ignition on, the warning can be deactivated.
The tire pressure warning light in the instrument
panel goes out only when the tire pressure has
been corrected. Stage 2 – Flat tire
At speeds
below 100 mph (160 km/h):
The pressure in the tire has dropped by more
than 7 psi (0.5 bar) . This significant pressure
loss is a danger to road safety.
At speeds above 100 mph (160 km/h):
The pressure in the tire has dropped by more
than 5 psi (0.4 bar) . This significant pressure
loss is a danger to road safety.
f When the tire pressure warning appears, stop
immediately at a suitable location. Check the
indicated tire for signs of damage. If neces-
sary, fill in tire sealant and set the correct tire
pressure. This tire pressure warning also appears when
driving and can be acknowledged.
The tire pressure warning light on the instrument
panel goes out only when the tire pressure has
been corrected.
Page 160 of 284

158
Instruments, On-Board Computer, Warnings
System learningThe Tire Pressure Monitoring begins to “learn” the
wheels after a wheel change, wheel transmitter
replacement or update of the tire settings. During
this process, the Tire Pressure Monitoring recog-
nizes the tires and their locations.
The on-board computer displayes the message
“TPM is learning, monitoring not act.” .The Tire Pressure Monitoring requires a certain
amount of time to learn the wheels. During this
time, the current tire pressures are not available
on the on-board-computer:
– The tire pressure warning light remains lit until
all wheels have been learned.
– The display of the tire pressure function of the on-board computer shows lines.
– The required pressures for cold tires at 68 °F (20 °C) are indicated in the Info pressure
display in the tire pressure menu.
Position and pressure information is displayed as
soon as the Tire Pressure Monitoring has as-
signed the wheels identified as belonging to the
vehicle to the correct wheel positions.
The wheel learning process takes place
exclusively when the vehicle is being driven
(vehicle speed above 25 km/h (16 mph)).
f Check the tire pressure for all wheels on the
“Info pressure” display.
f Correct the tire pressure to the required
pressure if necessary.
Changing a wheel and replacing tiresfNew wheels must be fitt ed with radio transmit-
ters for the Tire Pressure Monitoring.
Before tires are changed, the battery charge
state of the wheel transmitters should be
checked at an authorized Porsche dealer.
f Switch the ignition off when changing a wheel.
The tire settings on the on-board computer must
be updated after changing a wheel.
If the tire settings are not updated, the message
“Wheel change? Input new TPM settings!” is
displayed on the on-board computer.
f Update the on-board computer settings when
the vehicle is stationary the next time.
Page 164 of 284

162
Instruments, On-Board Computer, Warnings
6. If the segments are fille
d in up to the top line,
the oil level has reached the maximum mark.
Under no circumstances add engine oil. 7. If the bottom segment is filled in, the oil level
has reached the minimum mark.
Add engine oil immediately.
8. If the bottom segment fl ashes, the oil level has
dropped to below the minimum mark.
Add engine oil immediately.
The difference between the minimum and
maximum marks on the segment display is
approx. 1.3 quarts (1.25 litres).
One segment of the display corresponds to a
top-up quantity of approx. 0.42 quarts (0.4 litre).
f Add engine oil if necessary.
Switch off ignition before adding engine oil. f
Please see the chapter “ENGINE OIL LEVEL”
on Page 189.
f Never add more engine oil than required
to reach the maximum mark.
Failure
A failure of the oil level display is indicated by a
warning message on the on-board computer.
“Check engine oil level” display
The on-board computer display “Check engine oil
level” is an additional measurement that takes
place in the background while driving.
The display depends on the distance travelled.
This display appears if th e oil level has reached the
minimum mark or if the o il level is well above the
maximum mark.
This message must be acknowledged by measu-
ring the engine oil leve l manually using the on-
board computer.
f Please see the chapter “INITIATING OIL LEVEL
MEASUREMENT” on Page 161.
If an oil level measurement was initiated manually
on the on-board computer and no oil was topped
up, the message “Check engine oil level” is
displayed again when the vehicle is driven.