2009 PORSCHE CAYMAN ESP
[x] Cancel search: ESPPage 72 of 284
70
Operation, Safety
Parking Aids Parking assistantWhen the driver backs up, the parking assistant
system indicates the distance between the car
and a large obstacle behind it, by means of signal
tones.
Warning!
Risk of serious personal injury or death.
Parking assistant cannot detect small ob-
jects such as children and pets.
Despite use of the parking assistant system,
the driver is still responsible for taking due
care and assessing obstacles when backing
up.
f Make sure that no persons, especially small
children, animals or obstacles are within the maneuvering area.
The parking assistant syst em is activated auto-
matically when reverse gear is selected and the ig-
nition is on.
Note
Be aware that the parkin g assistant system is
not switched on if the car rolls backward without
reverse gear being engaged.
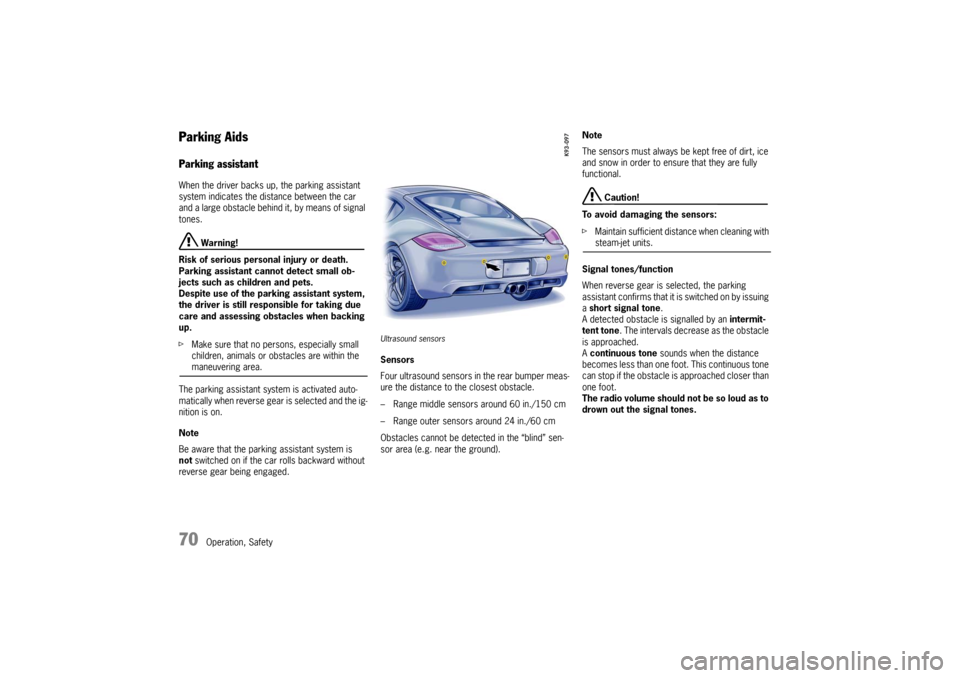
Ultrasound sensors Sensors
Four ultrasound sensors in the rear bumper meas-
ure the distance to the closest obstacle.
– Range middle sensors around 60 in./150 cm
– Range outer sensors around 24 in./60 cm
Obstacles cannot be detected in the “blind” sen-
sor area (e.g. near the ground). Note
The sensors must always be kept free of dirt, ice
and snow in order to ensure that they are fully
functional.
Caution!
To avoid damaging the sensors:
f Maintain sufficient distance when cleaning with steam-jet units.
Signal tones/function
When reverse gear is selected, the parking
assistant confirms that it is switched on by issuing
a short signal tone .
A detected obstacle is signalled by an intermit-
tent tone . The intervals decrease as the obstacle
is approached.
A continuous tone sounds when the distance
becomes less than one foot. This continuous tone
c a n s t o p i f t h e o b s t a c l e i s a p p ro a c h e d c l o s e r t h a n
one foot.
The radio volume should no t be so loud as to
drown out the signal tones.
Page 85 of 284
Operation, Safety
83
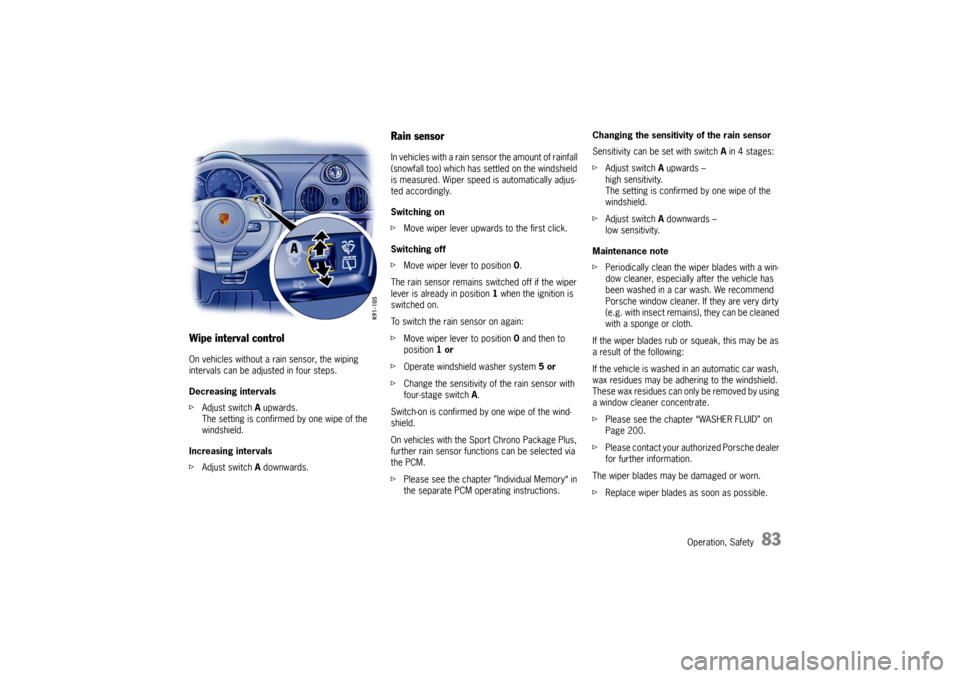
Wipe interval controlOn vehicles without a rain sensor, the wiping
intervals can be adjusted in four steps.
Decreasing intervals
fAdjust switch A upwards.
The setting is confirmed by one wipe of the
windshield.
Increasing intervals
f Adjust switch A downwards.
Rain sensorIn vehicles with a rain sensor the amount of rainfall
(snowfall too) which has se ttled on the windshield
is measured. Wiper speed is automatically adjus-
ted accordingly.
Switching on
f Move wiper lever upwards to the first click.
Switching off
f Move wiper lever to position 0.
The rain sensor remains switched off if the wiper
lever is already in position 1 when the ignition is
switched on.
To switch the rain sensor on again:
f Move wiper lever to position 0 and then to
position 1 or
f Operate windshield washer system 5 or
f Change the sensitivity of the rain sensor with
four-stage switch A.
Switch-on is confirmed by one wipe of the wind-
shield.
On vehicles with the Sport Chrono Package Plus,
further rain sensor functi ons can be selected via
the PCM.
f Please see the chapter ”Individual Memory“ in
the separate PCM operating instructions. Changing the sensitivity of the rain sensor
Sensitivity can be set with switch
A in 4 stages:
f Adjust switch A upwards –
high sensitivity.
The setting is confirmed by one wipe of the
windshield.
f Adjust switch A downwards –
low sensitivity.
Maintenance note
f Periodically clean the wiper blades with a win-
dow cleaner, especially after the vehicle has
been washed in a car wash. We recommend
Porsche window cleaner. If they are very dirty
(e.g. with insect remains), they can be cleaned
with a sponge or cloth.
If the wiper blades rub or squeak, this may be as
a result of the following:
If the vehicle is washed in an automatic car wash,
wax residues may be adhering to the windshield.
These wax residues can only be removed by using
a window cleaner concentrate.
f Please see the chapter “WASHER FLUID” on
Page 200.
f Please contact your auth orized Porsche dealer
for further information.
The wiper blades may be damaged or worn.
f Replace wiper blades as soon as possible.
Page 88 of 284
86
Operation, Safety
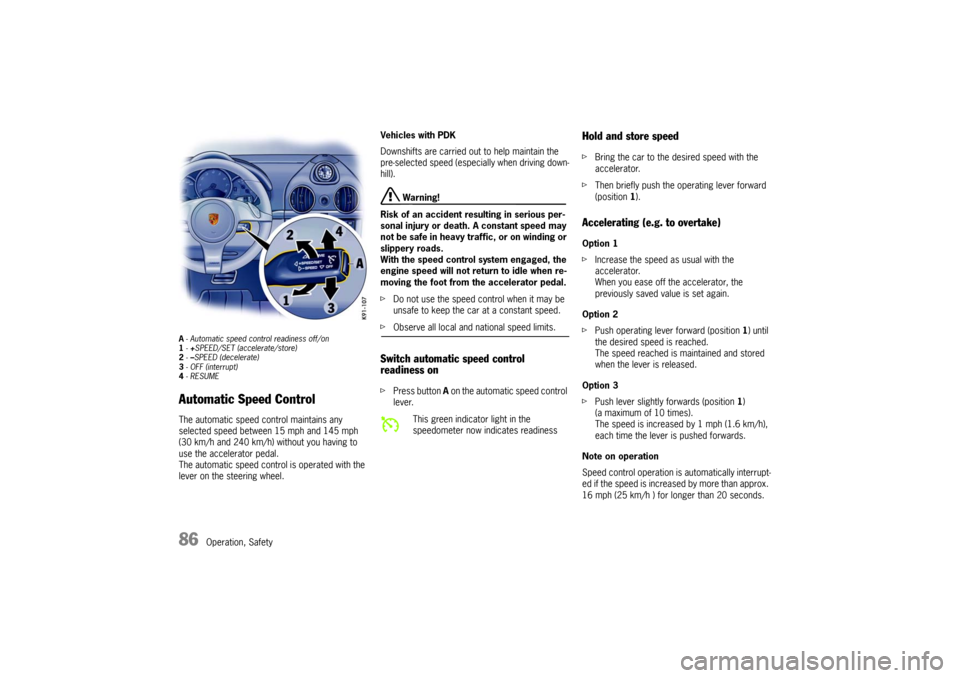
A- Automatic speed control readiness off/on
1 -+SPEED/SET (accelerate/store)
2 -–SPEED (decelerate)
3 - OFF (interrupt)
4 -RESUMEAutomatic Speed Control The automatic speed control maintains any
selected speed between 15 mph and 145 mph
(30 km/h and 240 km/h) without you having to
use the accelerator pedal.
The automatic speed control is operated with the
lever on the steering wheel. Vehicles with PDK
Downshifts are carried out to help maintain the
pre-selected speed (especially when driving down-
hill).
Warning!
Risk of an accident resulting in serious per-
sonal injury or death. A constant speed may
not be safe in heavy traf fic, or on winding or
slippery roads.
With the speed control system engaged, the
engine speed will not return to idle when re-
moving the foot from the accelerator pedal.
f Do not use the speed co ntrol when it may be
unsafe to keep the car at a constant speed.
f Observe all local and national speed limits. Switch automatic speed control
readiness onfPress button A on the automatic speed control
lever.
Hold and store speed f Bring the car to the desired speed with the
accelerator.
f Then briefly push the operating lever forward
(position 1).Accelerating (e.g. to overtake) Option 1
f Increase the speed as usual with the
accelerator.
When you ease off the accelerator, the
previously saved value is set again.
Option 2
f Push operating lever forward (position 1) until
the desired speed is reached.
The speed reached is maintained and stored
when the lever is released.
Option 3
f Push lever slightly forwards (position 1 )
(a maximum of 10 times).
The speed is increased by 1 mph (1.6 km/h),
each time the lever is pushed forwards.
Note on operation
Speed control operation is automatically interrupt-
ed if the speed is increased by more than approx.
16 mph (25 km/h ) for lo nger than 20 seconds.
This green indicator light in the
speedometer now indicates readiness
Page 89 of 284

Operation, Safety
87
Decelerating Option 1
fPull operating lever towards the steering wheel
(position 2) until the desired speed is reached.
The speed reached is maintained and stored
when the lever is released.
Option 2
f Briefly move lever towards the steering wheel
(position 2 ) (a maximum of 10 times).
The speed is reduced by 1 mph (1.6 km/h),
each time the lever is moved towards the
steering wheel.
Vehicles with PDK
Downshifts are carried o ut to improve decelera-
tion (especially when driving downhill).
Interrupting automatic speed control
operation f Pull operating lever downwards briefly
(position 3) or
f Operate brake or clutch pedal or
f Switch PDK to selector lever position N.
f Please see the chapter “PORSCHE DOPPEL-
KUPPLUNG (PDK)” on Page 178.
The speed driven before the interruption remains
stored in the memory.
Automatic speed control operation is
interrupted automatically:
– If the set vehicle speed is exceeded by more than approx. 16 mph (25 km/h) for longer than
20 seconds.
– If the actual vehicle sp eed falls to approx.
37 mph (60 km/h) below the set vehicle speed
for longer than 60 seconds (upward slopes).
– For PSM control operations.
Resuming the stored speed f Briefly push operating lever upwards
(position 4).
The speed control accelerates/decelerates
the vehicle to the stored speed.
The stored speed should only be recalled when
traffic conditions and the road surface so permit.Switching automatic speed control
readiness off f Press button A on the automatic speed control
lever.
The green readiness light in the speedometer
goes off.
Note
The stored speed value is cleared when the
vehicle is parked and the ignition is switched off.
Important note
On upward or downward slopes, the set speed
cannot always be maintained by the automatic
speed control.
f To obtain sufficient engine braking or a better
engine-speed range, a lo wer gear needs to be
selected.
Page 90 of 284
88
Operation, Safety
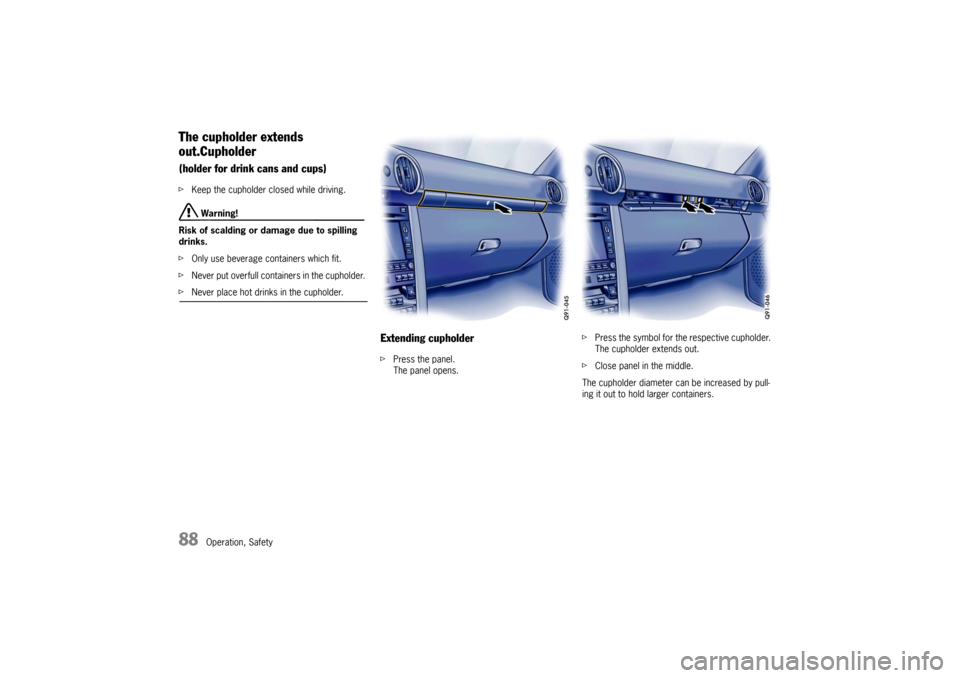
The cupholder extends
out.Cupholder(holder for drink cans and cups)fKeep the cupholder closed while driving.
Warning!
Risk of scalding or da mage due to spilling
drinks.
f Only use beverage containers which fit.
f Never put overfull containers in the cupholder.
fNever place hot drinks in the cupholder.
Extending cupholderfPress the panel.
The panel opens. f
Press the symbol for the respective cupholder.
The cupholder extends out.
f Close panel in the middle.
The cupholder diameter can be increased by pull-
ing it out to hold larger containers.
Page 95 of 284

Operation, Safety
93
A - Opening front luggage compartment lid
B - Opening rear luggage compartment lid Front Luggage Compartment LidUnlocking the lidf Operate pull-button A next to the driver’s seat
or corresponding button of the remote control.
When the lid is open, the luggage compart-
ment is lit.
f Please see the chapter “LOAD SWITCH-OFF AF-
TER 2 HOURS OR 7 DAYS” on Page 236.
f Please see the chapter “KEYS” on Page 15. Important Note
If the vehicle battery is discharged, the front lug-
gage compartment lid can be opened only by con-
necting an external electrical power source.
f
Please see the chapter “EMERGENCY UNLO-
CKING OF THE FRONT LUGGAGE COMPART-
MENT LID” on Page 238.
or the description inside the fuse box lid.
A warning message in the on-board computer
comes on if the lids are not completely closed.
f Fully close the lid.
Opening front luggage compartment lid
Caution!
Risk of damage to lu ggage compartment lid
or windshield wipers.
f Make sure that the windshield wipers are not folded out forwards when opening the lid.
f Raise lid slightly and unlatch the safety catch
with the red lever ( arrow).
Warning message
Page 97 of 284
Operation, Safety
95
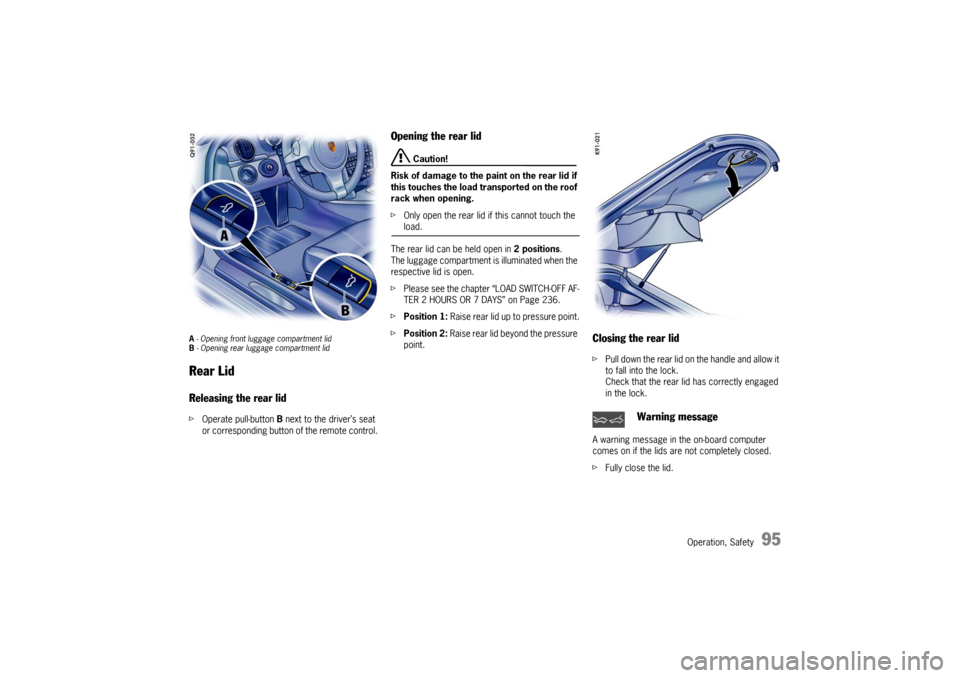
A - Opening front luggage compartment lid
B - Opening rear luggage compartment lid Rear LidReleasing the rear lidf Operate pull-button B next to the driver’s seat
or corresponding button of the remote control.
Opening the rear lid
Caution!
Risk of damage to the paint on the rear lid if
this touches the load transported on the roof
rack when opening.
f Only open the rear lid if this cannot touch the load.
The rear lid can be held open in 2 positions.
The luggage compartment is illuminated when the
respective lid is open.
f Please see the chapter “LOAD SWITCH-OFF AF-
TER 2 HOURS OR 7 DAYS” on Page 236.
f Position 1: Raise rear lid up to pressure point.
f Position 2: Raise rear lid beyond the pressure
point.
Closing the rear lidf Pull down the rear lid on the handle and allow it
to fall into the lock.
Check that the rear lid has correctly engaged
in the lock.
A warning message in the on-board computer
comes on if the lids are not completely closed.
f Fully close the lid.
Warning message
Page 104 of 284

102
Operation, Safety
Fading and drifting
FM range is limited to
about 25 miles (40 km),
except for some high power stations.
If a vehicle is moving aw ay from the desired sta-
tion’s transmitter, the signal will tend to fade and/
or drift. This condition is more prevalent with FM
than AM, and is often ac companied by distortion.
Fading and drifting can be minimized to a certain
degree by careful attention to fine tuning or selec-
tion of a stronger signal.
Static and fluttering
When the line-of-sight link between a transmitter
and vehicle is blocked by large buildings or moun-
tains, the radio sound may be accompanied with
static or fluttering because of the characteristic of
FM.
In a similar effect, a fluttering noise is sometimes
heard when driving along a tree-lined road.
This static and fluttering can be reduced by adjust-
ing the tone control for greater bass response un-
til the disturbance has passed.
Multipath
Because of the reflecting characteristics of FM,
direct and reflected signals may reach the antenna
at the same time (multipath) and cancel each other
out.
As a vehicle moves through these electronic dead
spots, the listener may hear a momentary flutter
or loss of reception. Station swapping
When two FM stations are close to each other, and
an electronic dead spot, such as static or multi-
path area, interrupts the original signal, some-
times the stronger second signal will be selected
automatically until the original one returns.
This swapping can also occur as you drive away
from the selected station and approach another
station of a stronger signal.
Compact disc player
Caution!
To avoid damage to compact disc player and
discs.
f Use only compact discs labeled as shown, hav-
ing no dirt, damage or warpage.
f Never attempt to disassemble or oil any part
of the player unit.
Do not insert any object other than a disc into
the slot.
Remember there are no user-serviceable parts
inside the compact disc player.
f Do not allow the disc to sustain any finger-
prints, scrapes or stickers on the surfaces.
This may cause poor sound quality.
Hold the disc only on the edge or center hole. f
When not in use, take th e disc out of the player,
put the disc back into its case and store it
away from dust, heat, damp and direct
sunlight.
Leaving the disc on the dashboard in the sun
can damage the disc.
f If the disc gets dirty, clean the disc by wiping
the surfaces from the center to the outside in
a radial direction with a soft cloth.
Do not use a conventional record cleaner or
anti-static record preservative.
Disc cleaners are available in audio stores.