2009 PONTIAC TORRENT wiring
[x] Cancel search: wiringPage 72 of 436

Servicing Your Airbag-Equipped
Vehicle
Airbags affect how the vehicle should be serviced.
There are parts of the airbag system in several places
around the vehicle. Your dealer/retailer and the
service manual have information about servicing the
vehicle and the airbag system. To purchase a service
manual, seeService Publications Ordering Information
on page 7-16.
{CAUTION:
For up to 10 seconds after the ignition is turned off
and the battery is disconnected, an airbag can still
in�ate during improper service. You can be injured
if you are close to an airbag when it in�ates. Avoid
yellow connectors. They are probably part of the
airbag system. Be sure to follow proper service
procedures, and make sure the person performing
work for you is quali�ed to do so.
Adding Equipment to Your
Airbag-Equipped Vehicle
Q:Is there anything I might add to or change
about the vehicle that could keep the airbags
from working properly?
A:Yes. If you add things that change the vehicle’s
frame, bumper system, height, front end or side
sheet metal, they may keep the airbag system from
working properly. Changing or moving any parts
of the front seats, safety belts, the airbag sensing
and diagnostic module, steering wheel, instrument
panel, roof-rail airbag modules, ceiling headliner
or pillar garnish trim, overhead console, front
sensors, side impact sensors, rollover sensor
module, or airbag wiring can affect the operation
of the airbag system.
In addition, the vehicle has a passenger sensing
system for the right front passenger position, which
includes sensors that are part of the passenger seat.
1-68
Page 73 of 436

The passenger sensing system may not operate
properly if the original seat trim is replaced with
non-GM covers, upholstery or trim, or with GM
covers, upholstery or trim designed for a different
vehicle. Any object, such as an aftermarket seat
heater or a comfort enhancing pad or device,
installed under or on top of the seat fabric, could also
interfere with the operation of the passenger sensing
system. This could either prevent proper deployment
of the passenger airbag(s) or prevent the passenger
sensing system from properly turning off the
passenger airbag(s). SeePassenger Sensing
System on page 1-63.
If you have any questions, call Customer Assistance.
The phone numbers and addresses for Customer
Assistance are in Step Two of the Customer
Satisfaction Procedure in this manual. SeeCustomer
Satisfaction Procedure on page 7-2.
If the vehicle has rollover roof-rail airbags, see
Different Size Tires and Wheels on page 5-66for
additional important information.Q:Because I have a disability, I have to get my
vehicle modi�ed. How can I �nd out whether
this will affect my airbag system?
A:If you have questions, call Customer Assistance.
The phone numbers and addresses for Customer
Assistance are in Step Two of the Customer
Satisfaction Procedure in this manual. See
Customer Satisfaction Procedure on page 7-2.
In addition, your dealer/retailer and the service manual
have information about the location of the airbag sensors,
sensing and diagnostic module and airbag wiring.
1-69
Page 88 of 436

Lockout Protection
If you press the power door lock switch when the key is
in the ignition and any door is open, all the doors will
lock and only the driver’s door will unlock. Be sure
to remove the key from the ignition when locking
your vehicle.
If the keyless entry transmitter is used to lock the
doors and the key is in the ignition, a chime will sound
three times. All passenger doors will lock, but the driver’s
door will remain unlocked.
Liftgate
{CAUTION:
It can be dangerous to drive with the liftgate or
liftglass open because carbon monoxide (CO) gas
can come into your vehicle. You cannot see or
smell CO. It can cause unconsciousness and even
death. If you must drive with the liftgate open or if
CAUTION: (Continued)
CAUTION: (Continued)
electrical wiring or other cable connections must
pass through the seal between the body and the
liftgate or liftglass:
Make sure all other windows are shut.
Turn the fan on your climate control system to
its highest speed and select the control setting
that will force outside air into your vehicle.
See “Climate Control System” in the Index.
If you have air outlets on or under the
instrument panel, open them all the way.
SeeEngine Exhaust on page 2-35.
To unlock the liftgate, press the unlock button on the
Remote Keyless Entry (RKE) transmitter twice or use
the power door lock switch.
To lock the liftgate, press the lock button on the
RKE transmitter or use the power door lock switch.
The liftgate does not have a key lock cylinder.
To open the liftgate, press the touchpad centered on
the underside of the liftgate handle and pull up.
When closing the liftgate, use the molded handles to
pull the liftgate down. Push the liftgate closed until
it latches.
2-12
Page 152 of 436

Airbag Readiness Light
There is an airbag readiness light on the instrument
panel cluster, which shows the airbag symbol.
The system checks the airbag’s electrical system
for malfunctions. The light tells you if there is an
electrical problem. The system check includes the
airbag sensor, the pretensioners, the airbag modules,
the wiring and the crash sensing and diagnostic module.
For more information on the airbag system, seeAirbag
System on page 1-55.
If the airbag readiness light stays on after you start
the vehicle or comes on when you are driving, your
airbag system may not work properly. Have your vehicle
serviced right away.{CAUTION:
If the airbag readiness light stays on after the
vehicle is started or comes on while driving, it
means the airbag system might not be working
properly. The airbags in the vehicle might not
in�ate in a crash, or they could even in�ate
without a crash. To help avoid injury, have the
vehicle serviced right away.
The airbag readiness light should �ash for a
few seconds when you start the engine. If the light
does not come on then, have it �xed immediately.
If there is a problem with the airbag system, an airbag
Driver Information Center (DIC) message may also come
on. SeeDIC Warnings and Messages on page 3-49for
more information.
3-28
Page 328 of 436

Headlamps, Front Turn Signal,
Sidemarker, and Parking Lamps
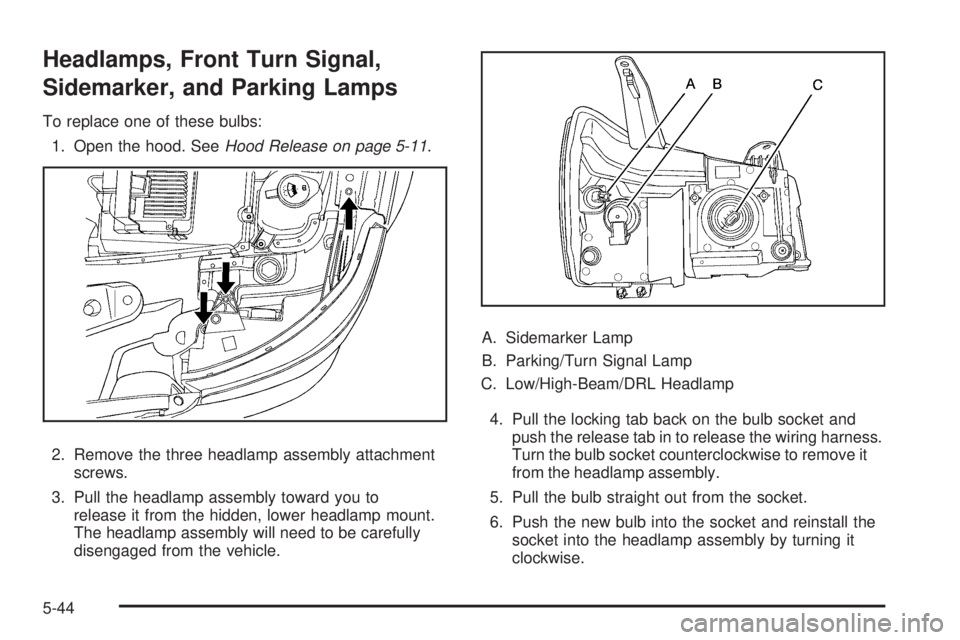
To replace one of these bulbs:
1. Open the hood. SeeHood Release on page 5-11.
2. Remove the three headlamp assembly attachment
screws.
3. Pull the headlamp assembly toward you to
release it from the hidden, lower headlamp mount.
The headlamp assembly will need to be carefully
disengaged from the vehicle.A. Sidemarker Lamp
B. Parking/Turn Signal Lamp
C. Low/High-Beam/DRL Headlamp
4. Pull the locking tab back on the bulb socket and
push the release tab in to release the wiring harness.
Turn the bulb socket counterclockwise to remove it
from the headlamp assembly.
5. Pull the bulb straight out from the socket.
6. Push the new bulb into the socket and reinstall the
socket into the headlamp assembly by turning it
clockwise.
5-44
Page 375 of 436

Electrical System
Add-On Electrical Equipment
Notice:Do not add anything electrical to the
vehicle unless you check with your dealer/retailer
�rst. Some electrical equipment can damage
the vehicle and the damage would not be covered
by the vehicle’s warranty. Some add-on electrical
equipment can keep other components from
working as they should.
Add-on equipment can drain the vehicle battery, even if
the vehicle is not operating.
The vehicle has an airbag system. Before attempting to
add anything electrical to the vehicle, seeServicing
Your Airbag-Equipped Vehicle on page 1-68.
Windshield Wiper Fuses
The windshield wiper motor is protected by a circuit
breaker and a fuse. If the motor overheats due to heavy
snow or ice, the wiper will stop until the motor cools.
If the overload is caused by some electrical problem,
have it �xed.
Fuses and Circuit Breakers
The wiring circuits in the vehicle are protected from
short circuits by fuses and circuit breakers. This greatly
reduces the chance of circuit overload and �re caused
by electrical problems.
The vehicle has an underhood fuse block and an
instrument panel fuse block.
To identify and check fuses, circuit breakers, and relays,
refer to the Fuse Usage Chart on the inside surface
of the fuse panel door.
5-91