2009 PONTIAC TORRENT bulb
[x] Cancel search: bulbPage 1 of 436

Seats and Restraint System............................. 1-1
Front Seats
............................................... 1-2
Rear Seats
..............................................1-10
Safety Belts
.............................................1-12
Child Restraints
.......................................1-31
Airbag System
.........................................1-55
Restraint System Check
............................1-70
Features and Controls..................................... 2-1
Keys
........................................................ 2-3
Doors and Locks
......................................2-10
Windows
.................................................2-14
Theft-Deterrent Systems
............................2-16
Starting and Operating Your Vehicle
...........2-19
Mirrors
....................................................2-36
OnStar
®System
......................................2-38
Storage Areas
.........................................2-42
Sunroof
..................................................2-47
Instrument Panel............................................. 3-1
Instrument Panel Overview
.......................... 3-4
Climate Controls
......................................3-19
Warning Lights, Gages, and Indicators
........3-24
Driver Information Center (DIC)
..................3-42
Audio System(s)
.......................................3-64Driving Your Vehicle....................................... 4-1
Your Driving, the Road, and the Vehicle
....... 4-2
Towing
...................................................4-26
Service and Appearance Care.......................... 5-1
Service
..................................................... 5-3
Fuel
......................................................... 5-5
Checking Things Under the Hood
...............5-10
All-Wheel Drive
........................................5-41
Headlamp Aiming
.....................................5-43
Bulb Replacement
....................................5-43
Windshield Wiper Blade Replacement
.........5-47
Tires
......................................................5-48
Appearance Care
.....................................5-82
Vehicle Identi�cation
.................................5-90
Electrical System
......................................5-91
Capacities and Speci�cations
.....................5-97
Maintenance Schedule..................................... 6-1
Maintenance Schedule
................................ 6-2
Customer Assistance Information.................... 7-1
Customer Assistance and Information
........... 7-2
Reporting Safety Defects
...........................7-15
Vehicle Data Recording and Privacy
...........7-17
Index................................................................ 1
2009 Pontiac Torrent Owner ManualM
Page 131 of 436
Turn Signal/Multifunction Lever
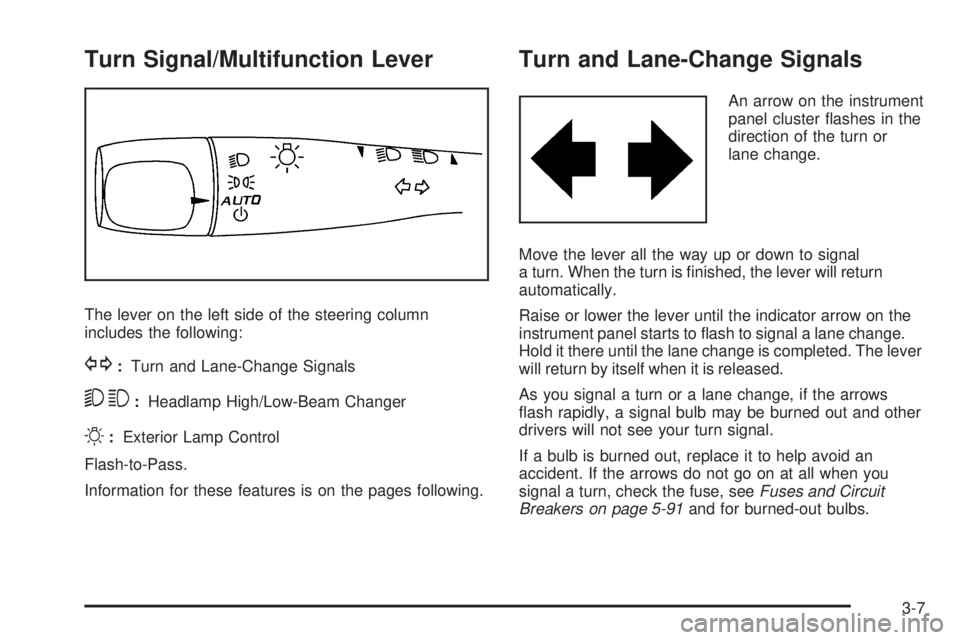
The lever on the left side of the steering column
includes the following:
G:Turn and Lane-Change Signals
53:Headlamp High/Low-Beam Changer
O:Exterior Lamp Control
Flash-to-Pass.
Information for these features is on the pages following.
Turn and Lane-Change Signals
An arrow on the instrument
panel cluster �ashes in the
direction of the turn or
lane change.
Move the lever all the way up or down to signal
a turn. When the turn is �nished, the lever will return
automatically.
Raise or lower the lever until the indicator arrow on the
instrument panel starts to �ash to signal a lane change.
Hold it there until the lane change is completed. The lever
will return by itself when it is released.
As you signal a turn or a lane change, if the arrows
�ash rapidly, a signal bulb may be burned out and other
drivers will not see your turn signal.
If a bulb is burned out, replace it to help avoid an
accident. If the arrows do not go on at all when you
signal a turn, check the fuse, seeFuses and Circuit
Breakers on page 5-91and for burned-out bulbs.
3-7
Page 283 of 436
Making Turns
Notice:Making very sharp turns while trailering
could cause the trailer to come in contact with the
vehicle. The vehicle could be damaged. Avoid
making very sharp turns while trailering.
When turning with a trailer, make wider turns than
normal. Do this so the trailer will not strike soft
shoulders, curbs, road signs, trees or other objects.
Avoid jerky or sudden maneuvers. Signal well in
advance.
Turn Signals When Towing a Trailer
The arrows on the instrument panel �ash whenever
signaling a turn or lane change. Properly hooked up, the
trailer lamps also �ash, telling other drivers the vehicle
is turning, changing lanes or stopping.
When towing a trailer, the arrows on the instrument
panel �ash for turns even if the bulbs on the trailer
are burned out. For this reason you may think other
drivers are seeing the signal when they are not.
It is important to check occasionally to be sure the
trailer bulbs are still working.
Driving On Grades
Reduce speed and shift to a lower gearbeforestarting
down a long or steep downgrade. If the transmission is
not shifted down, the brakes might have to be used so
much that they would get hot and no longer work well.
On a long uphill grade, shift down and reduce the
vehicle’s speed to around 45 mph (70 km/h) to reduce
the possibility of the engine and the transmission
overheating.
Vehicles can tow in D (Drive). Shift the transmission to
a lower gear if the transmission shifts too often under
heavy loads and/or hilly conditions.
When towing at high altitude on steep uphill grades,
consider the following: Engine coolant will boil at a lower
temperature than at normal altitudes. If the engine is
turned off immediately after towing at high altitude on
steep uphill grades, the vehicle may show signs similar to
engine overheating. To avoid this, let the engine run while
parked, preferably on level ground, with the automatic
transmission in P (Park) for a few minutes before turning
the engine off. If the overheat warning comes on, see
Engine Overheating on page 5-28.
4-39
Page 285 of 436
Service............................................................5-3
Accessories and Modi�cations..........................5-3
California Proposition 65 Warning.....................5-4
California Perchlorate Materials Requirements.....5-4
Doing Your Own Service Work.........................5-4
Adding Equipment to the Outside of the
Vehicle......................................................5-5
Fuel................................................................5-5
Gasoline Octane............................................5-5
Gasoline Speci�cations....................................5-6
California Fuel...............................................5-6
Additives.......................................................5-6
Fuels in Foreign Countries...............................5-7
Filling the Tank..............................................5-8
Filling a Portable Fuel Container.....................5-10
Checking Things Under the Hood....................5-10
Hood Release..............................................5-11
Engine Compartment Overview.......................5-12
Engine Oil...................................................5-15
Engine Oil Life System..................................5-18
Engine Air Cleaner/Filter................................5-20
Automatic Transmission Fluid.........................5-22
Cooling System............................................5-22
Engine Coolant.............................................5-23
Engine Overheating.......................................5-28Overheated Engine Protection
Operating Mode........................................5-29
Power Steering Fluid.....................................5-30
Windshield Washer Fluid................................5-31
Brakes........................................................5-32
Battery........................................................5-35
Jump Starting...............................................5-36
All-Wheel Drive..............................................5-41
Headlamp Aiming...........................................5-43
Bulb Replacement..........................................5-43
Halogen Bulbs..............................................5-43
Headlamps, Front Turn Signal, Sidemarker,
and Parking Lamps....................................5-44
Taillamps, Turn Signal, Stoplamps and
Back-up Lamps.........................................5-45
License Plate Lamp......................................5-46
Replacement Bulbs.......................................5-46
Windshield Wiper Blade Replacement..............5-47
Tires..............................................................5-48
Tire Sidewall Labeling...................................5-49
Tire Terminology and De�nitions.....................5-52
In�ation - Tire Pressure.................................5-55
High-Speed Operation...................................5-56
Tire Pressure Monitor System.........................5-57
Section 5 Service and Appearance Care
5-1
Page 327 of 436

To get an accurate reading, the vehicle should be on a
level surface.
If the level is below the bottom of the �ller plug hole,
you’ll need to add some lubricant. Add enough lubricant
to raise the level to the bottom of the �ller plug hole.
A �uid loss could indicate a problem; check and have
it repaired, if needed.
What to Use
Refer to the Maintenance Schedule to determine what
kind of lubricant to use. SeeRecommended Fluids
and Lubricants on page 6-13.
Headlamp Aiming
Headlamp aim has been preset at the factory and
should need no further adjustment.
However, if your vehicle is damaged in a crash, the
headlamp aim may be affected. Aim adjustment to the
low-beam headlamps may be necessary if oncoming
drivers �ash their high-beam headlamps at you
(for vertical aim).
If the headlamps need to be re-aimed, it is
recommended that you take the vehicle to your
dealer/retailer for service.
Bulb Replacement
For the proper type of replacement bulbs, see
Replacement Bulbs on page 5-46.
For any bulb changing procedure not listed in this
section, contact your dealer/retailer.
Halogen Bulbs
{CAUTION:
Halogen bulbs have pressurized gas inside and
can burst if you drop or scratch the bulb. You or
others could be injured. Be sure to read and follow
the instructions on the bulb package.
5-43
Page 328 of 436
Headlamps, Front Turn Signal,
Sidemarker, and Parking Lamps
To replace one of these bulbs:
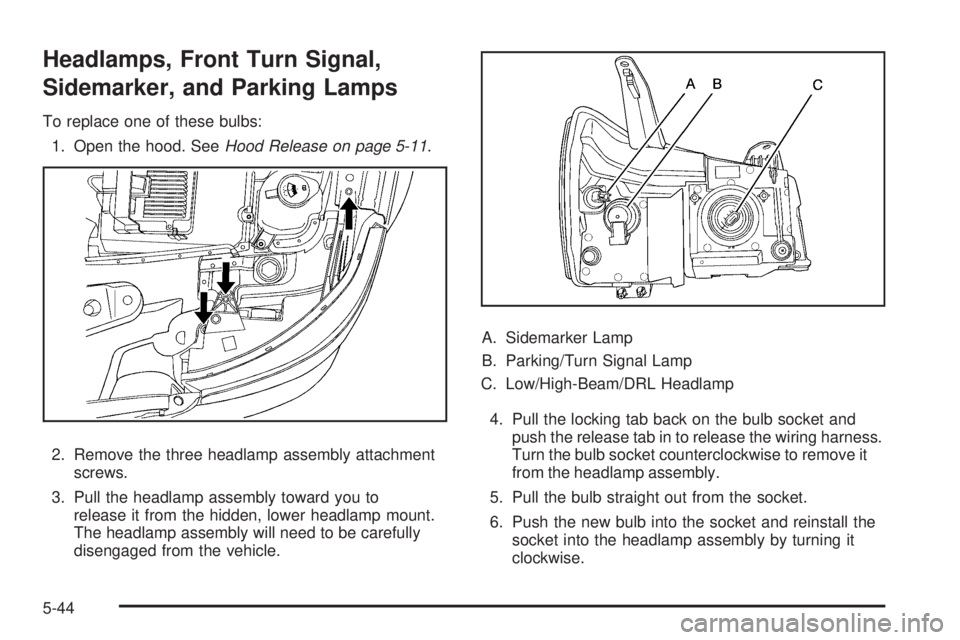
1. Open the hood. SeeHood Release on page 5-11.
2. Remove the three headlamp assembly attachment
screws.
3. Pull the headlamp assembly toward you to
release it from the hidden, lower headlamp mount.
The headlamp assembly will need to be carefully
disengaged from the vehicle.A. Sidemarker Lamp
B. Parking/Turn Signal Lamp
C. Low/High-Beam/DRL Headlamp
4. Pull the locking tab back on the bulb socket and
push the release tab in to release the wiring harness.
Turn the bulb socket counterclockwise to remove it
from the headlamp assembly.
5. Pull the bulb straight out from the socket.
6. Push the new bulb into the socket and reinstall the
socket into the headlamp assembly by turning it
clockwise.
5-44
Page 329 of 436
7. Reconnect the electrical connector.
8. Push the headlamp back into the lower headlamp
mount carefully.
9. Reinstall the three headlamp assembly screws.
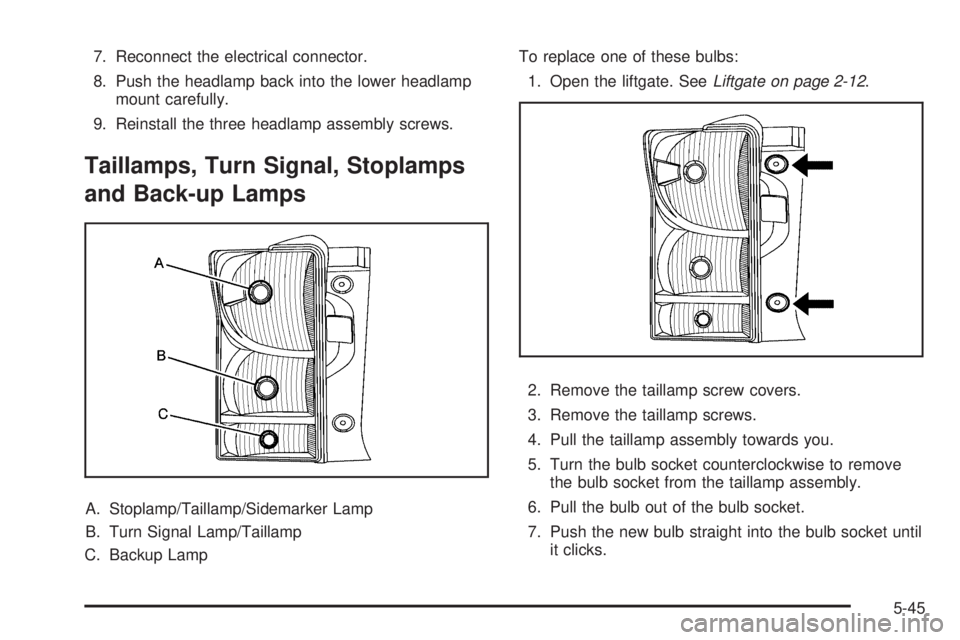
Taillamps, Turn Signal, Stoplamps
and Back-up Lamps
A. Stoplamp/Taillamp/Sidemarker Lamp
B. Turn Signal Lamp/Taillamp
C. Backup LampTo replace one of these bulbs:
1. Open the liftgate. SeeLiftgate on page 2-12.
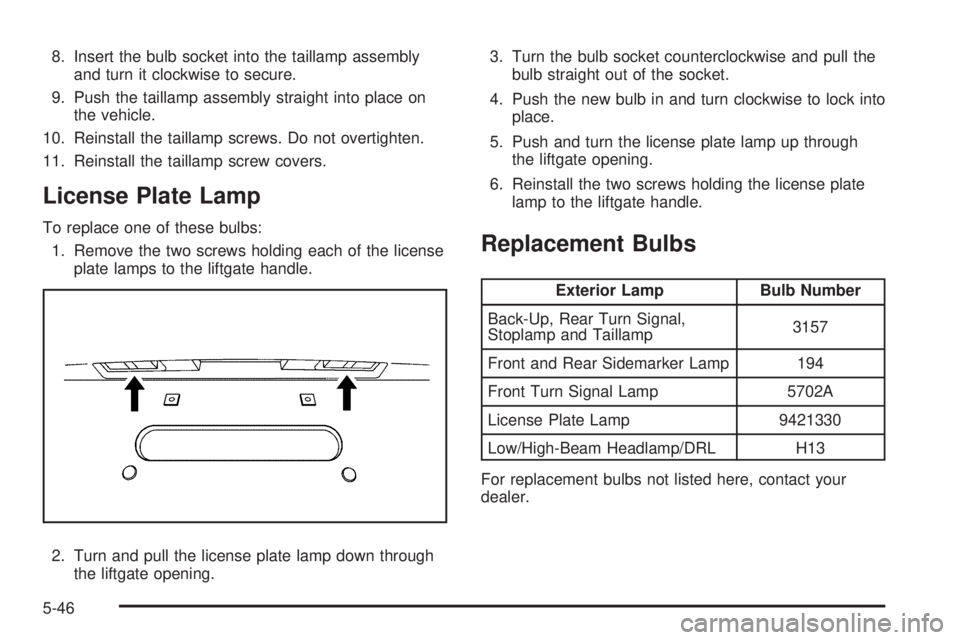
2. Remove the taillamp screw covers.
3. Remove the taillamp screws.
4. Pull the taillamp assembly towards you.
5. Turn the bulb socket counterclockwise to remove
the bulb socket from the taillamp assembly.
6. Pull the bulb out of the bulb socket.
7. Push the new bulb straight into the bulb socket until
it clicks.
5-45
Page 330 of 436
8. Insert the bulb socket into the taillamp assembly
and turn it clockwise to secure.
9. Push the taillamp assembly straight into place on
the vehicle.
10. Reinstall the taillamp screws. Do not overtighten.
11. Reinstall the taillamp screw covers.
License Plate Lamp
To replace one of these bulbs:
1. Remove the two screws holding each of the license
plate lamps to the liftgate handle.
2. Turn and pull the license plate lamp down through
the liftgate opening.3. Turn the bulb socket counterclockwise and pull the
bulb straight out of the socket.
4. Push the new bulb in and turn clockwise to lock into
place.
5. Push and turn the license plate lamp up through
the liftgate opening.
6. Reinstall the two screws holding the license plate
lamp to the liftgate handle.
Replacement Bulbs
Exterior Lamp Bulb Number
Back-Up, Rear Turn Signal,
Stoplamp and Taillamp3157
Front and Rear Sidemarker Lamp 194
Front Turn Signal Lamp 5702A
License Plate Lamp 9421330
Low/High-Beam Headlamp/DRL H13
For replacement bulbs not listed here, contact your
dealer.
5-46