2009 NISSAN XTERRA wheel
[x] Cancel search: wheelPage 202 of 336

AUTOMATIC TRANSMISSION
The ignition lock is designed so the ignition
switch cannot be turned to the LOCK position
and the key removed until the shift selector is
moved to the P (Park) position.
When removing the key from the ignition switch,
make sure the shift selector is in the P (Park)
position.
If the shift selector is not returned to P (Park)
position, the ignition switch cannot be moved to
the LOCK position.To remove the key from the ignition switch:
1. Shift the shift selector to the P (Park) posi-
tion with the ignition switch in the ON posi-
tion.
2. Place the ignition switch in the LOCK posi-
tion.
3. Remove the key from the ignition switch.
If the shift selector is shifted to the P (Park)
position after the ignition switch is turned to the
OFF position or when the ignition switch cannot
be turned to the LOCK position, proceed as
follows to remove the key.
1. Move the shift selector into the P (Park)
position.
2. Turn the ignition switch slightly toward the
ON position.
3. Place the ignition switch in the LOCK posi-
tion.
4. Remove the key.
The shift selector is designed so it cannot moved
out of P (Park) and into any of the other gear
positions if the ignition switch is turned to the
OFF position or if the key is removed from the
switch.The shift selector can be moved if the igni-
tion switch is in the ON position and the
foot brake pedal is depressed.
There is an OFF position between the
LOCK and ACC positions. The OFF position
is indicated by a “1” on the key cylinder.
When the ignition switch is in the OFF
position, the steering wheel is not locked.
In order for the steering wheel to be locked, it
must be turned about 1/8 of a turn clockwise
from the straight up position.
To lock the steering wheel, turn the key to
the LOCK position. Remove the key. To
unlock the steering wheel, insert the key
and turn it gently while rotating the steer-
ing wheel slightly right and left.
If the key will not turn from the LOCK posi-
tion, turn the steering wheel to the left or
right while turning the key to unlock the
key cylinder.
WSD0041
5-10Starting and driving
ZREVIEW COPYÐ2009 Xterra(xtr)
Owners ManualÐUSA_English(nna)
05/21/08Ðdebbie
X
Page 203 of 336

MANUAL TRANSMISSION
The ignition switch includes a device that helps
prevent accidental removal of the key while driv-
ing.
The key can only be removed when the ignition
switch is in the LOCK position.
On manual transmission models, to turn the igni-
tion switch to LOCK position from the ACC or
ON position, turn the ignition switch to OFF, push
the key in, then turn the ignition switch to LOCK.
In order for the steering wheel to be locked, it
must be turned about 1/8 of a turn clockwise
from the straight up position.To lock the steering wheel, turn the ignition
switch to the LOCK position. Remove the
key. To unlock the steering wheel, insert
the key and turn it gently while rotating the
steering wheel slightly right and left.
KEY POSITIONS
LOCK: Normal parking position (0)
OFF: (Not used) (1)
ACC: (Accessories) (2)
This position activates electrical accessories
such as the radio when the engine is not running.
ON: Normal operating position (3)
This position turns on the ignition system and the
electrical accessories.
START: (4)
This position starts the engine. As soon as the
engine has started, release the key. It automati-
cally returns to the ON position.
NISSAN VEHICLE IMMOBILIZER
SYSTEM
The NISSAN Vehicle Immobilizer system will not
allow the engine to start without the use of the
registered key.If the engine fails to start using a registered key
(for example, when interference is caused by
another registered key, an automated toll road
device or automatic payment device on the key
ring) , restart the engine using the following pro-
cedure:
1. Leave the ignition switch in the ON position
for approximately 5 seconds.
2. Place the ignition switch to the OFF or
LOCK position, and wait approximately 10
seconds.
3. Repeat steps 1 and 2.
4. Restart the engine while holding the device
(which may have caused the interference)
separate from the registered key.
If the no start condition re-occurs, NISSAN rec-
ommends placing the registered key on a sepa-
rate key ring to avoid interference from other
devices.
WSD0052
Starting and driving5-11
ZREVIEW COPYÐ2009 Xterra(xtr)
Owners ManualÐUSA_English(nna)
05/21/08Ðdebbie
X
Page 207 of 336

1 (Low gear):
Use this position when climbing steep hills slowly
or slow driving through deep snow, sand or mud,
or for maximum engine braking on steep downhill
grades.
Do not downshift into the 1 position at speeds
over the following and do not exceed the follow-
ing speeds in the 1 position.
2WD:
43 MPH (70 km/h)
4H:
43 MPH (70 km/h)
4LO:
31 MPH (50 km/h)
Shift lock release
If the battery is discharged, the shift selector may
not be moved from the P (Park) position even with
the brake pedal depressed.
To move the shift selector, release the shift lock.
The shift selector can be moved to N (Neutral) .
However, the steering wheel will be locked un-
less the ignition switch is turned to the ON posi-
tion. This allows the vehicle to be moved if the
battery is discharged.
To push the shift lock release, complete the fol-
lowing procedure:1. Turn the ignition switch to the LOCK posi-
tion and remove the key
2. Apply the parking brake.
3. Remove the shift lock release cover as
shown.
4. Insert a small screwdriver in the shift lock
release slot and push down.
5. Move the shift selector to the N (Neutral)
position while holding down the shift lock
release.
6. Turn the ignition switch to the ON position to
unlock the steering wheel. Now the vehicle
may be moved to the desired location.
If the shift selector cannot be moved out of P
(Park) , have a NISSAN dealer check the auto-
matic transmission system as soon as possible.
WARNING
If the selector lever cannot be moved from
the P (Park) position while the engine is
running and the brake pedal is depressed,
the stop lights may not work. Malfunction-
ing stop lights could cause an accident
injuring yourself and others.
LSD0141
Starting and driving5-15
ZREVIEW COPYÐ2009 Xterra(xtr)
Owners ManualÐUSA_English(nna)
05/21/08Ðdebbie
X
Page 209 of 336

MANUAL TRANSMISSION (if so
equipped)
WARNING
cDo not downshift abruptly on slippery
roads. This may cause a loss of control.
cDo not over-rev the engine when shift-
ing to a lower gear. This may cause a
loss of control or engine damage.
CAUTION
cDo not rest your foot on the clutch pedal
while driving. This may cause clutch
damage.
cFully depress the clutch pedal before
shifting to help prevent transmission
damage.
cStop your vehicle completely before
shifting into R (Reverse) .
cWhen the vehicle is stopped with the
engine running (for example, at a stop
light) , shift to N (Neutral) and release
the clutch pedal with the foot brake
applied.
Shifting
To change gears, or when upshifting or down-
shifting, depress the clutch pedal fully, shift into
the appropriate gear, then release the clutch
slowly and smoothly.
To ensure smooth gear changes, fully depress
the clutch pedal before operating the shift selec-
tor. If the clutch pedal is not fully depressed
before the transmission is shifted, a gear noise
may be heard. Transmission damage could oc-
cur.
Start the vehicle in 1st gear and shift to 2nd, 3rd,
4th, 5th and 6th gear in sequence according to
vehicle speed.To back up depress the shift selector and then
move it to the R (Reverse) position after stopping
the vehicle completely.
If it is difficult to move the shift selector into R
(Reverse) or 1 (First) , shift into N (Neutral) , then
release the clutch pedal. Fully depress the clutch
pedal again and shift into R (Reverse) or 1 (First) .
If your vehicle is equipped with 4-wheel drive, see
“Transfer case shifting procedures” later in this
section.
Suggested upshift speeds
The following are suggested vehicle speeds for
shifting into a higher gear. These suggestions
relate to fuel economy and vehicle performance.
Actual upshift speeds will vary according to road
conditions, the weather and individual driving
habits.
cTwo-wheel drive models and four-wheel
drive models (2H and 4H position):
GEAR CHANGE MPH (km/h)
1st to 2nd 11 (18)
2nd to 3rd 17 (27)
3rd to 4th 25 (40)
4th to 5th 32 (51)
5th to 6th 45 (72)
LSD0148
Starting and driving5-17
ZREVIEW COPYÐ2009 Xterra(xtr)
Owners ManualÐUSA_English(nna)
05/21/08Ðdebbie
X
Page 210 of 336
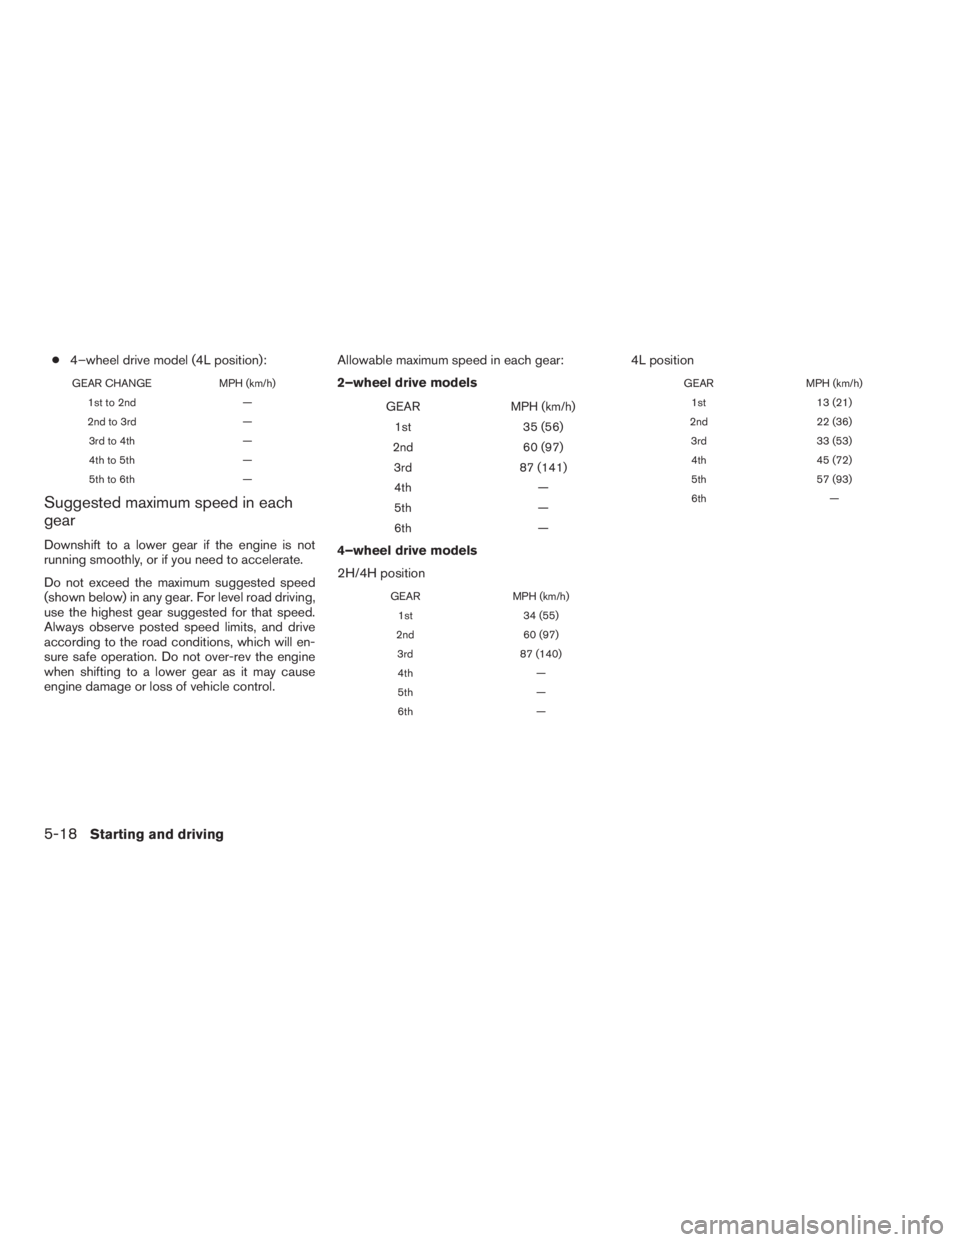
c4–wheel drive model (4L position):
GEAR CHANGE MPH (km/h)
1st to 2nd —
2nd to 3rd —
3rd to 4th —
4th to 5th —
5th to 6th —
Suggested maximum speed in each
gear
Downshift to a lower gear if the engine is not
running smoothly, or if you need to accelerate.
Do not exceed the maximum suggested speed
(shown below) in any gear. For level road driving,
use the highest gear suggested for that speed.
Always observe posted speed limits, and drive
according to the road conditions, which will en-
sure safe operation. Do not over-rev the engine
when shifting to a lower gear as it may cause
engine damage or loss of vehicle control.Allowable maximum speed in each gear:
2–wheel drive models
GEAR MPH (km/h)
1st 35 (56)
2nd 60 (97)
3rd 87 (141)
4th —
5th —
6th —
4–wheel drive models
2H/4H position
GEAR MPH (km/h)
1st 34 (55)
2nd 60 (97)
3rd 87 (140)
4th —
5th —
6th —
4L position
GEAR MPH (km/h)
1st 13 (21)
2nd 22 (36)
3rd 33 (53)
4th 45 (72)
5th 57 (93)
6th —
5-18Starting and driving
ZREVIEW COPYÐ2009 Xterra(xtr)
Owners ManualÐUSA_English(nna)
05/21/08Ðdebbie
X
Page 212 of 336

1. ACCEL/RES switch
2. COAST/SET switch
3. ON/OFF switch
4. CANCEL switch
PRECAUTIONS ON CRUISE
CONTROL
cIf the cruise control system malfunctions, it
cancels automatically. The SET indicator
light in the instrument panel then blinks to
warn the driver.
cIf the SET indicator light blinks, turn the
cruise control main switch off and have the
system checked by a NISSAN dealer.cThe SET indicator light may blink when the
cruise control main switch is turned ON
while pushing the ACCEL/RES, COAST/
SET, or CANCEL switch (located on the
steering wheel) . To properly set the cruise
control system, use the following proce-
dures.
WARNING
Do not use the cruise control when driving
under the following conditions:
cWhen it is not possible to keep the
vehicle at a set speed.
cIn heavy traffic or in traffic that varies in
speed.
cOn winding or hilly roads.
cOn slippery roads (rain, snow, ice, etc.) .
cIn very windy areas.
Doing so could cause a loss of vehicle
control and result in an accident.
CAUTION
On manual transmission models, do not
shift into N (Neutral) without depressing
the clutch pedal when the cruise control is
set. Should this occur, depress the clutch
pedal and turn the main switch off imme-
diately. Failure to do so may cause engine
damage.
CRUISE CONTROL OPERATIONS
The cruise control allows driving at a speed be-
tween 25 - 89 MPH (40 - 144 km/h) without
keeping your foot on the accelerator pedal.
To turn on the cruise control,push the main
switch. The CRUISE indicator light in the instru-
ment panel comes on.
To set cruising speed,accelerate the vehicle to
the desired speed, push the COAST/SET switch
and release it. The SET indicator light in the
instrument panel comes on. Take your foot off the
accelerator pedal. Your vehicle maintains the set
speed.
cTo pass another vehicle,depress the ac-
celerator pedal. When you release the
pedal, the vehicle returns to the previously
set speed.
WSD0153
CRUISE CONTROL
5-20Starting and driving
ZREVIEW COPYÐ2009 Xterra(xtr)
Owners ManualÐUSA_English(nna)
05/21/08Ðdebbie
X
Page 214 of 336

cAccelerate slowly and smoothly. Maintain
cruising speeds with a constant accelerator
position.
cDrive at moderate speeds on the highway.
Driving at high speed lowers fuel economy.
cAvoid unnecessary stopping and braking.
Maintain a safe distance behind other ve-
hicles.
cUse a proper gear range which suits road
conditions. On level roads, shift into high
gear as soon as possible.
cAvoid unnecessary engine idling.
cKeep your engine tuned up.
cFollow the recommended periodic mainte-
nance schedule.
cKeep the tires inflated to the correct pres-
sure. Low tire pressure increases tire wear
and lowers fuel economy.
cKeep the front wheels in correct alignment.
Improper alignment increases tire wear and
lowers fuel economy.
cAir conditioner operation lowers fuel
economy. Use the air conditioner only when
necessary.cWhen cruising at highway speeds, it is more
economical to use the air conditioner and
leave the windows closed to reduce drag.
cFor vehicles equipped with
, use 4H
or 4L position only when necessary. Four-
wheel drive operation lowers fuel economy.
WARNING
cFor 4WD equipped vehicles, do not at-
tempt to raise two wheels off the
ground and shift the transmission to
any drive or reverse position with the
engine running. Doing so may result in
drivetrain damage or unexpected ve-
hicle movement which could result in
serious vehicle damage or personal
injury.
cDo not attempt to test a 4WD equipped
vehicle on a 2-wheel dynamometer
(such as the dynamometers used by
some states for emissions testing) , or
similar equipment even if the other two
wheels are raised off the ground. Make
sure you inform test facility personnel
that your vehicle is equipped with 4WD
before it is placed on a dynamometer.
Using the wrong test equipment may
result in drivetrain damage or unex-
pected vehicle movement which could
result in serious vehicle damage or per-
sonal injury.
INCREASING FUEL ECONOMYUSING FOUR WHEEL DRIVE
(4WD)
5-22Starting and driving
ZREVIEW COPYÐ2009 Xterra(xtr)
Owners ManualÐUSA_English(nna)
05/22/08Ðtbrooks
X
Page 216 of 336

2WD or 4WD shift procedure:
4WD Shift Switch
PositionWheels
DrivenIndicator Light
Use Conditions 4WD Shift Procedure
4WD shift Transfer 4LO position
2WDRear wheels
For driving on dry, paved
roads (Economy drive) or
state dynamometer I/M
testingMove the 4WD switch.
2WD <—> 4H
4WD shift indicator light will indicate transfer shift position en-
gaged.
4H4 wheels
For driving on rocky, sandy
or snow-covered roads
Neutral
*1
May blinkNeutral disengages the au-
tomatic transmission me-
chanical parking lock,
which will allow the vehicle
to roll. Do not leave the
transfer shift position in
Neutral.*21. Stop the vehicle.
2. For automatic transmission vehicles: Shift the shift selec-
tor to the (N) position with the brake pedal depressed.
For manual transmission vehicles: Shift the shift selector
to the (N) position with the clutch depressed.
3. For automatic transmission vehicles: Depress and turn
the 4WD shift switch to 4LO or 4H with the brake pedal
depressed.
For manual transmission vehicles: Depress and turn the
4WD switch to 4LO or 4H with the clutch pedal de-
pressed.
THE TRANSFER CASE DOES NOT ENGAGE BETWEEN 4H
AND 4LO (OR 4LO TO 4H) UNLESS YOU HAVE FIRST
STOPPED THE VEHICLE, DEPRESSED THE BRAKE PEDAL
AND MOVED THE SHIFT SELECTOR TO NEUTRAL FOR
AUTOMATIC TRANSMISSION VEHICLES. FOR MANUAL
TRANSMISSION VEHICLES YOU MUST MOVE THE SHIFT
SELECTOR TO NEUTRAL. *3
4LO
4 wheels
IlluminatedFor use when maximum
power and traction is re-
quired (for example: on
steep grades or rocky,
sandy, muddy roads)
*1: Before moving the shift selector from neutral, wait until the 4LO indicator light stays on steady. This indicates that the 4WD shift procedure is completed
and the transfer gear is correctly set in the 4LO position. If the vehicle is shifted into gear before the indicator is on steady, the transfer gear may grind,
not engage correctly or stay in the neutral position.
- If the 4WD warning light illuminates, perform the following procedure to return the transfer case to correct operating condition.
5-24Starting and driving
ZREVIEW COPYÐ2009 Xterra(xtr)
Owners ManualÐUSA_English(nna)
05/21/08Ðdebbie
X