Page 244 of 305

CHANGING ENGINE OIL FILTER
1. Park the vehicle on a level surface and apply
the parking brake.
2. Turn the engine off.
3. Place a large drain pan under the oil filter
�C
HR16DE and MR18DE engine models.
4. Loosen the oil filter with an oil filter wrench
by turning it counterclockwise. Then remove
the oil filter by turning it by hand.
CAUTION
Be careful not to burn yourself. The engine
oil may be hot.
5. Wipe the engine oil filter sealing surface with
a clean rag.
CAUTION
Be sure to remove any old gasket material
remaining on the sealing surface of the
engine. Failure to do so could lead to
engine damage.
6. Coat the gasket on the new filter with clean
engine oil.
7. Screw on the oil filter until a slight resistance
is felt, then tighten an additional 2/3 turn.
8. Start the engine and check for leakage
around the oil filter. Correct as required.
9. Turn the engine off and wait more than 10
minutes. Check the oil level. Add engine oil if
necessary.
HR16DE engine
�AOil filler cap
�BOil drain plug
�COil filter
LDI0608
MR18DE engine
�AOil filler cap
�BOil drain plug
�COil filter
WDI0521
8-12Maintenance and do-it-yourself
�REVIEW COPY—2009 Versa(vrs)
Owners Manual—USA_English(nna)
09/10/08—debbie
�
Page 247 of 305

For further brake and clutch fluid specification
information, refer to “Capacities and recom-
mended fuel/lubricants” in the “Technical and
consumer information” section of this manual.
WARNING
●Use only new fluid from a sealed con-
tainer. Old, inferior or contaminated
fluid may damage the brake and clutch
systems. The use of improper fluids can
damage the brake system and affect
the vehicle’s stopping ability.
●Clean the filler cap before removing.
●Brake and clutch fluid is poisonous and
should be stored carefully in marked
containers out of reach of children.
CAUTION
Do not spill the fluid on any painted sur-
faces. This will damage the paint. If fluid is
spilled, immediately wash the surface
with water.
BRAKE FLUID
Check the brake fluid level in the reservoir. If the
fluid level is below the MIN line
�1or the brake
warning light comes on, add Genuine NISSAN
Brake Fluid or equivalentDOT 3fluid up to the
MAX line
�2. If fluid must be added frequently,
the system should be checked by a NISSAN
dealer.
CLUTCH FLUID
Check the clutch fluid level in the reservoir
(manual transmissions only) . If the fluid level is
below the MIN line
�1, add Genuine NISSAN
Brake Fluid or equivalentDOT 3fluid up to the
MAX line
�2. If fluid must be added frequently,
the system should be checked by a NISSAN
dealer.
SDI1958SDI1958
BRAKE AND CLUTCH FLUID
Maintenance and do-it-yourself8-15
�REVIEW COPY—2009 Versa(vrs)
Owners Manual—USA_English(nna)
09/10/08—debbie
�
Page 254 of 305

Rear window wiper blade
Contact a NISSAN dealer if checking or replace-
ment is required.If the brakes do not operate properly, have the
brakes checked by a NISSAN dealer.Self-adjusting brakes
Your vehicle is equipped with self-adjusting
brakes.
The front and rear disc-type brakes self-adjust
every time the brake pedal is applied.
WARNING
See a NISSAN dealer for a brake system
check if the brake pedal height does not
return to normal.
Brake pad wear indicators
The disc brake pads on your vehicle have audible
wear indicators. When a brake pad requires re-
placement, a high pitched scraping or screech-
ing sound will be heard when the vehicle is in
motion. The noise will be heard whether or not the
brake pedal is depressed. Have the brakes
checked as soon as possible if the wear indicator
sound is heard.
Under some driving or climate conditions, occa-
sional brake squeak, squeal or other noise may
be heard. Occasional brake noise during light to
moderate stops is normal and does not affect the
function or performance of the brake system.Proper brake inspection intervals should
be followed.For more information regarding
brake inspections, see the appropriate mainte-
nance schedule information in the “NISSAN Ser-
vice and Maintenance Guide”.
BRAKES
8-22Maintenance and do-it-yourself
�REVIEW COPY—2009 Versa(vrs)
Owners Manual—USA_English(nna)
09/10/08—debbie
�
Page 255 of 305

Two types of fuses are used. Type A is used in the
fuse boxes in the engine compartment. Type B is
used in the passenger compartment fuse box.
Type A fuses are provided as spare fuses. They
are stored in the passenger compartment fuse
box.
Type A fuses can be installed in the engine com-
partment and passenger compartment fuse
boxes.If a type A fuse is used to replace a type B fuse,
the type A fuse will not be level with the fuse
pocket as shown in the illustration. This will not
affect the performance of the fuse. Make sure the
fuse is installed in the fuse box securely.
Type B fuses cannot be installed in the under-
hood fuse boxes. Only use type A fuses in the
underhood fuse boxes.ENGINE COMPARTMENT
CAUTION
Never use a fuse of a higher or lower
amperage rating than specified on the
fuse box cover. This could damage the
electrical system or cause a fire.
If any electrical equipment does not come on,
check for an open fuse.
1. Be sure the ignition switch and the headlight
switch are OFF.
2. Open the engine hood.
LDI0455LDI0457WDI0551
FUSES
Maintenance and do-it-yourself8-23
�REVIEW COPY—2009 Versa(vrs)
Owners Manual—USA_English(nna)
09/10/08—debbie
�
Page 257 of 305
PASSENGER COMPARTMENT
CAUTION
Never use a fuse of a higher or lower
amperage rating than specified on the
fuse box cover. This could damage the
electrical system or cause a fire.
If any electrical equipment does not operate,
check for an open fuse.NOTE:
The fuse box is located on the drivers side
of the instrument panel.
1. Be sure the ignition switch and the headlight
switch are OFF.
2. Pull the fuse box cover to remove
�1.
3. Remove the fuse with the fuse puller
�2.4. If the fuse is open
�A, replace it with an
equivalent good fuse
�B.
5. Push the fuse box cover to install.
6. If a new fuse also opens, have the electrical
system checked and repaired by a NISSAN
dealer.
SDI1870
Type A
WDI0452
Maintenance and do-it-yourself8-25
�REVIEW COPY—2009 Versa(vrs)
Owners Manual—USA_English(nna)
09/10/08—debbie
�
Page 261 of 305

4. Close the lid securely as illustrated�C�D.
5. Operate the buttons to check the operation.
See a NISSAN dealer if you need assistance for
replacement.
FCC Notice:
Changes or modifications not expressly ap-
proved by the party responsible for compli-
ance could void the user’s authority to op-
erate the equipment.
This device complies with Part 15 of the
FCC Rules and RSS-210 of Industry
Canada.Operation is subject to the following two
conditions: (1) This device may not cause
harmful interference, and (2) this device
must accept any interference received, in-
cluding interference that may cause undes-
ired operation of the device.
HEADLIGHTS
Replacing the halogen headlight bulb
The headlight is a semi-sealed beam type which
uses a replaceable headlight (halogen) bulb.
They can be replaced from inside the engine
compartment without removing the headlight as-
sembly.
See a NISSAN dealer for replacing the head-
lights.
CAUTION
●Aiming is not necessary after replacing
the bulb. When aiming adjustment is
necessary, contact a NISSAN dealer.
●Do not leave the headlight assembly
open without a bulb installed for a long
period of time. Dust, moisture, smoke,
etc. entering the headlight body may
affect bulb performance. Remove the
bulb from the headlight assembly just
before a replacement bulb is installed.
●Only touch the base when handling the
bulb. Never touch the glass envelope.
Touching the glass could significantly
affect bulb life and/or headlight
performance.WDI0535
LIGHTS
Maintenance and do-it-yourself8-29
�REVIEW COPY—2009 Versa(vrs)
Owners Manual—USA_English(nna)
09/10/08—debbie
�
Page 262 of 305

●High pressure halogen gas is sealed
inside the halogen bulb. The bulb may
break if the glass envelope is scratched
or the bulb is dropped.
●Use the same number and wattage as
shown in the chart.
Fog may temporarily form inside the lens of the
exterior lights in the rain or in a car wash. A
temperature difference between the inside and
the outside of the lens causes the fog. This is not
a malfunction. If large drops of water collect
inside the lens, contact a NISSAN dealer.EXTERIOR AND INTERIOR LIGHTS
Item Wattage (W) Bulb No.*1
Headlight assembly*2
High/low (Halogen) 60/55 H4
Park/Turn 21 7507 LF
Front clearance light 5 WY5W
Front fog light*2 (if so equipped) 35 H8
Interior map lights (if so equipped) 8 AL54
Interior light 8 AL54
Glove box light*2 (if so equipped) 1.4 —
Luggage compartment light (hatchback) / Trunk
light (sedan) (if so equipped)5—
High-mounted stop light
Inside 18 921
Spoiler*2 (if so equipped) LED —
Hatchback*2 (if so equipped) LED —
Rear combination light*2
Turn signal light 21 7507 LF
Stop/Tail 21/5 12499
Backup (reversing) 21 7506 LF
License plate light*2 5 2J8
*1 Always check with the Parts Department at a NISSAN dealer for the latest parts information.
*2 If replacement is required contact a NISSAN dealer.
8-30Maintenance and do-it-yourself
�REVIEW COPY—2009 Versa(vrs)
Owners Manual—USA_English(nna)
09/10/08—debbie
�
Page 263 of 305
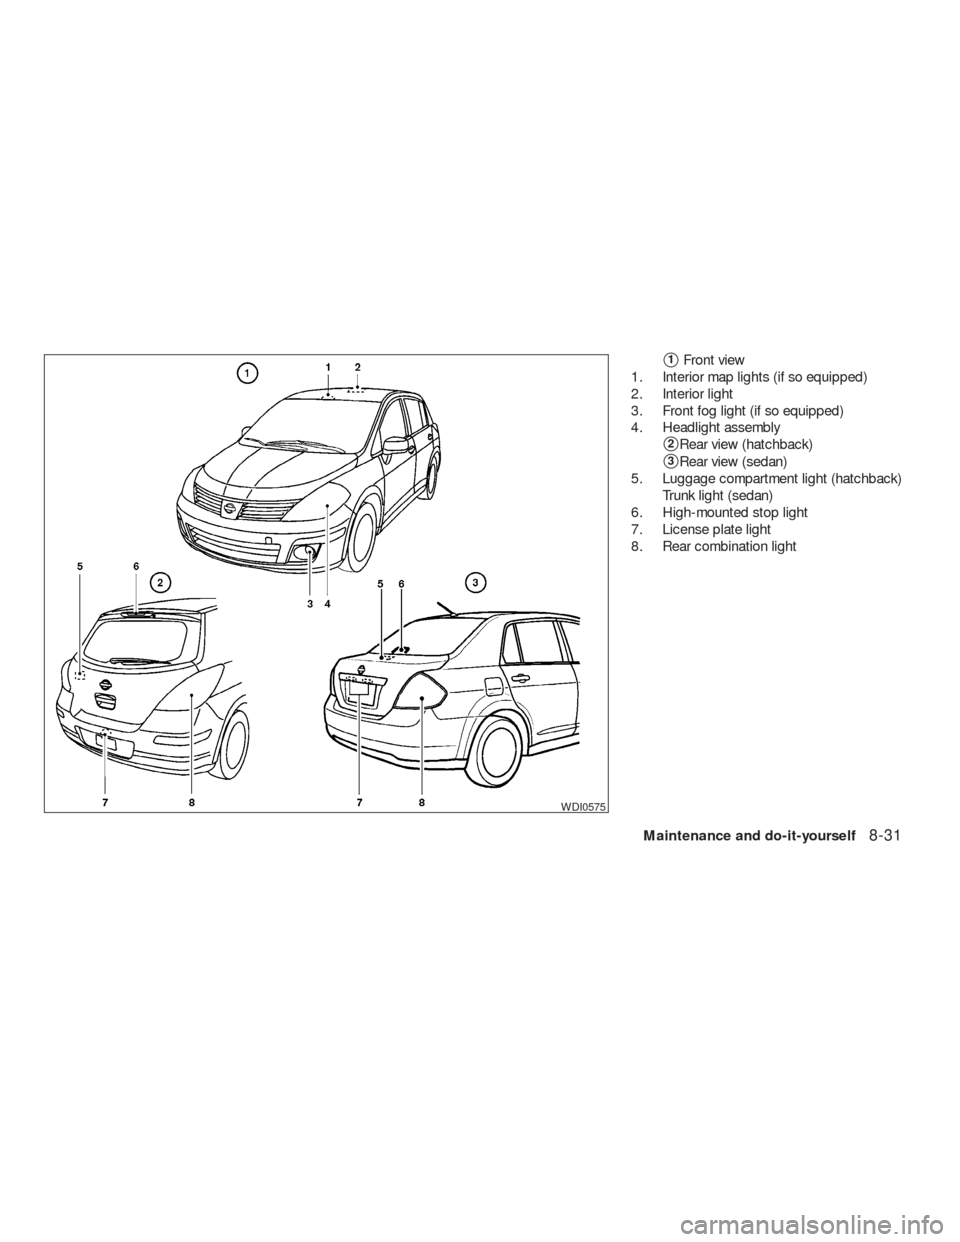
�1Front view
1. Interior map lights (if so equipped)
2. Interior light
3. Front fog light (if so equipped)
4. Headlight assembly
�2Rear view (hatchback)
�3Rear view (sedan)
5. Luggage compartment light (hatchback)
Trunk light (sedan)
6. High-mounted stop light
7. License plate light
8. Rear combination light
WDI0575
Maintenance and do-it-yourself8-31
�REVIEW COPY—2009 Versa(vrs)
Owners Manual—USA_English(nna)
09/10/08—debbie
�