Page 338 of 4331
AT
N
O P
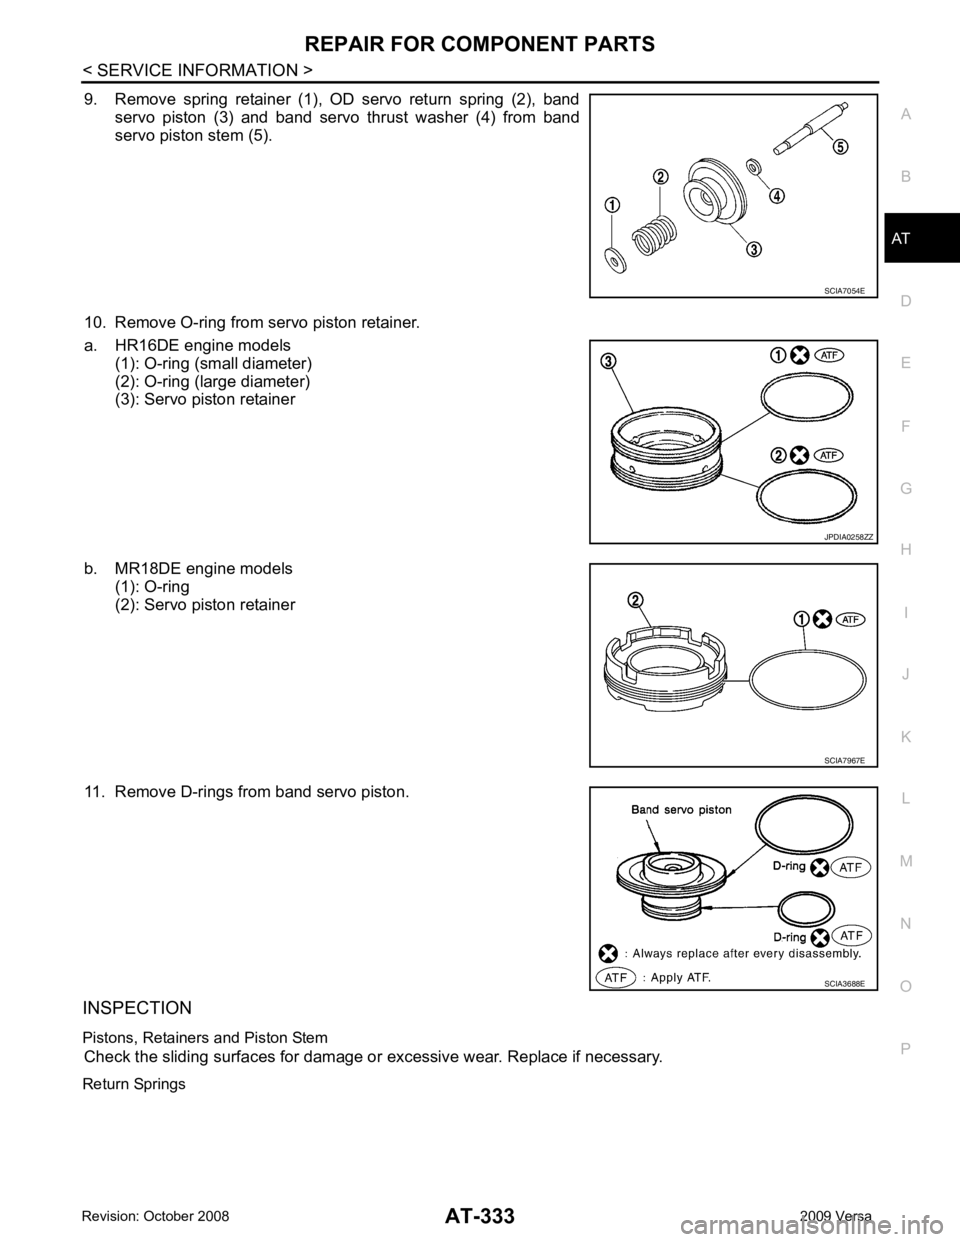
9. Remove spring retainer (1), OD servo return spring (2), band
servo piston (3) and band servo thrust washer (4) from band
servo piston stem (5).
10. Remove O-ring from servo piston retainer.
a. HR16DE engine models (1): O-ring (small diameter)
(2): O-ring (large diameter)
(3): Servo piston retainer
b. MR18DE engine models (1): O-ring
(2): Servo piston retainer
11. Remove D-rings from band servo piston.
INSPECTION
Pistons, Retainers and Piston Stem Check the sliding surfaces for damage or excessive wear. Replace if necessary.
Return Springs JPDIA0258ZZ
SCIA7967E
SCIA3688E
Page 372 of 4331
ASSEMBLY
AT-367
< SERVICE INFORMATION >
D
E
F
G H
I
J
K L
M A
B AT
N
O P
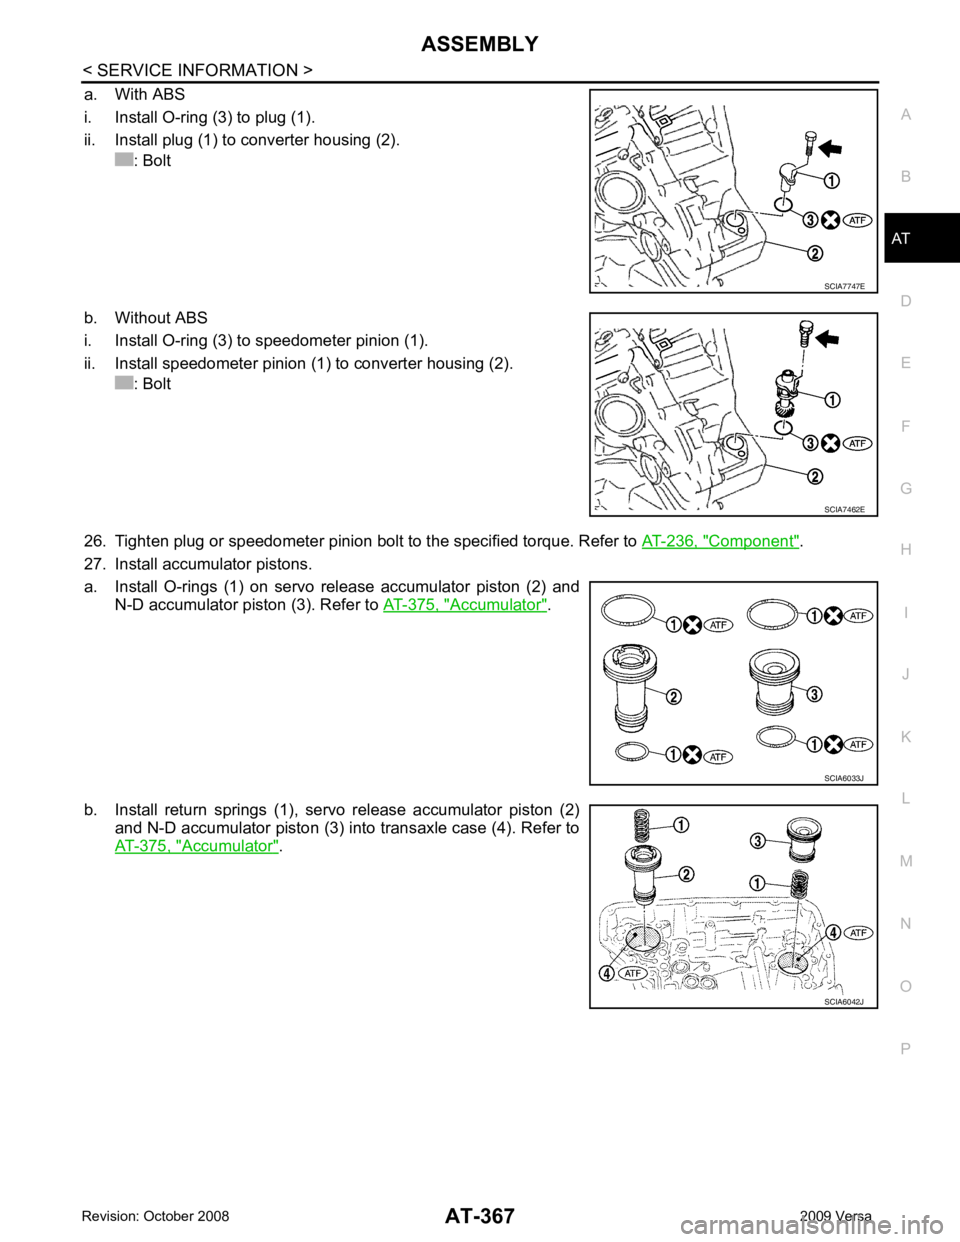
a. With ABS
i. Install O-ring (3) to plug (1).
ii. Install plug (1) to converter housing (2). : Bolt
b. Without ABS
i. Install O-ring (3) to speedometer pinion (1).
ii. Install speedometer pinion (1) to converter housing (2). : Bolt
26. Tighten plug or speedometer pinion bolt to the specified torque. Refer to AT-236, " Component " .
27. Install accumulator pistons.
a. Install O-rings (1) on servo release accumulator piston (2) and N-D accumulator piston (3). Refer to AT-375, " Accumulator " .
b. Install return springs (1), servo release accumulator piston (2) and N-D accumulator piston (3) into transaxle case (4). Refer to
AT-375, " Accumulator " . SCIA7747E
SCIA7462E
SCIA6033J
SCIA6042J
Page 837 of 4331
BR
N
O P
5. Connect the parking brake rear cable to the operating lever.
6. Install the shoe assembly. After assembly, be sure that each part is installed properly. CAUTION:
Do not damage the wheel cylinder piston boot.
7. Install the brake drum.
8. Depress brake pedal for several times (approximately 2 or 3 times).
9. Adjust clearance of brake shoe. Refer to PB-5, " On-Vehicle Service " .
10. Install rear wheel and tire. Refer to WT-7, " Rotation " .
Removal and Installati on of Wheel Cylinder INFOID:0000000004305917
REMOVAL 1. Drain the brake fluid. Refer to BR-9, " Drain and Refill " .
2. Remove the rear brake shoe assembly. Refer to BR-34, " Removal and Installation of Drum Brake Assem-
bly " .
3. Remove the bleed valve.
4. Disconnect the brake tube from the wheel cylinder.
5. Remove the wheel cylinder bolts and then remo ve the wheel cylinder from the back plate.
INSTALLATION Installation is in the reverse order of removal.
• Tighten bolts and bleed valve to the specified torque. Refer to BR-33, " Component " .
• Refill with new brake fluid and bleed the air. Refer to BR-9, " Bleeding Brake System " .
Disassembly and Assemb ly of Wheel Cylinder INFOID:0000000004305918
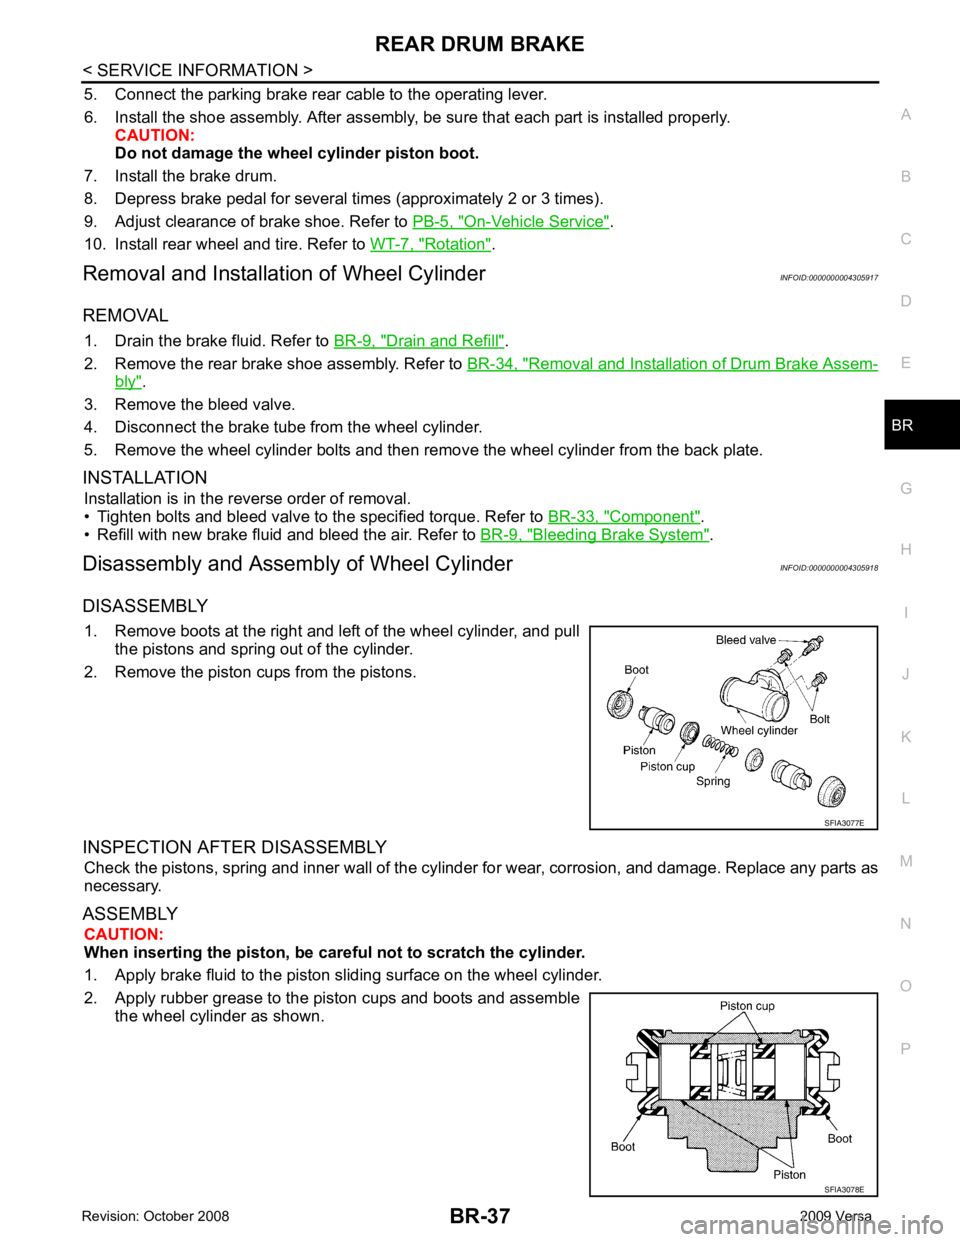
DISASSEMBLY 1. Remove boots at the right and left of the wheel cylinder, and pull the pistons and spring out of the cylinder.
2. Remove the piston cups from the pistons.
INSPECTION AFTER DISASSEMBLY Check the pistons, spring and inner wall of the cylinder for wear, corrosion, and damage. Replace any parts as
necessary.
ASSEMBLY CAUTION:
When inserting the piston, be caref ul not to scratch the cylinder.
1. Apply brake fluid to the piston sliding surface on the wheel cylinder.
2. Apply rubber grease to the piston cups and boots and assemble the wheel cylinder as shown.
Page 1612 of 4331
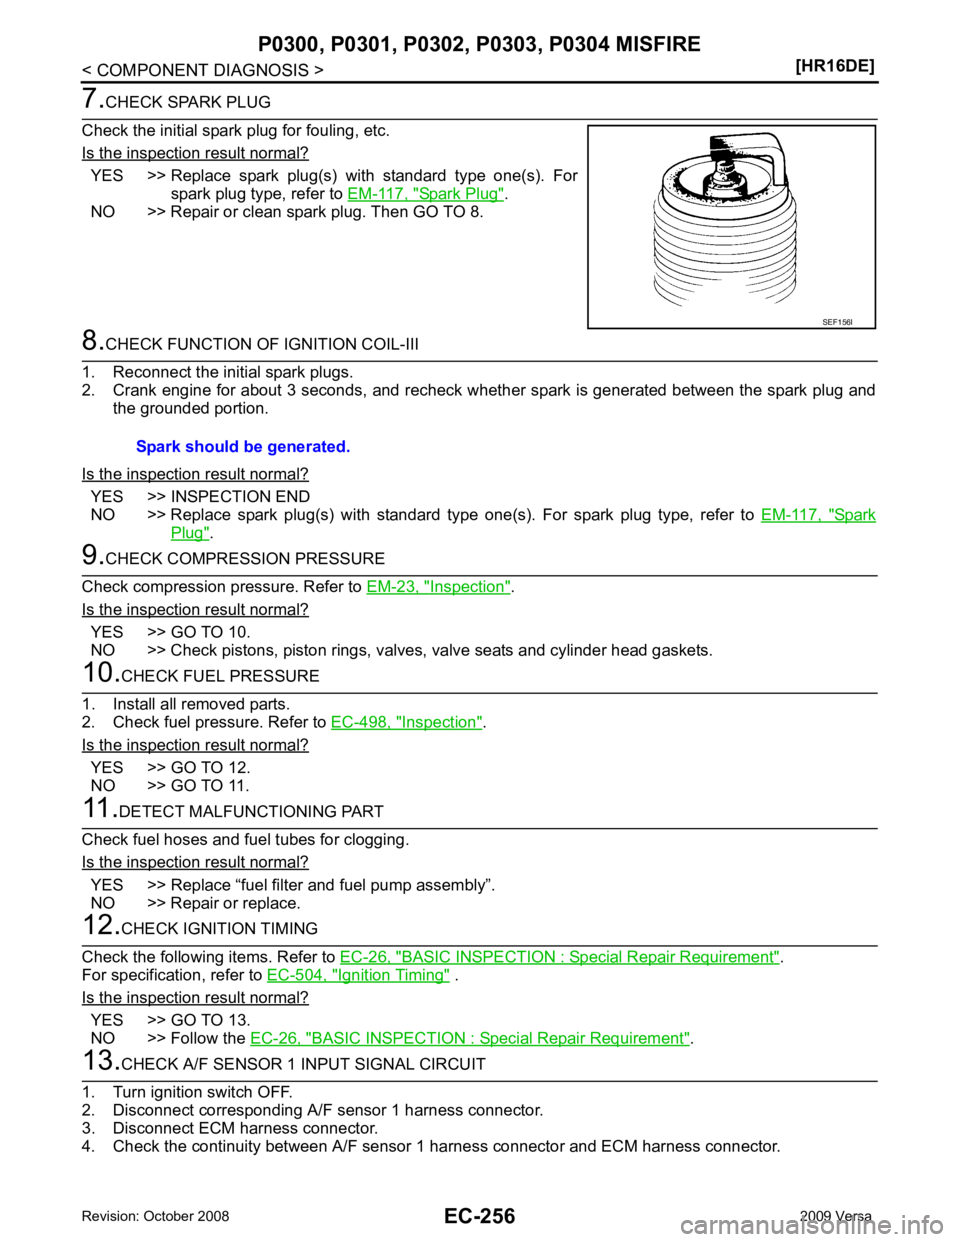
YES >> Replace spark plug(s) with standard type one(s). For
spark plug type, refer to EM-117, " Spark Plug " .
NO >> Repair or clean spark plug. Then GO TO 8. YES >> INSPECTION END
NO >> Replace spark plug(s) with standard type one(s). For spark plug type, refer to EM-117, " Spark
Plug " .
Inspection " .
Is the inspection result normal? YES >> GO TO 10.
NO >> Check pistons, piston rings, valves, valve seats and cylinder head gaskets. Inspection " .
Is the inspection result normal? YES >> GO TO 12.
NO >> GO TO 11. YES >> Replace “fuel filter and fuel pump assembly”.
NO >> Repair or replace. BASIC INSPECTION : Special Repair Requirement " .
For specification, refer to EC-504, " Ignition Timing " .
Is the inspection result normal? YES >> GO TO 13.
NO >> Follow the EC-26, " BASIC INSPECTION : Special Repair Requirement " .
Page 2124 of 4331
![NISSAN TIIDA 2009 Service Repair Manual EC-768< SERVICE INFOMATION >
[MR TYPE 1]
DTC P0300 - P0304 MULTIPLE CYLINDER
MISFIRE, NO. 1 - 4 CYLINDER MIS-
FIRE
OK or NG OK >> GO TO 7.
NG >> Check ignition coil, power transistor and their circui](/manual-img/5/57398/w960_57398-2123.png "NISSAN TIIDA 2009 Service Repair Manual EC-768< SERVICE INFOMATION >
[MR TYPE 1]
DTC P0300 - P0304 MULTIPLE CYLINDER
MISFIRE, NO. 1 - 4 CYLINDER MIS-
FIRE
OK or NG OK >> GO TO 7.
NG >> Check ignition coil, power transistor and their circui")
EC-768< SERVICE INFOMATION >
[MR TYPE 1]
DTC P0300 - P0304 MULTIPLE CYLINDER
MISFIRE, NO. 1 - 4 CYLINDER MIS-
FIRE
OK or NG OK >> GO TO 7.
NG >> Check ignition coil, power transistor and their circuits. Refer to EC-996 .
7.
CHECK SPARK PLUG
Check the initial spark plug for fouling, etc.
OK or NG OK >> Replace spark plug(s) with standard type one(s). For
spark plug type, refer to EM-227, " Standard and Limit " .
NG >> 1. Repair or clean spark plug.
2. GO TO 8. 8.
CHECK FUNCTION OF IGNITION COIL-III
1. Reconnect the initial spark plugs.
2. Crank engine for about three seconds, and recheck whether spark is generated between the spark plug
and the grounded portion.
OK or NG OK >>
INSPECTION END
NG >> Replace spark plug(s) with standard type one(s). For spark plug type, refer to EM-227, " Standard
and Limit " .
9.
CHECK COMPRESSION PRESSURE
Check compression pressure. Refer to EM-185, " On-Vehicle Service " .
OK or NG OK >> GO TO 10.
NG >> Check pistons, piston rings, valves, valve seats and cylinder head gaskets. 10.
CHECK FUEL PRESSURE
1. Install all removed parts.
2. Release fuel pressure to zero. Refer to EC-574, " Fuel Pressure Check " .
3. Install fuel pressure gauge and check fuel pressure. Refer to EC-574, " Fuel Pressure Check " .
OK or NG OK >> GO TO 12.
NG >> GO TO 11. 11.
DETECT MALFUNCTIONING PART
Check the following.
• Fuel pump and circuit (Refer to EC-991 .)
• Fuel pressure regulator (Refer to EC-574, " Fuel Pressure Check " .)
• Fuel lines (Refer to EM-156 .)
• Fuel filter for clogging
>> Repair or replace. 12.
CHECK IGNITION TIMING
Check the following items. Refer to EC-566, " Basic Inspection " .
Spark should be generated.
SEF156I
Spark should be generated.
At idling: Approximately 350 kPa (3.57 kg/cm 2
, 51 psi)
Page 2642 of 4331
![NISSAN TIIDA 2009 Service Repair Manual EC-1286< SERVICE INFOMATION >
[MR TYPE 2]
DTC P0300 - P0304 MULTIPLE CYLINDER
MISFIRE, NO. 1 - 4 CYLINDER MIS-
FIRE
3. Crank engine for about 3 seconds, and recheck whether spark is generated between](/manual-img/5/57398/w960_57398-2641.png "NISSAN TIIDA 2009 Service Repair Manual EC-1286< SERVICE INFOMATION >
[MR TYPE 2]
DTC P0300 - P0304 MULTIPLE CYLINDER
MISFIRE, NO. 1 - 4 CYLINDER MIS-
FIRE
3. Crank engine for about 3 seconds, and recheck whether spark is generated between")
EC-1286< SERVICE INFOMATION >
[MR TYPE 2]
DTC P0300 - P0304 MULTIPLE CYLINDER
MISFIRE, NO. 1 - 4 CYLINDER MIS-
FIRE
3. Crank engine for about 3 seconds, and recheck whether spark is generated between the spark plug and the grounded metal portion.
OK or NG OK >> GO TO 7.
NG >> Check ignition coil, power transistor and their circuits. Refer to EC-1518 .
7.
CHECK SPARK PLUG
Check the initial spark plug for fouling, etc.
OK or NG OK >> Replace spark plug(s) with standard type one(s). For
spark plug type, refer to EM-227, " Standard and Limit " .
NG >> 1. Repair or clean spark plug. 2. GO TO 8. 8.
CHECK FUNCTION OF IGNITION COIL-III
1. Reconnect the initial spark plugs.
2. Crank engine for about three seconds, and recheck whether spark is generated between the spark plug
and the grounded portion.
OK or NG OK >>
INSPECTION END
NG >> Replace spark plug(s) with standard type one(s). For spark plug type, refer to EM-227, " Standard
and Limit " .
9.
CHECK COMPRESSION PRESSURE
Check compression pressure. Refer to EM-185, " On-Vehicle Service " .
OK or NG OK >> GO TO 10.
NG >> Check pistons, piston rings, valves, valve seats and cylinder head gaskets. 10.
CHECK FUEL PRESSURE
1. Install all removed parts.
2. Release fuel pressure to zero. Refer to EC-1086, " Fuel Pressure Check " .
3. Install fuel pressure gauge and check fuel pressure. Refer to EC-1086, " Fuel Pressure Check " .
OK or NG OK >> GO TO 12.
NG >> GO TO 11. 11.
DETECT MALFUNCTIONING PART
Check the following.
• Fuel pump and circuit (Refer to EC-1513 .)
• Fuel pressure regulator (Refer to EC-1086, " Fuel Pressure Check " .)
• Fuel lines (Refer to FL-4, " Checking Fuel Line " .)
• Fuel filter for clogging
>> Repair or replace.
Spark should be generated.
SEF156I
Spark should be generated.
At idling: Approximately 350 kPa (3.57 kg/cm 2
, 51 psi)