Page 250 of 326

and are installed securely. Check the belt web-
bing for cuts, fraying, wear or damage.
Steering wheelCheck for changes in the steer-
ing system, such as excessive freeplay, hard
steering or strange noises.
Warning lights and chimesMake sure all
warning lights and chimes are operating properly.
Windshield wiper and washer*Check that
the wipers and washer operate properly and that
the wipers do not streak.
Windshield defrosterCheck that the air
comes out of the defroster outlets properly and in
sufficient quantity when operating the heater or
air conditioner.
Under the hood and vehicle
The maintenance items listed here should be
checked periodically (for example, each time you
check the engine oil or refuel) .
Battery*Check the fluid level in each cell. It
should be between the MAX and MIN lines. Ve-
hicles operated in high temperatures or under
severe conditions require frequent checks of the
battery fluid level.
Brake and clutch fluid levels*Make sure that
the brake and clutch fluid level is between the
MIN and MAX lines on the reservoir.Engine coolant level*Check the coolant level
when the engine is cold.
Engine drive belts*Make sure the drive belts
are not frayed, worn, cracked or oily.
Engine oil level*Check the level after parking
the vehicle on a level surface with the engine off.
Wait more than 10 minutes for the oil to drain
back into the oil pan.
Exhaust systemMake sure there are no loose
supports, cracks or holes. If the sound of the
exhaust seems unusual or there is a smell of
exhaust fumes, immediately have the exhaust
system inspected by a NISSAN dealer. See the
carbon monoxide warning in the “Starting and
driving” section of this manual.
Fluid leaksCheck under the vehicle for fuel, oil,
water or other fluid leaks after the vehicle has
been parked for a while. Water dripping from the
air conditioner after use is normal. If you should
notice any leaks or if gasoline fumes are evident,
check for the cause and have it corrected imme-
diately.
Radiator and hosesCheck the front of the
radiator and clean off any dirt, insects, leaves,
etc., that may have accumulated. Make sure the
hoses have no cracks, deformation, rot or loose
connections.UnderbodyThe underbody is frequently ex-
posed to corrosive substances such as those
used on icy roads or to control dust. It is very
important to remove these substances from the
underbody, otherwise rust may form on the floor
pan, frame, fuel lines and exhaust system. At the
end of winter, the underbody should be thor-
oughly flushed with plain water, in those areas
where mud and dirt may have accumulated. See
the “Appearance and care” section of this
manual.
Windshield washer fluid*Check that there is
adequate fluid in the reservoir.
8-4Maintenance and do-it-yourself
�REVIEW COPY—2009 Sentra(sen)
Owners Manual—USA_English(nna)
10/27/08—tbrooks
�
Page 252 of 326
MR20DE engine
1. Engine coolant reservoir
2. Engine oil filler cap
3. Brake fluid reservoir/Clutch fluid
reservoir (M/T model)
4. Battery
5. Air cleaner
6. Fuse/Fusible link box
7. Radiator cap
8. Engine oil dipstick
9. Drive belt location
10. Windshield washer fluid reservoir
WDI0587
ENGINE COMPARTMENT CHECK
LOCATIONS
8-6Maintenance and do-it-yourself
�REVIEW COPY—2009 Sentra(sen)
Owners Manual—USA_English(nna)
10/27/08—tbrooks
�
Page 255 of 326

CHANGING ENGINE COOLANT
A NISSAN dealer can change the engine coolant.
The service procedure can be found in the
NISSAN Service Manual.
Improper servicing can result in reduced
heater performance and engine overheat-
ing.
WARNING
●To avoid the danger of being scalded,
never change the coolant when the en-
gine is hot.
●Never remove the radiator cap when the
engine is hot. Serious burns could be
caused by high pressure fluid escaping
from the radiator.
●Avoid direct skin contact with used
coolant. If skin contact is made, wash
thoroughly with soap or hand cleaner
as soon as possible.
●Keep coolant out of the reach of chil-
dren and pets.
Engine coolant must be disposed of properly.
Check your local regulations.
CHECKING ENGINE OIL LEVEL
1. Park the vehicle on a level surface and apply
the parking brake.
2. Start the engine and let it idle until it reaches
operating temperature.
3. Turn off the engine.Wait more than 10
minutes for the oil to drain back into
the oil pan.
4. Remove the dipstick and wipe it clean. Re-
insert it all the way.
Type B
LDI0589
Type A
WDI0591
ENGINE OIL
Maintenance and do-it-yourself8-9
�REVIEW COPY—2009 Sentra(sen)
Owners Manual—USA_English(nna)
10/27/08—tbrooks
�
Page 256 of 326
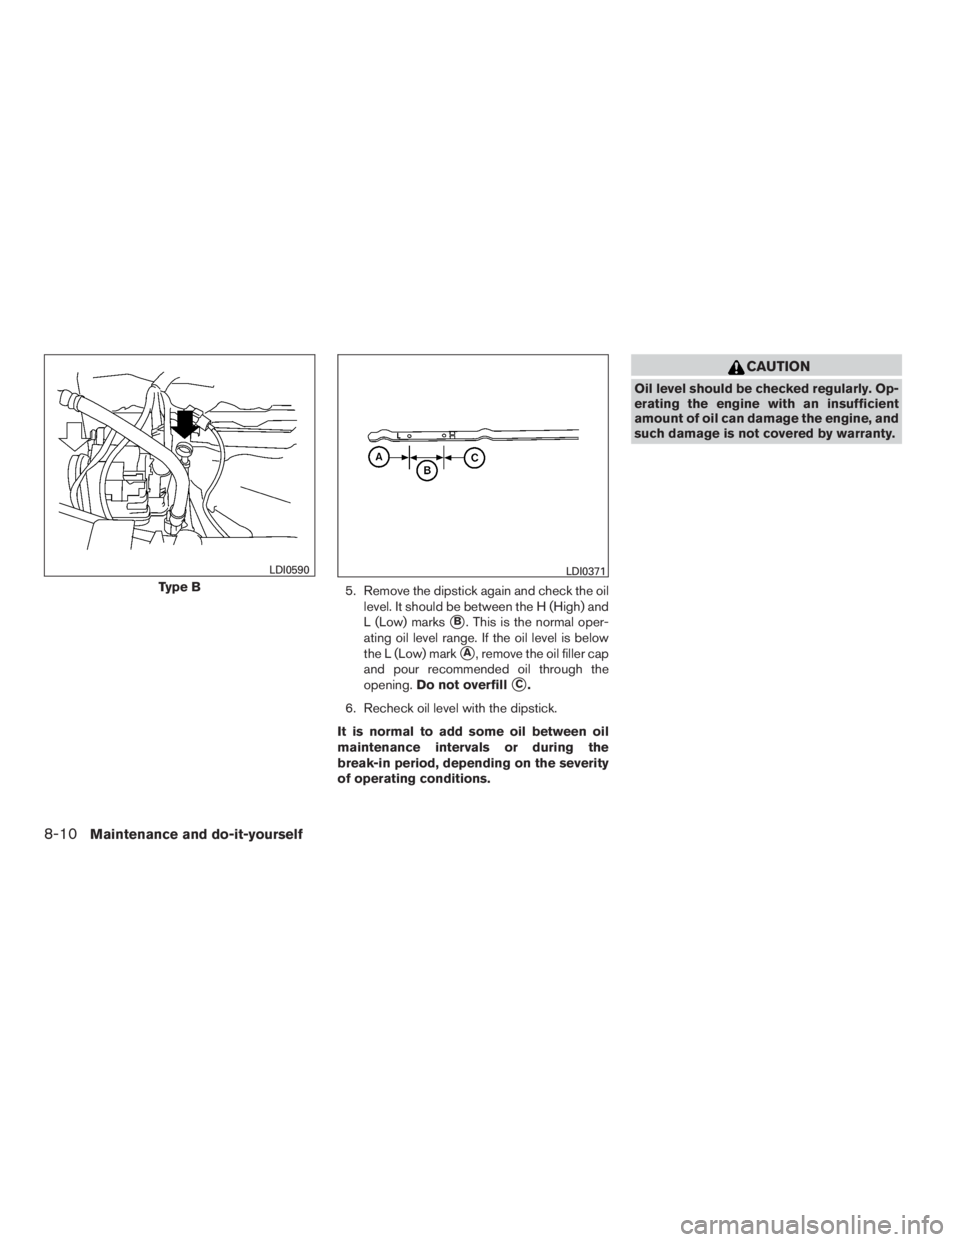
5. Remove the dipstick again and check the oil
level. It should be between the H (High) and
L (Low) marks
�B. This is the normal oper-
ating oil level range. If the oil level is below
the L (Low) mark
�A, remove the oil filler cap
and pour recommended oil through the
opening.Do not overfill
�C.
6. Recheck oil level with the dipstick.
It is normal to add some oil between oil
maintenance intervals or during the
break-in period, depending on the severity
of operating conditions.
CAUTION
Oil level should be checked regularly. Op-
erating the engine with an insufficient
amount of oil can damage the engine, and
such damage is not covered by warranty.
Type B
LDI0590LDI0371
8-10Maintenance and do-it-yourself
�REVIEW COPY—2009 Sentra(sen)
Owners Manual—USA_English(nna)
10/27/08—tbrooks
�
Page 257 of 326

CHANGING ENGINE OIL
1. Park the vehicle on a level surface and apply
the parking brake.
2. Start the engine and let it idle until it reaches
operating temperature, then turn it off.
3. Remove the oil filler cap
�Aby turning it
counterclockwise.4. Place a large drain pan under the drain plug
�B.
5. Remove the drain plug
�Bwith a wrench by
turning it counterclockwise and completely
drain the oil.
If the oil filter is to be changed, remove and
replace it at this time. See “Changing engine
oil filter” later in this section.
●Waste oil must be disposed of prop-
erly.
●Check your local regulations.
WARNING
●Prolonged and repeated contact with
used engine oil may cause skin cancer.
●Try to avoid direct skin contact with
used oil. If skin contact is made, wash
thoroughly with soap or hand cleaner
as soon as possible.
●Keep used engine oil out of reach of
children.MR20DE engine
�AOil filler cap
�BOil drain plug
�COil filter
WDI0521
QR25DE engine
�AOil filler cap
�BOil drain plug
�COil filter
WDI0597
Maintenance and do-it-yourself8-11
�REVIEW COPY—2009 Sentra(sen)
Owners Manual—USA_English(nna)
10/27/08—tbrooks
�
Page 258 of 326

CAUTION
Be careful not to burn yourself. The engine
oil may be hot.
6. Clean and reinstall the drain plug and a new
washer. Securely tighten the drain plug with
a wrench. Do not use excessive force.
Drain plug tightening torque:
22 - 29 ft-lb (29 - 39 N·m)
7. Refill engine with recommended oil through
the oil filler opening, then install the oil filler
cap securely.
See “Capacities and recommended
fuel/lubricants” in the “Technical and con-
sumer information” section of this manual for
drain and refill capacity.
The drain and refill capacity depends on the
oil temperature and drain time. Use these
specifications for reference only. Always use
the dipstick to determine when the proper
amount of oil is in the engine.
8. Start the engine. Check for leakage around
the drain plug and oil filter. Correct as re-
quired.
9. Turn the engine off and wait more than 10
minutes. Check the oil level with the dipstick.
Add engine oil if necessary.
CHANGING ENGINE OIL FILTER
1. Park the vehicle on a level surface and apply
the parking brake.
2. Turn the engine off.
3. Place a large drain pan under the oil filter
�C.
4. Loosen the oil filter with an oil filter wrench
by turning it counterclockwise. Then remove
the oil filter by turning it by hand.
MR20DE engine
�AOil filler cap
�BOil drain plug
�COil filter
WDI0521
QR25DE engine
�AOil filler cap
�BOil drain plug
�COil filter
WDI0597
8-12Maintenance and do-it-yourself
�REVIEW COPY—2009 Sentra(sen)
Owners Manual—USA_English(nna)
10/27/08—tbrooks
�
Page 259 of 326

CAUTION
Be careful not to burn yourself. The engine
oil may be hot.
5. Wipe the engine oil filter sealing surface with
a clean rag.
CAUTION
Be sure to remove any old gasket material
remaining on the sealing surface of the
engine. Failure to do so could lead to
engine damage.
6. Coat the gasket on the new filter with clean
engine oil.
7. Screw on the oil filter until a slight resistance
is felt, then tighten an additional 2/3 turn.
8. Start the engine and check for leakage
around the oil filter. Correct as required.
9. Turn the engine off and wait more than 10
minutes. Check the oil level. Add engine oil if
necessary.
CAUTION
●Use only Genuine NISSAN CVT Fluid
NS-2-V. Do not mix with other fluids.
●Using transmission fluid other than
Genuine NISSAN CVT Fluid NS-2-V will
damage the CVT, which is not covered
by the NISSAN new vehicle limited
warranty.
When checking or replacement of CVT Fluid is
required, we recommend your NISSAN dealer for
servicing.For further brake and clutch fluid specification
information, refer to “Capacities and recom-
mended fuel/lubricants” in the “Technical and
consumer information” section of this manual.
WARNING
●Use only new fluid from a sealed con-
tainer. Old, inferior or contaminated
fluid may damage the brake and clutch
systems. The use of improper fluids can
damage the brake system and affect
the vehicle’s stopping ability.
●Clean the filler cap before removing.
●Brake and clutch fluid is poisonous and
should be stored carefully in marked
containers out of reach of children.
CAUTION
Do not spill the fluid on any painted sur-
faces. This will damage the paint. If fluid is
spilled, immediately wash the surface
with water.
CONTINUOUSLY VARIABLE
TRANSMISSION (CVT) FLUIDBRAKE AND CLUTCH FLUID
Maintenance and do-it-yourself8-13
�REVIEW COPY—2009 Sentra(sen)
Owners Manual—USA_English(nna)
10/27/08—tbrooks
�
Page 275 of 326
EXTERIOR AND INTERIOR LIGHTS
Item Wattage (W) Bulb No.*
Headlight assembly
Low/High (Halogen) 55/65 H13
Park 4 194
Turn 27 3457AK
Side marker 4 194
Front fog light* (if so equipped) 55 H11
Front map lights* (if so equipped) 8 168
Room light 8 AL57
Glove box light* (if so equipped) 1.4 158
Trunk light 5 158
High-mounted stop light*
Inside (if so equipped) 16 921
Spoiler (if so equipped) — LED
Rear combination light
Turn signal light 27/7 3057K
Stop/Tail 27/7 3057K
Backup (reversing) 16 921
Rear side marker 4 194
License plate light* 5 W5W
* Always check with the Parts Department at a NISSAN dealer for the latest parts information.
Maintenance and do-it-yourself8-29
�REVIEW COPY—2009 Sentra(sen)
Owners Manual—USA_English(nna)
10/27/08—tbrooks
�

4. Battery
5. Air cleaner
6. Fuse/Fusible link box
7. Radiator cap
8. Eng")
 Bulb No.*
Headlight assembly
Low/High (Halogen) 55/65 H13
Park 4 194
Turn 27 3457AK
Side marker 4 194
Front fog light* (if so equipped) 55 H11
Front map l")