2009 NISSAN QASHQAI ignition lock
[x] Cancel search: ignition lockPage 97 of 297
Downloaded from www.Manualslib.com manuals search engine The driver’s door can be locked/unlocked from out-
side using the key/emergency key if the vehicle’s
battery is dead.
To lock the door, insert the key into the driver’s door
key cylinder and turn it towards the front of the ve-
hicle
j1.
To unlock the door, turn the key towards the rear of
the vehicle
j2.
See “Ignition knob (where fitted)” in the “5. Starting
and driving” section for instructions on accessing
the Intelligent Key system Emergency key.
CAUTION
The alarm system will be triggered when the door
is opened using the key (NISSAN alarm equipped
models). To stop the alarm, turn the ignition key
to the ON position or press the unlock
button
on the integrated keyfob.
Initialising the system after vehicle
battery loading or replacement
After recharging or replacing the battery, you should
release (initialise) the system by:
Inserting the key into the ignition switch and then
turning it to the ON position.
Unlocking the vehicle using the integrated key-
fob.
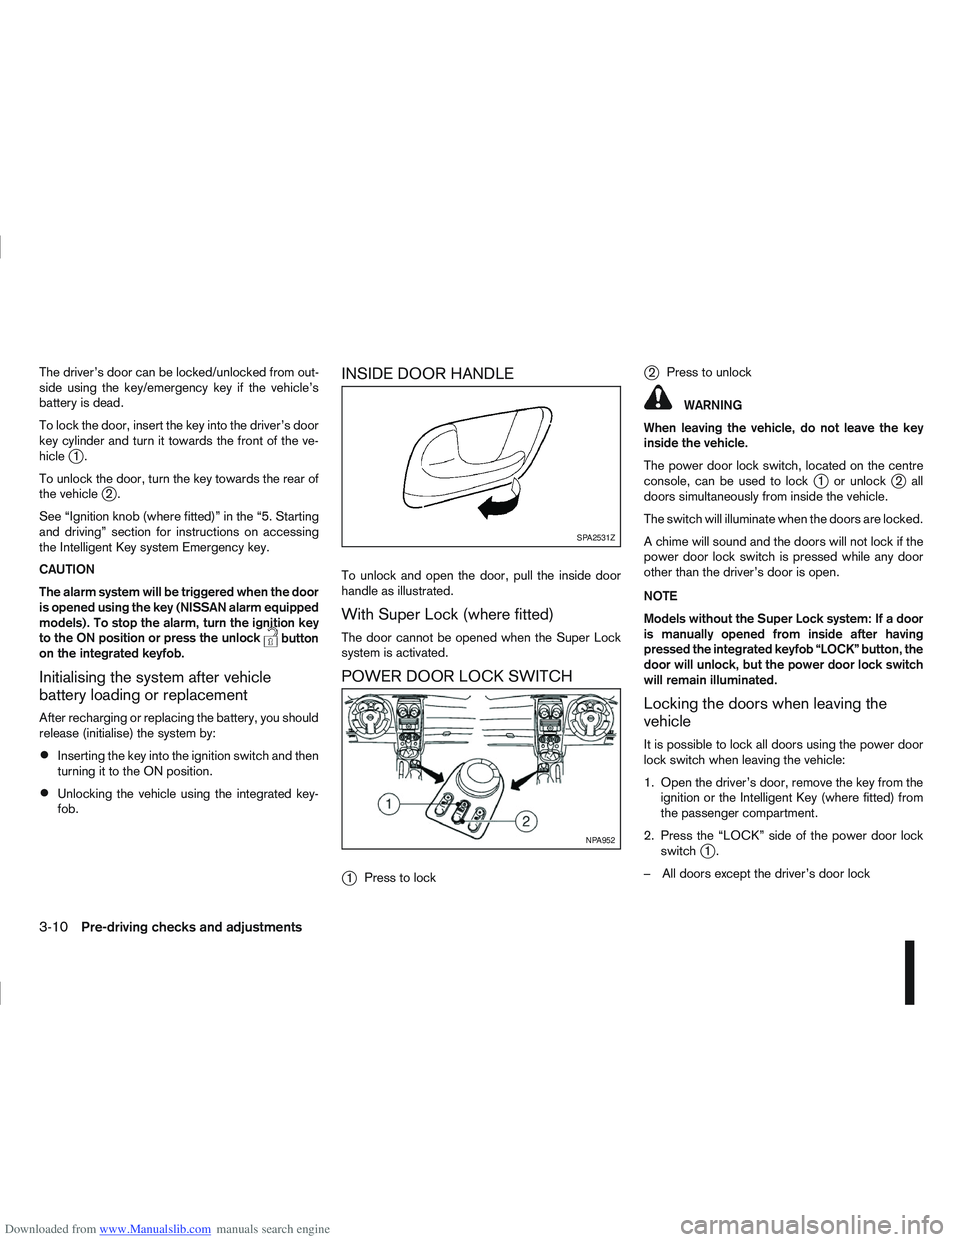
INSIDE DOOR HANDLE
To unlock and open the door, pull the inside door
handle as illustrated.
With Super Lock (where fitted)
The door cannot be opened when the Super Lock
system is activated.
POWER DOOR LOCK SWITCH
j
1 Press to lock
j2Press to unlock
WARNING
When leaving the vehicle, do not leave the key
inside the vehicle.
The power door lock switch, located on the centre
console, can be used to lock
j1 or unlockj2all
doors simultaneously from inside the vehicle.
The switch will illuminate when the doors are locked.
A chime will sound and the doors will not lock if the
power door lock switch is pressed while any door
other than the driver’s door is open.
NOTE
Models without the Super Lock system: If a door
is manually opened from inside after having
pressed the integrated keyfob “LOCK” button, the
door will unlock, but the power door lock switch
will remain illuminated.
Locking the doors when leaving the
vehicle
It is possible to lock all doors using the power door
lock switch when leaving the vehicle:
1. Open the driver’s door, remove the key from the ignition or the Intelligent Key (where fitted) from
the passenger compartment.
2. Press the “LOCK” side of the power door lock switch
j1.
– All doors except the driver’s door lock
SPA2531Z
NPA952
3-10Pre-driving checks and adjustments
Page 98 of 297
Downloaded from www.Manualslib.com manuals search engine 3. Close the driver’s door.
– The driver’s door locks
– The power door lock switch illuminates
–Super Lock system models: The Super Lock
system is not activated
– Intelligent Key models: If the Intelligent Key has
been left inside the vehicle, all doors will unlock
and an alarm will sound
Super Lock equipped models (RHD
models)
If the doors are locked using the integrated keyfob
“LOCK” button or an outside door lock switch (In-
telligent Key models), the Super Lock system will be
activated. The power door lock switch will illuminate
to indicate that all doors are locked, but it will not be
possible to use the power door lock switch to un-
lock the doors.
Locking the doors with the power door lock switch
will not activate the Super Lock system.
Drive away door locking
When active, the drive away door locking function
will automatically lock all doors when the vehicle
speed exceeds 12 km/h (7 MPH).
All doors will be automatically unlocked when a front
door is opened except in anti-hijack mode (only the
driver’s door or front passenger door will unlock); or
when opening a rear passenger door from the in-
side.
When “UNLOCK”, on the power door lock switch, is pressed the drive away door locking system will
not lock the doors again until a door is opened and
closed.
To activate or deactivate drive-away door
locking:
1. Unlock the doors.
2. Turn the ignition switch ON.
3.
Activation
Press and hold the “LOCK” side of the power
door lock switch
j1 for 5 seconds.
Deactivation
Press and hold the “UNLOCK” side of the power
door lock switch
j1 for 5 seconds.
4. A buzzer will sound if activation or deactivation was successful.
Once activated, drive-away door locking will func-
tion on every subsequent trip.
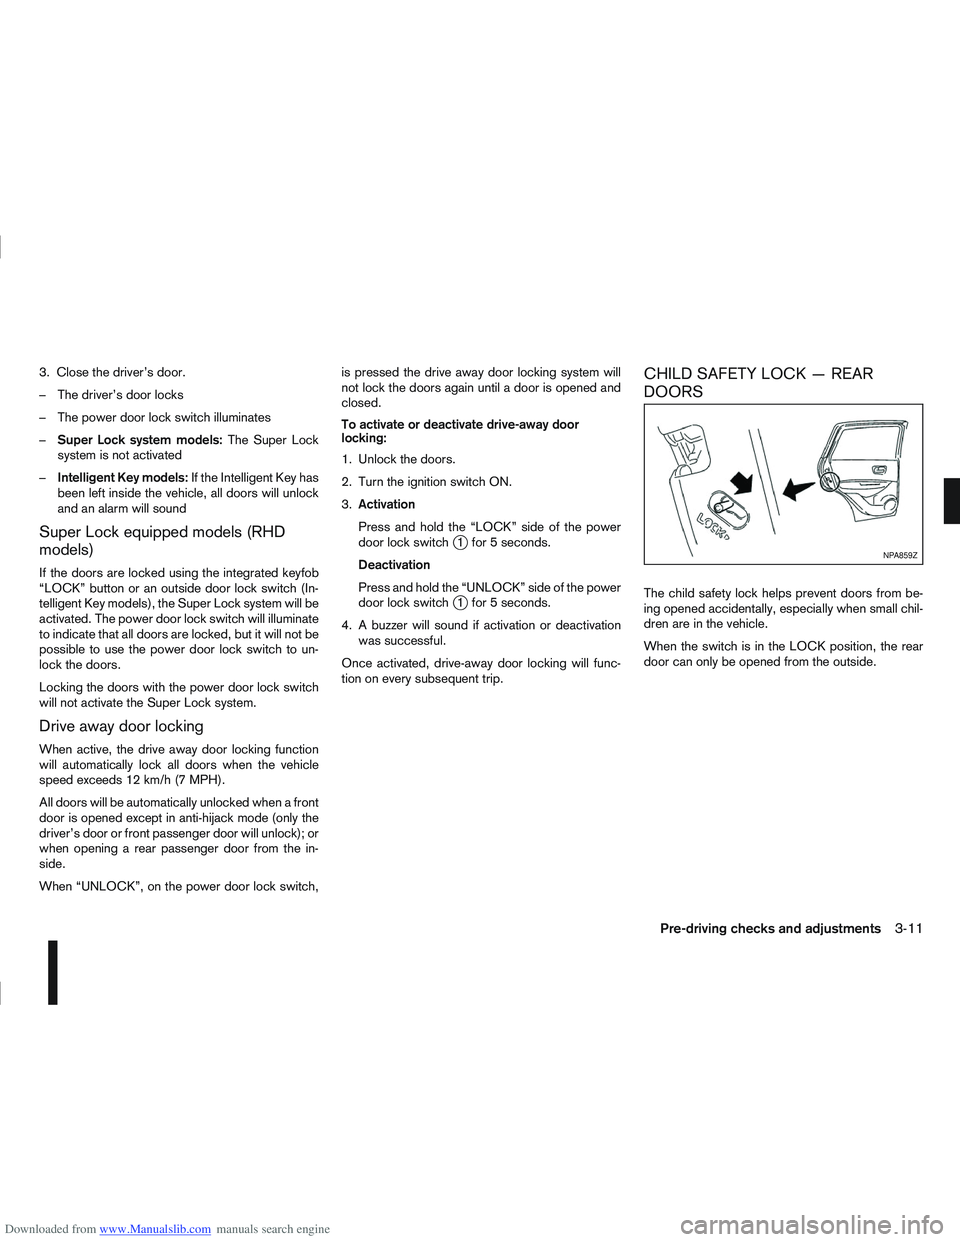
CHILD SAFETY LOCK — REAR
DOORS
The child safety lock helps prevent doors from be-
ing opened accidentally, especially when small chil-
dren are in the vehicle.
When the switch is in the LOCK position, the rear
door can only be opened from the outside.
NPA859Z
Pre-driving checks and adjustments3-11
Page 100 of 297

Downloaded from www.Manualslib.com manuals search engine ALARM SYSTEM (where fitted)
The alarm system provides visual and audible alarm
signals if parts of the vehicle are disturbed.
How to arm the alarm system
1. Close all doors, windows, back door and bon-net.
2. Lock the vehicle using the keyfob (lock button), for additional information, see “Integrated key-
fob/remote control system” in the “3. Pre-driving
checks and adjustments” section.
NOTE
If the vehicle is not fully locked, a door/bonnet/
back door is open, or the ignition switch is in the
ON position (after arming the system), the buzzer
will sound. After correctly closing, the buzzer will
stop.
Alarm system operation
The system will give the following alarm:
The siren sounds intermittently and all direction
indicators will flash.
The alarm automatically turns off after 28 sec-
onds.
The alarm is activated when:
The volumetric sensing system (ultrasonic sen-
sors) is triggered.
Any door/the back door is opened.
The bonnet is opened.
The ignition circuit is turned on without the own-
er’s key being used.
The alarm system will stop when:
The vehicle is unlocked using the keyfob unlock
button.
The ignition switch or ignition knob is turned to
the ON position with a registered NATS key.
If the system does not operate as described
above, have it checked by your NISSAN dealer or
qualified workshop.
Ultrasonic sensors (where fitted)
The ultrasonic sensors (volumetric sensing) detect
movements in the passenger’s compartment. When
the alarm system is set to the armed position, it will
automatically switch on the ultrasonic sensors.
It is possible to exclude the ultrasonic sensors (e.g.
when leaving pets inside the car).
To exclude the ultrasonic sensors:
1. Turn the ignition switch 3 times within 7 seconds from the “OFF” to the ON position.
2. Close the door(s)/bonnet/back door and press the lock button
on the keyfob to lock all doors/
back door.
The ultrasonic sensors are now excluded from the
alarm system. All other functions of the system re-
main activated until the alarm system is disarmed
again.
NISSAN ANTI-THEFT SYSTEM (NATS)
The NISSAN Anti-Theft System (NATS)* will not
allow the engine to start without the use of the reg-
istered NATS key.
* Immobilizer
If the engine fails to start using the registered NATS
key, it may be due to interference from another
NATS key, an automated toll road device or an auto-
mated payment device on the key ring. Restart the
engine using the following procedure:
1. Leave the ignition switch in the ON position for approximately 5 seconds.
2. Turn the ignition switch to the “OFF” or LOCK position and wait approximately 5 seconds.
3. Repeat steps 1 and 2.
4. Restart the engine while holding the device (which may have caused the interference) sepa-
rated from the registered NATS key or NATS
Intelligent Key (where fitted).
If this procedure allows the engine to start,
NISSAN recommends placing the registered
NATS key or NATS Intelligent Key (where fitted)
on a separate key-ring to avoid interference from
other devices.
SECURITY SYSTEM
Pre-driving checks and adjustments3-13
Page 101 of 297
Downloaded from www.Manualslib.com manuals search engine NATS security warning/indicator light
(where fitted)
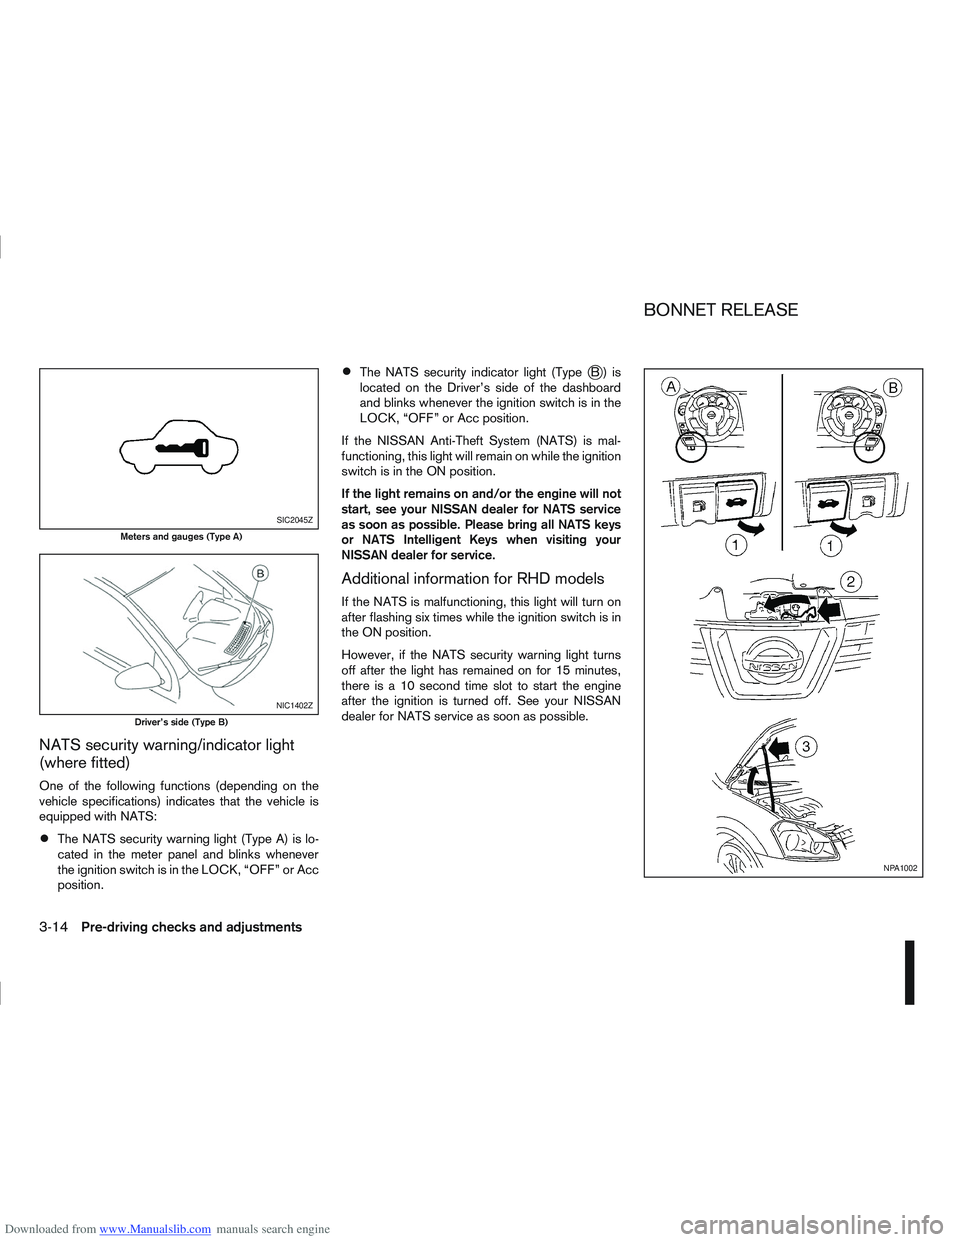
One of the following functions (depending on the
vehicle specifications) indicates that the vehicle is
equipped with NATS:
The NATS security warning light (Type A) is lo-
cated in the meter panel and blinks whenever
the ignition switch is in the LOCK, “OFF” or Acc
position.
The NATS security indicator light (TypejB) is
located on the Driver’s side of the dashboard
and blinks whenever the ignition switch is in the
LOCK, “OFF” or Acc position.
If the NISSAN Anti-Theft System (NATS) is mal-
functioning, this light will remain on while the ignition
switch is in the ON position.
If the light remains on and/or the engine will not
start, see your NISSAN dealer for NATS service
as soon as possible. Please bring all NATS keys
or NATS Intelligent Keys when visiting your
NISSAN dealer for service.
Additional information for RHD models
If the NATS is malfunctioning, this light will turn on
after flashing six times while the ignition switch is in
the ON position.
However, if the NATS security warning light turns
off after the light has remained on for 15 minutes,
there is a 10 second time slot to start the engine
after the ignition is turned off. See your NISSAN
dealer for NATS service as soon as possible.
SIC2045Z
Meters and gauges (Type A)
NIC1402Z
Driver’s side (Type B)
NPA1002
BONNET RELEASE
3-14Pre-driving checks and adjustments
Page 131 of 297
Downloaded from www.Manualslib.com manuals search engine ANTI-THEFT SYSTEM
The audio unit is uniquely matched to the vehicle’s
NISSAN Anti Theft System (NATS) and therefore
cannot be transferred to any other vehicle. This unit
can only be activated when the ignition switch for
NATS is in the Acc or ON position.
AUDIO MAIN OPERATION
The audio unit operates when the ignition switch is
in Acc or ON position.
mPower ON/OFF button
Press thebutton to switch on the audio unit. If
the audio unit was switched off using the ignition
switch, it can also be switched on with the ignition
switch. The mode (radio or CD) that was playing
immediately before the unit was switched off will
resume playing and the volume will be set to the pre-
vious volume level.
The audio unit can be switched off either by press-
ing the
button or by turning the ignition switch to
the “OFF” or LOCK position.
mVolume level control
Turn the MENU/VOL dial in the clockwise or anti-
clockwise direction to adjust the volume level.
The audio unit is equipped with a speed control vol-
ume function, this means that the audio unit auto-
matically adjusts the volume level in relation to ve-
hicle speed. For details, see “MENU button” later in
this section.
Mute button (where fitted)
Press thebutton to mute the sound and
[MUTE] appears in the display. To cancel the mode,
use any one of the following options:
– Press the
button again.
– Turn the MENU/VOL dial.
– Press the
mSound button
Press thebutton to enter the sound menu. Each
time thebutton is pressed, the mode will change
as follows:
[BASS] →[TREBLE] →[BALANCE] →[FADE] →
[EQ] →[BASS]
When the desired mode appears in the display, turn
the MENU/VOL dial clockwise or anticlockwise to
adjust the settings. When the configuration is com-
plete, press the
is exited or wait at least 5 seconds without pressing
any buttons.
BASS control
Use this control to enhance or attenuate bass re-
sponse sound.
Turn the MENU/VOL dial clockwise or anticlockwise
to adjust the bass settings.
TREBLE control
Use this control to enhance or attenuate the treble.
Turn the MENU/VOL dial clockwise or anticlockwise
to adjust the treble settings.
BALANCE control
Use this control to adjust the balance of the volume
between the left and right speakers.
Turn the MENU/VOL dial anticlockwise or clock-
wise to adjust the left/right balance.
FADE (Fader) control
Use this control to adjust the balance of the volume
between the front and rear (where fitted) speakers.
Turn the MENU/VOL dial anticlockwise or clock-
wise to adjust the front/rear balance.
EQ (Equalizer)
Use this control to change the preset sound mode.
Turn the MENU/VOL dial in the clockwise or anti-
clockwise direction and the mode will change as fol-
lows:
[OFF] ⇔[ENHANCE] ⇔[ACOUSTIC] ⇔[LIVE]
⇔ [OFF]
RADIO OPERATION
When the(Power) button is pressed, the audio
unit will switch on with the last received radio sta-
tion, if the audio unit was previously switched off in
radio mode.
4-24Display screen, heater and air conditioner, and audio system
Page 134 of 297

Downloaded from www.Manualslib.com manuals search engine When the
during a NEWS interruption, the NEWS standby
mode remains active.
However, if the button is pressed and
the radio wave band changes to the MW or LW,
then the NEWS standby mode will be switched
off.
MENU BUTTON
To configure Alternative Frequency (AF), Regional
(REG) and Language settings, perform the follow-
ing procedure:
1) Press and hold the
Page 136 of 297
Downloaded from www.Manualslib.com manuals search engine CD eject button
CD player:
Press the eject (
) button and the CD will be
ejected.
6 CD changer:
1. A CD can be ejected by:
Pressing the eject () button (the currently
played CD will be ejected).
Pressing a CD select button followed by the
eject () button.
Pressing the eject () button followed by a
CD select button.
2. After pressing the eject (
) button, a notifica-
tion message appears in the display.
3. When the CD slot door opens, the CD is ejected and the CD can now be removed.
4. If necessary, insert another CD into the respec- tive CD slot or wait to let the system close the
CD slot door.
To eject all the discs sequentially, press and hold
the eject (
) button for longer than 1.5 seconds.
The CD changer will start to eject from the current
or last used CD. After removing an ejected CD, the
next CD will be ejected. Ejecting CD (with ignition switch in “OFF” or
LOCK):
When the ignition switch is in the “OFF” or LOCK
position it is possible to eject the currently played
CD. However the audio unit will not be activated.
CD player:
Press the eject (
) button and the CD will be
ejected.
6 CD changer:
Press the eject () button less than 1.5 sec-
onds and the CD will be ejected.
To eject all CD’s in sequential order, keep the
eject () button pressed for longer than 1.5
seconds. The CD changer starts to eject from
the current or last used CD onwards. After re-
moving an ejected CD, the next one comes out.
NOTE
When the CD is ejected and not removed
within 15 seconds, it will automatically retract
into the slot to protect it from damage.
If an error message appears in the display,
press the eject () button to eject the faulty
CD and insert another CD or check if the
ejected CD is inserted upside down.
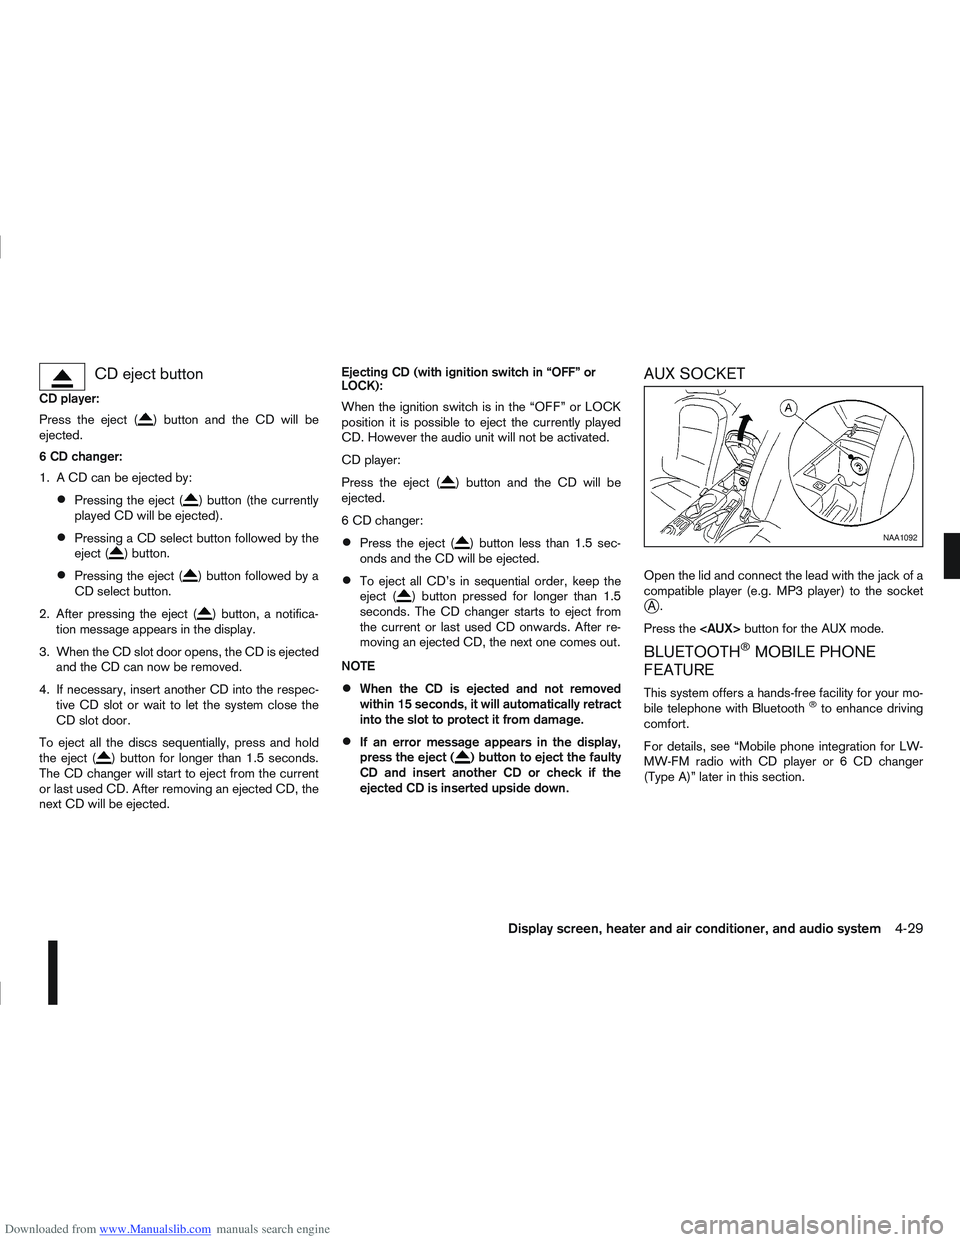
AUX SOCKET
Open the lid and connect the lead with the jack of a
compatible player (e.g. MP3 player) to the socket
jA.
Press the
BLUETOOTH®MOBILE PHONE
FEATURE
This system offers a hands-free facility for your mo-
bile telephone with Bluetooth®to enhance driving
comfort.
For details, see “Mobile phone integration for LW-
MW-FM radio with CD player or 6 CD changer
(Type A)” later in this section.
NAA1092
Display screen, heater and air conditioner, and audio system4-29
Page 138 of 297
Downloaded from www.Manualslib.com manuals search engine ANTI-THEFT SYSTEM
Use of a 4-digit radio PIN (Personal Identification
Number) code, known only to the vehicle owner,
effectively reduces the possibility of the audio unit
being stolen. Without the PIN code the audio unit
cannot be activated.
If force is used to try and remove the audio unit, the
Anti-theft system activates and the audio unit is
locked. The only way to unlock the audio unit is to
enter the radio code number shown on an identifica-
tion card supplied with the vehicle documentation.
NOTE
The 4 digit radio code is shown on a card that
you received with your vehicle documenta-
tion.
Record the 4 digit radio code on the “Security
information” page at the end of this manual.
Remove the security page and keep it in a
safe, not in the vehicle.
Contact a NISSAN dealer if you do lose the 4
digit radio code of the audio unit.
Unlocking the unit
If the battery supply to the vehicle is interrupted, the
audio unit will lock.
When the power is restored and the unit switched
on, the display will show [Radio Code:] and it will be
unlocked when the codes have been entered cor-
rectly.
Unlocking procedure:
Read this section very carefully. It is important
that the instructions are followed precisely.
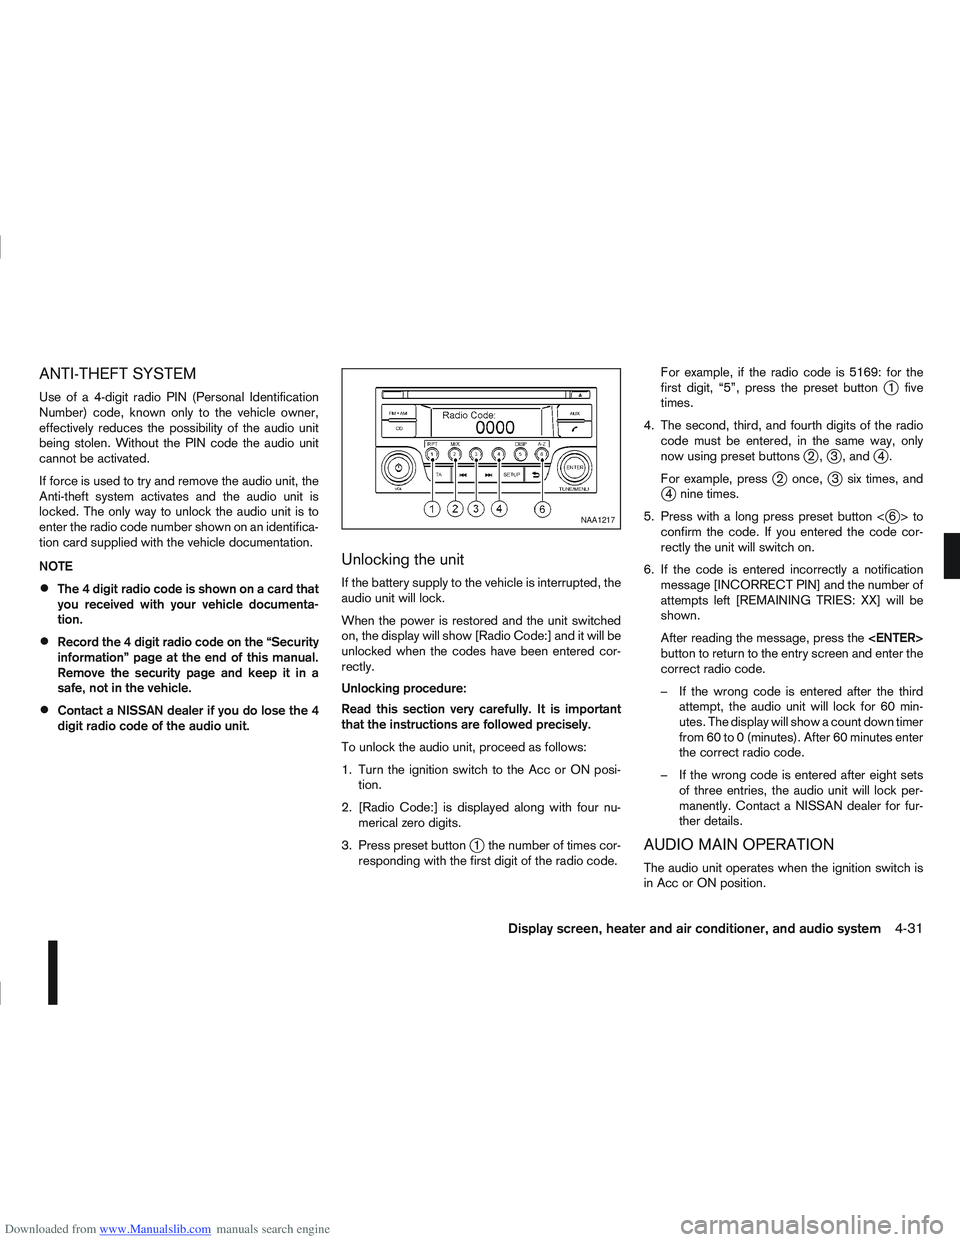
To unlock the audio unit, proceed as follows:
1. Turn the ignition switch to the Acc or ON posi-tion.
2. [Radio Code:] is displayed along with four nu- merical zero digits.
3. Press preset button
j1 the number of times cor-
responding with the first digit of the radio code. For example, if the radio code is 5169: for the
first digit, “5”, press the preset button
j1 five
times.
4. The second, third, and fourth digits of the radio code must be entered, in the same way, only
now using preset buttons
j2,j3 , andj4.
For example, press
j2 once,j3 six times, andj4 nine times.
5. Press with a long press preset button <
j6>to
confirm the code. If you entered the code cor-
rectly the unit will switch on.
6. If the code is entered incorrectly a notification message [INCORRECT PIN] and the number of
attempts left [REMAINING TRIES: XX] will be
shown.
After reading the message, press the
button to return to the entry screen and enter the
correct radio code.
– If the wrong code is entered after the third attempt, the audio unit will lock for 60 min-
utes. The display will show a count down timer
from 60 to 0 (minutes). After 60 minutes enter
the correct radio code.
– If the wrong code is entered after eight sets of three entries, the audio unit will lock per-
manently. Contact a NISSAN dealer for fur-
ther details.
AUDIO MAIN OPERATION
The audio unit operates when the ignition switch is
in Acc or ON position.
NAA1217
Display screen, heater and air conditioner, and audio system4-31