2009 NISSAN QASHQAI battery
[x] Cancel search: batteryPage 115 of 297
Downloaded from www.Manualslib.com manuals search engine Yellow linej2 :approx.1m(3ft)
Green linej3 :approx.2m(7ft)
Green linej4 :approx.3m(10ft)
Vehicle width guide lines
j5:
Indicate the vehicle width when reversing.
Predictive course lines
j6:
Indicate the predictive course when operating the
vehicle. The predictive course lines will be displayed
on the monitor when the steering wheel is turned.
The predictive course lines will move depending on
how much the steering wheel is turned and will not
be displayed while the steering wheel is in the neu-
tral position.
The front view will not be displayed when the vehicle
speed is above 10 km/h (6 MPH).
WARNING
The distance between objects viewed in the
rear view differs from actual distance because
a wide-angle lens is used. Objects in the rear
view will appear visually opposite than when
viewed in the rear view and outside mirrors.
On a snow-covered or slippery road, there
may be a difference between the predictive
course line and the actual course line.
If the battery is disconnected or becomes dis-
charged, the predictive course lines may be
displayed incorrectly. If this occurs visit a
NISSAN dealer or qualified workshop.
If predictive course lines are displayed incor-
rectly visit a NISSAN dealer or qualified work-
shop.
The displayed lines on the rear view will ap-
pear slightly off to the right because the rear
view camera is not installed in the rear centre
of the vehicle.
NOTE
When the monitor displays the front view and the
steering wheel turns about 90 degrees or less
from the neutral position, both the right and left
predictive course lines
j6 are displayed. When
the steering wheel turns about 90 degrees or
more, a line is displayed only on the opposite
side of the turn.
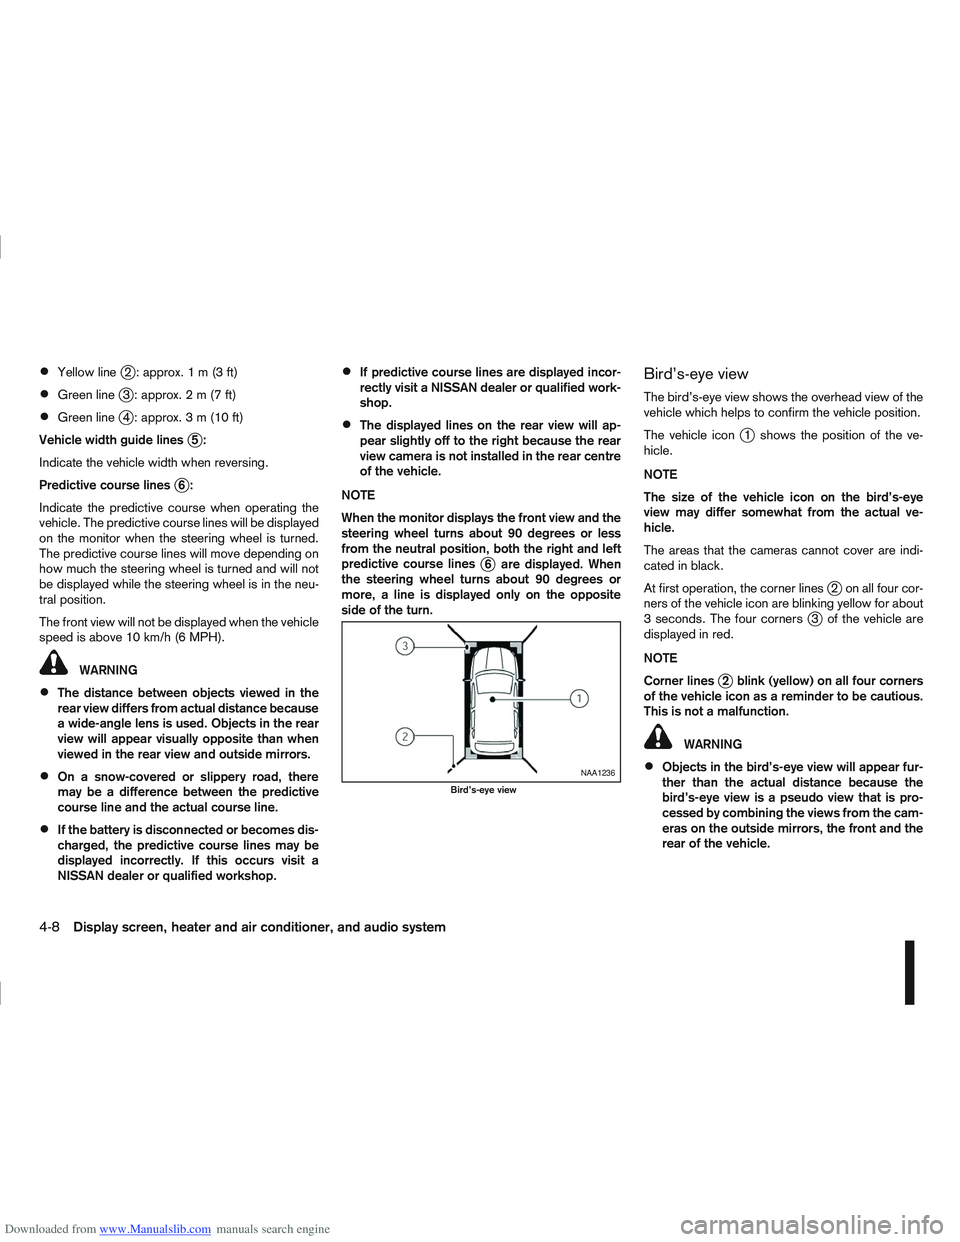
Bird’s-eye view
The bird’s-eye view shows the overhead view of the
vehicle which helps to confirm the vehicle position.
The vehicle icon
j1 shows the position of the ve-
hicle.
NOTE
The size of the vehicle icon on the bird’s-eye
view may differ somewhat from the actual ve-
hicle.
The areas that the cameras cannot cover are indi-
cated in black.
At first operation, the corner lines
j2 on all four cor-
ners of the vehicle icon are blinking yellow for about
3 seconds. The four corners
j3 of the vehicle are
displayed in red.
NOTE
Corner lines
j2 blink (yellow) on all four corners
of the vehicle icon as a reminder to be cautious.
This is not a malfunction.
WARNING
Objects in the bird’s-eye view will appear fur-
ther than the actual distance because the
bird’s-eye view is a pseudo view that is pro-
cessed by combining the views from the cam-
eras on the outside mirrors, the front and the
rear of the vehicle.NAA1236
Bird’s-eye view
4-8Display screen, heater and air conditioner, and audio system
Page 132 of 297
Downloaded from www.Manualslib.com manuals search engine Band select button
Press the button to change the reception
wave band as follows:
FM1 →FM 2 →FM T →MW →LW →FM1
When button is pressed while the igni-
tion switch is in the Acc or ON position, the radio
will come on at the last received radio station. If the
CD is already playing, pressing the but-
ton will switch off the CD play mode and the last
received radio station will be selected.
FM Auto store
When the button is pressed for more
than 1.5 seconds and the six strongest stations are
stored in the preset (1 to 6) of the FM T band. Dur-
ing the search, a notification message [AU-
TOSTORE] appears in the display and the sound is
muted until the operation is complete. Once com-
pleted, the radio selects preset 1.
Manual tuning buttons
WARNING
The radio should not be tuned while driving in
order for full attention to be given to the driving
operation.
Press the
orbutton repeatedly to in-
crease or decrease the frequency. The frequency increases or decreases in steps of
100 kHz on the FM band, 9kHz on the MW band,
and 3 kHz on the LW band.
If the
orbutton is held down with a long
press, the frequency will continuously increase or
decrease until the button is released.
SEEK tuning buttons
Pressing briefly on theorbutton starts the
tuning mode. The radio tuner seeks from low to high
or high to low frequencies and stops at the next
broadcasting station. During seek mode, the audio
output is muted. If no broadcasting station can be
found within the complete band cycle, it will return
to the initial frequency.
If the
orbutton is held down with a long
press, the seek mode will continuously increase or
decrease until the button is released. When the but-
ton is released, the seek mode will seek the next
broadcasting station.
Preset station buttonsj1j2j3j4j5j6
Pressing a preset button for less than 2 seconds will
select the stored radio station.
Pressing a preset button for more than 2 seconds
will cause the station currently being received to be
stored against that preset button.
Eighteen stations can be stored in the FM band.
(Six each for FM1, FM2 and FMT)
Six stations can be set for both the MW and LW
bands. If the battery is disconnected, or if the fuse blows,
the radio memory will be erased. In that case, reset
the desired stations after battery connection or fuse
replacement.
Radio data system (RDS) operation
The RDS is a system through which encoded digital
information is transmitted by FM radio station in ad-
dition to the normal FM-radio broadcasting. The
RDS provides information services such as station
name, traffic information and news.
NOTE
In some countries or regions, some of these ser-
vices may not be available.
Alternative Frequency (AF) mode:
The AF mode operates in the FM (radio) mode.
The AF mode operates both in the FM (radio)
and CD mode (if FM was previously selected in
the radio mode).
When AF mode has been set to the “ON” posi-
tion in the user set up menu mode, the [AF] indi-
cator comes on. For activation or deactivation
details, see “MENU button” later in this section.
The AF function compares signal strengths and se-
lects the station with the optimum reception condi-
tions for the currently tuned-in station.
Display screen, heater and air conditioner, and audio system4-25
Page 138 of 297
Downloaded from www.Manualslib.com manuals search engine ANTI-THEFT SYSTEM
Use of a 4-digit radio PIN (Personal Identification
Number) code, known only to the vehicle owner,
effectively reduces the possibility of the audio unit
being stolen. Without the PIN code the audio unit
cannot be activated.
If force is used to try and remove the audio unit, the
Anti-theft system activates and the audio unit is
locked. The only way to unlock the audio unit is to
enter the radio code number shown on an identifica-
tion card supplied with the vehicle documentation.
NOTE
The 4 digit radio code is shown on a card that
you received with your vehicle documenta-
tion.
Record the 4 digit radio code on the “Security
information” page at the end of this manual.
Remove the security page and keep it in a
safe, not in the vehicle.
Contact a NISSAN dealer if you do lose the 4
digit radio code of the audio unit.
Unlocking the unit
If the battery supply to the vehicle is interrupted, the
audio unit will lock.
When the power is restored and the unit switched
on, the display will show [Radio Code:] and it will be
unlocked when the codes have been entered cor-
rectly.
Unlocking procedure:
Read this section very carefully. It is important
that the instructions are followed precisely.
To unlock the audio unit, proceed as follows:
1. Turn the ignition switch to the Acc or ON posi-tion.
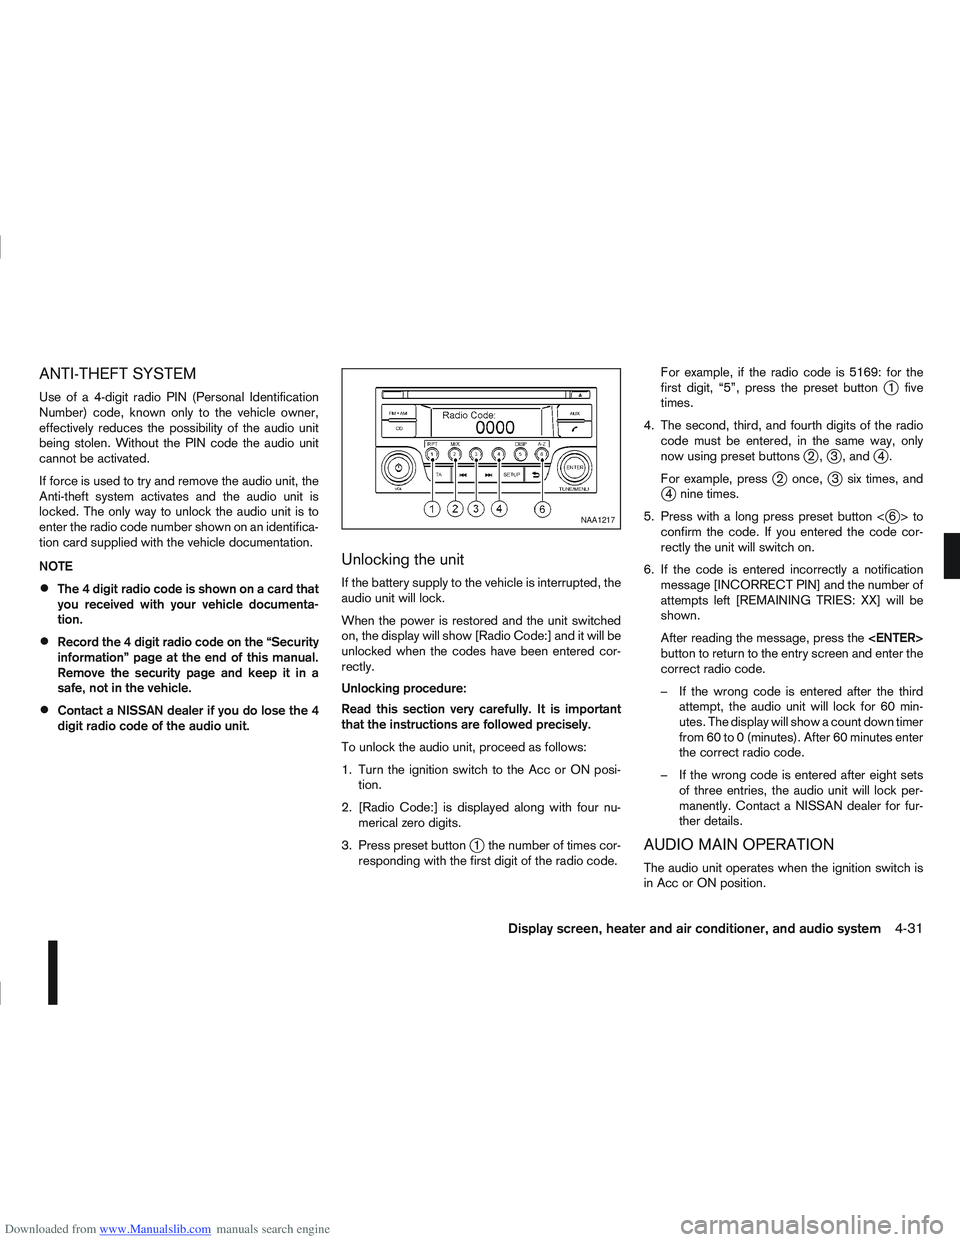
2. [Radio Code:] is displayed along with four nu- merical zero digits.
3. Press preset button
j1 the number of times cor-
responding with the first digit of the radio code. For example, if the radio code is 5169: for the
first digit, “5”, press the preset button
j1 five
times.
4. The second, third, and fourth digits of the radio code must be entered, in the same way, only
now using preset buttons
j2,j3 , andj4.
For example, press
j2 once,j3 six times, andj4 nine times.
5. Press with a long press preset button <
j6>to
confirm the code. If you entered the code cor-
rectly the unit will switch on.
6. If the code is entered incorrectly a notification message [INCORRECT PIN] and the number of
attempts left [REMAINING TRIES: XX] will be
shown.
After reading the message, press the
button to return to the entry screen and enter the
correct radio code.
– If the wrong code is entered after the third attempt, the audio unit will lock for 60 min-
utes. The display will show a count down timer
from 60 to 0 (minutes). After 60 minutes enter
the correct radio code.
– If the wrong code is entered after eight sets of three entries, the audio unit will lock per-
manently. Contact a NISSAN dealer for fur-
ther details.
AUDIO MAIN OPERATION
The audio unit operates when the ignition switch is
in Acc or ON position.
NAA1217
Display screen, heater and air conditioner, and audio system4-31
Page 140 of 297

Downloaded from www.Manualslib.com manuals search engine Eighteen stations can be stored in the FM band.
(Six each for FM1, FM2 and FMT)
Six stations can be set for the AM band.
If the battery is disconnected, or if the fuse blows,
the radio memory will be erased. In that case, reset
the desired stations after battery connection or fuse
replacement.
Radio data system (RDS) operation
The RDS is a system through which encoded digital
information is transmitted by FM radio stations in
addition to the normal FM radio broadcasting. The
RDS provides information services such as station
name, traffic information, or news.
NOTE
In some countries or regions, some of these ser-
vices may not be available.
Alternative Frequency (AF) mode:
The AF mode operates in the FM (radio) mode.
The AF mode operates in the FM (radio), AUX or
CD mode (if FM was previously selected in the
radio mode).
The AF function compares signal strengths and
selects the station with the optimum reception
conditions for the currently tuned-in station.
RDS functions
Programme Service (PS) function (station name
display function):
When an RDS station is tuned in with seek or manual
tuning, the RDS data is received and the PS name
is displayed.
TA Traffic announcement
This function operates in FM (Radio), CD or AUX
mode.
Pressing the
The TA indicator is displayed while TA mode is
on.
When
switched off and the TA indicator will disappear
from the display.
Traffic announcement interrupt function:
When a traffic announcement is received, the an-
nouncement is tuned in and the display shows a
notification message with the radio station name e.g.
[TA: Radio 1].
Once the traffic announcement has finished, the unit
returns to the source that was active before the traf-
fic announcement started.
If
the traffic announcement interrupt mode is can-
celled. The TA mode returns to the standby mode
and the audio unit returns to the previous source.
SETUP BUTTON
To configure Audio, Clock, Bluetooth, Language or
Scroll direction settings, perform the following pro-
cedure:
1. Press the
2. Turn the
clockwise, the display will appear in the following
order:
[Audio] ⇔[Clock] ⇔[Bluetooth] ⇔[Language]
⇔ [Scroll Direction]
After the desired levels have been set, press either
the
(Back) button repeatedly, the
button, or wait for 8 seconds without pressing any
buttons to exit the menu screen.
Display brightness (Day/Night mode)
Press the
switch the display brightness between the daytime
and nighttime mode.
Audio adjustments
Press the
screen then select [Audio].
Each time the
will change as follows:
[Bass] →[Treble] →[Balance] →[Fade] →[AUX
VOL] →[SPD VOL] →setup menu screen [Audio]
→ [Bass]
Display screen, heater and air conditioner, and audio system4-33
Page 144 of 297
Downloaded from www.Manualslib.com manuals search engine USB MEMORY OPERATION
(where fitted)
Connecting USB memory
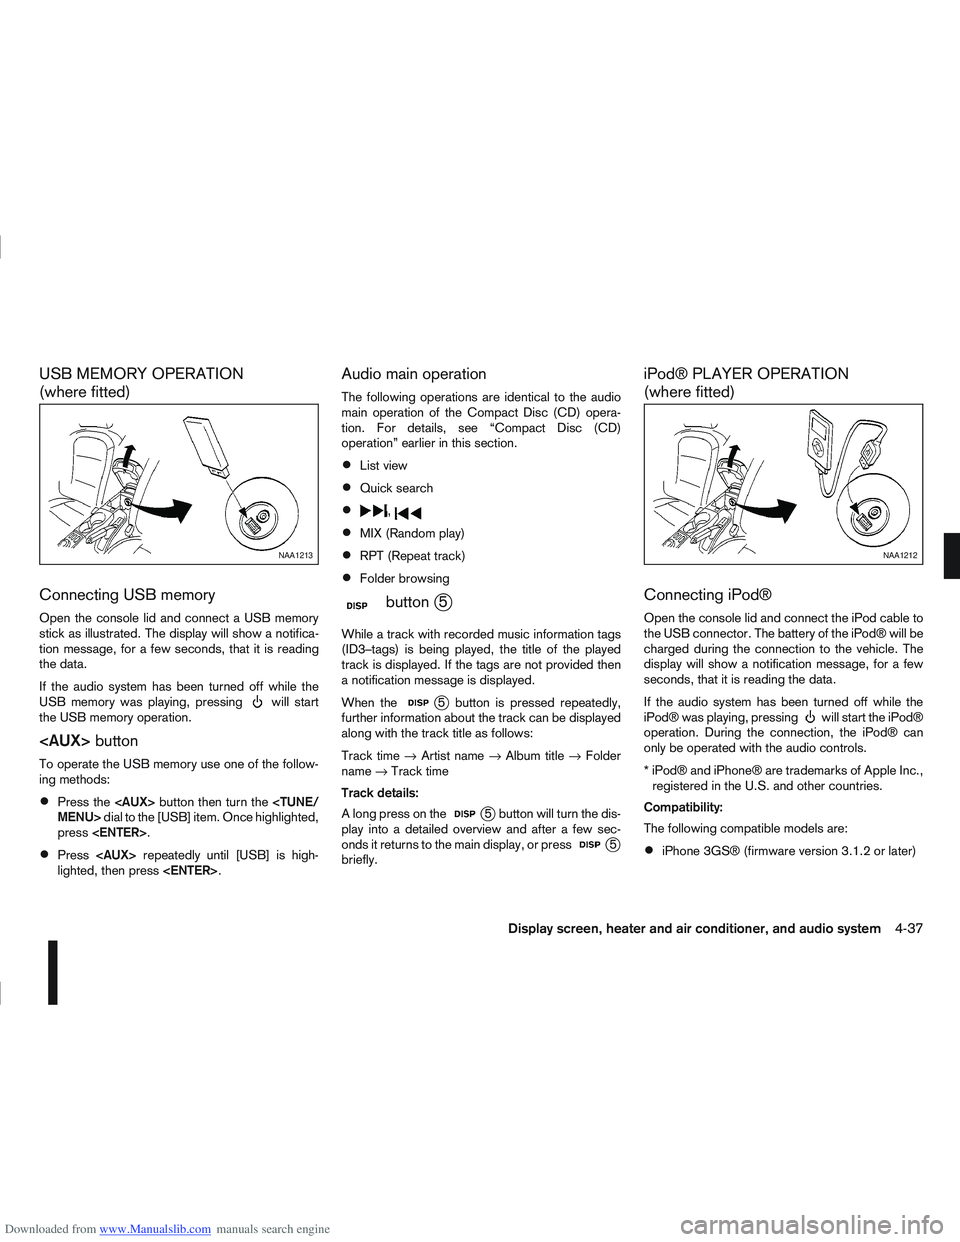
Open the console lid and connect a USB memory
stick as illustrated. The display will show a notifica-
tion message, for a few seconds, that it is reading
the data.
If the audio system has been turned off while the
USB memory was playing, pressing
will start
the USB memory operation.
To operate the USB memory use one of the follow-
ing methods:
Press the
press
Press
lighted, then press
Audio main operation
The following operations are identical to the audio
main operation of the Compact Disc (CD) opera-
tion. For details, see “Compact Disc (CD)
operation” earlier in this section.
List view
Quick search
,
MIX (Random play)
RPT (Repeat track)
Folder browsing
mbuttonj5
While a track with recorded music information tags
(ID3–tags) is being played, the title of the played
track is displayed. If the tags are not provided then
a notification message is displayed.
When the
j5 button is pressed repeatedly,
further information about the track can be displayed
along with the track title as follows:
Track time →Artist name →Album title →Folder
name →Track time
Track details:
A long press on the
j5 button will turn the dis-
play into a detailed overview and after a few sec-
onds it returns to the main display, or press
j5
briefly.
iPod® PLAYER OPERATION
(where fitted)
Connecting iPod®
Open the console lid and connect the iPod cable to
the USB connector. The battery of the iPod® will be
charged during the connection to the vehicle. The
display will show a notification message, for a few
seconds, that it is reading the data.
If the audio system has been turned off while the
iPod® was playing, pressing
will start the iPod®
operation. During the connection, the iPod® can
only be operated with the audio controls.
* iPod® and iPhone® are trademarks of Apple Inc., registered in the U.S. and other countries.
Compatibility:
The following compatible models are:
iPhone 3GS® (firmware version 3.1.2 or later)
NAA1213NAA1212
Display screen, heater and air conditioner, and audio system4-37
Page 147 of 297

Downloaded from www.Manualslib.com manuals search engine Audio device without PIN code:
The Bluetooth connection will be automati-
cally connected without any further input.
Audio device with PIN code:
A new screen will appear. Assign the 4 digit
PIN code by turning the
to each code and press the
to confirm. Then select [Validate] and press
made.
The 4–digit PIN code is provided with the
audio device, see the owner’s manual of the
audio device.
3. On Bluetooth® audio/mobile phone devices. 1) Switch on the Bluetooth® connection, if not already switched on.
2) Switch on the search mode for Bluetooth® devices. If the search mode finds a device it
will be shown on the device display.
3) When a device is found use the
to select [My Car].
4) Enter the number code shown on the relevant device with the device’s own keypad, and
press the confirmation key on the device it-
self. Refer to the relevant Bluetooth® device
owner’s manual for further details.
When successfully paired a notification message
will be displayed, then the audio system display will return to the current audio source display.
During connection the following status icons will
be displayed (top left of the display): Signal
strength (), Battery status* () and Blue-
tooth “ON” ().
*: If the low battery message comes on, the
Bluetooth® device must be recharged soon.
The pairing procedure and operation may vary ac-
cording to device type and compatibility. See the
Bluetooth® owner’s manual for further details.
NOTE
For device details, see your audio/mobile
phone Owner’s Manual.
For assistance with the Bluetooth® audio/
mobile phone integration, please visit your lo-
cal NISSAN dealer.
[Select Device]:
The paired device list shows which Bluetooth® au-
dio or mobile phone devices have been paired or
registered with the Bluetooth® audio system. If the
list contains devices then select the appropriate de-
vice to connect to the Bluetooth® audio system.
The following symbols (where fitted) indicate the
capability of the registered device:
: Mobile phone integration
: Audio streaming (A2DP – Advanced Audio
Distribution Profile) [Delete Device]:
A registered device can be removed from the Blue-
tooth audio system. Select a registered device then
press
[On/Off]:
If Bluetooth® has been switched off a notification
message [On/Off] appears when you select [Blue-
tooth] from the setup menu screen, or press
.To
switch the Bluetooth® signal on, press
and a follow up screen will appear. Then select [On]
and press
tings menu screen.
Bluetooth® audio streaming main
operation
Turn the ignition switch to the Acc or ON position.
If the audio system was turned off while the Blue-
tooth® audio was playing, pressing the <
> but-
ton will start the Bluetooth® audio streaming.
NAA1203
4-40Display screen, heater and air conditioner, and audio system
Page 160 of 297
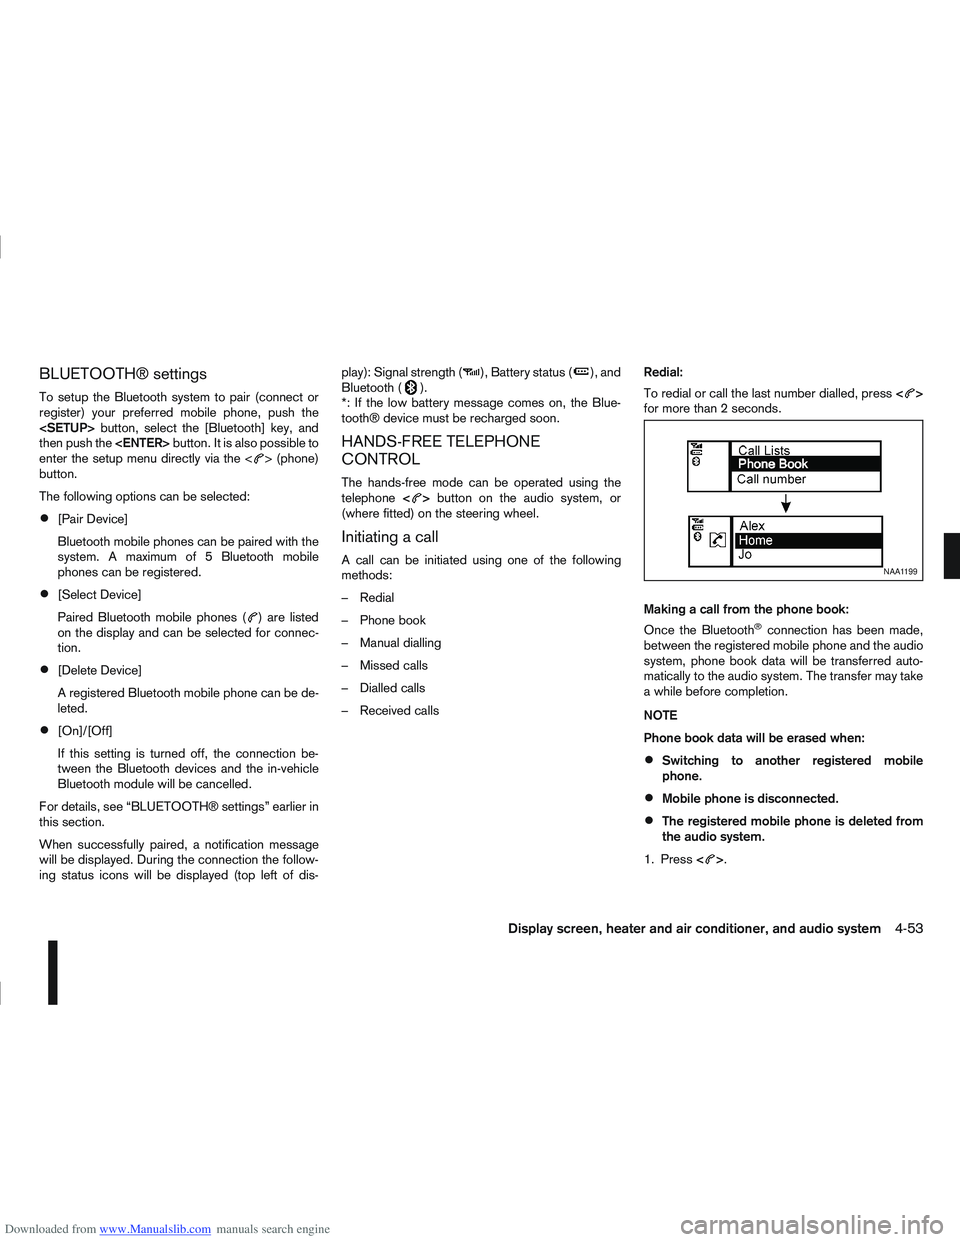
Downloaded from www.Manualslib.com manuals search engine BLUETOOTH® settings
To setup the Bluetooth system to pair (connect or
register) your preferred mobile phone, push the
then push the
enter the setup menu directly via the <
> (phone)
button.
The following options can be selected:
[Pair Device]
Bluetooth mobile phones can be paired with the
system. A maximum of 5 Bluetooth mobile
phones can be registered.
[Select Device]
Paired Bluetooth mobile phones (
) are listed
on the display and can be selected for connec-
tion.
[Delete Device]
A registered Bluetooth mobile phone can be de-
leted.
[On]/[Off]
If this setting is turned off, the connection be-
tween the Bluetooth devices and the in-vehicle
Bluetooth module will be cancelled.
For details, see “BLUETOOTH® settings” earlier in
this section.
When successfully paired, a notification message
will be displayed. During the connection the follow-
ing status icons will be displayed (top left of dis- play): Signal strength (
), Battery status (), and
Bluetooth ().
*: If the low battery message comes on, the Blue-
tooth® device must be recharged soon.
HANDS-FREE TELEPHONE
CONTROL
The hands-free mode can be operated using the
telephone <>button on the audio system, or
(where fitted) on the steering wheel.
Initiating a call
A call can be initiated using one of the following
methods:
– Redial
– Phone book
– Manual dialling
– Missed calls
– Dialled calls
– Received calls Redial:
To redial or call the last number dialled, press
<
>
for more than 2 seconds.
Making a call from the phone book:
Once the Bluetooth
®connection has been made,
between the registered mobile phone and the audio
system, phone book data will be transferred auto-
matically to the audio system. The transfer may take
a while before completion.
NOTE
Phone book data will be erased when:
Switching to another registered mobile
phone.
Mobile phone is disconnected.
The registered mobile phone is deleted from
the audio system.
1. Press <
>.
NAA1199
Display screen, heater and air conditioner, and audio system4-53
Page 163 of 297

Downloaded from www.Manualslib.com manuals search engine 5Starting and driving
Starting and driving
Running-in schedule ................................................ 5-2
Before starting the engine ........................................ 5-2
Precautions when starting and driving ...................... 5-3
Exhaust gas (Carbon Monoxide) ......................... 5-3
On-pavement and off-road driving precautions ......... 5-4
Three-way catalyst (Petrol engine models)................ 5-4 To help prevent damage ..................................... 5-4
Turbocharger system (Diesel engine models) ........... 5-5
Diesel Particulate Filter (DPF) (where fitted) ............. 5-5 Regeneration restrictions .................................... 5-5
If regeneration fails ............................................. 5-5
Care when driving ................................................... 5-6 Engine cold start period ...................................... 5-6
Loading luggage ................................................. 5-6
Driving on wet roads ........................................... 5-6
Driving under winter conditions ........................... 5-6
Ignition switch.......................................................... 5-6 Manual transmission ........................................... 5-6
Automatic transmission or Continuously
variable transmission........................................... 5-7
Steering lock ...................................................... 5-7
Key positions ...................................................... 5-7
NISSAN Anti-Theft System (NATS)..................... 5-7
Ignition knob (where fitted)....................................... 5-8 Manual transmission ........................................... 5-8
Automatic transmission or Continuously
variable transmission........................................... 5-9
Steering lock ...................................................... 5-9
Ignition knob position .......................................... 5-9 Emergency key – Intelligent Key dead battery
situation .............................................................. 5-10
NISSAN Anti-Theft System (NATS)..................... 5-10
Starting the engine................................................... 5-11
Driving the vehicle.................................................... 5-12 Driving with manual transmission......................... 5-12
Driving with automatic transmission or with
continuously variable transmission (Models
with manual shift) ................................................ 5-14
Driving with Continuously Variable Transmis-
sion (CVT) (Models without manual shift) ............ 5-17
Stop/Start System (where fitted) .............................. 5-21 Normal operation ................................................ 5-21
Precautions ........................................................ 5-22
Stop/Start System OFF switch ........................... 5-23
Environmental savings ........................................ 5-23
Ultrasonic Parking Sensor (where fitted) .................. 5-24
Four-wheel Drive (4WD) (where fitted)..................... 5-24 4WD mode operations........................................ 5-25
4WD shift tips .................................................... 5-25
4WD Warning light ............................................. 5-26
4WD Mode indicator lights ................................. 5-27
Driving four-wheel drive (4WD) safely ................. 5-27
Cruise control (where fitted) .................................... 5-29 Precautions on cruise control .............................. 5-29
Cruise control system operations ........................ 5-30
Speed limiter ........................................................... 5-31 Speed limiter operations ..................................... 5-32
Parking .................................................................... 5-33
Trailer towing ........................................................... 5-35