2009 NISSAN MURANO center console
[x] Cancel search: center consolePage 108 of 443
Black plate (106,1)
Model "Z51-D" EDITED: 2007/ 10/ 2
SIC3650
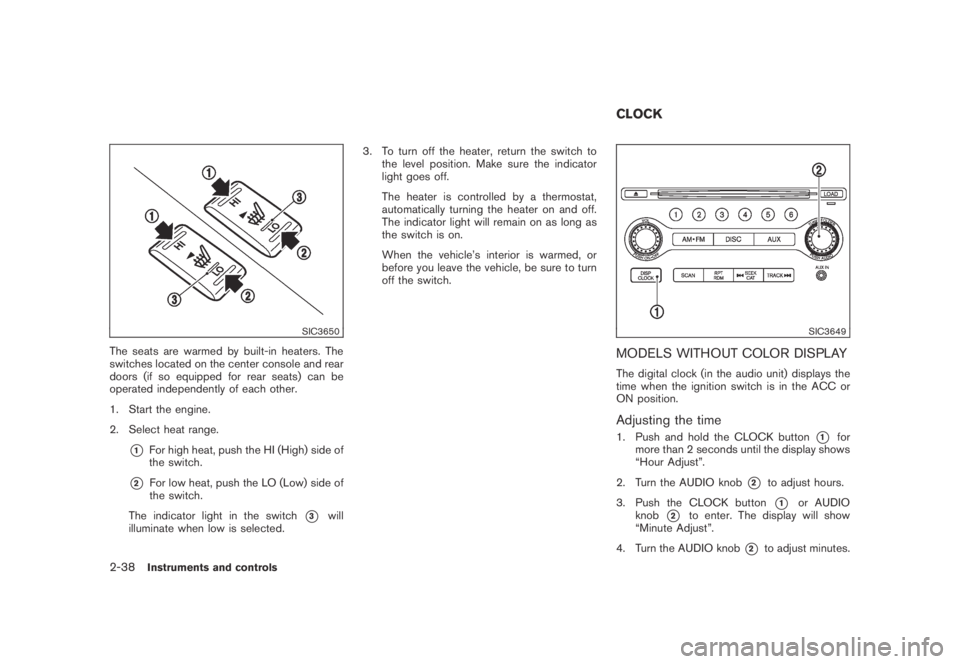
The seats are warmed by built-in heaters. The
switches located on the center console and rear
doors (if so equipped for rear seats) can be
operated independently of each other.
1. Start the engine.
2. Select heat range.
*1For high heat, push the HI (High) side of
the switch.
*2For low heat, push the LO (Low) side of
the switch.
The indicator light in the switch
*3will
illuminate when low is selected.3. To turn off the heater, return the switch to
the level position. Make sure the indicator
light goes off.
The heater is controlled by a thermostat,
automatically turning the heater on and off.
The indicator light will remain on as long as
the switch is on.
When the vehicle’s interior is warmed, or
before you leave the vehicle, be sure to turn
off the switch.
SIC3649
MODELS WITHOUT COLOR DISPLAY
The digital clock (in the audio unit) displays the
time when the ignition switch is in the ACC or
ON position.
Adjusting the time
1. Push and hold the CLOCK button*1for
more than 2 seconds until the display shows
“Hour Adjust”.
2. Turn the AUDIO knob
*2to adjust hours.
3. Push the CLOCK button
*1or AUDIO
knob
*2to enter. The display will show
“Minute Adjust”.
4. Turn the AUDIO knob
*2to adjust minutes.
CLOCK
2-38Instruments and controls
Page 109 of 443

Black plate (107,1)
Model "Z51-D" EDITED: 2007/ 10/ 2
5. Push the CLOCK button*1or AUDIO
knob
*2to enter.
The display will return to the regular clock
display after 10 seconds.
If the power supply is disconnected, the clock
will not indicate the correct time.
Readjust the time.
MODELS WITH COLOR DISPLAY
For adjusting the time, see “Clock settings” in
the “4. Monitor, heater, air conditioner, audio,
phone and voice recognition systems” section.
SIC1881
The vehicle should be driven with the Vehicle
Dynamic Control (VDC) system on for most
driving conditions.
If the vehicle is stuck in mud or snow, the VDC
system reduces the engine output to reduce
wheel spin. The engine speed will be reduced
even if the accelerator is depressed to the floor.
If maximum engine power is needed to free a
stuck vehicle, turn the VDC system off.
To turn off the VDC system, push the VDC OFF
switch. The
indicator will illuminate.
Push the VDC OFF switch again or restart the
engine to turn on the system. (See “VEHICLE
DYNAMIC CONTROL (VDC) SYSTEM” in the
“5. Starting and driving” section.)
SIC3587Center console
SIC3651Cargo area
VEHICLE DYNAMIC CONTROL (VDC)
OFF SWITCHPOWER OUTLET
Instruments and controls2-39
Page 198 of 443
Black plate (196,1)
Model "Z51-D" EDITED: 2007/ 10/ 2
iPod®player (if so equipped)
.Some characters used in other lan-
guages (Chinese, Japanese, etc.) are
not displayed properly on the vehicle
center screen. We recommend using
English language characters with an
iPod
®.
.Large video podcast files cause slow
responses in the iPod
®. The vehicle
center display may momentarily black
out, but it will soon recover.
.If the iPod
®automatically selects large
video podcast files while in the shuffle
mode, the vehicle center display may
momentarily black out, but it will soon
recover.
.Improperly plugging in the iPod
®may
cause a checkmark to be displayed on
and off (flickering) . Always make sure
that the iPod
®is connected properly.
.The iPod
®nano (2nd Generation) will
continue to fast forward or rewind if it
is disconnected during a seek opera-
tion.
.An incorrect song title may appear
when the Play Mode is changed while
using the iPod
®nano (2nd Generation) .
.Audiobooks may not play in the sameorder as they appear on the iPod
®.
.The iPod
®nano (1st Generation) may
remain in fast forward or rewind mode
if it is connected during a seek opera-
tion. In this case, please manually reset
the iPod
®.
.If you are using an iPod
®(3rd Genera-
tion with Dock connector) , do not use
very long names for the song title,
album name or artist name to avoid
the iPod
®from resetting itself.
.Be careful not to do the following, or
the cable could be damaged and a loss
of function may occur.
—Bend the cable excessively (1.6 in (40
mm) radius minimum) .
—Twist the cable excessively (more
than 180 degrees) .
—Pull or drop the cable.
—Close the center console lid on the
cable or connectors.
—Store objects with sharp edges in the
storage where the cable is stored.
—Spill liquids on the cable and con-
nectors.
.Do not connect the cable to the iPod
®ifthe cable and/or connectors are wet. It
may damage the iPod
®.
.If the cable and connectors are ex-
posed to water, allow the cable and/or
connectors to dry completely before
connecting the cable to the iPod
®(wait
24 hours for it to dry) .
.If the connector is exposed to fluids
other than water, evaporative residue
may cause a short between the con-
nector pins. In this case, replace the
cable, otherwise damage to the iPod
®
and a loss of function may occur.
.If the cable is damaged (insulation cut,
connectors cracked, contamination
such as liquids, dust, dirt, etc. in the
connectors) , do not use the cable and
contact a NISSAN dealer to replace the
cable with a new one.
.When not in use for extended periods
of time, store the cable in a clean, dust
free environment at room temperature
and without direct sun exposure.
.Do not use the cable for any other
purposes other than its intended use in
the vehicle.
*iPod
®is a trademark of Apple Inc., registered in
the U.S. and other countries.
4-34Monitor, heater, air conditioner, audio, phone and voice recognition systems
Page 212 of 443
Black plate (210,1)
Model "Z51-D" EDITED: 2007/ 10/ 2
CD EJECT:
When the CD EJECT button is pushed with the
compact disc loaded, the compact disc will be
ejected.
To eject the discs selected by the CD select
button, push the EJECT button for less than 1.5
seconds.
To eject all the discs (if so equipped) , push the
EJECT button for more than 1.5 seconds.
When this button is pushed while the compact
disc is being played, the compact disc will come
out and the system will turn off.
If the compact disc comes out and is not
removed, it will be pulled back into the slot
to protect it.
SAA1856
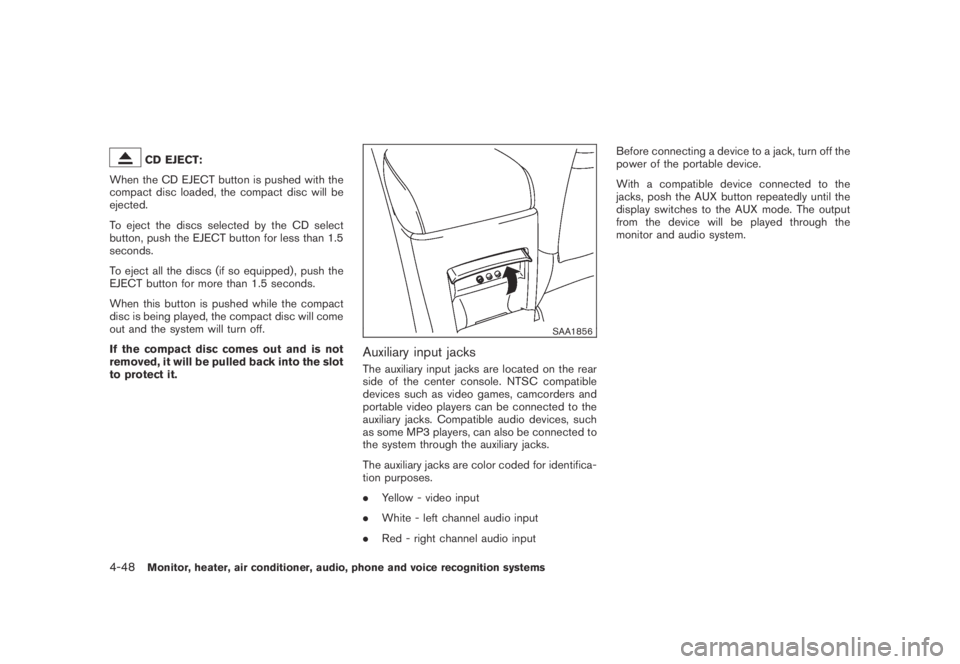
Auxiliary input jacks
The auxiliary input jacks are located on the rear
side of the center console. NTSC compatible
devices such as video games, camcorders and
portable video players can be connected to the
auxiliary jacks. Compatible audio devices, such
as some MP3 players, can also be connected to
the system through the auxiliary jacks.
The auxiliary jacks are color coded for identifica-
tion purposes.
.Yellow - video input
.White - left channel audio input
.Red - right channel audio inputBefore connecting a device to a jack, turn off the
power of the portable device.
With a compatible device connected to the
jacks, posh the AUX button repeatedly until the
display switches to the AUX mode. The output
from the device will be played through the
monitor and audio system.
4-48Monitor, heater, air conditioner, audio, phone and voice recognition systems
Page 215 of 443
Black plate (213,1)
Model "Z51-D" EDITED: 2007/ 10/ 2
iPod®PLAYER OPERATION (if so
equipped)
Connecting iPod
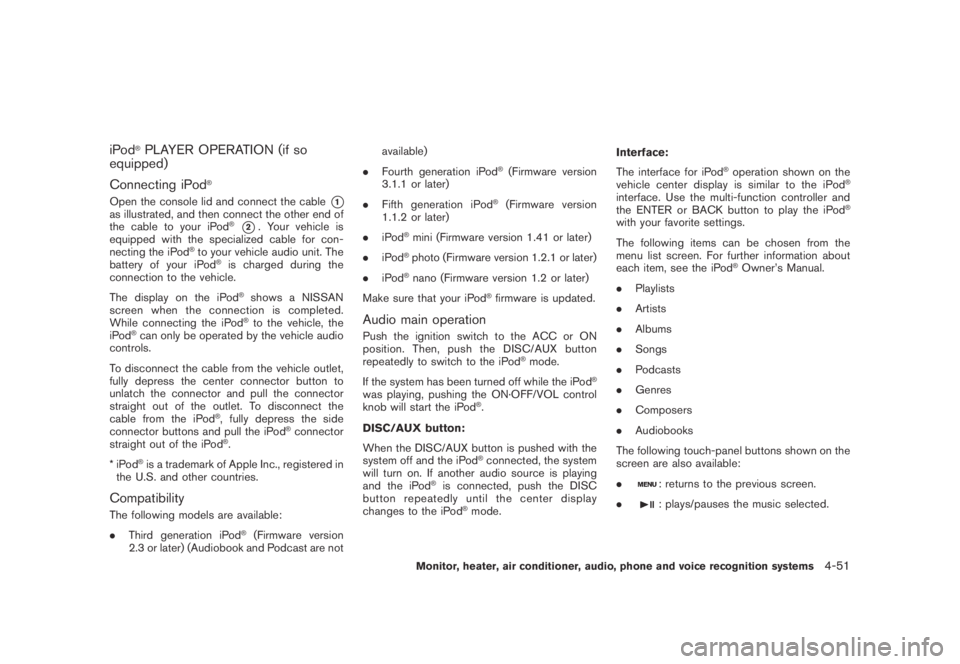
®
Open the console lid and connect the cable*1as illustrated, and then connect the other end of
the cable to your iPod®*2. Your vehicle is
equipped with the specialized cable for con-
necting the iPod
®to your vehicle audio unit. The
battery of your iPod®is charged during the
connection to the vehicle.
The display on the iPod
®shows a NISSAN
screen when the connection is completed.
While connecting the iPod
®to the vehicle, the
iPod®can only be operated by the vehicle audio
controls.
To disconnect the cable from the vehicle outlet,
fully depress the center connector button to
unlatch the connector and pull the connector
straight out of the outlet. To disconnect the
cable from the iPod
®, fully depress the side
connector buttons and pull the iPod®connector
straight out of the iPod®.
*iPod
®is a trademark of Apple Inc., registered in
the U.S. and other countries.
Compatibility
The following models are available:
.Third generation iPod
®(Firmware version
2.3 or later) (Audiobook and Podcast are notavailable)
.Fourth generation iPod
®(Firmware version
3.1.1 or later)
.Fifth generation iPod
®(Firmware version
1.1.2 or later)
.iPod
®mini (Firmware version 1.41 or later)
.iPod
®photo (Firmware version 1.2.1 or later)
.iPod
®nano (Firmware version 1.2 or later)
Make sure that your iPod
®firmware is updated.
Audio main operation
Push the ignition switch to the ACC or ON
position. Then, push the DISC/AUX button
repeatedly to switch to the iPod
®mode.
If the system has been turned off while the iPod
®
was playing, pushing the ON·OFF/VOL control
knob will start the iPod®.
DISC/AUX button:
When the DISC/AUX button is pushed with the
system off and the iPod
®connected, the system
will turn on. If another audio source is playing
and the iPod
®is connected, push the DISC
button repeatedly until the center display
changes to the iPod
®mode.Interface:
The interface for iPod
®operation shown on the
vehicle center display is similar to the iPod®
interface. Use the multi-function controller and
the ENTER or BACK button to play the iPod®
with your favorite settings.
The following items can be chosen from the
menu list screen. For further information about
each item, see the iPod
®Owner’s Manual.
.Playlists
.Artists
.Albums
.Songs
.Podcasts
.Genres
.Composers
.Audiobooks
The following touch-panel buttons shown on the
screen are also available:
.
: returns to the previous screen.
.
: plays/pauses the music selected.
Monitor, heater, air conditioner, audio, phone and voice recognition systems4-51
Page 228 of 443
Black plate (226,1)
Model "Z51-D" EDITED: 2007/ 10/ 2
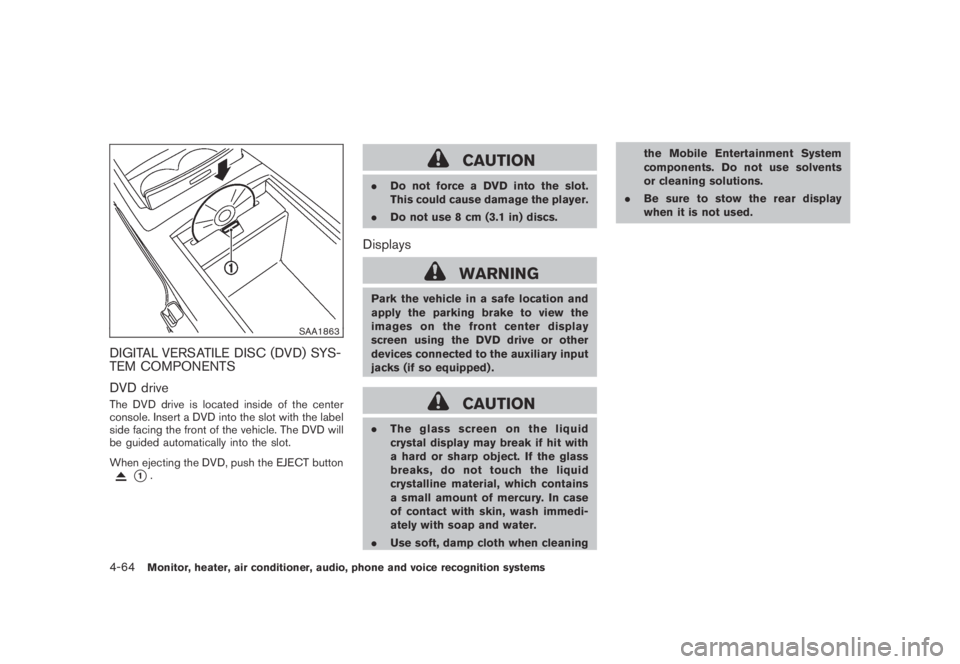
SAA1863
DIGITAL VERSATILE DISC (DVD) SYS-
TEM COMPONENTS
DVD drive
The DVD drive is located inside of the center
console. Insert a DVD into the slot with the label
side facing the front of the vehicle. The DVD will
be guided automatically into the slot.
When ejecting the DVD, push the EJECT button
*1.
CAUTION
.Do not force a DVD into the slot.
This could cause damage the player.
.Do not use 8 cm (3.1 in) discs.
Displays
WARNING
Park the vehicle in a safe location and
apply the parking brake to view the
images on the front center display
screen using the DVD drive or other
devices connected to the auxiliary input
jacks (if so equipped) .
CAUTION
.The glass screen on the liquid
crystal display may break if hit with
a hard or sharp object. If the glass
breaks, do not touch the liquid
crystalline material, which contains
a small amount of mercury. In case
of contact with skin, wash immedi-
ately with soap and water.
.Use soft, damp cloth when cleaningthe Mobile Entertainment System
components. Do not use solvents
or cleaning solutions.
.Be sure to stow the rear display
when it is not used.
4-64Monitor, heater, air conditioner, audio, phone and voice recognition systems
Page 435 of 443
Black plate (2,1)
10-2
Cigarette lighter and ashtray...................... 2-41
Circuit breaker, Fusible link ....................... 8-20
Cleaning exterior and interior................. 7-2, 7-4
Clock ............................................... 2-38
Coat hooks......................................... 2-49
Cold weather driving.............................. 5-28
Command (See Bluetooth
®Hands-Free
Phone System).................................... 4-100
Command (See NISSAN voice recognition
system)............................ 4-11, 4-114, 4-132
Compact Disc (CD) changer
(See audio system)................................ 4-41
CompactFlash (CF) player
(See audio system)................................ 4-49
Compass............................................. 2-7
Console box........................................ 2-44
Continuously Variable Transmission (CVT)
fluid................................................. 8-11
Coolant
Capacities and recommended
fuel/ lubricants ................................... 9-2
Changing engine coolant........................ 8-8
Checking engine coolant level.................. 8-7
Corrosion protection................................. 7-5
Cover, Cargo cover................................ 2-46
Cruise control...................................... 5-18
Cup holders........................................ 2-41
CVT, Driving with CVT
(Continuously Variable Transmission)............. 5-13
D
Daytime running light system..................... 2-35
Defroster switch, Rear window and outside
mirror defroster switch............................ 2-31
Dimensions and weights............................ 9-8Display cleaning...................................... 4-5
Display controls
(See center multi-function control panel).......... 4-2
Dot matrix liquid crystal display................... 2-17
Drive belts.......................................... 8-15
Drive positioner.................................... 3-30
Driving
All-wheel drive (AWD)......................... 5-21
Cold weather driving.......................... 5-28
Driving with CVT
(Continuously Variable Transmission)......... 5-13
On-pavement and off-road driving............. 5-5
Precautions when starting and driving......... 5-2
Safety precautions............................... 5-6
DVD player, NISSAN mobile entertainment...... 4-62
E
Economy, Fuel ..................................... 5-20
Elapsed time ....................................... 2-22
Emission control information label................ 9-10
Emission control system warranty................ 9-25
Engine
Before starting the engine.................... 5-12
Break-in schedule.............................. 5-20
Capacities and recommended
fuel/lubricants.................................... 9-2
Changing engine coolant........................ 8-8
Changing engine oil and filter................... 8-8
Checking engine coolant level.................. 8-7
Checking engine oil level........................ 8-8
Coolant temperature gauge..................... 2-6
Engine block heater........................... 5-29
Engine compartment check locations.......... 8-6
Engine cooling system.......................... 8-7Engine oil......................................... 8-8
Engine oil and oil filter recommendation....... 9-5
Engine oil replacement indicator.............. 2-20
Engine oil viscosity .............................. 9-5
Engine serial number ............................ 9-9
Engine specifications............................ 9-7
If your vehicle overheats....................... 6-11
Starting the engine............................ 5-12
Entry/exit function, Automatic drive positioner . . . 3-30
Event Data Recorders (EDR)..................... 9-26
Exhaust gas (Carbon monoxide).................... 5-2
F
F.M.V.S.S./C.M.V.S.S. certification label............ 9-9
Filter
Air cleaner housing filter...................... 8-16
Changing engine oil and filter................... 8-8
Flashers (See hazard warning flasher switch) . . . 2-36
Flat tire................................................ 6-2
Flat towing.......................................... 9-23
Floor mat cleaning ................................... 7-4
Fluid
Brake fluid...................................... 8-12
Capacities and recommended
fuel/lubricants.................................... 9-2
Continuously Variable Transmission (CVT)
fluid............................................. 8-11
Engine coolant ................................... 8-7
Engine oil......................................... 8-8
Power steering fluid ........................... 8-11
Window washer fluid.......................... 8-12
FM-AM radio with Compact Disc (CD)
changer............................................. 4-39
Model "Z51-D" EDITED: 2007/ 10/ 2