2009 NISSAN MURANO change time
[x] Cancel search: change timePage 235 of 443
Black plate (233,1)
Model "Z51-D" EDITED: 2007/ 10/ 2
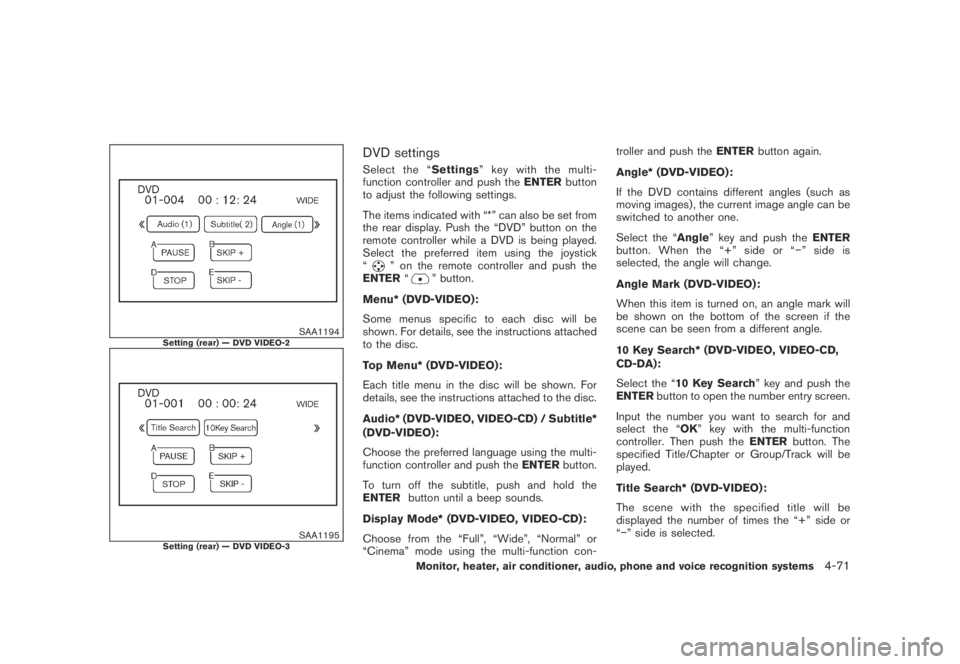
SAA1194Setting (rear) — DVD VIDEO-2
SAA1195Setting (rear) — DVD VIDEO-3
DVD settings
Select the “Settings” key with the multi-
function controller and push theENTERbutton
to adjust the following settings.
The items indicated with “*” can also be set from
the rear display. Push the “DVD” button on the
remote controller while a DVD is being played.
Select the preferred item using the joystick
“
” on the remote controller and push the
ENTER“” button.
Menu* (DVD-VIDEO):
Some menus specific to each disc will be
shown. For details, see the instructions attached
to the disc.
Top Menu* (DVD-VIDEO):
Each title menu in the disc will be shown. For
details, see the instructions attached to the disc.
Audio* (DVD-VIDEO, VIDEO-CD) / Subtitle*
(DVD-VIDEO):
Choose the preferred language using the multi-
function controller and push theENTERbutton.
To turn off the subtitle, push and hold the
ENTERbutton until a beep sounds.
Display Mode* (DVD-VIDEO, VIDEO-CD):
Choose from the “Full”, “Wide”, “Normal” or
“Cinema” mode using the multi-function con-troller and push theENTERbutton again.
Angle* (DVD-VIDEO):
If the DVD contains different angles (such as
moving images) , the current image angle can be
switched to another one.
Select the “Angle” key and push theENTER
button. When the “+” side or “−” side is
selected, the angle will change.
Angle Mark (DVD-VIDEO):
When this item is turned on, an angle mark will
be shown on the bottom of the screen if the
scene can be seen from a different angle.
10 Key Search* (DVD-VIDEO, VIDEO-CD,
CD-DA):
Select the “10 Key Search” key and push the
ENTERbutton to open the number entry screen.
Input the number you want to search for and
select the “OK” key with the multi-function
controller. Then push theENTERbutton. The
specified Title/Chapter or Group/Track will be
played.
Title Search* (DVD-VIDEO) :
The scene with the specified title will be
displayed the number of times the “+” side or
“−” side is selected.
Monitor, heater, air conditioner, audio, phone and voice recognition systems4-71
Page 236 of 443
Black plate (234,1)
Model "Z51-D" EDITED: 2007/ 10/ 2
Select No.* (VIDEO-CD) :
Select the “Select No.” key and push the
ENTERbutton to open the number entry screen.
Input the number you wish to search for and
select the “OK” key with the multi-function
controller, and then push theENTERbutton.
The specified scene will be played.
Menu Skip (DVD-VIDEO):
DVD menus are automatically configured and
the contents will be played directly when the
“Menu Skip” key is turned on. Note that some
discs may not be played directly even if this item
is turned on.
DVD Language (DVD-VIDEO, VIDEO-CD):
Select the “DVD Language” key and push the
ENTERbutton to open the number entry screen.
Input the number corresponding to the preferred
language and select the “OK” key with the multi-
function controller. Then push theENTER
button. The DVD top menu language will be
changed to the one specified.
DRC (DVD-VIDEO) :
DRC (Dynamic Range Compression) allows you
to tune the dynamic range of the sound
recorded in the Dolby Digital format.Remote controller operation
Use the remote controller to adjust the following
items.
Rear display open/close:
To open or close the flip-down rear display, push
the “
” button on the remote controller.
Joystick:
Use the joystick “
” to select the items
displayed on the rear screen.
ENTER button:
Push theENTER“
” button to make the
selected item complete on the rear screen.
BACK button:
Press to go back to the previous screen or
cancel the selection.
Display tilt:
Adjust the display angle by pushing the “DIS-
PLAY TILT” button
or.
DVD mode:
To select the DVD mode, push the DVD button.
AUX mode:
To select the AUX (Auxiliary input jacks) mode,
push the AUX button.Volume:
To control the volume level, push the “VOL”
button
or.
Display:
Press to adjust the rear display screen bright-
ness, tint, contrast, etc.
Aspect:
To change the display size, push the “ASPECT”
button. Each time the button is pushed, the
display size will change to “Cinema”, “Wide”,
“Full” or “Normal”.
Sound:
To change the language, push the “SOUND”
button. Each time the button is pushed, the
language will change to each language stored in
the DVD.
Headphones:
The DVD sound can be heard through the
headphones.
Push the “
” button. Each time the button is
pushed the mode will switch to ON or OFF.
To control the volume of sound from the
headphones, use the VOLUME CONTROL
knob attached to the headphones.
4-72Monitor, heater, air conditioner, audio, phone and voice recognition systems
Page 269 of 443
Black plate (267,1)
Model "Z51-D" EDITED: 2007/ 10/ 2
Up to 5 phones can be paired. If you try to pair a
sixth phone, the system announces that you
must first delete one phone or replace an
existing phone.
If you try to pair a phone that has already been
paired to your vehicle’s system, the system
announces the name the phone is already using.
The pairing procedure will then be canceled.
When prompted by the system, choose from the
following commands:
.“New phone” — see “PAIRING PROCE-
DURE” earlier in this section.
.“Replace phone” — The system announces
the names of the phones already paired and
asks which you would like to replace.
Once you say the name of the phone you
wish to replace, the paring procedure will
begin. (See “PAIRING PROCEDURE” ear-
lier in this section.)
.“List phone” — See the description below.
“List Phones”
Use the List Phone command to hear the names
of the phones currently paired. If no phones are
paired, the system announces, “No paired
phones to list.” The system then ends the VR
session.“Select Phone”
Use the Select Phone command to select a
phone of lesser priority when two or more
phones paired with Bluetooth
®Hands-Free
Phone System are in the vehicle at the same
time.
The system asks you to name the phone and
confirm the selection.
Once the selection is confirmed, the selected
phone remains active until the ignition switch is
turned OFF or you select a new phone.
“Change Priority”
Use the Change Priority command to change
the priority level of the active phone.
The priority level determines which phone is
active when more than one paired Bluetooth
®
phone is in the vehicle.
The system states the priority level of the active
phone and asks for a new priority level (1, 2, 3,
4, 5) .
If the new priority level is already being used for
another phone, the two phones will swap priority
levels.For example, if the current priority levels are:
Priority Level 1 = Phone A
Priority Level 2 = Phone B
Priority Level 3 = Phone C
and you change the priority level of Phone C to
Level 1, then:
Priority Level 1 = Phone C
Priority Level 2 = Phone B
Priority Level 3 = Phone A
“Delete Phone”
Use the Delete Phone command to delete a
specific phone or all phones from the Bluetooth
®
Hands-Free Phone System.
The system announces the names of the phones
already paired with the system and their priority
level. The system then gives you the option to
delete a specific phone, all phones or listen to
the list again.
Once you choose to delete a phone or all
phones, the system asks you to confirm this
action.
NOTE:
When you delete a phone, the associated
phone book for that phone will also be
deleted.
Monitor, heater, air conditioner, audio, phone and voice recognition systems4-105
Page 273 of 443
Black plate (271,1)
Model "Z51-D" EDITED: 2007/ 10/ 2
NISSAN Voice Recognition allows hands-free
operation of the systems equipped on this
vehicle, such as phone and vehicle information
as a factory default setting (Standard Mode) .
Commands that are available are always shown
on the display and announced by the system.
You can complete your desired operation by
simply following the prompts given by the
system. In this mode, hands-free operation of
Audio, Climate Control and Display is not
available through NISSAN Voice Recognition.
For advanced operation, you can change to an
Alternate Command Mode that enables the
operation of the display, audio, and climate
control through NISSAN Voice Recognition.
When this mode is active, an expanded list of
commands can be spoken after pushing the
TALK
switch, and the voice command
menu prompts are turned off. Note that in this
mode the recognition success rate may be
affected as the number of available commands
and the ways of speaking each command are
increased. (See “NISSAN VOICE RECOGNI-
TION ALTERNATE COMMAND MODE” later in
this section for details about Alternate Com-
mand Mode.)
To improve the recognition success rate when
Alternate Command Mode is active, try using the
Speaker Adaptation Function available in that
mode. (See “SPEAKER ADAPTATION FUNC-
TION” later in this section.) Otherwise, it isrecommended that Alternate Command Mode
be turned off and Standard Mode be used for
the best recognition performance.
For the voice commands for the navigation
system, refer to the Navigation System Owner’s
Manual of your vehicle.
NISSAN VOICE RECOGNITION
STANDARD MODE
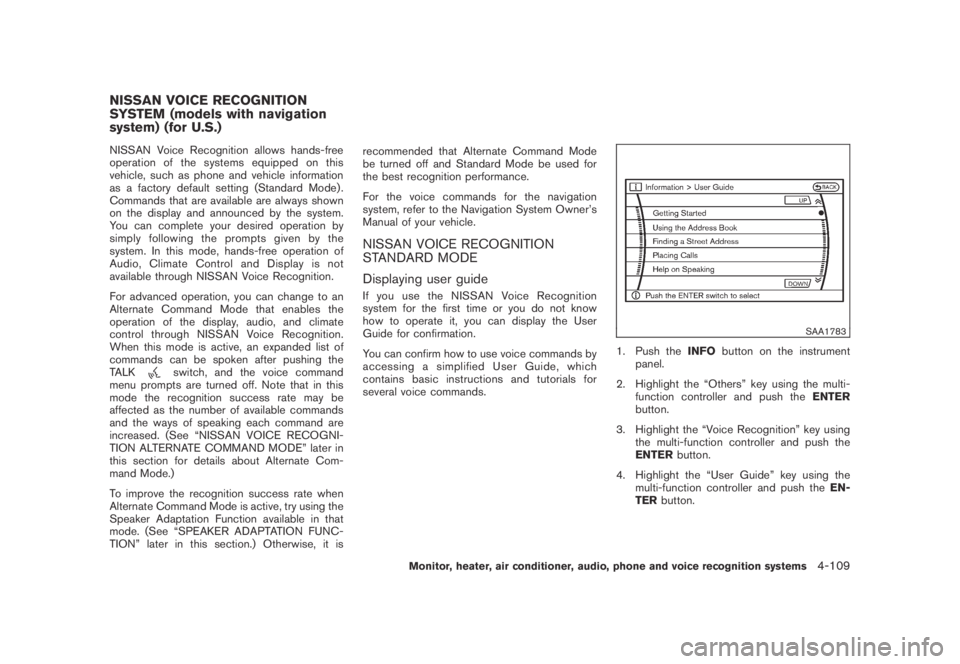
Displaying user guide
IfyouusetheNISSANVoiceRecognition
system for the first time or you do not know
how to operate it, you can display the User
Guide for confirmation.
You can confirm how to use voice commands by
accessing a simplified User Guide, which
contains basic instructions and tutorials for
several voice commands.
SAA1783
1. Push theINFObutton on the instrument
panel.
2. Highlight the “Others” key using the multi-
function controller and push theENTER
button.
3. Highlight the “Voice Recognition” key using
the multi-function controller and push the
ENTERbutton.
4. Highlight the “User Guide” key using the
multi-function controller and push theEN-
TERbutton.
NISSAN VOICE RECOGNITION
SYSTEM (models with navigation
system) (for U.S.)
Monitor, heater, air conditioner, audio, phone and voice recognition systems4-109
Page 314 of 443
Black plate (314,1)
Model "Z51-D" EDITED: 2007/ 10/ 2
WARNING
.Do not leave children or adults who
would normally require the support
of others alone in your vehicle. Pets
should not be left alone either. They
could accidentally injure themselves
or others through inadvertent op-
eration of the vehicle. Also, on hot,
sunny days, temperatures in a
closed vehicle could quickly become
high enough to cause severe or
possibly fatal injuries to people or
animals.
.Properly secure all cargo with ropes
or straps to help prevent it from
sliding or shifting. Do not place
cargo higher than the seatbacks. In
a sudden stop or collision, unse-
cured cargo could cause personal
injury.
EXHAUST GAS (carbon monoxide)
WARNING
.Do not breathe exhaust gases; they
contain colorless and odorless car-
bon monoxide. Carbon monoxide isdangerous. It can cause uncon-
sciousness or death.
.If you suspect that exhaust fumes
are entering the vehicle, drive with
all windows fully open, and have the
vehicle inspected immediately.
.Do not run the engine in closed
spaces such as a garage.
.Do not park the vehicle with the
engine running for any extended
length of time.
.Keep the lift gate closed while
driving, otherwise exhaust gases
could be drawn into the passenger
compartment. If you must drive with
the lift gate open, follow these
precautions:
1. Open all the windows.
2. Set the
air recirculation to off
and the fan control to high to
circulate the air.
.If electrical wiring or other cable
connections must pass to a trailer
through the seal on the lift gate or
the body, follow the manufacturer’s
recommendation to prevent carbon
monoxide entry into the vehicle..If a special body, camper or other
equipment is added for recreational
or other usage, follow the manufac-
turer’s recommendation to prevent
carbon monoxide entry into the
vehicle. (Some recreational vehicle
appliances such as stoves, refrig-
erators, heaters, etc. may also gen-
erate carbon monoxide.)
.The exhaust system and body
should be inspected by a qualified
mechanic whenever:
— The vehicle is raised for service.
— You suspect that exhaust fumes
are entering into the passenger
compartment.
— You notice a change in the
sound of the exhaust system.
— You have had an accident invol-
ving damage to the exhaust
system, underbody, or rear of
the vehicle.
THREE-WAY CATALYST
The three-way catalyst is an emission control
device installed in the exhaust system. Exhaust
gases in the three-way catalyst are burned at
high temperatures to help reduce pollutants.
PRECAUTIONS WHEN STARTING
AND DRIVING
5-2Starting and driving
Page 317 of 443
Black plate (317,1)
Model "Z51-D" EDITED: 2007/ 10/ 2
pressure sensors, and the TPMS will
not function properly.
Some devices and transmitters may temporarily
interfere with the operation of the TPMS and
cause the low tire pressure warning light to
illuminate. Some examples are:
.Facilities or electric devices using similar
radio frequencies are near the vehicle.
.If a transmitter set to similar frequencies is
being used in or near the vehicle.
.If a computer (or similar equipment) or a DC/
AC converter is being used in or near the
vehicle.
FCC Notice:
Changes or modifications not expressly
approved by the party responsible for
compliance could void the user’s authority
to operate the equipment.
This device complies with Part 15 of the
FCC Rules and RSS-210 of Industry Cana-
da.
Operation is subject to the following two
conditions: (1) This device may not cause
harmful interference, and (2) this device
must accept any interference received,
including interference that may cause un-
desired operation of the device.AVOIDING COLLISION AND ROLL-
OVER
WARNING
Failure to operate this vehicle in a safe
and prudent manner may result in loss
of control or an accident.
Be alert and drive defensively at all times. Obey
all traffic regulations. Avoid excessive speed,
high speed cornering,or sudden steering
maneuvers, because these driving practices
could cause you to lose control of your vehicle.
As with any vehicle, a loss of control could
result in a collision with other vehicles or
objects, or cause the vehicle to rollover,
particularly if the loss of control causes the
vehicle to slide sideways.Be attentive at all
times, and avoid driving when tired. Never drive
when under the influence of alcohol or drugs
(including prescription or over-the-counter
drugs which may cause drowsiness) . Always
wear your seat belt as outlined in the “SEAT
BELTS” in the “1. Safety — Seats, seat belts and
supplemental restraint system” section of this
manual, and also instruct your passengers to do
so.
Seat belts help reduce the risk of injury in
collisions and rollovers.In a rollover crash, an
unbelted or improperly belted person issignificantly more likely to be injured or
killed than a person properly wearing a
seat belt.
ON-PAVEMENT AND OFF-ROAD
DRIVING PRECAUTIONS
Utility vehicles have a significantly higher
rollover rate than other types of vehicles.
They have higher ground clearance than pas-
senger cars to make them capable of performing
in a variety of on-pavement and off-road
applications. This gives them a higher center of
gravity than ordinary cars. An advantage of
higher ground clearance is a better view of the
road, allowing you to anticipate problems.
However, they are not designed for cornering
at the same speeds as conventional passenger
cars any more than low-slung sports cars are
designed to perform satisfactorily under off-road
conditions. If at all possible, avoid sharp turns or
abrupt maneuvers, particularly at high speeds.
As with other vehicles of this type, failure to
operate this vehicle correctly may result in loss
of control or vehicle rollover. Seat belts help
reduce the risk of injury in collisions and
rollovers. In a rollover crash, an unbelted or
improperly belted person is significantly more
likely to be injured or killed than a person
properly wearing a seat belt.
Be sure to read “DRIVING SAFETY PRECAU-
TIONS” later in this section.
Starting and driving5-5
Page 322 of 443
Black plate (322,1)
Model "Z51-D" EDITED: 2007/ 10/ 2
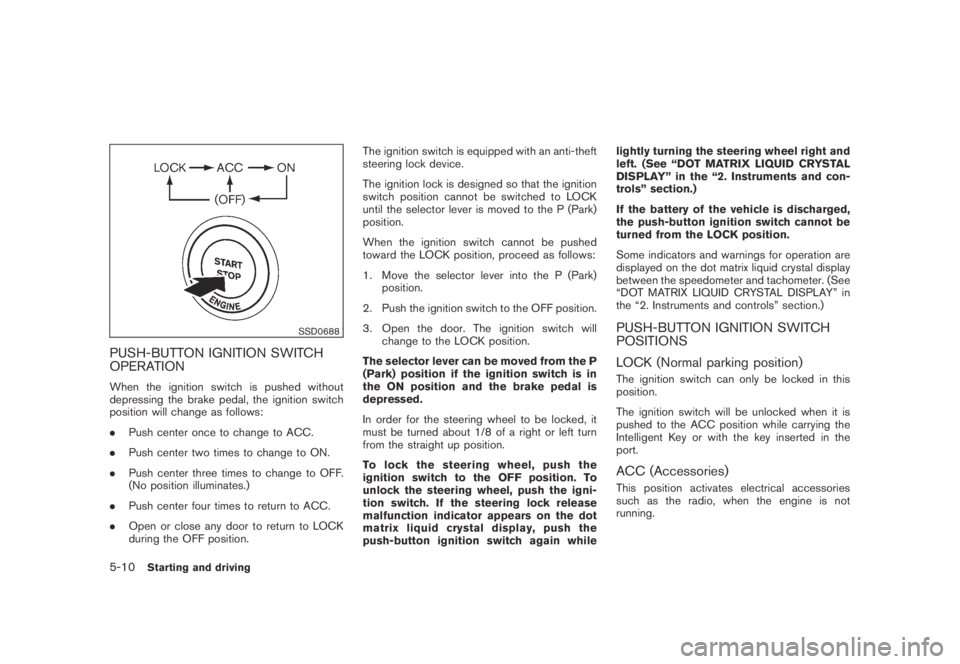
SSD0688
PUSH-BUTTON IGNITION SWITCH
OPERATION
When the ignition switch is pushed without
depressing the brake pedal, the ignition switch
position will change as follows:
.Push center once to change to ACC.
.Push center two times to change to ON.
.Push center three times to change to OFF.
(No position illuminates.)
.Push center four times to return to ACC.
.Open or close any door to return to LOCK
during the OFF position.The ignition switch is equipped with an anti-theft
steering lock device.
The ignition lock is designed so that the ignition
switch position cannot be switched to LOCK
until the selector lever is moved to the P (Park)
position.
When the ignition switch cannot be pushed
toward the LOCK position, proceed as follows:
1. Move the selector lever into the P (Park)
position.
2. Push the ignition switch to the OFF position.
3. Open the door. The ignition switch will
change to the LOCK position.
The selector lever can be moved from the P
(Park) position if the ignition switch is in
the ON position and the brake pedal is
depressed.
In order for the steering wheel to be locked, it
must be turned about 1/8 of a right or left turn
from the straight up position.
To lock the steering wheel, push the
ignition switch to the OFF position. To
unlock the steering wheel, push the igni-
tion switch. If the steering lock release
malfunction indicator appears on the dot
matrix liquid crystal display, push the
push-button ignition switch again whilelightly turning the steering wheel right and
left. (See “DOT MATRIX LIQUID CRYSTAL
DISPLAY” in the “2. Instruments and con-
trols” section.)
If the battery of the vehicle is discharged,
the push-button ignition switch cannot be
turned from the LOCK position.
Some indicators and warnings for operation are
displayed on the dot matrix liquid crystal display
between the speedometer and tachometer. (See
“DOT MATRIX LIQUID CRYSTAL DISPLAY” in
the “2. Instruments and controls” section.)
PUSH-BUTTON IGNITION SWITCH
POSITIONS
LOCK (Normal parking position)
The ignition switch can only be locked in this
position.
The ignition switch will be unlocked when it is
pushed to the ACC position while carrying the
Intelligent Key or with the key inserted in the
port.
ACC (Accessories)
This position activates electrical accessories
such as the radio, when the engine is not
running.
5-10Starting and driving
Page 333 of 443
Black plate (333,1)
Model "Z51-D" EDITED: 2007/ 10/ 2
WARNING
.For AWD equipped vehicles, do not
attempt to raise two wheels off the
ground and shift the transmission to
any drive or reverse position with
the engine running. Doing so may
result in drivetrain damage or un-
expected vehicle movement which
could result in serious vehicle da-
mage or personal injury.
.Do not attempt to test an AWD
equipped vehicle on a 2-wheel dy-
namometer (such as the dynam-
ometers used by some states for
emissions testing) or similar equip-
ment even if the other two wheels
are raised off the ground. Make sure
that you inform the test facility
personnel that your vehicle is
equipped with AWD before it is
placed on a dynamometer. Using
the wrong test equipment may re-
sult in drivetrain damage or unex-
pected vehicle movement which
could result in serious vehicle da-
mage or personal injury.
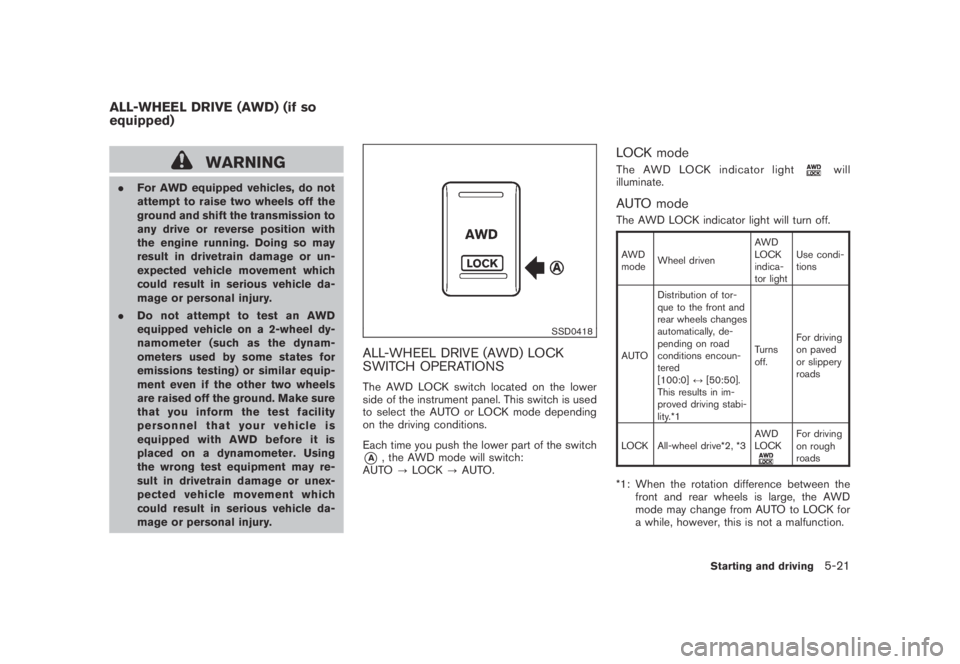
SSD0418
ALL-WHEEL DRIVE (AWD) LOCK
SWITCH OPERATIONS
The AWD LOCK switch located on the lower
side of the instrument panel. This switch is used
to select the AUTO or LOCK mode depending
on the driving conditions.
Each time you push the lower part of the switch
*A, the AWD mode will switch:
AUTO?LOCK?AUTO.
LOCK mode
The AWD LOCK indicator lightwill
illuminate.
AUTO mode
The AWD LOCK indicator light will turn off.
AWD
modeWheel drivenAWD
LOCK
indica-
tor lightUse condi-
tions
AUTODistribution of tor-
que to the front and
rear wheels changes
automatically, de-
pending on road
conditions encoun-
tered
[100:0]↔[50:50].
This results in im-
proved driving stabi-
lity.*1Turns
off.For driving
on paved
or slippery
roads
LOCK All-wheel drive*2, *3AWD
LOCK
For driving
on rough
roads
*1: When the rotation difference between the
front and rear wheels is large, the AWD
mode may change from AUTO to LOCK for
a while, however, this is not a malfunction.
ALL-WHEEL DRIVE (AWD) (if so
equipped)
Starting and driving5-21