2009 NISSAN MURANO check oil
[x] Cancel search: check oilPage 80 of 443

Black plate (78,1)
Model "Z51-D" EDITED: 2007/ 10/ 2
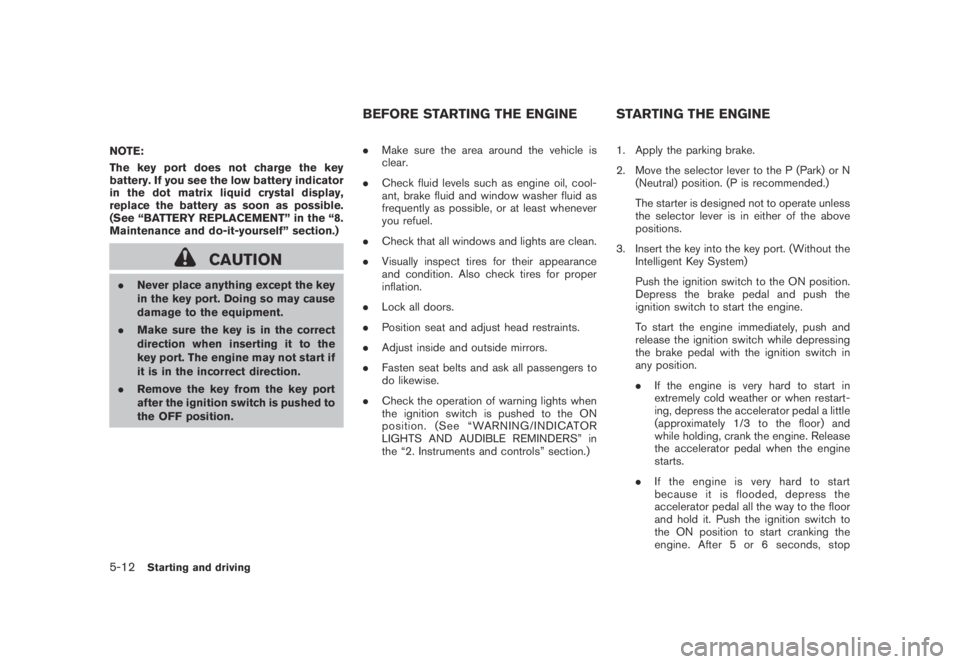
All-Wheel Drive (AWD) warning light (AWD
models)*Low tire pressure warning lightHigh beam indicator light (Blue)
Anti-lock Braking System (ABS) warning
lightMaster warning lightMalfunction Indicator Light (MIL)
Seat belt warning lightOverdrive off indicator light
Brake warning light
Supplemental air bag warning lightSlip indicator light
All-Wheel Drive (AWD) LOCK indicator light
(AWD models)*Small light indicator light
Charge warning lightContinuously Variable Transmission (CVT)
position indicator lightTurn signal/hazard indicator lights
Engine oil pressure warning lightCruise main switch indicator lightVehicle Dynamic Control (VDC) off indicator
light
Intelligent Key warning light*Front passenger air bag status light*
*: if so equipped
CHECKING BULBS
With all doors closed, apply the parking brake
and push the ignition switch to the ON position
without starting the engine. The following lights
will come on (if so equipped):
,or,,,,,
The following lights come on briefly and then go
off (if so equipped):
,or,,,,,,
If any light does not come on, it may indicate a
burned-out bulb or an open circuit in the
electrical system. Have the system checked by
a NISSAN dealer.
Some indicators and warnings are also dis-
played on the dot matrix crystal display between
the speedometer and tachometer. (See “DOT
MATRIX LIQUID CRYSTAL DISPLAY” later in
this section.)
WARNING LIGHTS
All-Wheel Drive (AWD) warning
light (AWD models)
The light comes on when the ignition switch is
pushed to ON. It turns off soon after the engine
is started.
If the AWD system malfunctions, or the diameter
of the front and the rear wheels are different, the
warning light will either remain illuminated or
WARNING/INDICATOR LIGHTS AND
AUDIBLE REMINDERS
2-10Instruments and controls
Page 82 of 443

Black plate (80,1)
Model "Z51-D" EDITED: 2007/ 10/ 2
earlier in this section.)
WARNING
.Your brake system may not be
working properly if the warning light
is on. Driving could be dangerous. If
you judge it to be safe, drive care-
fully to the nearest service station
for repairs. Otherwise, have your
vehicle towed because driving it
could be dangerous.
.Pressing the brake pedal with the
engine stopped and/or low brake
fluid level may increase your stop-
ping distance and braking will re-
quire greater pedal effort as well as
pedal travel.
.If the brake fluid level is below the
minimum or MIN mark on the brake
fluid reservoir, do not drive until the
brake system has been checked at a
NISSAN dealer.
Charge warning light
If the light comes on while the engine is running,
it may indicate the charging system is not
functioning properly. Turn the engine off and
check the alternator belt. If the belt is loose,
broken, missing or if the light remains on, see a
NISSAN dealer immediately.
CAUTION
Do not continue driving if the alternator
belt is loose, broken or missing.
Engine oil pressure warning light
This light warns of low engine oil pressure. If the
light flickers or comes on during normal driving,
pull off the road in a safe area, stop the engine
immediatelyand call a NISSAN dealer or other
authorized repair shop.
The engine oil pressure warning light is
not designed to indicate a low oil level.
Use the dipstick to check the oil level.(See
“ENGINE OIL” in the “8. Maintenance and do-it-
yourself” section.)
CAUTION
Running the engine with the engine oil
pressure warning light on could cause
serious damage to the engine almost
immediately. Such damage is not cov-
ered by warranty. Turn off the engine as
soon as it is safe to do so.
Intelligent Key warning light (if so
equipped)
After the ignition switch is pushed to the ON
position, this light comes on for about 2 seconds
and then turns off.
This light warns of a malfunction with the
electrical steering lock system or the Intelligent
Key system.
If the light comes on while the engine is
stopped, it may be impossible to free the
steering lock or to start the engine. If the light
comes on while the engine is running, you can
drive the vehicle. However in these cases,
contact a NISSAN dealer for repair as soon as
possible.
2-12Instruments and controls
Page 94 of 443

Black plate (92,1)
Model "Z51-D" EDITED: 2007/ 10/ 2
SIC3678
Setting
Setting cannot be made while driving. A
message “Setting can only be operated
when stopped” is also displayed on the dot
matrix crystal display.
The
switch*Aandswitch*Bare
used in the setting mode to select and decide a
menu.
SKIP:
Push the
switch*Ato move to the
warning check mode.
Push the
switch*Bto select other menus.ALERT:
Alert menu can be set to notify the following
items.
.TIME TO REST
Select this submenu to specify when the
“TIME TO REST” indicator activates.
.ICY
Select this submenu to display the low
outside temperature warning.
To return to the top page of the setting mode,
select “BACK”.
MAINTENANCE:
The maintenance intervals of the following items
can be set or reset for the reminders.
.ENGINE OIL
Select this submenu to set or reset the
distance for changing the engine oil.
.OIL FILTER
Select this submenu to set or reset the
distance for replacing the oil filter.
.TIRE
Select this submenu to set or reset the
distance for replacing tires..OTHER
Select this submenu and set or reset the
distance for replacing items other than the
engine oil, oil filter and tires.
To return to the top page of the setting mode,
select “BACK”.
OPTIONS:
The 3 option menus can be set to your
preference.
.LANGUAGE
Select this submenu to choose English or
French for display.
.UNIT
Select this submenu to choose the unit from
MPG or l/100 km.
.DIAL EFFECTS
Select this menu to set the dial effects
described below to on or off.
— The indicator needles sweep in the
meters and the ring illumination will be
brightened gradually when the engine is
started.
To return to the top page of the setting mode,
select “BACK”.
2-24Instruments and controls
Page 324 of 443

Black plate (324,1)
Model "Z51-D" EDITED: 2007/ 10/ 2
NOTE:
The key port does not charge the key
battery. If you see the low battery indicator
in the dot matrix liquid crystal display,
replace the battery as soon as possible.
(See “BATTERY REPLACEMENT” in the “8.
Maintenance and do-it-yourself” section.)
CAUTION
.Never place anything except the key
in the key port. Doing so may cause
damage to the equipment.
.Make sure the key is in the correct
direction when inserting it to the
key port. The engine may not start if
it is in the incorrect direction.
.Remove the key from the key port
after the ignition switch is pushed to
the OFF position..Make sure the area around the vehicle is
clear.
.Check fluid levels such as engine oil, cool-
ant, brake fluid and window washer fluid as
frequently as possible, or at least whenever
you refuel.
.Check that all windows and lights are clean.
.Visually inspect tires for their appearance
and condition. Also check tires for proper
inflation.
.Lock all doors.
.Position seat and adjust head restraints.
.Adjust inside and outside mirrors.
.Fasten seat belts and ask all passengers to
do likewise.
.Check the operation of warning lights when
the ignition switch is pushed to the ON
position. (See “WARNING/INDICATOR
LIGHTS AND AUDIBLE REMINDERS” in
the “2. Instruments and controls” section.)1. Apply the parking brake.
2. Move the selector lever to the P (Park) or N
(Neutral) position. (P is recommended.)
The starter is designed not to operate unless
the selector lever is in either of the above
positions.
3. Insert the key into the key port. (Without the
Intelligent Key System)
Push the ignition switch to the ON position.
Depress the brake pedal and push the
ignition switch to start the engine.
To start the engine immediately, push and
release the ignition switch while depressing
the brake pedal with the ignition switch in
any position.
.If the engine is very hard to start in
extremely cold weather or when restart-
ing, depress the accelerator pedal a little
(approximately 1/3 to the floor) and
while holding, crank the engine. Release
the accelerator pedal when the engine
starts.
.If the engine is very hard to start
because it is flooded, depress the
accelerator pedal all the way to the floor
and hold it. Push the ignition switch to
the ON position to start cranking the
engine. After 5 or 6 seconds, stop
BEFORE STARTING THE ENGINE STARTING THE ENGINE
5-12Starting and driving
Page 335 of 443

Black plate (335,1)
Model "Z51-D" EDITED: 2007/ 10/ 2
If any malfunction occurs in the AWD system
while the engine is running, the warning light will
come on.
The warning light may blink rapidly (about twice
per second) while trying to free a stuck vehicle
due to high powertrain oil temperature. The
driving mode may change to 2WD. AUTO mode
may change to LOCK mode before the warning
light blinks. If the warning light blinks rapidly
during operation, stop the vehicle with the
engine idling in a safe place immediately. Then
if the light turns off after a while, you can
continue driving.
A large difference between the diameters of
front and rear wheels will make the warning light
blink slowly (about once per two seconds) . Pull
off the road in a safe area, and idle the engine.
Check that all tire sizes are the same, tire
pressure is correct and tires are not worn.
CAUTION
.If the warning light remains on after
the above operation, have your
vehicle checked by a NISSAN dealer
as soon as possible.
.If the warning light comes on while
driving there may be a malfunction
in the AWD system. Reduce the
vehicle speed and have your vehiclechecked by a NISSAN dealer as
soon as possible.
.The powertrain may be damaged if
you continue driving with the warn-
ing light blinking rapidly.
.Never drive on dry hard surface
roads in the LOCK mode, as this
will overload the powertrain and
may cause a serious malfunction.
Starting and driving5-23
Page 361 of 443

Black plate (363,1)
Model "Z51-D" EDITED: 2007/ 10/ 2
REMOVING SPOTS
Remove tar and oil spots, industrial dust,
insects, and tree sap as quickly as possible
from the paint surface to avoid lasting damage
or staining. Special cleaning products are
available at a NISSAN dealer or any automotive
accessory stores.
UNDERBODY
In areas where road salt is used in winter, the
underbody must be cleaned regularly. This will
prevent dirt and salt from building up and
causing the acceleration of corrosion on the
underbody and suspension. Before the winter
period and again in the spring, the underseal
must be checked and, if necessary, re-treated.
GLASS
Use glass cleaner to remove smoke and dust
film from the glass surfaces. It is normal for glass
to become coated with a film after the vehicle is
parked in the hot sun. Glass cleaner and a soft
cloth will easily remove this film.
CAUTION
When cleaning the inside of the win-
dows, do not use sharp-edged tools,
abrasive cleaners or chlorine-based
disinfectant cleaners. They could da-mage the electrical conductors, radio
antenna elements or rear window
defroster elements.
ALUMINUM ALLOY WHEELS
Wash regularly with a sponge dampened in a
mild soap solution, especially during winter
months in areas where road salt is used. Salt
could discolor the wheels if not removed.
CAUTION
Follow the directions below to avoid
staining or discoloring the wheels:
.Do not use a cleaner that uses
strong acid or alkali contents to
clean the wheels.
.Do not apply wheel cleaners to the
wheels when they are hot. The
wheel temperature should be the
same as ambient temperature.
.Rinse the wheel to completely re-
move the cleaner within 15 minutes
after the cleaner is applied.
CHROME PARTS
Clean chrome parts regularly with a non-
abrasive chrome polish to maintain the finish.
TIRE DRESSING
NISSAN does not recommend the use of tire
dressings. Tire manufacturers apply a coating to
the tires to help reduce discoloration of the
rubber. If a tire dressing is applied to the tires, it
may react with the coating and form a com-
pound. This compound may come off the tire
while driving and stain the vehicle paint.
If you choose to use a tire dressing, take the
following precautions:
.Use a water-based tire dressing. The coat-
ing on the tire dissolves more easily with an
oil-based tire dressing.
.Apply a light coat of tire dressing to help
prevent it from entering the tire tread/
grooves (where it would be difficult to
remove) .
.Wipe off excess tire dressing using a dry
towel. Make sure the tire dressing is
completely removed from the tire tread/
grooves.
.Allow the tire dressing to dry as recom-
mended by tire dressing manufacturer.
Appearance and care7-3
Page 362 of 443

Black plate (364,1)
Model "Z51-D" EDITED: 2007/ 10/ 2
Occasionally remove loose dust from the interior
trim, plastic parts and seats using a vacuum
cleaner or soft bristled brush. Wipe the vinyl and
leather surfaces with a clean, soft cloth dam-
pened in mild soap solution, then wipe clean
with a dry soft cloth.
Regular care and cleaning is required in order to
maintain the appearance of the leather.
Before using any fabric protector, read the
manufacturer’s recommendations. Some fabric
protectors contain chemicals that may stain or
bleach the seat material.
Use a cloth dampened only with water, to clean
the meter and gauge lens.
CAUTION
.Never use benzine, thinner, or any
similar material.
.Small dirt particles can be abrasive
and damaging to the leather sur-
faces and should be removed
promptly. Do not use saddle soap,
car waxes, polishes, oils, cleaning
fluids, solvents, detergents or am-
monia-based cleaners as they may
damage the leather’s natural finish.
.Only use fabric protectors approved
by NISSAN..Do not use glass or plastic cleaner
on meter or gauge lens covers. It
may damage the lens cover.
FLOOR MATS
The use of NISSAN floor mats can extend the
life of your vehicle carpet and make it easier to
clean the interior.No matter what mats are
used, be sure they are fitted for your
vehicle and are properly positioned in the
footwell to prevent interference with pedal
operation.Mats should be maintained with
regular cleaning and replaced if they become
excessively worn.
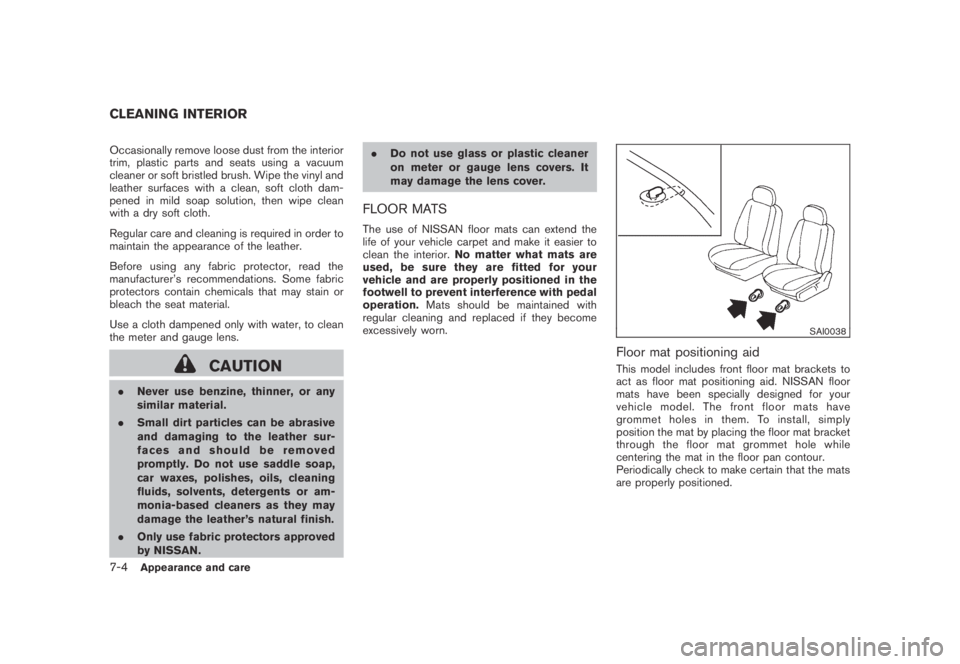
SAI0038
Floor mat positioning aid
This model includes front floor mat brackets to
act as floor mat positioning aid. NISSAN floor
mats have been specially designed for your
vehicle model. The front floor mats have
grommet holes in them. To install, simply
position the mat by placing the floor mat bracket
through the floor mat grommet hole while
centering the mat in the floor pan contour.
Periodically check to make certain that the mats
are properly positioned.
CLEANING INTERIOR
7-4Appearance and care
Page 365 of 443

Black plate (25,1)
8 Maintenance and do-it-yourself
Model "Z51-D" EDITED: 2007/ 10/ 2
Maintenance requirement..................................... 8-2
Scheduled maintenance................................... 8-2
General maintenance...................................... 8-2
Where to go for service................................... 8-2
General maintenance.......................................... 8-2
Explanation of maintenance items....................... 8-2
Maintenance precautions..................................... 8-5
Engine compartment check locations...................... 8-6
VQ35DE engine............................................ 8-6
Engine cooling system......................................... 8-7
Checking engine coolant level........................... 8-7
Changing engine coolant................................. 8-8
Engine oil......................................................... 8-8
Checking engine oil level................................. 8-8
Changing engine oil and filter............................ 8-8
Continuously Variable Transmission (CVT) fluid........8-11
Power steering fluid..........................................8-11
Brake fluid......................................................8-12
Window washer fluid........................................8-12
Battery..........................................................8-13
Jump starting..............................................8-14
Variable voltage control system (if so equipped)......8-15
Drive belts......................................................8-15Spark plugs....................................................8-16
Replacing spark plugs...................................8-16
Air cleaner......................................................8-16
Windshield wiper blades....................................8-17
Cleaning....................................................8-17
Replacing...................................................8-18
Rear window wiper blade...................................8-19
Brakes...........................................................8-19
Self-adjusting brakes....................................8-19
Brake pad wear indicators..............................8-19
Fuses............................................................8-20
Engine compartment.....................................8-20
Passenger compartment................................8-21
Battery replacement..........................................8-21
Lights............................................................8-24
Headlights..................................................8-25
Exterior and interior lights...............................8-27
Wheels and tires..............................................8-30
Tire pressure...............................................8-30
Tire labeling................................................8-33
Types of tires..............................................8-35
Tire chains..................................................8-36
Changing wheels and tires.............................8-37