2009 NISSAN ARMADA automatic transmission
[x] Cancel search: automatic transmissionPage 20 of 465
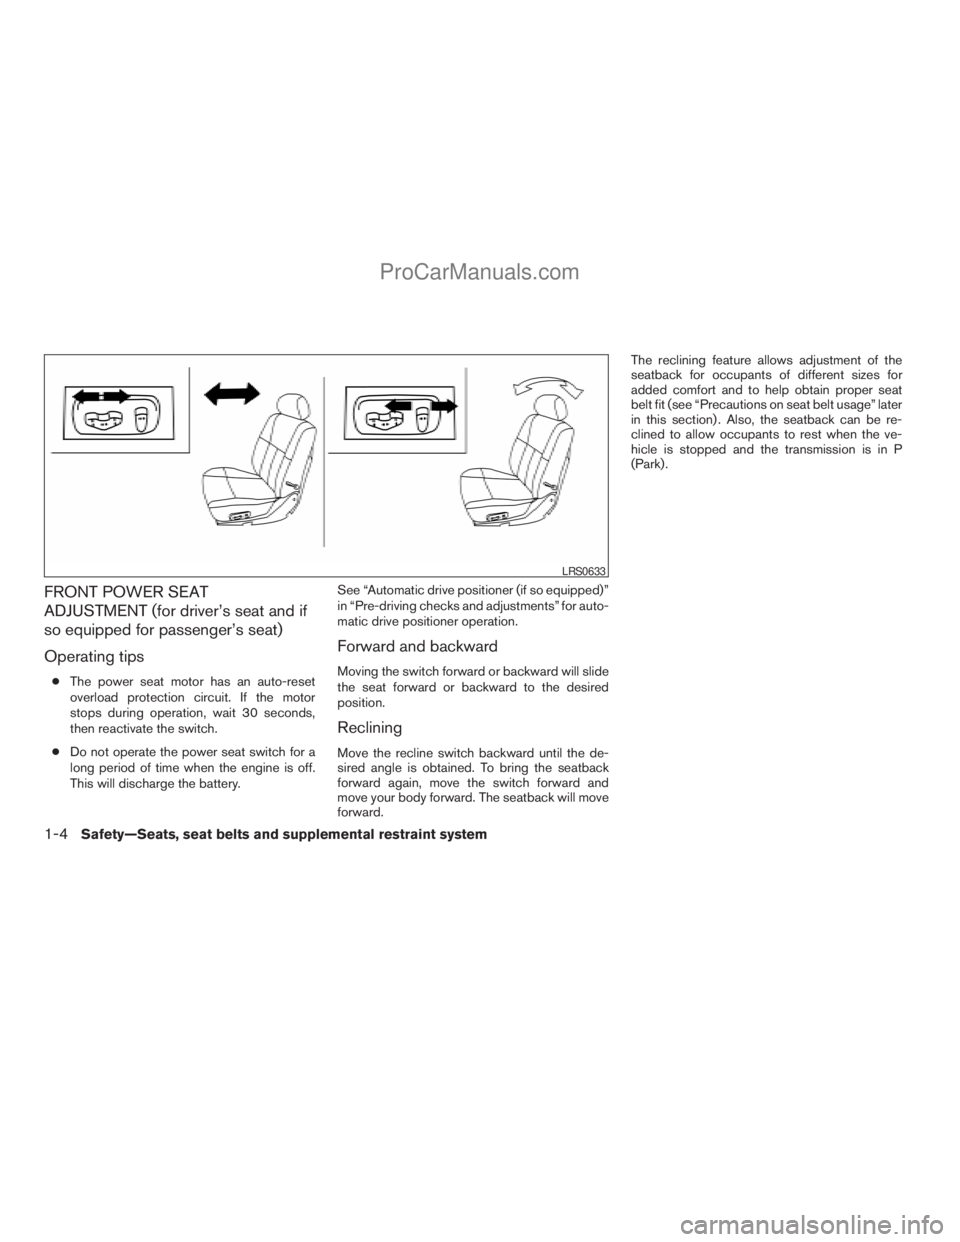
FRONT POWER SEAT
ADJUSTMENT (for driver’s seat and if
so equipped for passenger’s seat)
Operating tips
cThe power seat motor has an auto-reset
overload protection circuit. If the motor
stops during operation, wait 30 seconds,
then reactivate the switch.
cDo not operate the power seat switch for a
long period of time when the engine is off.
This will discharge the battery.See “Automatic drive positioner (if so equipped)”
in “Pre-driving checks and adjustments” for auto-
matic drive positioner operation.
Forward and backward
Moving the switch forward or backward will slide
the seat forward or backward to the desired
position.
Reclining
Move the recline switch backward until the de-
sired angle is obtained. To bring the seatback
forward again, move the switch forward and
move your body forward. The seatback will move
forward.The reclining feature allows adjustment of the
seatback for occupants of different sizes for
added comfort and to help obtain proper seat
belt fit (see “Precautions on seat belt usage” later
in this section) . Also, the seatback can be re-
clined to allow occupants to rest when the ve-
hicle is stopped and the transmission is in P
(Park) .
LRS0633
1-4Safety—Seats, seat belts and supplemental restraint system
ZREVIEW COPYÐ2009 Armada(wzw)
Owners ManualÐUSA_English(nna)
02/26/08Ðdebbie
X
ProCarManuals.com
Page 82 of 465
2 Instruments and controls
Instrument panel...................................2-2
Meters and gauges................................2-4
Speedometer and odometer.....................2-5
Tachometer....................................2-6
Engine coolant temperature gauge...............2-6
Fuel gauge....................................2-7
Engine oil pressure gauge.......................2-8
Voltmeter......................................2-8
Automatic transmission fluid temperature
gauge.........................................2-9
Compass display (if so equipped)...................2-9
Compass display..............................2-10
Zone variation change procedure................2-11
Warning/indicator lights and audible reminders......2-13
Checking bulbs...............................2-13
Warning lights................................2-13
Indicator lights................................2-18
Audible reminders.............................2-20
Vehicle Information Display........................2-21
How to use the Vehicle Information Display.......2-21
Security systems.................................2-27
Vehicle security system.........................2-27
NISSAN vehicle immobilizer system.............2-29Windshield wiper and washer switch...............2-30
Switch operation..............................2-30
Rear window wiper and washer switch..............2-31
Rear window and outside mirror defroster switch.....2-32
Headlight and turn signal switch....................2-32
Headlight control switch........................2-32
Daytime running light system (Canada only)......2-34
Instrument brightness control...................2-35
Turn signal switch.............................2-35
Fog light switch (if so equipped)................2-35
Hazard warning flasher switch.....................2-36
Horn............................................2-36
Heated seat (if so equipped).......................2-37
Heated steering wheel (if so equipped).............2-37
Vehicle Dynamic Control (VDC) off switch...........2-38
Front and rear sonar system off switch..............2-38
Tow mode switch (if so equipped)..................2-39
Power outlet.....................................2-40
Storage.........................................2-41
Instrument panel storage trays..................2-41
Console box..................................2-41
Glove box....................................2-43
Sunglasses holder.............................2-43
ZREVIEW COPYÐ2009 Armada(wzw)
Owners ManualÐUSA_English(nna)
02/26/08Ðdebbie
X
ProCarManuals.com
Page 86 of 465
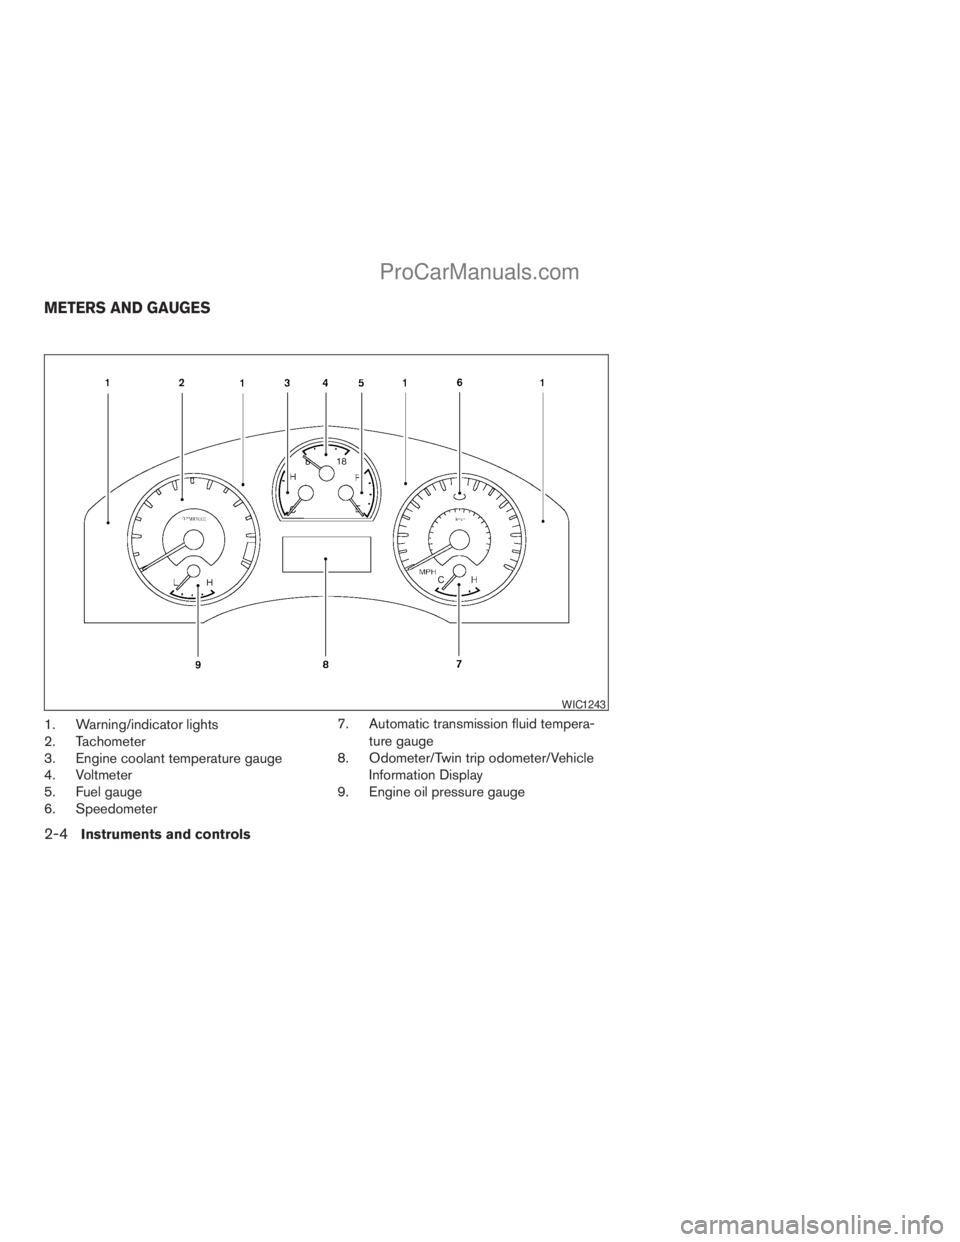
1. Warning/indicator lights
2. Tachometer
3. Engine coolant temperature gauge
4. Voltmeter
5. Fuel gauge
6. Speedometer7. Automatic transmission fluid tempera-
ture gauge
8. Odometer/Twin trip odometer/Vehicle
Information Display
9. Engine oil pressure gauge
WIC1243
METERS AND GAUGES
2-4Instruments and controls
ZREVIEW COPYÐ2009 Armada(wzw)
Owners ManualÐUSA_English(nna)
02/26/08Ðdebbie
X
ProCarManuals.com
Page 91 of 465
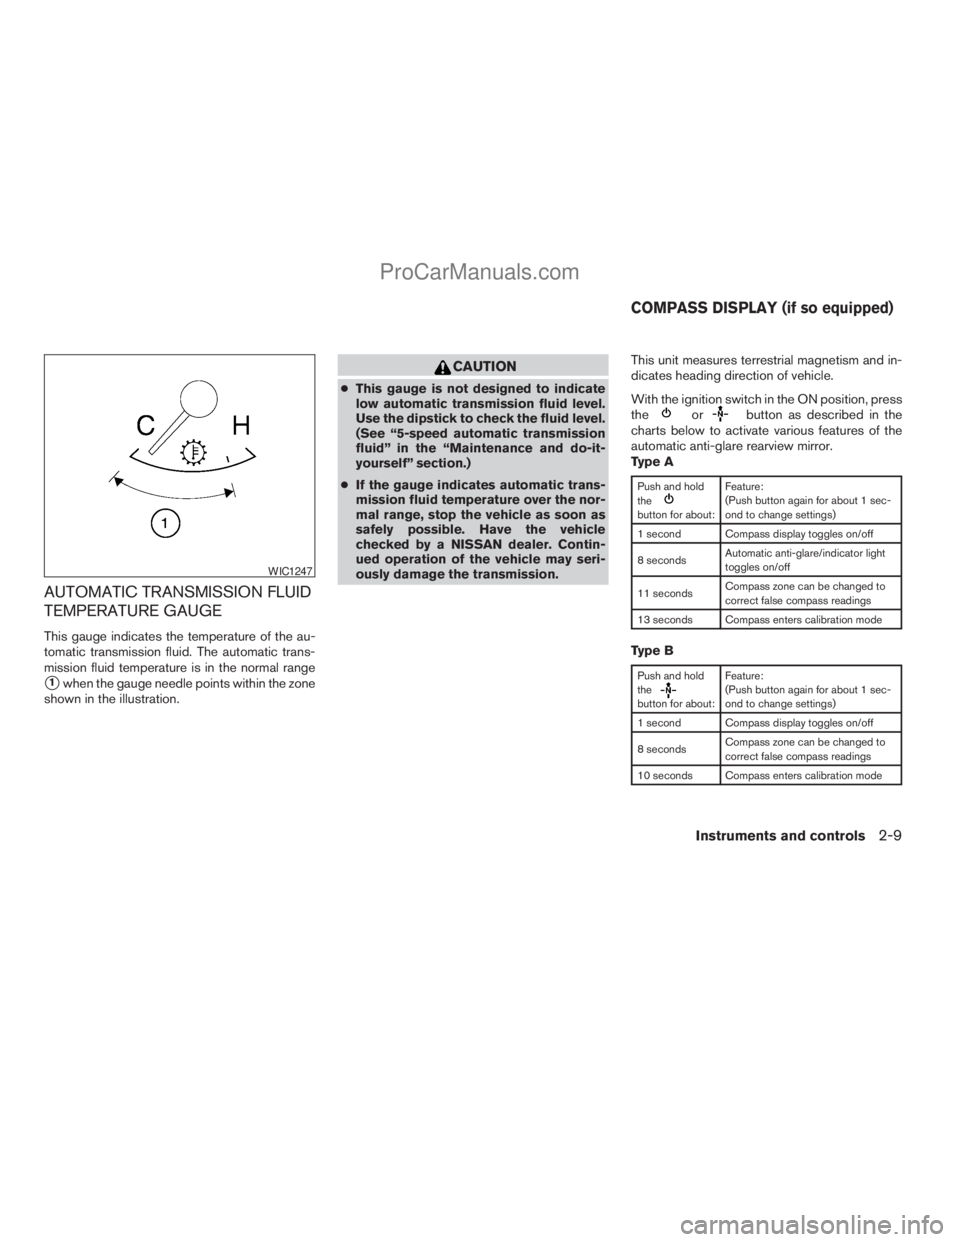
AUTOMATIC TRANSMISSION FLUID
TEMPERATURE GAUGE
This gauge indicates the temperature of the au-
tomatic transmission fluid. The automatic trans-
mission fluid temperature is in the normal range
s1when the gauge needle points within the zone
shown in the illustration.
CAUTION
cThis gauge is not designed to indicate
low automatic transmission fluid level.
Use the dipstick to check the fluid level.
(See “5-speed automatic transmission
fluid” in the “Maintenance and do-it-
yourself” section.)
cIf the gauge indicates automatic trans-
mission fluid temperature over the nor-
mal range, stop the vehicle as soon as
safely possible. Have the vehicle
checked by a NISSAN dealer. Contin-
ued operation of the vehicle may seri-
ously damage the transmission.This unit measures terrestrial magnetism and in-
dicates heading direction of vehicle.
With the ignition switch in the ON position, press
the
orbutton as described in the
charts below to activate various features of the
automatic anti-glare rearview mirror.
Type A
Push and hold
the
button for about:Feature:
(Push button again for about 1 sec-
ond to change settings)
1 second Compass display toggles on/off
8 secondsAutomatic anti-glare/indicator light
toggles on/off
11 secondsCompass zone can be changed to
correct false compass readings
13 seconds Compass enters calibration mode
Type B
Push and hold
the
button for about:Feature:
(Push button again for about 1 sec-
ond to change settings)
1 second Compass display toggles on/off
8 secondsCompass zone can be changed to
correct false compass readings
10 seconds Compass enters calibration mode
WIC1247
COMPASS DISPLAY (if so equipped)
Instruments and controls2-9
ZREVIEW COPYÐ2009 Armada(wzw)
Owners ManualÐUSA_English(nna)
02/27/08Ðtbrooks
X
ProCarManuals.com
Page 95 of 465
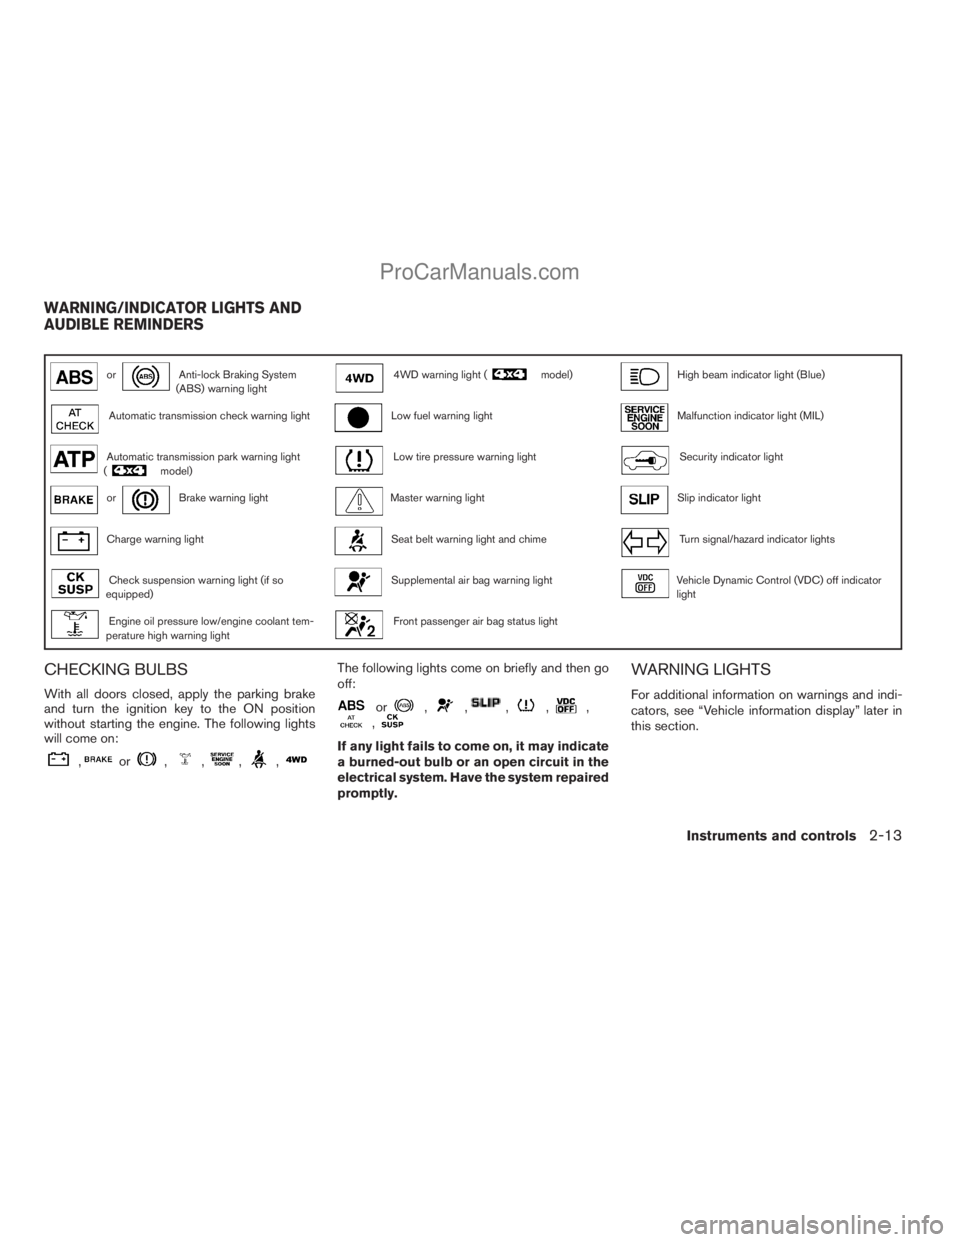
orAnti-lock Braking System
(ABS) warning light4WD warning light (model)High beam indicator light (Blue)
Automatic transmission check warning lightLow fuel warning lightMalfunction indicator light (MIL)
Automatic transmission park warning light
(model)Low tire pressure warning lightSecurity indicator light
orBrake warning lightMaster warning lightSlip indicator light
Charge warning lightSeat belt warning light and chimeTurn signal/hazard indicator lights
Check suspension warning light (if so
equipped)Supplemental air bag warning lightVehicle Dynamic Control (VDC) off indicator
light
Engine oil pressure low/engine coolant tem-
perature high warning lightFront passenger air bag status light
CHECKING BULBS
With all doors closed, apply the parking brake
and turn the ignition key to the ON position
without starting the engine. The following lights
will come on:
,or,,,,
The following lights come on briefly and then go
off:
or,,,,,,
If any light fails to come on, it may indicate
a burned-out bulb or an open circuit in the
electrical system. Have the system repaired
promptly.
WARNING LIGHTS
For additional information on warnings and indi-
cators, see “Vehicle information display” later in
this section.
WARNING/INDICATOR LIGHTS AND
AUDIBLE REMINDERS
Instruments and controls2-13
ZREVIEW COPYÐ2009 Armada(wzw)
Owners ManualÐUSA_English(nna)
02/27/08Ðtbrooks
X
ProCarManuals.com
Page 96 of 465
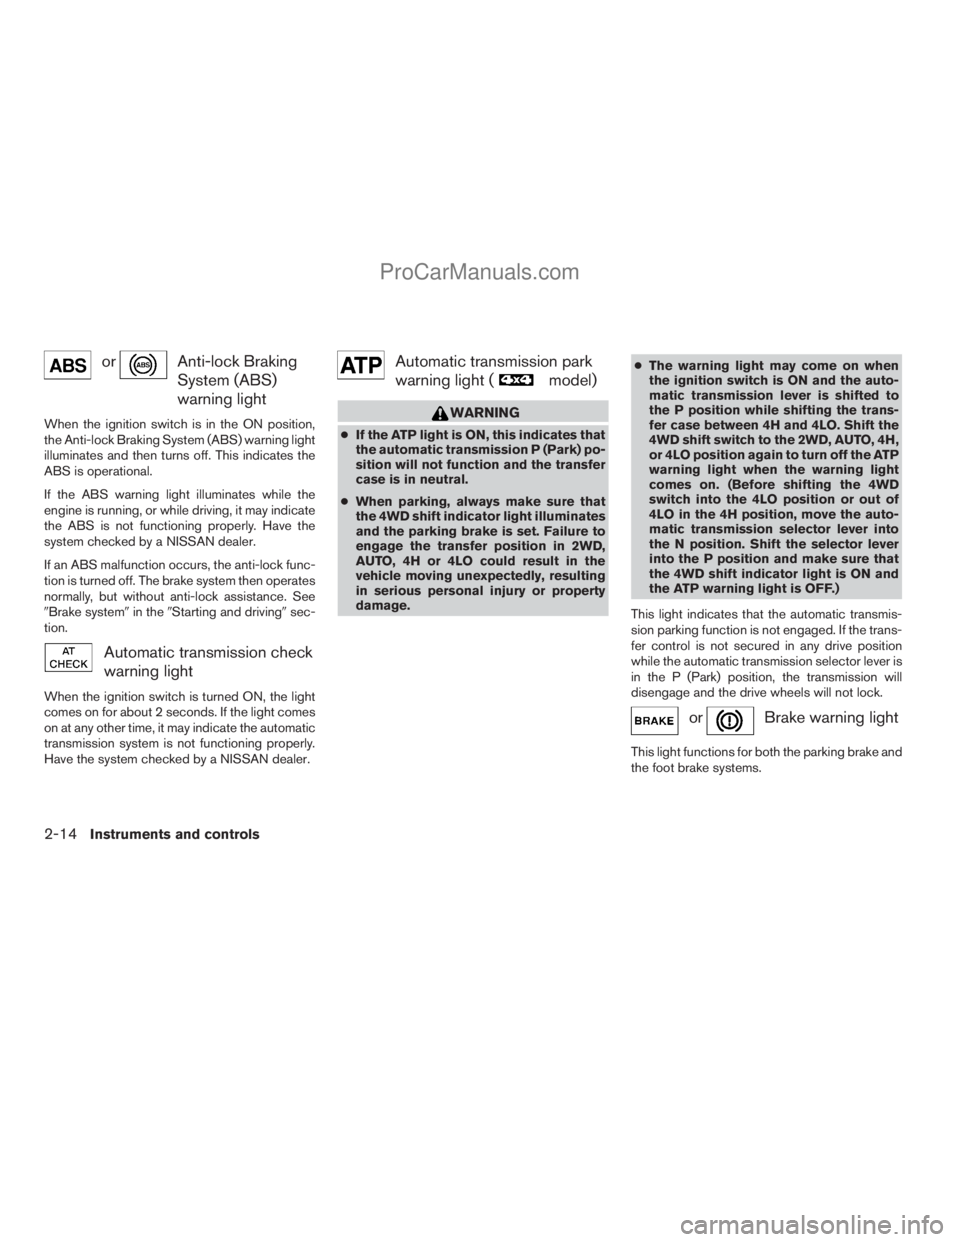
orAnti-lock Braking
System (ABS)
warning light
When the ignition switch is in the ON position,
the Anti-lock Braking System (ABS) warning light
illuminates and then turns off. This indicates the
ABS is operational.
If the ABS warning light illuminates while the
engine is running, or while driving, it may indicate
the ABS is not functioning properly. Have the
system checked by a NISSAN dealer.
If an ABS malfunction occurs, the anti-lock func-
tion is turned off. The brake system then operates
normally, but without anti-lock assistance. See
9Brake system9in the9Starting and driving9sec-
tion.
Automatic transmission check
warning light
When the ignition switch is turned ON, the light
comes on for about 2 seconds. If the light comes
on at any other time, it may indicate the automatic
transmission system is not functioning properly.
Have the system checked by a NISSAN dealer.
Automatic transmission park
warning light (
model)
WARNING
cIf the ATP light is ON, this indicates that
the automatic transmission P (Park) po-
sition will not function and the transfer
case is in neutral.
cWhen parking, always make sure that
the 4WD shift indicator light illuminates
and the parking brake is set. Failure to
engage the transfer position in 2WD,
AUTO, 4H or 4LO could result in the
vehicle moving unexpectedly, resulting
in serious personal injury or property
damage.cThe warning light may come on when
the ignition switch is ON and the auto-
matic transmission lever is shifted to
the P position while shifting the trans-
fer case between 4H and 4LO. Shift the
4WD shift switch to the 2WD, AUTO, 4H,
or 4LO position again to turn off the ATP
warning light when the warning light
comes on. (Before shifting the 4WD
switch into the 4LO position or out of
4LO in the 4H position, move the auto-
matic transmission selector lever into
the N position. Shift the selector lever
into the P position and make sure that
the 4WD shift indicator light is ON and
the ATP warning light is OFF.)
This light indicates that the automatic transmis-
sion parking function is not engaged. If the trans-
fer control is not secured in any drive position
while the automatic transmission selector lever is
in the P (Park) position, the transmission will
disengage and the drive wheels will not lock.
orBrake warning light
This light functions for both the parking brake and
the foot brake systems.
2-14Instruments and controls
ZREVIEW COPYÐ2009 Armada(wzw)
Owners ManualÐUSA_English(nna)
02/27/08Ðtbrooks
X
ProCarManuals.com
Page 98 of 465
do-it-yourself” section of this manual. Also see “If
your vehicle overheats” in the “In case of emer-
gency” section of this manual.
CAUTION
cRunning the engine with the engine oil
pressure warning light on could cause
serious damage to the engine almost
immediately. Such damage is not cov-
ered by warranty. Turn off the engine as
soon as it is safe to do so.
cIf the gauge indicates engine coolant
temperature over the normal range,
stop the vehicle as soon as safely pos-
sible. If the engine is overheated, con-
tinued operation of the vehicle may se-
riously damage the engine. See “If your
vehicle overheats” in the “In case of
emergency” section for immediate ac-
tion required.
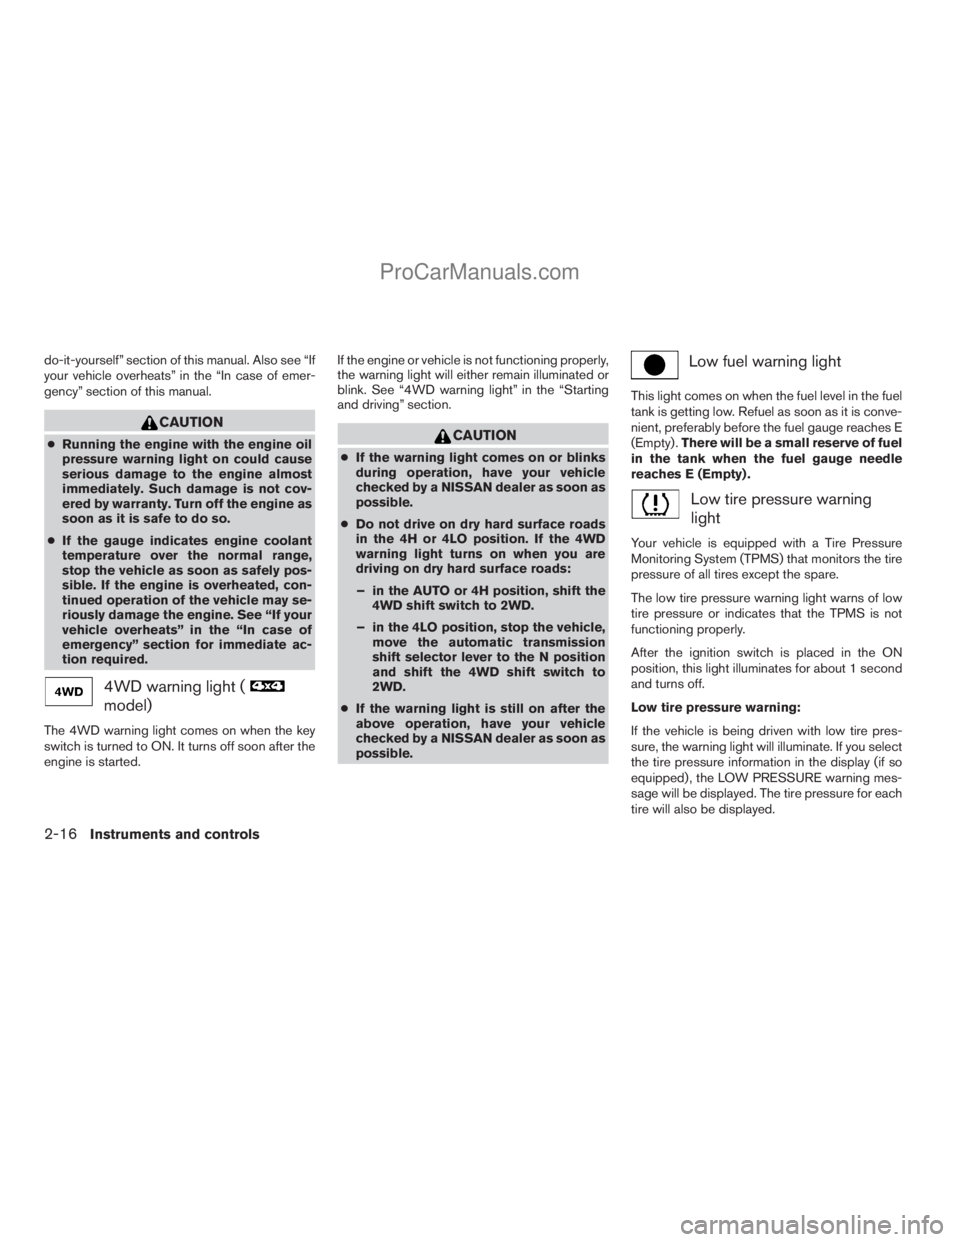
4WD warning light (
model)
The 4WD warning light comes on when the key
switch is turned to ON. It turns off soon after the
engine is started.If the engine or vehicle is not functioning properly,
the warning light will either remain illuminated or
blink. See “4WD warning light” in the “Starting
and driving” section.
CAUTION
cIf the warning light comes on or blinks
during operation, have your vehicle
checked by a NISSAN dealer as soon as
possible.
cDo not drive on dry hard surface roads
in the 4H or 4LO position. If the 4WD
warning light turns on when you are
driving on dry hard surface roads:
– in the AUTO or 4H position, shift the
4WD shift switch to 2WD.
– in the 4LO position, stop the vehicle,
move the automatic transmission
shift selector lever to the N position
and shift the 4WD shift switch to
2WD.
cIf the warning light is still on after the
above operation, have your vehicle
checked by a NISSAN dealer as soon as
possible.
Low fuel warning light
This light comes on when the fuel level in the fuel
tank is getting low. Refuel as soon as it is conve-
nient, preferably before the fuel gauge reaches E
(Empty) .There will be a small reserve of fuel
in the tank when the fuel gauge needle
reaches E (Empty) .
Low tire pressure warning
light
Your vehicle is equipped with a Tire Pressure
Monitoring System (TPMS) that monitors the tire
pressure of all tires except the spare.
The low tire pressure warning light warns of low
tire pressure or indicates that the TPMS is not
functioning properly.
After the ignition switch is placed in the ON
position, this light illuminates for about 1 second
and turns off.
Low tire pressure warning:
If the vehicle is being driven with low tire pres-
sure, the warning light will illuminate. If you select
the tire pressure information in the display (if so
equipped) , the LOW PRESSURE warning mes-
sage will be displayed. The tire pressure for each
tire will also be displayed.
2-16Instruments and controls
ZREVIEW COPYÐ2009 Armada(wzw)
Owners ManualÐUSA_English(nna)
02/27/08Ðtbrooks
X
ProCarManuals.com
Page 103 of 465
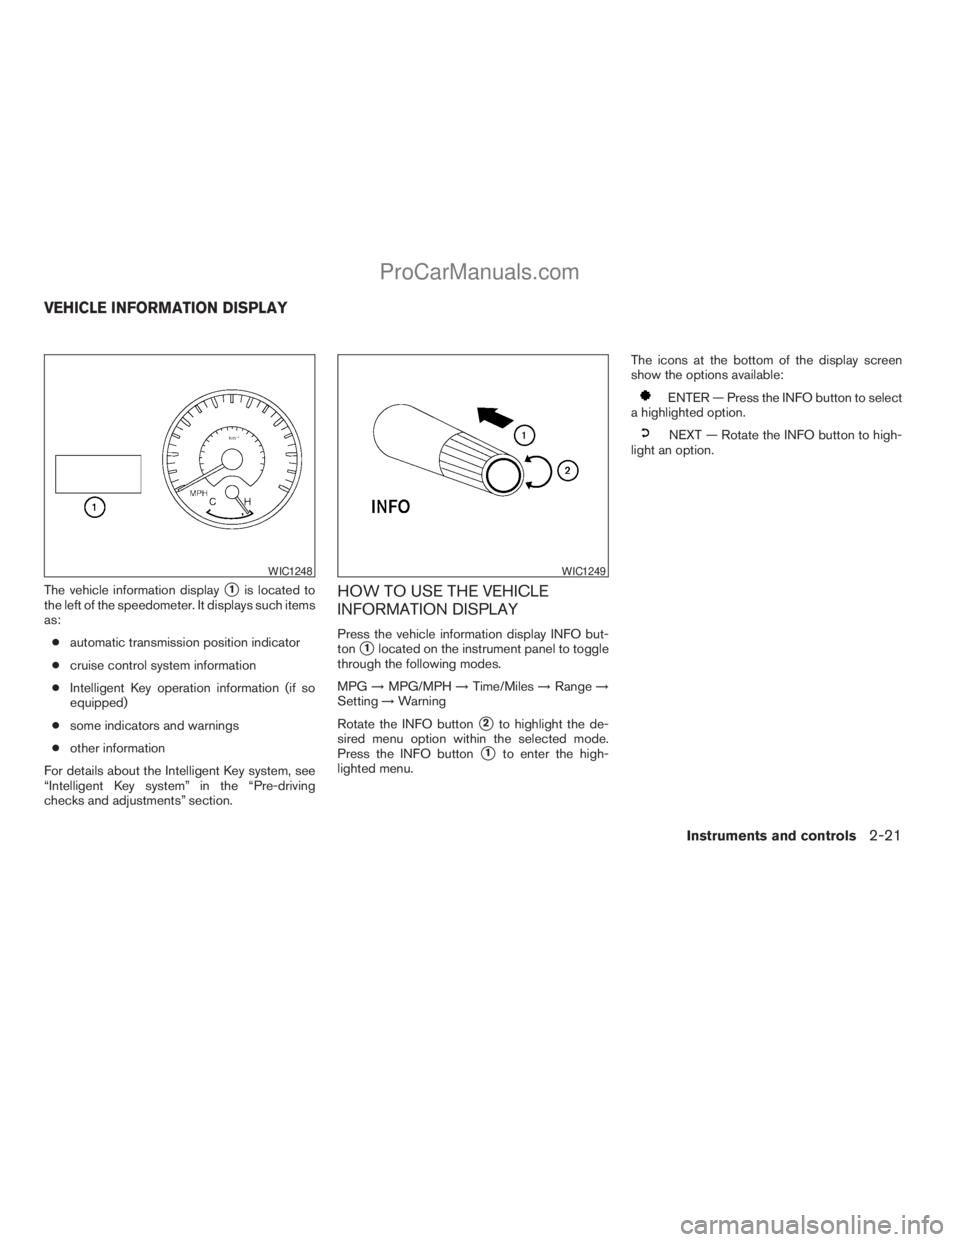
The vehicle information displays1is located to
the left of the speedometer. It displays such items
as:
cautomatic transmission position indicator
ccruise control system information
cIntelligent Key operation information (if so
equipped)
csome indicators and warnings
cother information
For details about the Intelligent Key system, see
“Intelligent Key system” in the “Pre-driving
checks and adjustments” section.HOW TO USE THE VEHICLE
INFORMATION DISPLAY
Press the vehicle information display INFO but-
ton
s1located on the instrument panel to toggle
through the following modes.
MPG!MPG/MPH!Time/Miles!Range!
Setting!Warning
Rotate the INFO button
s2to highlight the de-
sired menu option within the selected mode.
Press the INFO button
s1to enter the high-
lighted menu.The icons at the bottom of the display screen
show the options available:
ENTER — Press the INFO button to select
a highlighted option.
NEXT — Rotate the INFO button to high-
light an option.
WIC1248WIC1249
VEHICLE INFORMATION DISPLAY
Instruments and controls2-21
ZREVIEW COPYÐ2009 Armada(wzw)
Owners ManualÐUSA_English(nna)
02/26/08Ðdebbie
X
ProCarManuals.com